
Typically, when downloading JPG or PNG images in Canva, the DPI will be set at 96 DPI.
As long as you don’t want to print your images, there is absolutely nothing wrong with that.
For print, though, having the DPI set at 300 DPI is usually what you want, as it is the so-called industry standard.
Read on to learn how to set and download pictures and images in Canva with a DPI of 300.
300 DPI in Canva
300 DPI in Canva can only be set in one very specific way and that is by downloading your images and pictures in PDF Print format. Every image in the PDF print document will have the DPI set at 300. Use a free online PDF to JPG/PNG converter to get back from the PDF file to just your images.
How to Download with 300 DPI in Canva
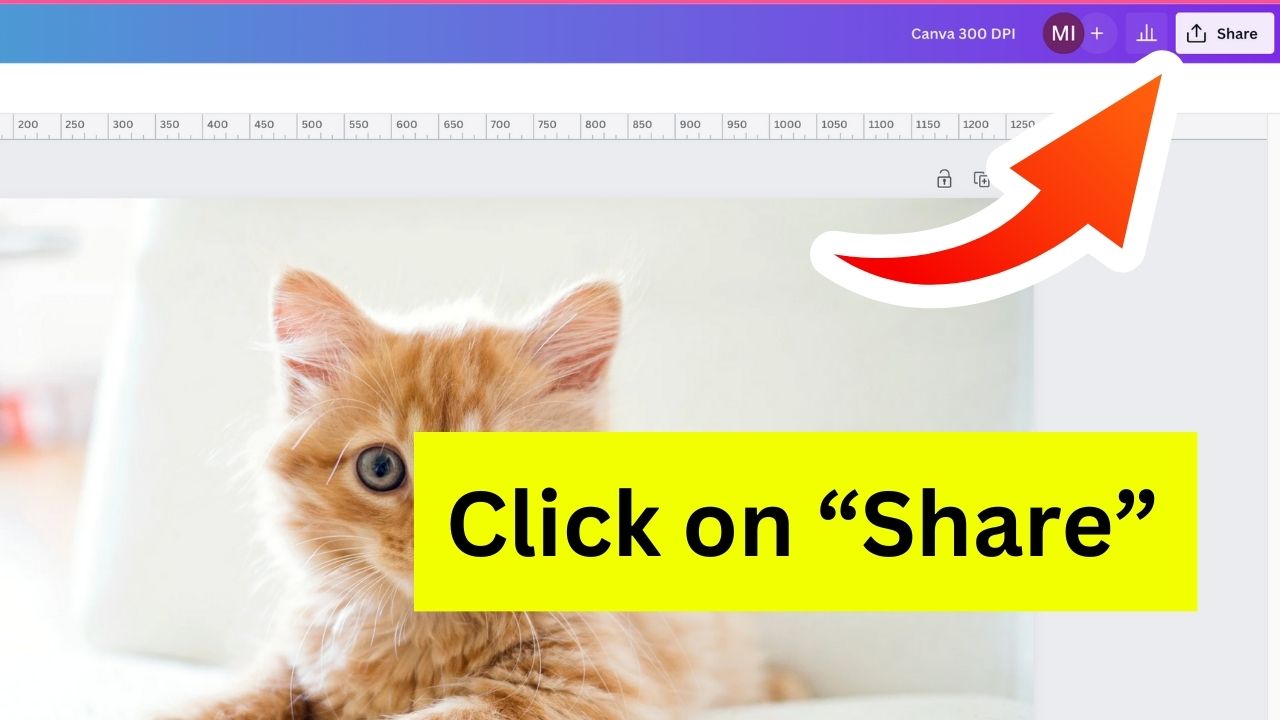
To download with 300 DPI in Canva, follow these steps:
- Click on “Share” in the upper-right corner of the screen
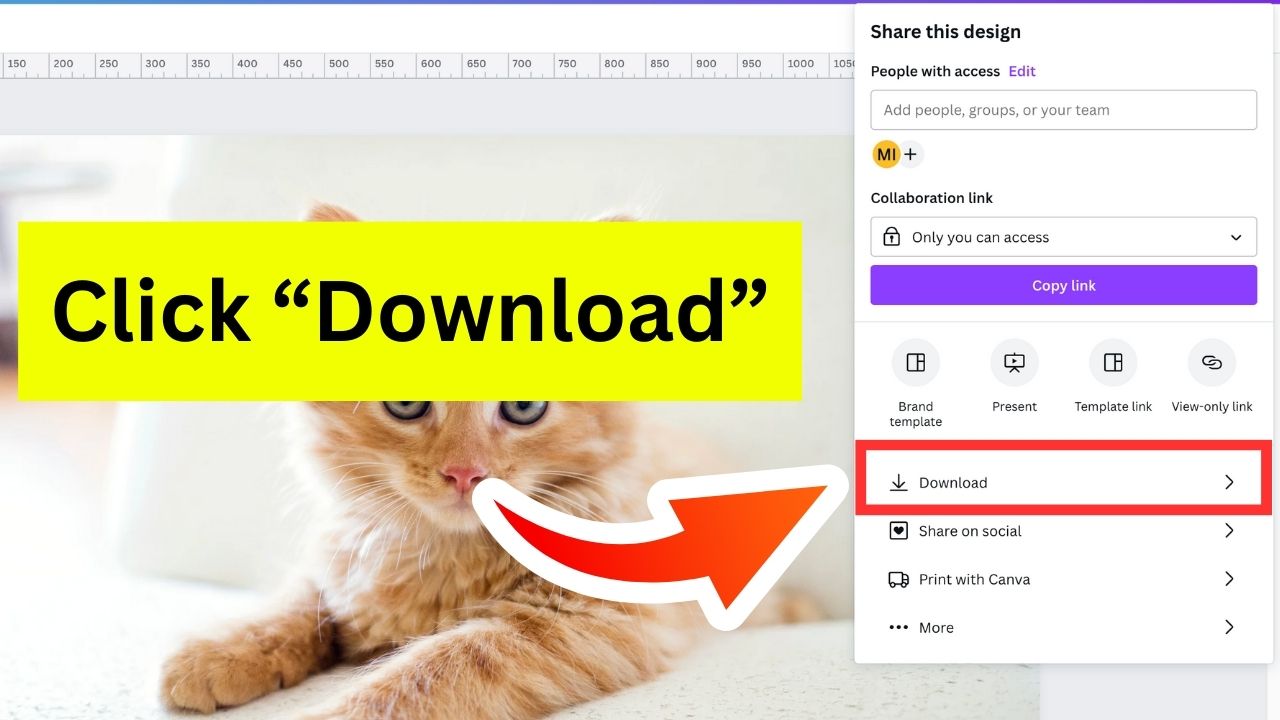
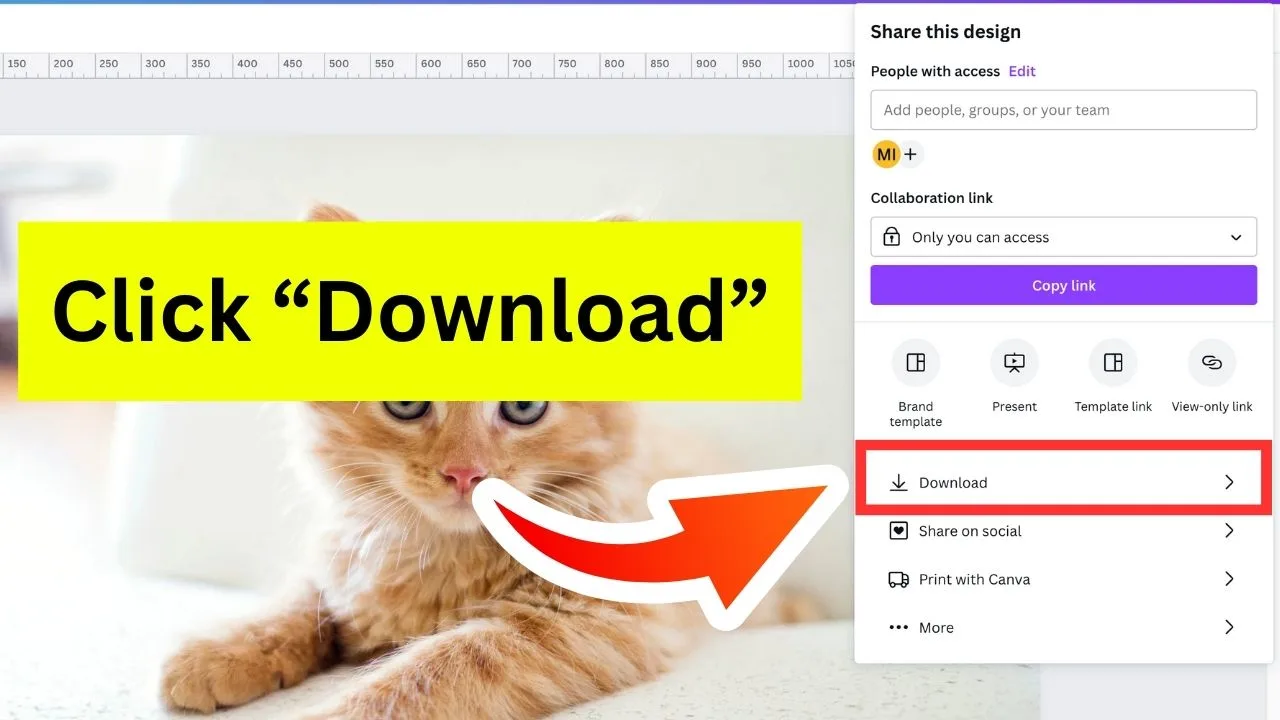
- Click on “Download”
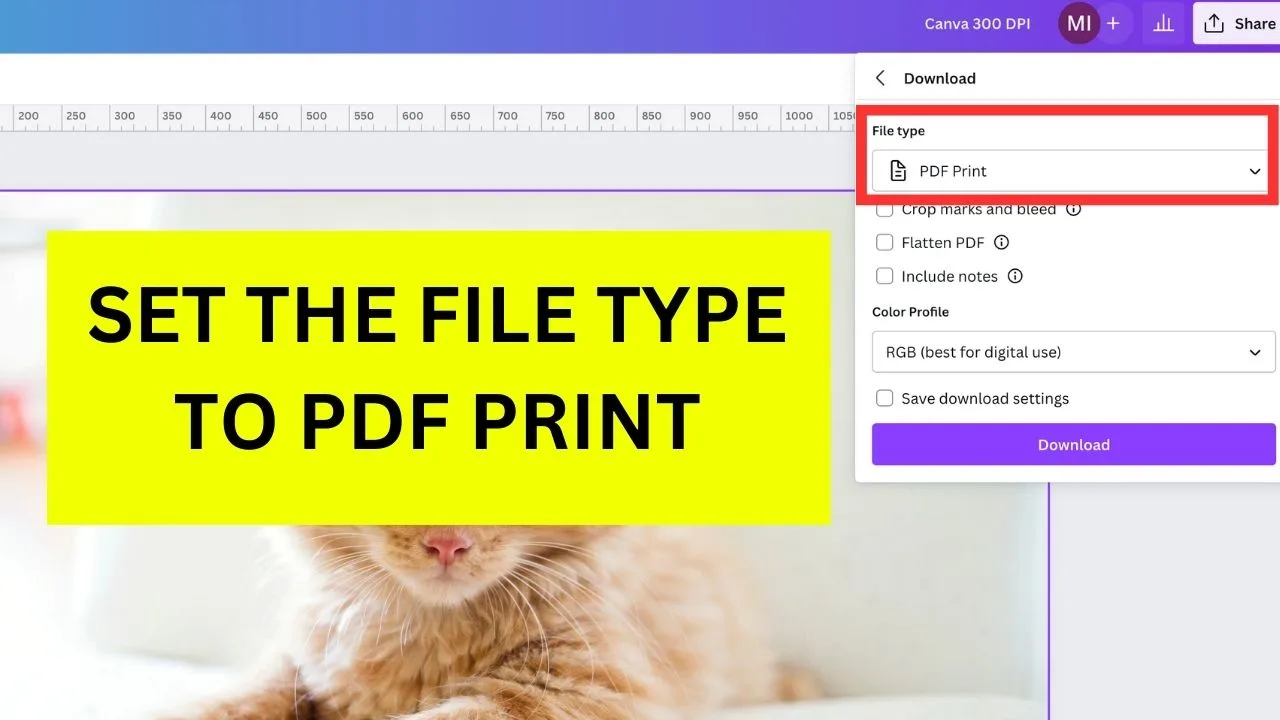
- As the file type, select “PDF print”
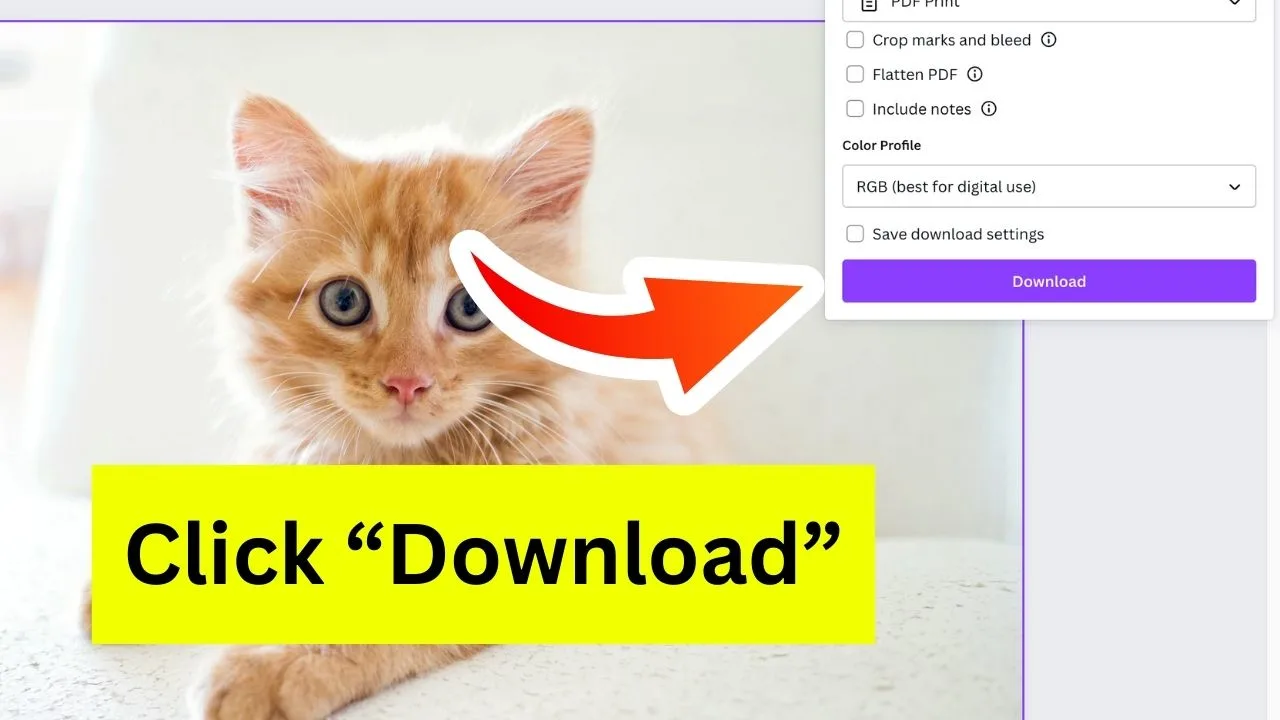
- Hit the Download button
Step 1: Click on “Share”

Step 2: Click on “Download”
Step 3: Choose “PDF Print” for the file type

Step 4: Hit the “Download” button

After the downloading process, you can now view the said image as a PDF file. However, since PDF files aren’t web-friendly, you’ll need to do the next phase to render the photo usable.
How to Convert your PDF back to either JPG or PNG Files
Since you cannot directly convert images in Canva, you’ll need free third-party online converters to get the file type you wish to have.
To convert your PDF back to either JPG or PNG files, follow these steps:


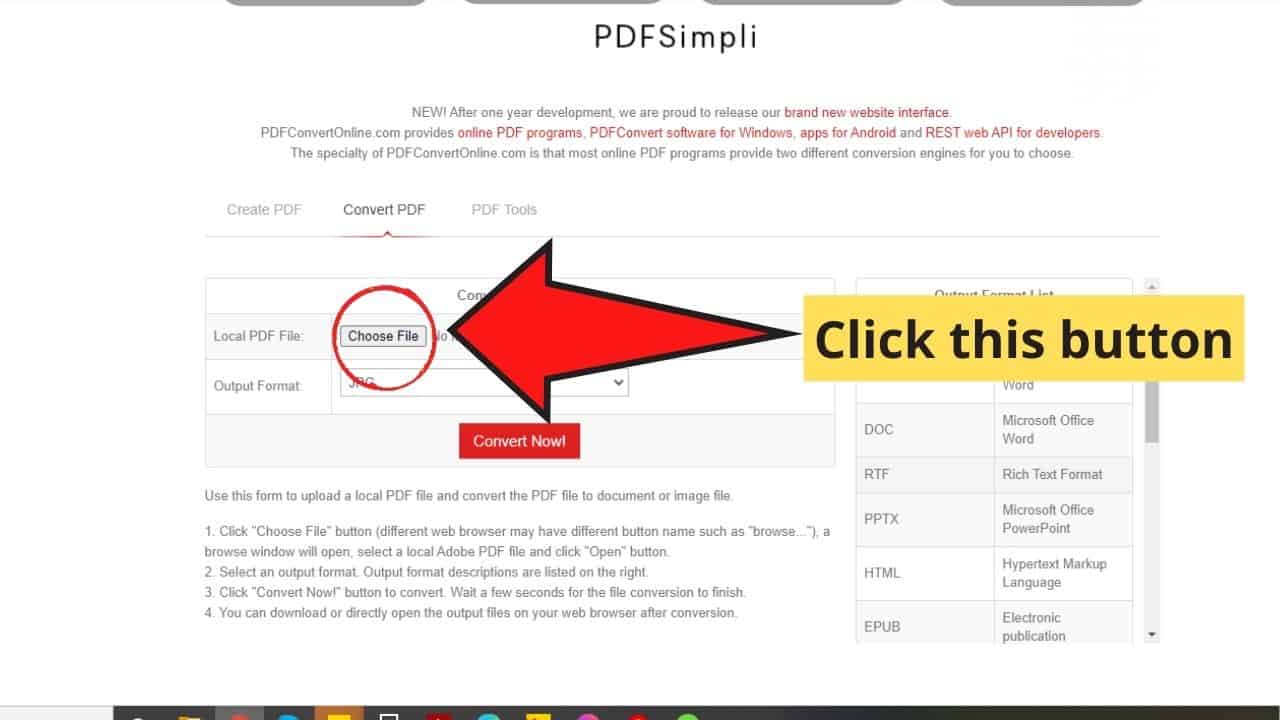
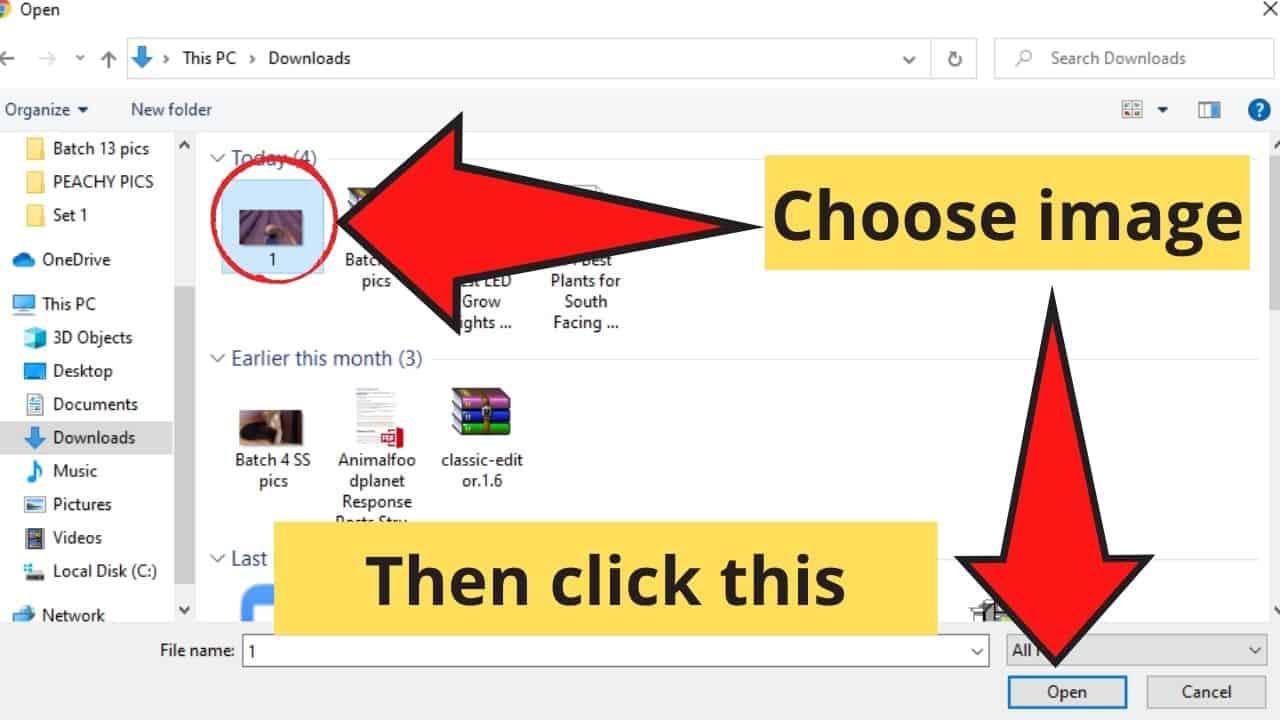
Step 1: Head over to the pdfconvertonline.com website.
Step 2: Head over to the “Convert PDF” option and click it. Once there, tap the “Choose file” button that appears on the form that will show on the screen.
Step 3: Tap on the “Open” button on the bottom part of the window that appears.

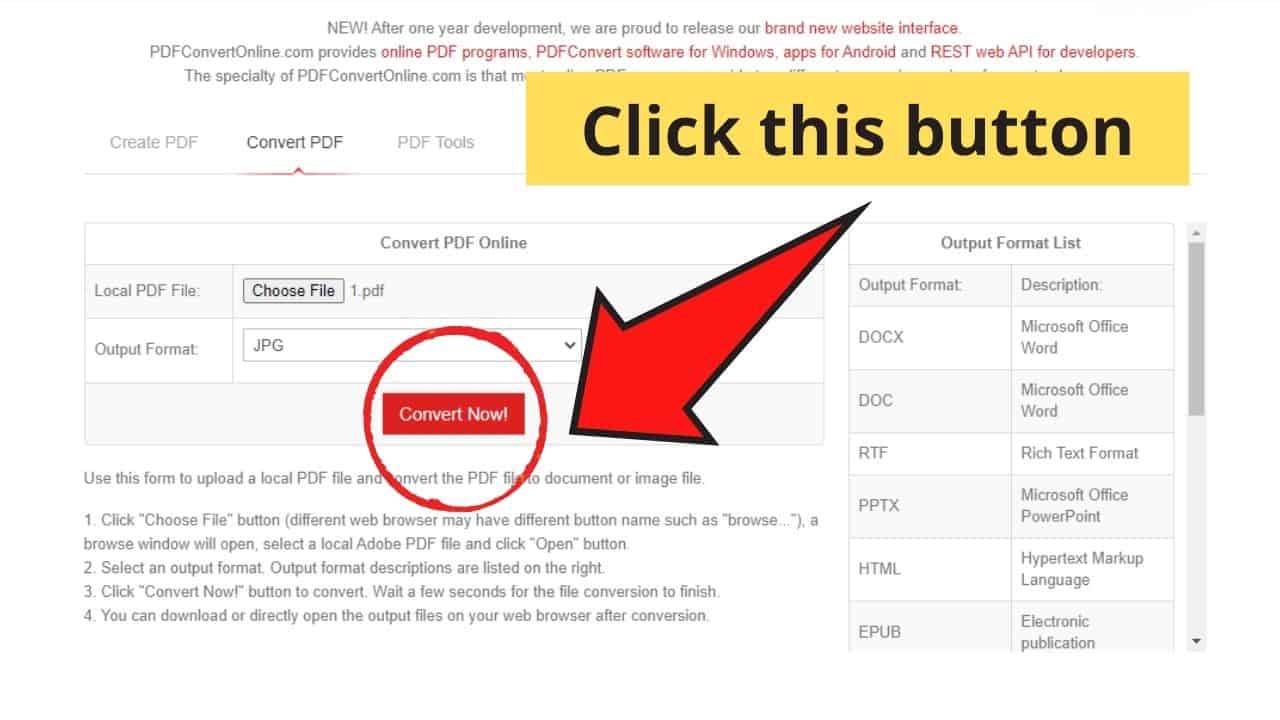
Step 4: Set the DPI to “300.” You can also change the JPG quality by inputting your desired value.
Step 5: Click on the red “Convert now” button.

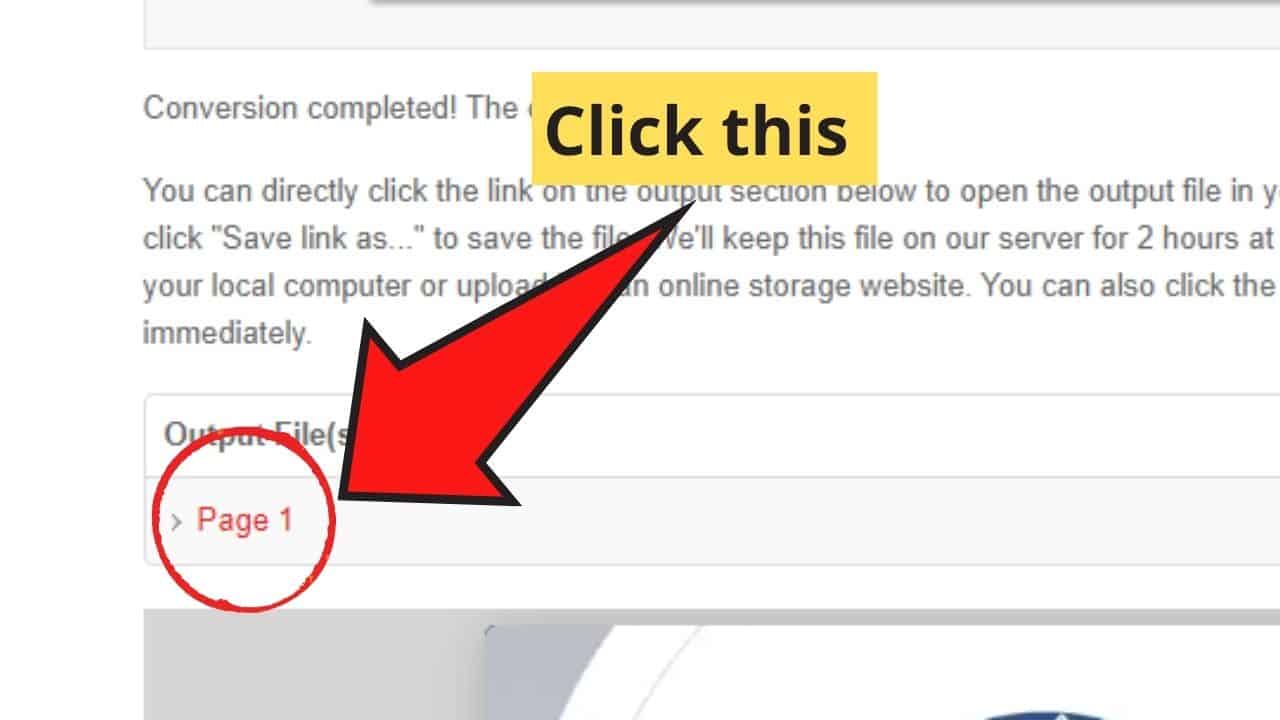
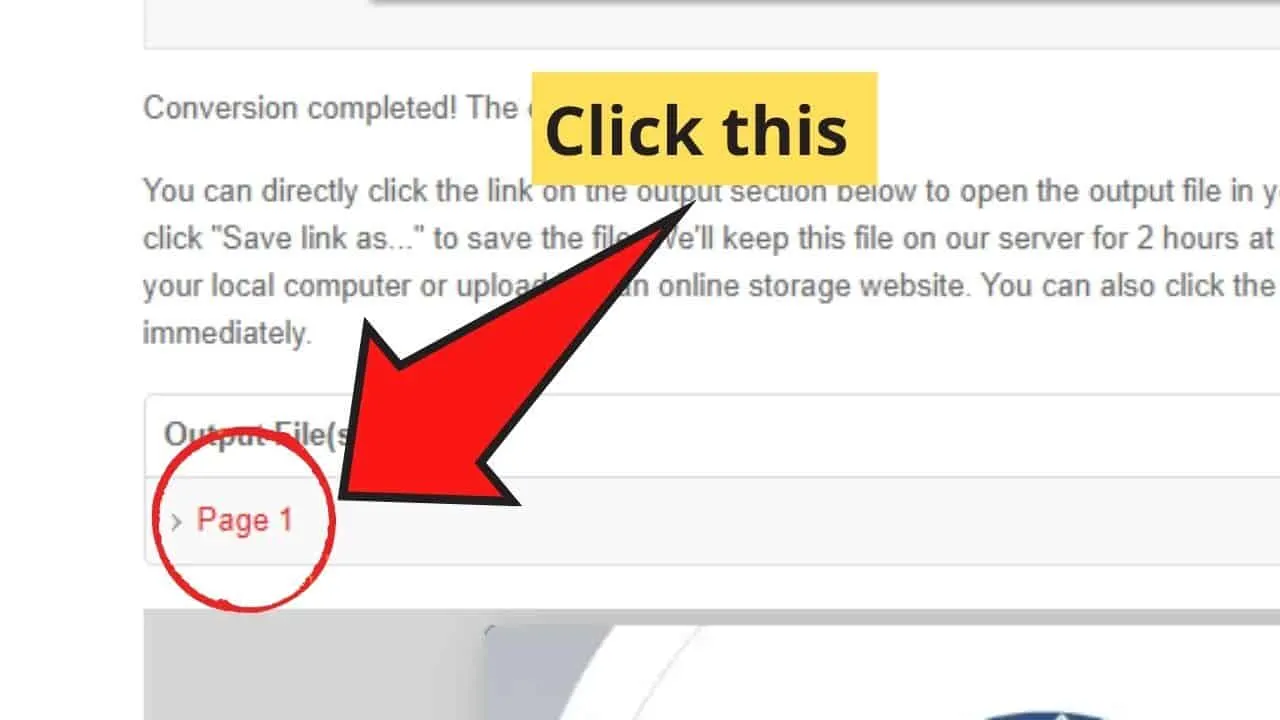
Step 6: Scroll the page down until you find the “Output Files” box. Click on the newly converted file to view the image in another window.
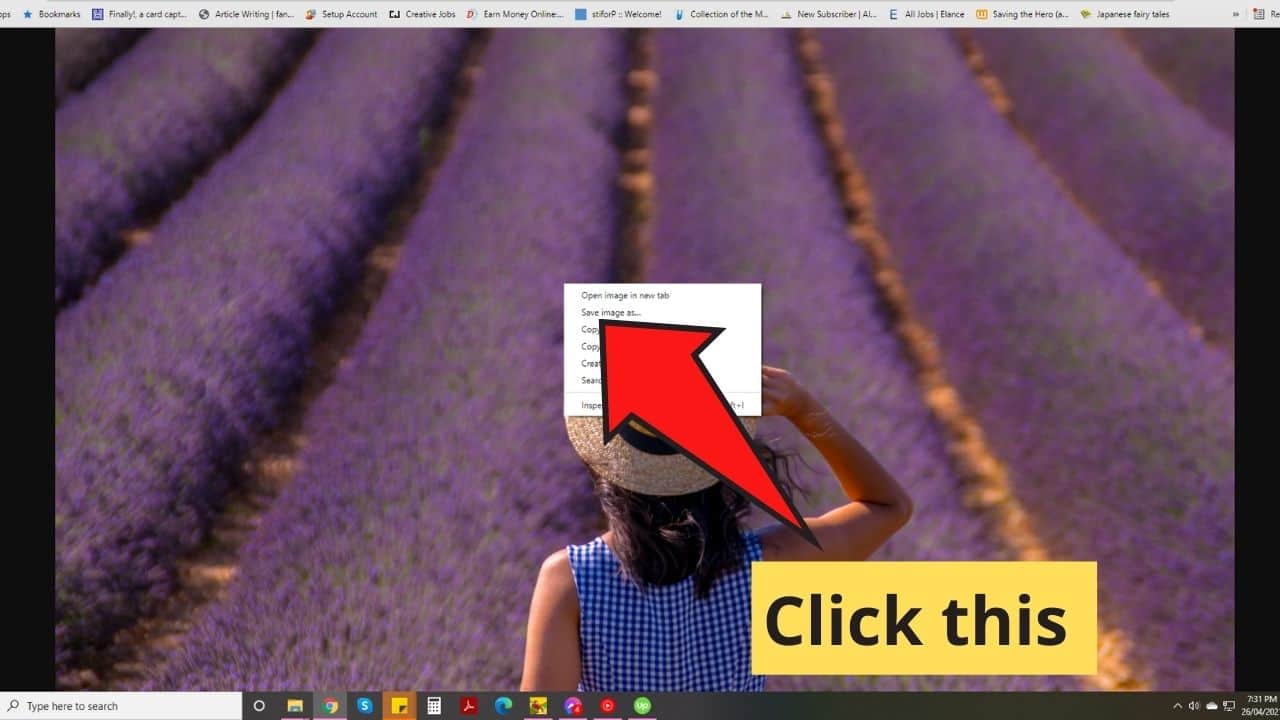
Step 7: To save the photo, right-click on it and choose the “Save image As…” option from the dropdown menu that appears.

Once the downloading process is done, you can go ahead and view the photo on your device.
However, if you want to verify the image’s DPI, there are two ways you can do this, depending on what OS your device is using.
On a PC: Right-click on the photo and select the “Properties” option from the dropdown menu that appears. Click on the “Details” tab to peek at the image resolution and other details.
On a Mac: Right-click on the image and click the “Get Info” option on the dropdown menu. Tap on the “More Info” option on the new window that appears to check the resolution.
You can also do this in Mac by heading over to the “Tools” section of the preview tool. Click on “Show Inspector” to view the image details.
Once there, take a look at the Image DPI to see if the 300 DPI you inputted earlier is followed.
If you’re planning to download the image in PNG format, you can follow the same steps mentioned above. Just tap on the “Free convert PDF to PNG” choice instead.
The how-to of downloading Canva elements with 300 DPI
Now that you’ve learned how to download high-resolution photos in Canva, can you also do the same process if you’re planning to use elements instead?
The answer: A big and resounding YES!
The process is virtually the same as for “regular” images and pictures.
The only difference is when you’re now on the download part.
Do note, though, that for you to download elements without a background, you will be forced to download it as a PNG. If you want to use JPG, the “Transparent background” option won’t be available.
Also, in order to download Canva elements without a background, you will need to be on a Pro plan, as the Canva Background Remover is a PRO feature only.
Other than that, proceed as you would when downloading and printing a photo with 300 DPI as outlined above.
Other ways of converting PDF to PNG or JPG format
Now, if you find all those processes a hassle, there are other ways for you to save high-resolution pictures in the JPG/PNG formats.
The first option that you have is to use Photo editing software. Be it Photoshop, Adobe Illustrator, or InDesign; it doesn’t matter.
Whichever software works best for you, go ahead with that choice. Just make sure that you can open the image in PDF format and, consequently, export it in PNG or JPG format.
If you don’t want to learn a whole new photo editing software just for conversion purposes, take advantage of the customization option in Canva.
Instead of using the usual resolutions you’ve been inputting, double the graphic size of the image itself. To do this, you’ll need to click on the “Resize” button on the upper left side of the Canva toolbar and input the doubled-up dimension.
Once you’re satisfied with the size, hit on the “Resize” button and carry on with creating your design.
However, while this method’s nifty, it has one major drawback. An increase in the photo’s dimensions means an increase in file size.
Most of the time, large image sizes aren’t too friendly for websites and social media. So, you might want to reconsider this option before using it.
While the second method’s the end of the road for most users, such isn’t the case for Mac users.
If you’re luckily a Mac user, there is an option for you to convert your PDF as JPG or PNG directly. Simply open the photo in the previewer tool.
Once you’re in the tool, head over to the “File” menu, click it, and choose the “Export” option in the dropdown menu that appears.
In the “Format” tab, choose either JPG or PNG on the save box to jumpstart the download process.
So, have you now decided on what method to use? You don’t have to torment your brains for it. Choose one that will work best for you, and you’re good to go.
Blurry image prints and the reasons behind it
While we already have mentioned the solutions in improving your Canva images’ print resolution, you’re probably curious now about other reasons that can cause photo blurring.
Aside from the image’s resolution, there are four other reasons behind the pixelating of Canva images when you print them.
Photo size on the design
Sometimes, the size of the image you’re using is simply too small for your template.
No matter how you try to resize the photo, you’ll still end up with a stretch-out or a blurry image.
With this, you can try to place the picture on the template in smaller sizes instead of trying to fit it on the template.
This will ultimately make the blurriness less obvious.
Yet, Canva doesn’t recommend using low-resolution pictures as backgrounds or large designs.
So, if you have other image options, you better use them instead of the current one you have.
PDF Proof
If you don’t have a desktop printer at home yet you want to print your project in Canva, you can most certainly avail of the Canva Print order option.
And what’s nifty with this option is that you can check for your design’s output even before you place the order.
That’s where the PDF Proof comes in.
PDF proof, simply put, is the sample of your work that you download right before placing your Canva Print order.
Now, if you find that the proof’s blurry, then there’s a high chance that the printed images you’ll receive will be blurry as well.
If it is, then it is better to make adjustments before proceeding with the order.
Image source
Simply put, this refers to the source of the photo where you got the picture itself. Most of the time, the images you find on the internet are of low resolution to make them web-friendly.
And with low resolution, web-sourced images usually have a 72 DPI only compared to the standard of 300 for high-quality pictures.
But, there is ultimately a reason for using low-resolution images on the web. Technically, the lower the image resolution is, the faster the loading time is.
Hence, Canva recommends using pictures that you directly capture with a camera or those from legit photographers.
Dimensions of the image
Lastly, the photo dimensions. And in this context, the image’s dimensions are measured in pixels or dots per inch. Hence, the term DPI.
So, if you’re planning to print your Canva design, know that the minimum standard DPI to have crisp and clear images is 300 DPI.
If your photos are sourced from the internet, then expect that the printout will be blurry. After all, web-based images only have 72 DPI as mentioned earlier.
So, before you use the picture, check its resolution first. Refer to the “Convert and print photo” section of this article to find out more about how to proceed with checking the image resolution.
The implication of DPI in printed image quality
For the not-so-techy people, DPI is the furthest thing that’ll come to their minds if they get blurry prints. For them, the easiest fix is to stretch the photo or downsize it to create better prints.
However, if you’re knowledgeable about how pixel density affects image quality, then you’ll undoubtedly save yourself more trouble.
Dots per inch, or DPI, measures the resolution of both scanned and printed documents. Simply put, it refers to the number of dots that you can place in a line in a 1-inch square.
The general rule for DPI is this: the higher the dot density, the higher the picture’s resolution is. And, with higher dot density, the greater resolution the photo has. Hence, the better quality of the image in question.
Technically, there are some guidelines you’ll need to keep in mind when accounting for DPI with printing pictures. Please take a look at them here.
Low-resolution
- 150 dpi or less (72 dpi is the standard for web pictures)
- Best used for scanning documents and digital storage.
High-resolution
- 200-300 dpi
- 300 dpi is considered the minimum standard for quality pictures
- Best for booklets, flyers, samples, and brochures for better printed image quality
Super-Duper Resolution
- 600 dpi or higher
- Results in large image file types, hence requiring more storage memory
- It takes longer to scan
- Can only be printed in professional print services as most desktop printers can’t produce photos of such quality
Now that you know more about DPI’s relation with print image quality, you can better use this for choosing the best photos according to your purpose.
With all the information you’ve learned, are you now ready to create stunning, high-resolution designs in Canva? If you do, then better start making one now and apply what you’ve learned!
But, if you want to review the regular way of downloading images and elements in Canva, read the “How to Download Pics and Elements from Canva” article now.
How to check the DPI of an Image on a MAC
If you use Canva stock pictures and images, you will find that the DPI of these elements is usually 96 DPI.
However, it also needs to be pointed out that you can’t really check the DPI value of a picture or image within Canva itself.
With that said, to check the DPI of an image, what you would need to do is to export the image from Canva first and then make these checks directly on your computer.
If you are on a MAC, here’s how to check the DPI of any image:
- Double-click on your image file to open it up in Preview mode
- Click on “Tools” in the top toolbar
- Click on “Show inspector”
- Check the DPI value where it says Image DPI
How to check the DPI of an image on a Windows PC
On a Windows machine, the file properties and details are where to find the DPI values. It shows you both the horizontal and the vertical resolution of the image.
The steps to find the DPI of an image on a Windows PC are listed below.
- Locate the image in File Explorer (Windows + E)
- Right-click and select “Properties”
- Click on the “Details” tab
- The “Vertical Resolution” and “Horizontal Resolution” are your image DPI
How to enhance photo quality in Canva
You can use a couple of tools to increase the photo quality of any photo within Canva.
This obviously includes personal photos that you are uploading to Canva.
To improve the photo quality in Canva, select your photo and click “Edit image” in the top toolbar.
On the left side, you will then have different tools at your disposal to improve the image quality of your image.
Perhaps the most useful panel for this purpose is the “Adjust” panel, where you can play around with basic photo editing options such as the brightness, the contrast and the saturation of your image.
If your picture seems to be too dark, simply increase the brightness.
If the colors in your picture seem dull and boring, increasing the saturation might be the answer.
If you are creating a Youtube thumbnail and you added a face or person onto your design, you might want to increase the contrast of the person/face element to make it pop out more.
Just by using the basic options “Brightness,” “Contrast” and “Saturation,” the image quality can be drastically improved.
Other great options in the “Adjust” panel include the “Blur” fader.
If your picture does not seem to be sharp enough, you can simply move the blur fader to the left and this will sharpen your whole image a lot.
In other photo editing tools, this “effect” is commonly known as “Sharpness.”
In Canva, however, Blur and Sharpness are simply combined into one single option. This also means that if you would like to blur your picture a bit, you can simply move the Blur fader to the right.
This is especially useful when you have a background element in your design. Applying some blur to the background element then makes your elements in the front pop much more. They will also appear to be more sharp that way (you can further sharpen the elements in the front by using the blur fader of course…).
Other than the “Adjust” panel, Canva also has a handful of nice tools that can help with enhancing the quality of an image.
For some quick improvements, make sure to check out the tool “Auto Enhance”. After selecting your image, simply type in “Auto Enhance” in the search field that says “Search effects” (you will find this situated in the top left corner after selecting your image).
Auto enhance is going to make your image more lively by automatically adding some tweaks to it pretty much by adjusting some of the parameters that we just got to know earlier in this paragraph (Saturation, Brightness, Contrast, etc.).
It does a pretty good job.
So, if you would like to save some time or simply don’t know what you are doing as far as photo editing goes, you might want to use “Auto Enhance” instead and see whether you like the result or not.
In the very same fashion, there are other tools you can use to enhance the quality of your images, such as the “Auto Focus” app and the “Face Retouch” app. To find these, simply type these app names into the very same search field and then left-click on it to access them.
Auto Focus easily let’s you adjust the focal point of your picture, whereas Face Retouch will make any face shine by removing blemishes on the face, by whitening the teeth and by adding/adjusting other small details that make your face (or any other face) look as fresh and pretty as possible. Pretty neat stuff!
Frequently asked questions
Can you change the DPI in Canva?
Canva does not offer any built-in functionality to adjust or increase the DPI. To get the best possible quality (300 DPI) on download, however, make sure to download your images and pictures in PDF print format. You can then change it back to a JPG or a PGN using a free online converter tool (simply search for “pdf to jpg/png converter online” on Google).
What DPI is Canva using?
Canva is usually working with 96 DPI. So, if you are downloading Canva stock footage and elements, these will be 96 DPI. However, to get better DPI, you can save and export your jpg’s and png’s in PDF Print format out of Canva and then convert the images back to a jpg or a png.
How to check the DPI in Canva?
There is no way to check the DPI of an image or picture in Canva itself. To check the DPI of an element, you would first need to download the element (or picture/image) and then check the DPI value on your computer.


Hey guys! It’s me, Marcel, aka Maschi. On MaschiTuts, it’s all about tutorials! No matter the topic of the article, the goal always remains the same: Providing you guys with the most in-depth and helpful tutorials!

