
Thanks to Canva, one doesn’t need to become a graphic design expert to create stunning artworks.
The user-friendly interface makes the app so fantastic that anyone can create templates and designs instantly.
Of course, how fast you can create one depends on your level of expertise and your familiarity with the software.
What’s more, it’s free! You can sign up with your current Google or Facebook account, and walla! You’re now part of the Canva nation!
With that said, you can make stunning visual effects with your designs without taking crash courses in photography. Take the famous bokeh effect for example.
Bokeh refers to the background blur of an image. Whether producing such an effect’s intentional or not, you can still save a poorly-captured photo if you’re creative enough.
But, can you also produce the bokeh effect with Canva? Let’s find out in a moment.
How to blur images and pictures in Canva?
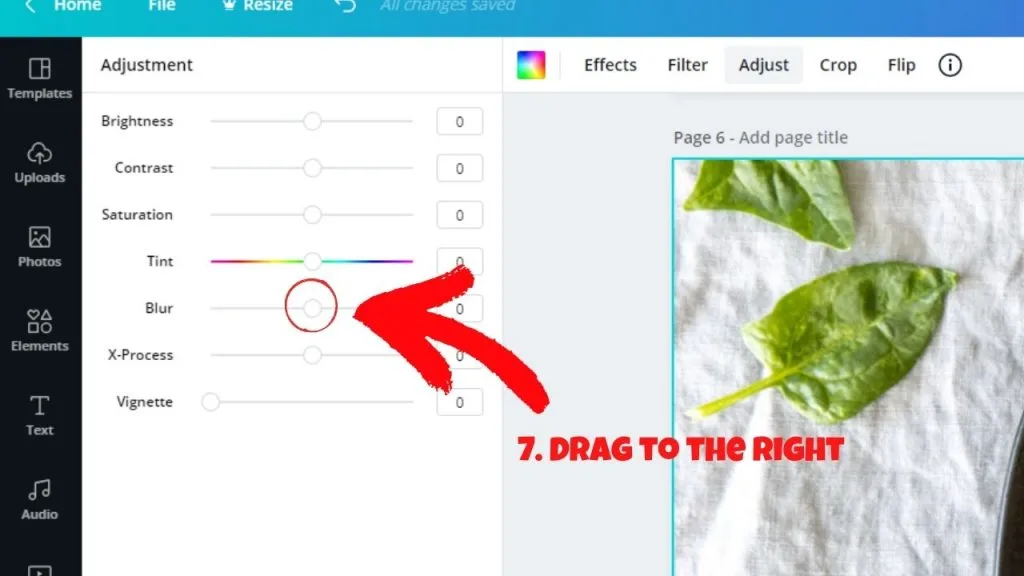
To activate the blur option in Canva, you need to choose your image or element you’d like to use for your design.Once you’ve chosen what image you want to use, click on it and look for the “Adjust” tab on the software’s upper menu. It will then lead you to the right-sided panel.You’ll then notice a couple of sliders in that menu. Search for the “Blur” tool and drag the slider to the right to make the picture hazy. The more you drag it to the right, the blurrier the image is.
Step-by-step guide how to blur images and photos in Canva
Blurring images and pictures in Canva isn’t as complicated as it seems. Unlike in photography, you only need to follow through with the easy steps laid out below to achieve it.
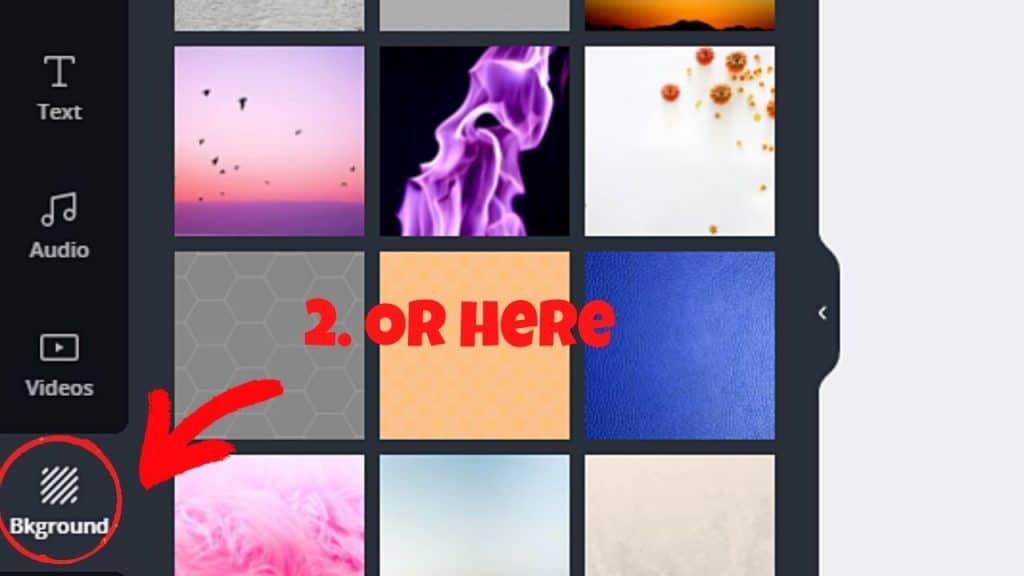
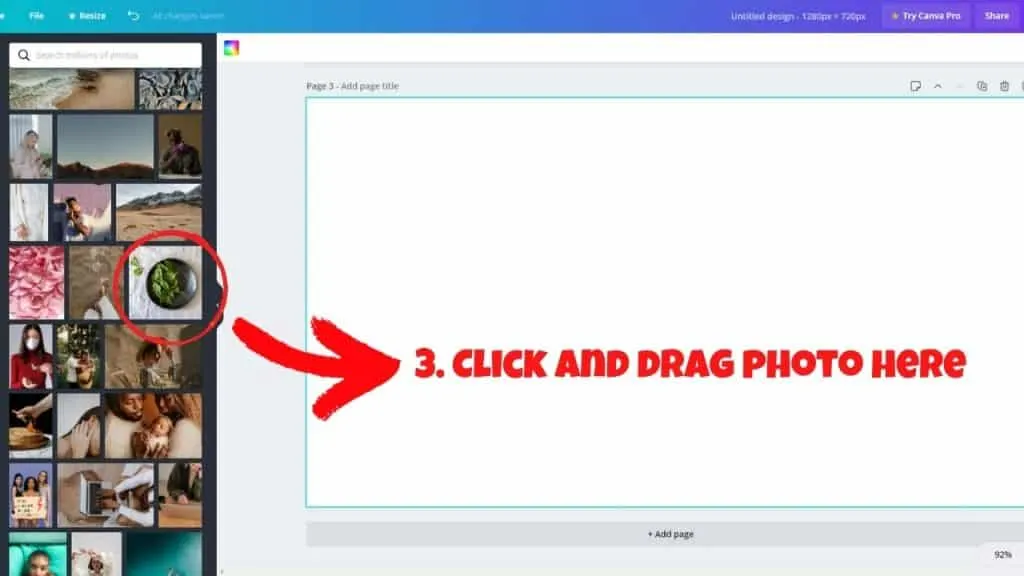
- Select a stock photo from Canva’s massive photo library by clicking on the “Photos” option.
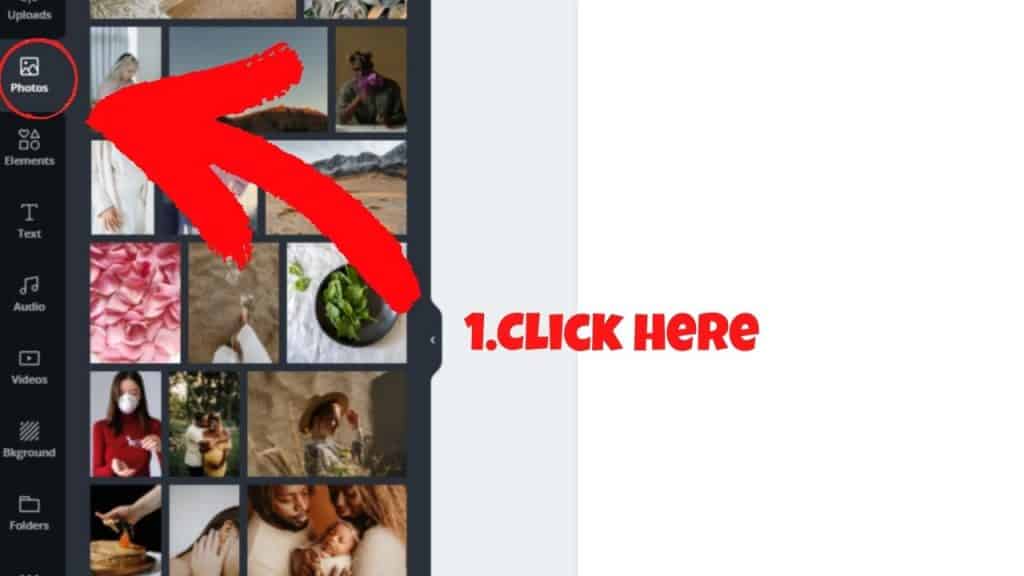
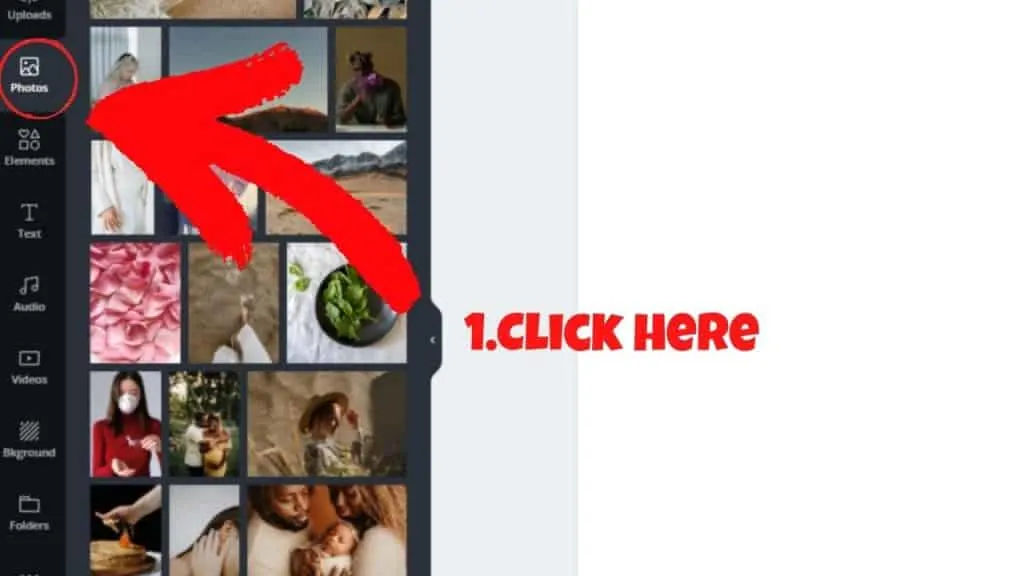
- If the gallery’s photos aren’t to your liking, head over to the “Background” option and choose from the available images.

- Once you’ve selected the image you’d like to use, drag and drop the photo towards the blank template you’ve created.

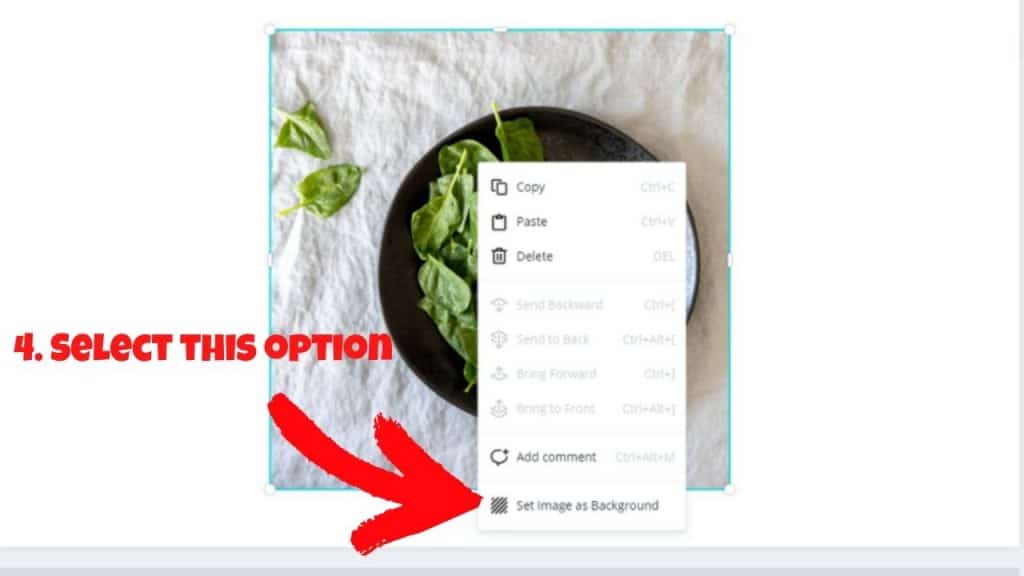
- Right-click on the picture you’ve selected and choose the “Replace background” from the dropdown menu. No need to do this step if you picked on the images from the “Background” gallery.

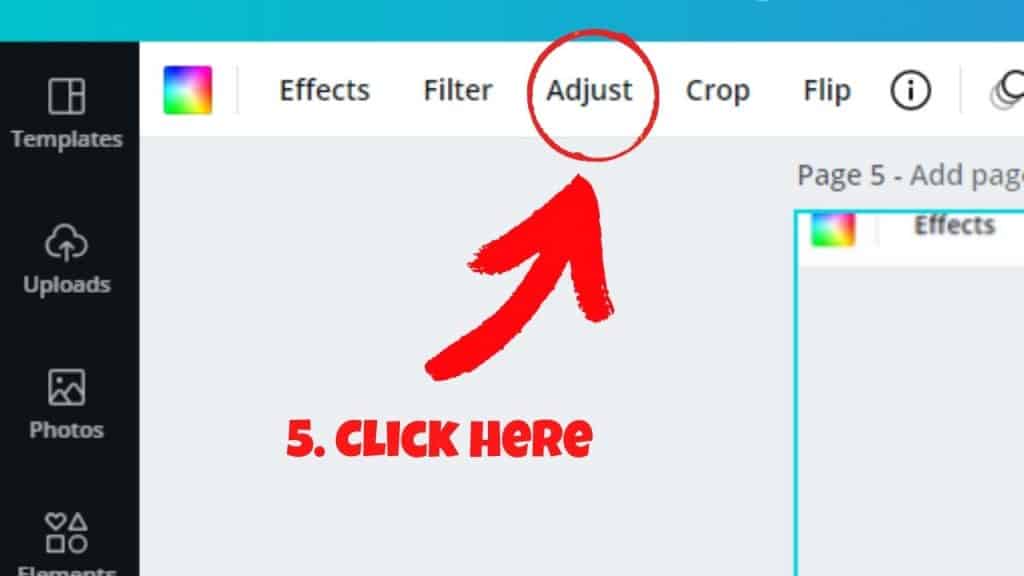
- To blur the image, click on the photo on the project template and find the “Adjust” tab right on top of it.

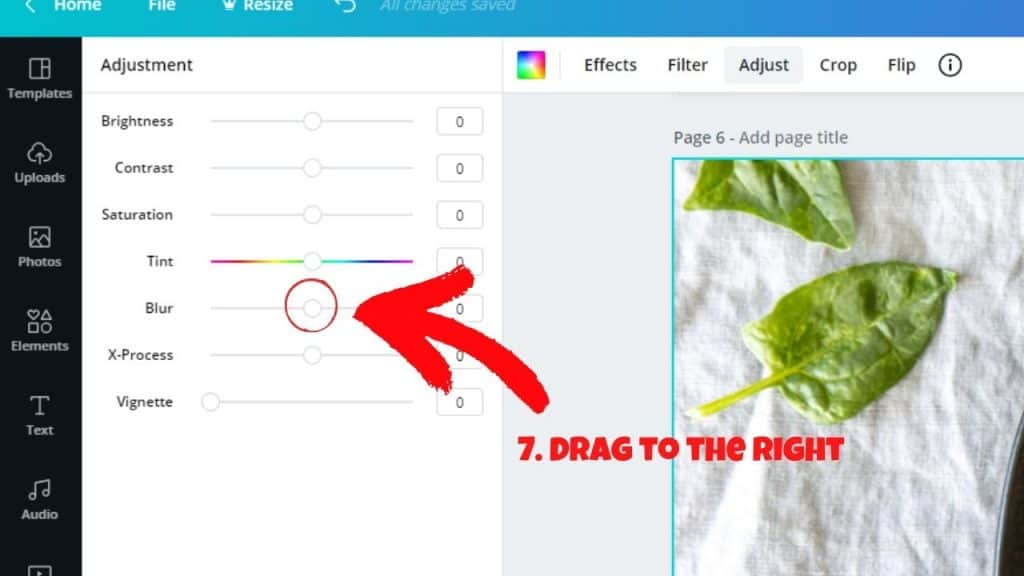
- On the pop-out menu that’ll appear on the left side of the screen, look for the “Blur fader” tool on it.


- To increase blur, drag the slider towards the right side of the screen. The more you drag it to the right, the more blurry the picture is.
How to blur the picture you’ve uploaded and make it your background
If, however, you want your design to stand out from the crowd, you can use your photos for a more personalized touch.
But, don’t you start fretting yet, as you only need to tweak the first few steps mentioned above to produce the same bokeh effect as on Canva’s stock photos.
Instead of heading over the “Photos” tab on the menu, click on the “Uploads” option. Then, click on the “Upload Media” button to start the process.
After which, follow the same procedures above to beget the same background blur you’ve always wanted.
Can you blur elements in Canva as well?
Now, this part here’s quite tricky.
Though you’ll only need to head over the “Elements” tab on the menu and choose your image, not all the elements in there can be blurred.
And, what makes this step more complex is that there’s no way for you to tell whether such an image’s “blurrable” or not.
With that said, you’ll have to undergo the usual process of picking out a photo or background and dragging it onto your project.
Once you’ve set the element onto the desired area, click on the image and make the necessary adjustments using the “Adjust” menu.
But, once you’ve clicked on the image and “Adjust” doesn’t appear, it only means that that element’s not “blurrable” at all.
What’s a bit annoying, though, is that there’s no indicator for you to check on the blur option of that element without using it onto the project.


Hence, you’ll need to manually check the element you’re planning to use to see whether it has the blur option or not.
Even if there’s no shortcut for this process, you can delete the element and find another one.
For sure, you won’t need to exhaust the stock images available before you can spot one that goes well with your design.
Is it possible not to blur the entire photo?
Unfortunately, there’s no such option for you in Canva to exclude one image from the background blur effect.
Once you activate the blur slider, there’s no turning back. Everything in the selected photo or background will lighten up according to how intense you’d want it to be.
But, regardless of the lacking feature, you can still make one of the elements in the image stand out – if you know the secret hack for it.
With that, carry on with the usual steps mentioned earlier to achieve the blurry background effect.
However, instead of merely using the photo or background once, you’ll have to pick it twice. Simply put, you’ll need to add another copy of the image for this effect to work.
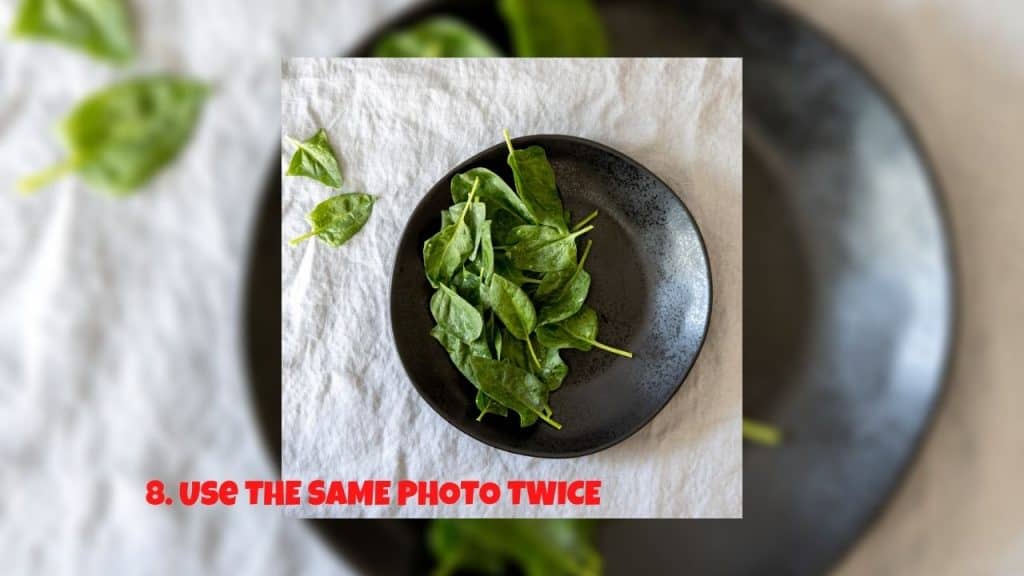

Once you’ve made the image’s second copy, remove its background. If you’re lucky to have the pro version of Canva, a “Background Remover” tab appears once you click on the photo.
But, even a free Canva user can still remove the image’s background by using a third-party tool called RemoveBG.
Upload the image you’d like to edit onto the software. Once the background removal process’ complete, then download and save the image on your computer.
Yet, to use it on Canva, you’ll need to re-upload the new, transparent image into the app with the “Upload Media” option.
Once the image’s available, then drag the background-less photo onto the project. Adjust its size to make it slightly larger than the one in the background.
After which, drag the adjusted image over the blurry one, making sure to overlap them perfectly. After all, you don’t want your final photo to look funny and peculiar.

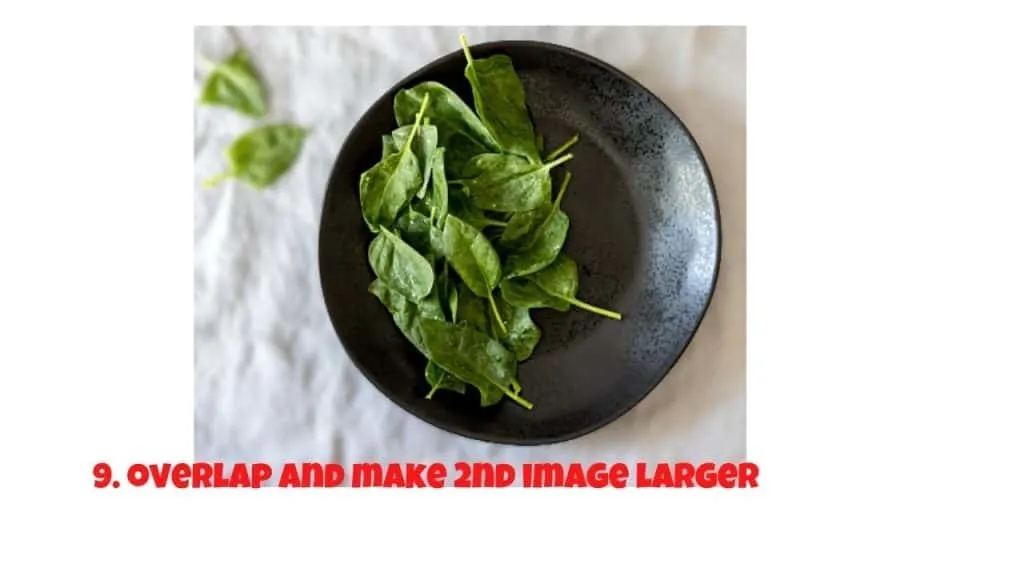
But, don’t rush with this step. Take all the time you want until you’ve perfectly aligned both images that you can’t point out which is which.
If need be, you can still adjust the background’s blur settings if you think it needs further polishing up. Just experiment with the options available in the Canva menu to get what you want.
How blurring pictures help make your design better
Most of us think that blurry images are the death of a beautiful photo. That said, we tend to immediately discard the hazy image and prepare for another click on the camera.
But, if you’re creative enough, you can save those bleary photos and even use them for your future projects.
However, there’s no need to become a photography expert if you know how to use Canva to your advantage.
With that said, there are three ways how the blur slider in Canva can enhance the wow factor of your future design.
Adds an artistic feel to your project.
There’s one primary reason why most of us don’t like hazy pictures. Aside from mucking up the image’s quality, it also makes us think that we’re going blind – nearsighted at the very least.
Yet, for those with a creative eye for design, a blur is another opportunity to enhance its wow factor.
How?
Well, blurring the photo ultimately brings out its ethereal or dream-like quality. If you already have picturesque views of nature and managed to capture that on cam, you can use them to your advantage.
Even if you only have cityscapes as part of your photo gallery, you can still make them look better with the blur slider in Canva.
However, one quick tip is: don’t be too cautious with how blurry you want your image.
Experiment as much as possible how much blur you want to achieve the effect you want. With that said, you only need to quickly drag the blur slider to the right until you reach the level that’ll produce the best results.
It makes the text pop out when you use it as a background.
Another way the blur option comes in handy is in creating customized backgrounds and add text over them.
If you still don’t know how to overlay text on your background, you don’t need to worry. There are two ways you can insert text into your project.
First, if you want to genuinely know where each tab and option is placed in the tool, you can explore the side panel menu. Simply click on the “Text” option, which brings you to another side panel menu with more options.
You can choose to add a heading, a subheading, or even the body text itself on the second panel. Depending on what you choose, the font size of the text is already in a default setting.
You can even change the font style through the different choices available. The sky’s the limit when you find the font style that goes well with your intended look.
Yet, for those who want to speed up their working process, you can simply press the letter “T” on your keyboard. With that single button, an editable textbox now appears on top of your blurred image.
Since it’s editable, then you can easily change what’s written inside the textbox. Just make sure, though, that all the text remains highlighted for you to edit it in one go.
You can even make adjustments to the text’s size without inputting the numeral in the font size section. Simply click and drag on the four white dots in the corners until you reach the desired size.
Now, if you want to adjust its placement, you can also click and drag the text box where you want it. If you wish to use the quicker route, then simply head over to the “Position” tab on the top menu and click on the positioning options available.
Don’t forget to change the font’s color to make the text stand out more from the blurred background. If you fail to do this vital step, then your potential readers will need to squint their eyes to see what you’ve written on it.
When combined with elements and effects, it can produce stunning images.
Who says the blur effect is only for background purposes? Well, if you’re a budding graphic artist, you can use the blur tool in your favor.
For one, you can blur an image and increase its transparency to produce a watermark-like effect on the overall appearance.
You can even heavily blur an image and increase its contrast to simulate harsh lighting effects.
As said earlier, the sky’s the limit to your creativity. Feel free to explore and combine different effects and elements with the blur tool.
Who knows, you’ll end up creating another style that will become a trend in the Canva world.
What if I want to sharpen the image instead?
Sharpening the image’s clarity is as easy to achieve as that of the blur effect. You don’t need to look for another tab on the menu, as you simply need to use the blur tool for this.
With that said, you can turn the blur tool into the sharpen tool by simply dragging the slider towards the left side until you reach the desired effect.
As the photos’ edges become more explicit, you can salvage a previously unfocused shot and make it stellar in the end.
And, like what’s mentioned earlier with the blur effect, don’t be afraid to experiment. After all, you can quickly make adjustments with a simple drag of the slider.
So, are you now more confident to take on your project to the next level? Well, if your answer is that of a resounding yes, then start creating your design now.
Remember, no matter how bad the original photo may seem, you simply add more creative flair to it by using the blur tool in Canva.
You just need to apply the steps mentioned above, and you’re on the right path to creative success.
You can also visit Canva’s support page, ask your techy friends about this process, or watch video tutorials about the process.
Or, you can combine these three strategies and choose whichever works best for you.
Who knows, all these methods can also add crucial inputs for you to grasp the technique better.


Hey guys! It’s me, Marcel, aka Maschi. On MaschiTuts, it’s all about tutorials! No matter the topic of the article, the goal always remains the same: Providing you guys with the most in-depth and helpful tutorials!

