
Paginating your pages in WordPress positively affects your page load time.
That’s good.
It’s not easy to implement, though unless you use one of the decent WordPress pagination plugins already coded.
There are different ways to add pagination functionality to your WordPress site, store, or blog.
Some are for your list pages (category, archive, blogroll), and others will paginate individual pages or posts to split long-form content.
What’s laid out below is the fundamentals of pagination – what it is, when to use it, how to implement it, and… The plugins to make the magic happen.
The Best WordPress Pagination Plugins
Alternatives to pagination
A primer on pagination
Pagination vs. infinite scroll
When to use pagination
How to manually paginate your pages in WordPress
The Best WordPress Pagination Plugins
- Automatically Paginate Posts
- Pagination by Best Web Soft
- WP Paginate
- Pagination Styler for WooCommerce
- Alphabetic Pagination
- List Category Posts
- WP Pagenavi
- CPTA Pagination
1. Automatically Paginate Posts
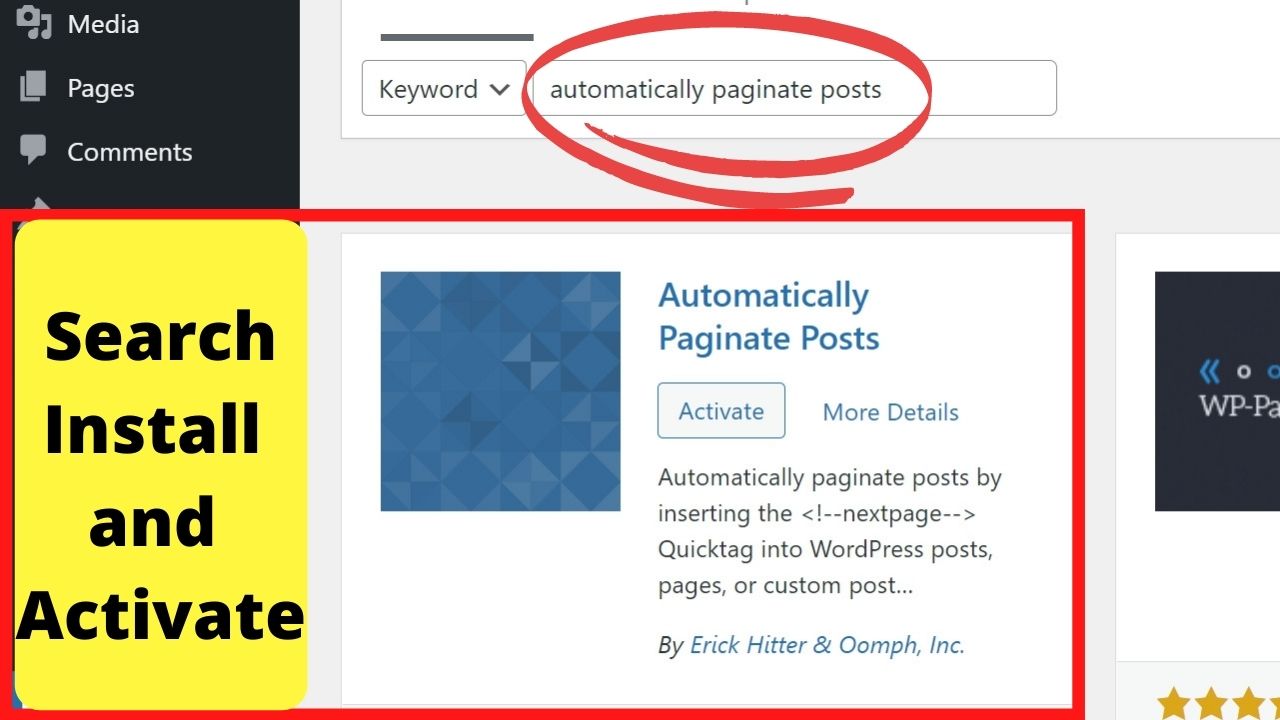

Use this to automate the manual process of adding page breaks to your content.
This gives you control over how much content is displayed, such as keeping all your content above the fold so users don’t have to scroll. You can automate that process with the “Automatically Paginate Posts” Plugin.
This adds more options to your General > Reading settings.

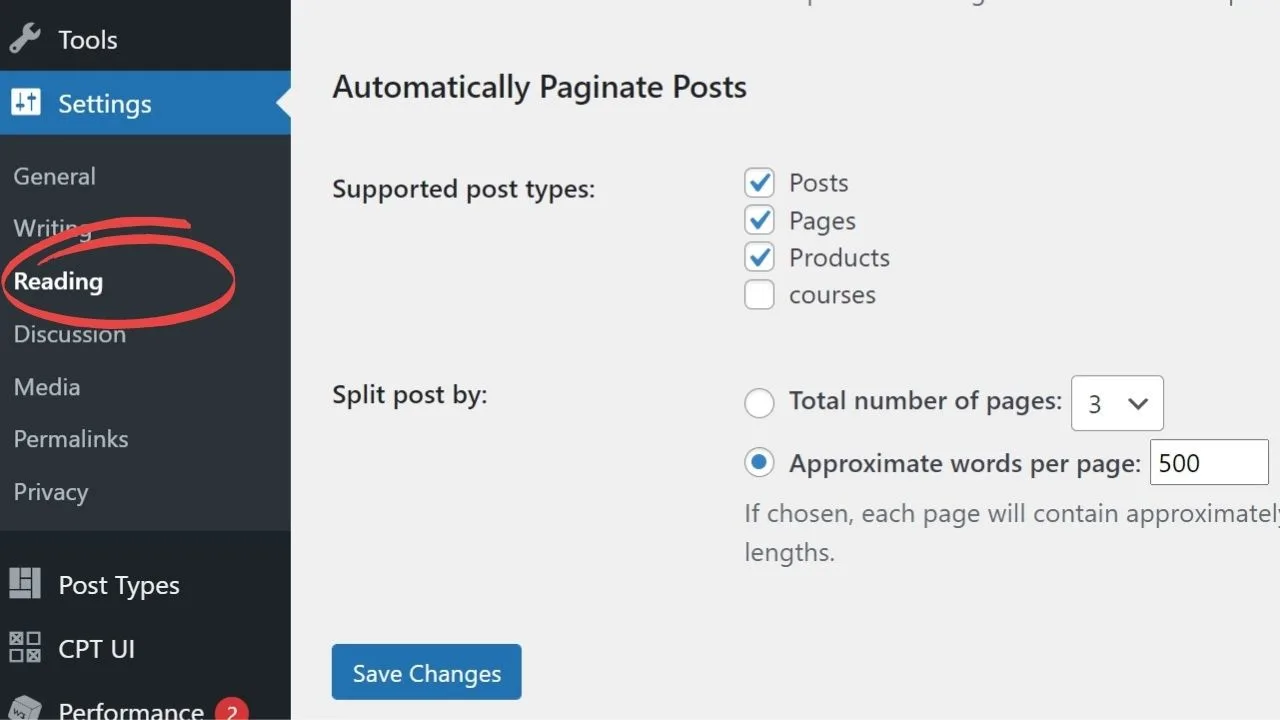
The plugin supports not only pages, but it functions well with both posts and custom post types as well.
The additional options for automating the pagination of single posts are to split it into a set number of pages or to limit the word count on a page.
As an example, if you frequently publish long-form content with images every 400 to 500 words, automatically splitting your posts every 400 words would limit the number of images loading on each page load.
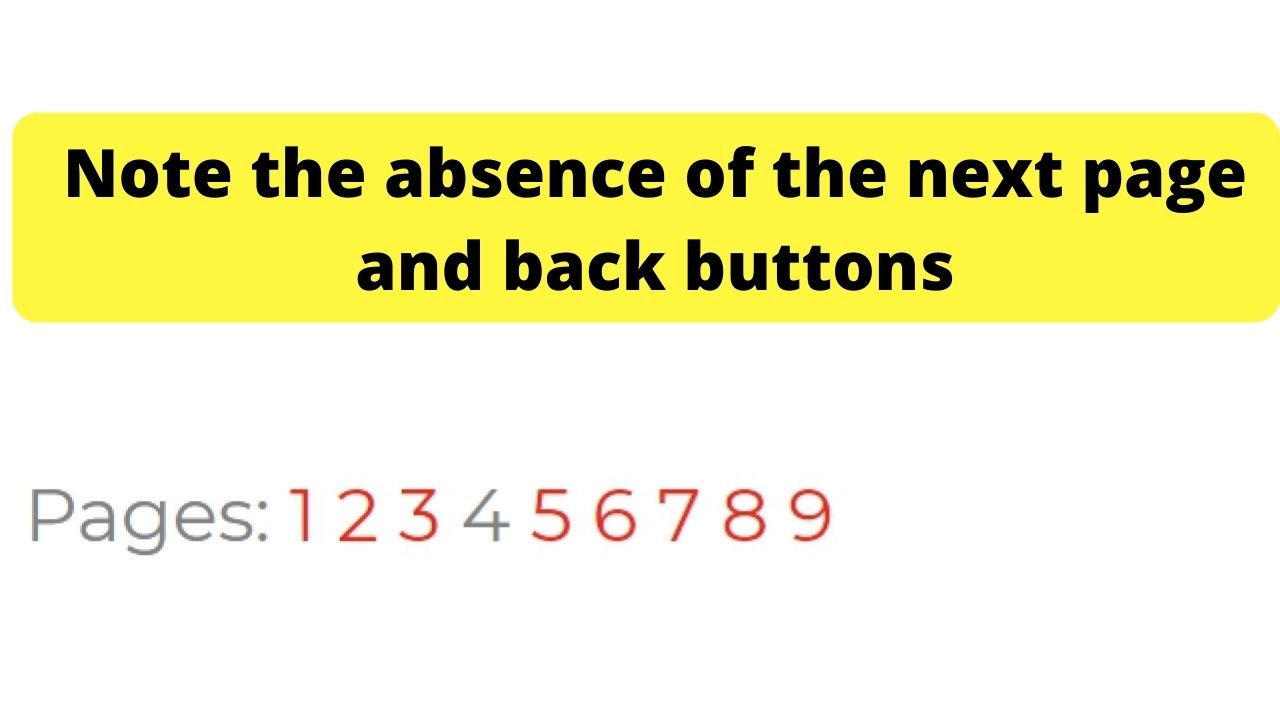
The downside is, there’s no next page link. Navigating is likely to be tricky on mobile.

2. Pagination by Best Web Soft

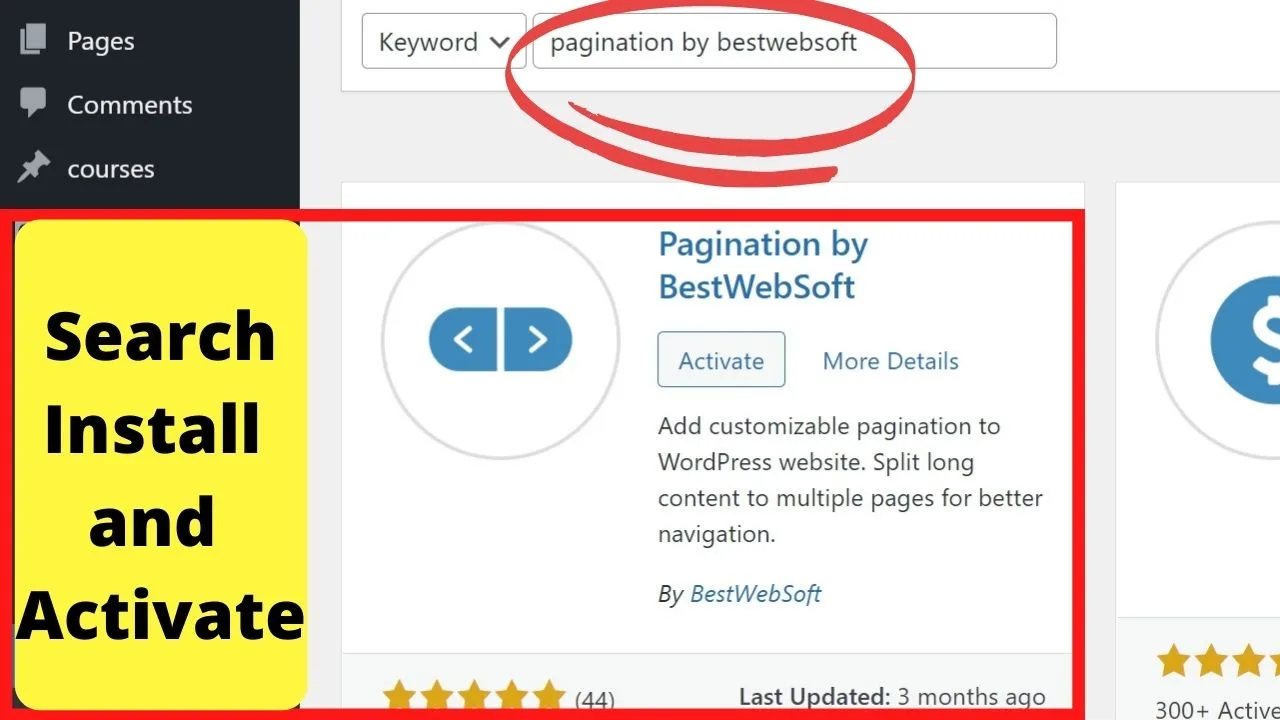
This is truly a plug-and-play pagination plugin that works well for WordPress.


Once installed, go to settings, and customize it to your liking.
Out the box, you can add to all pages, your home page, blog, archive, search results pages, and in paginated posts and pages.
The standard Pagination plugin is the freemium version. This gives you numeric pagination.
On the premium version, you can switch from numeric AJAX pagination to a single button to “Load More”, just like YouTube uses.
There’s also the option to switch to Infinite Scroll, or just use Next and Previous buttons, rather than the older Posts or Newer Posts that come as standard on a lot of WP themes.
For adding numeric pagination, this is the simplest plugin to use.
Even on the free version, you can customize the style of your pagination buttons and links to be the same style as the rest of your theme.
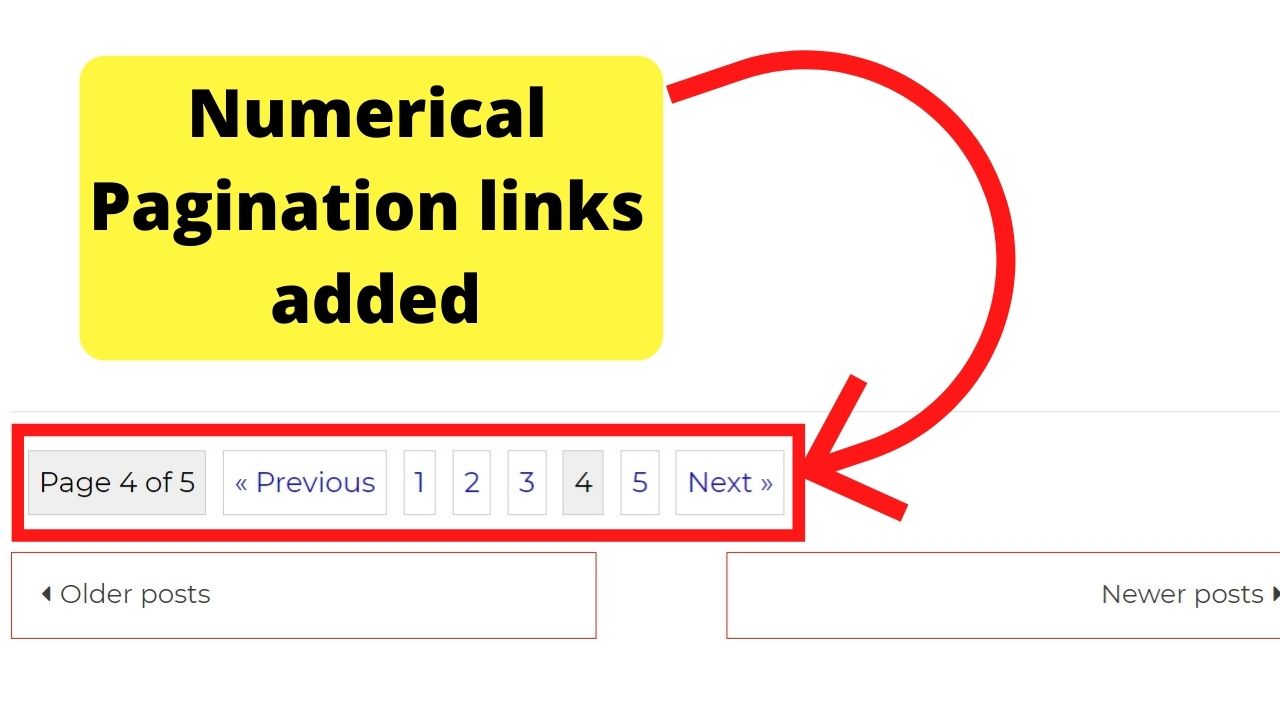
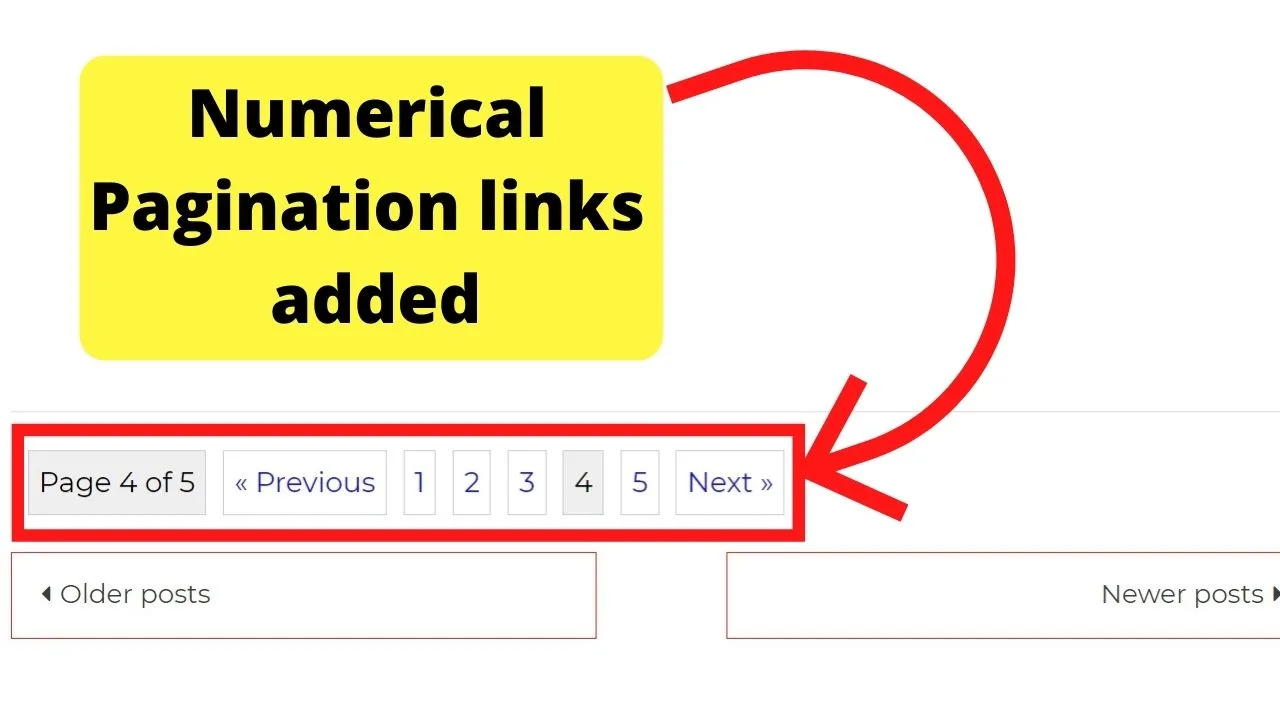
This adds numeric pagination but it doesn’t replace the default pagination in your theme. You need to edit your theme files, or use…
3. WP Paginate

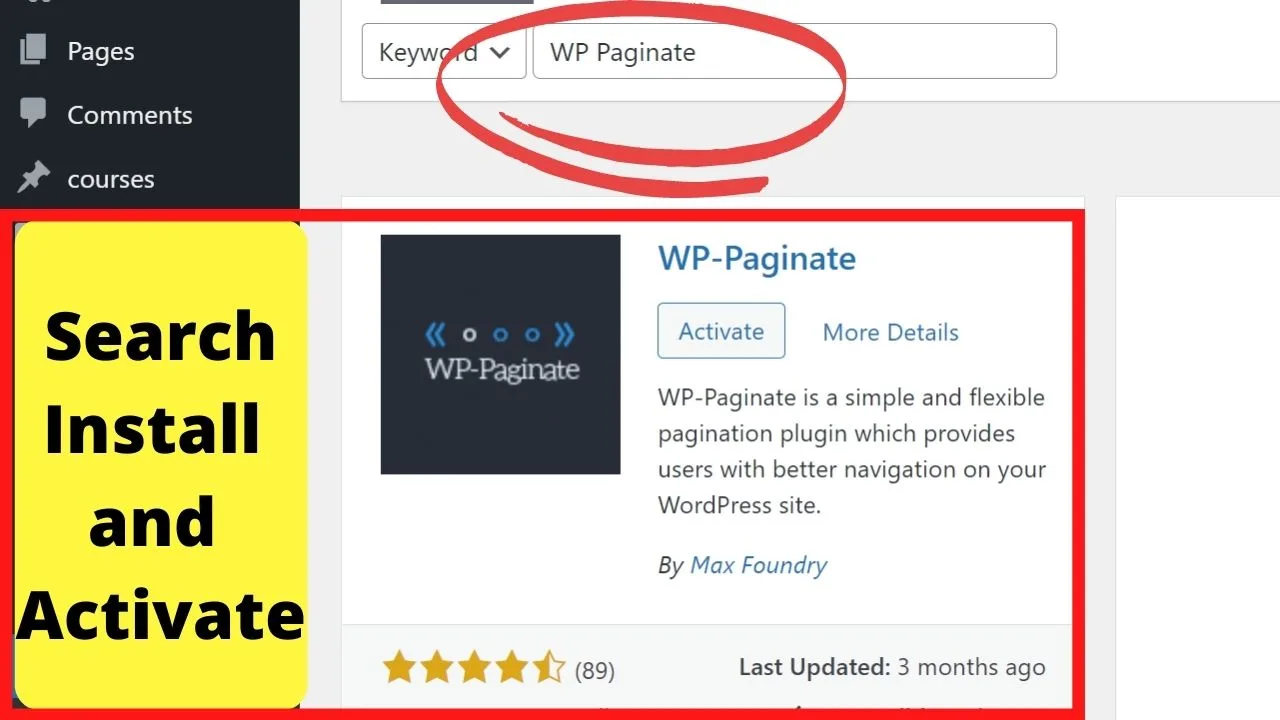
Similar to Pagination by Best Web Software, this is another that’s plug-and-play.
Not much to do in the settings, other than to select where you want it to display and pick a style.
Similar to others, you can have pagination links set above, below, or above and below, and you can check a box to override your themes default pagination.
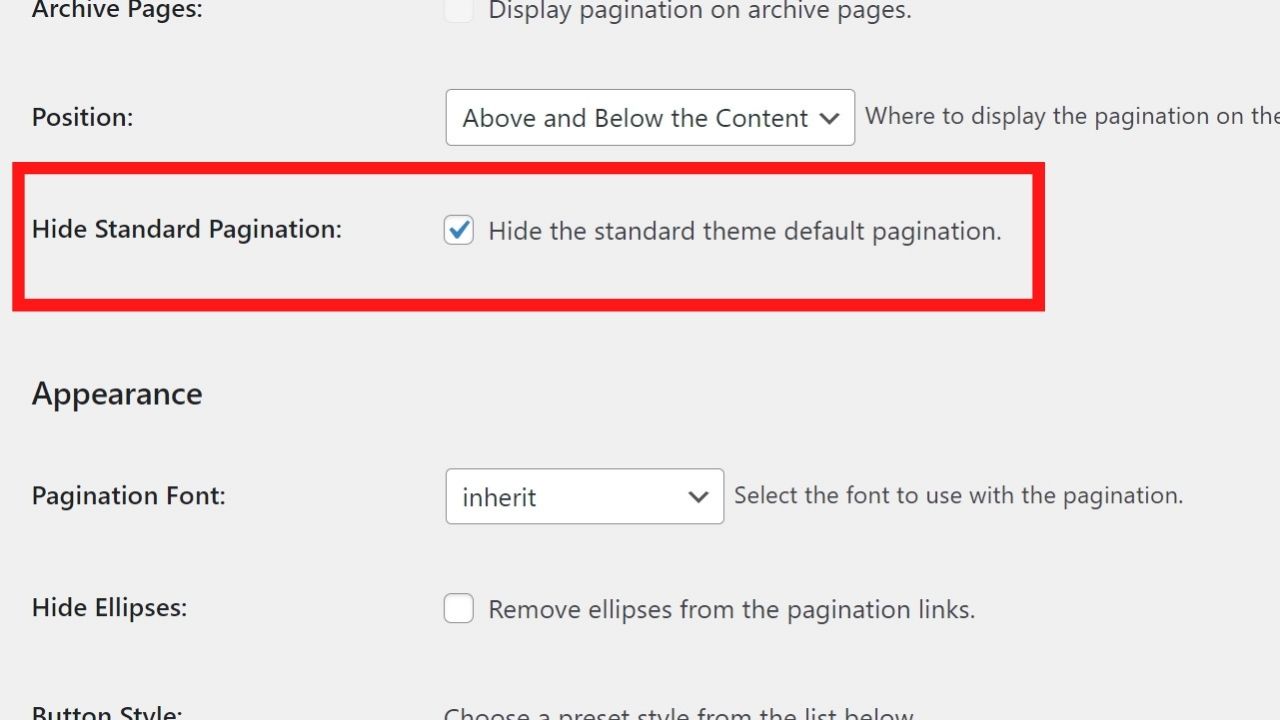

On others, this setting isn’t there.
Without editing your theme files to remove the default pagination code, you get both.
WP Paginate is one of the few to override your theme’s pagination.
There are 4 preset styling buttons – dark or light grey, blue, and neon pink.
If those aren’t to your fancy, there’s a section in the settings for custom CSS. Style your buttons however you like.
For those with an engaged audience getting loads of comments, the same pagination styles you set here can be applied to your comments pagination links too.
Most WP pagination plugins work on your content only and not on user-generated content.
WP-Paginate has you covered on all fronts.
4. Pagination Styler for WooCommerce

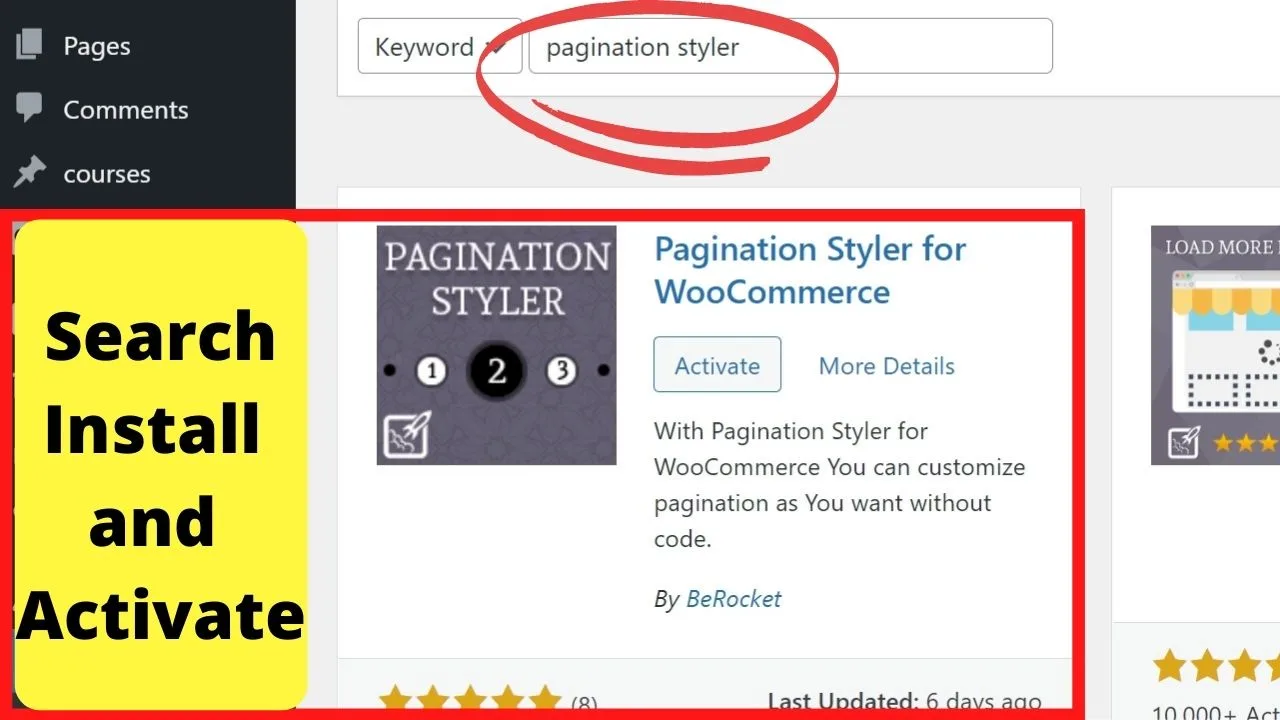
If you have the WooCommerce plugin installed, the pagination settings are controlled in the appearance customizer.
Go to Appearance > Customize > WooCommerce > Product Catalog and set the number of products to display per row and the number of rows per page.
Lowering the number of products per row increases the number of pages that will be paginated.
The style of the pagination is based on your WP theme.
To change it, add forward and back buttons and additional styling options, install the “Pagination Styler for WooCommerce” plugin.
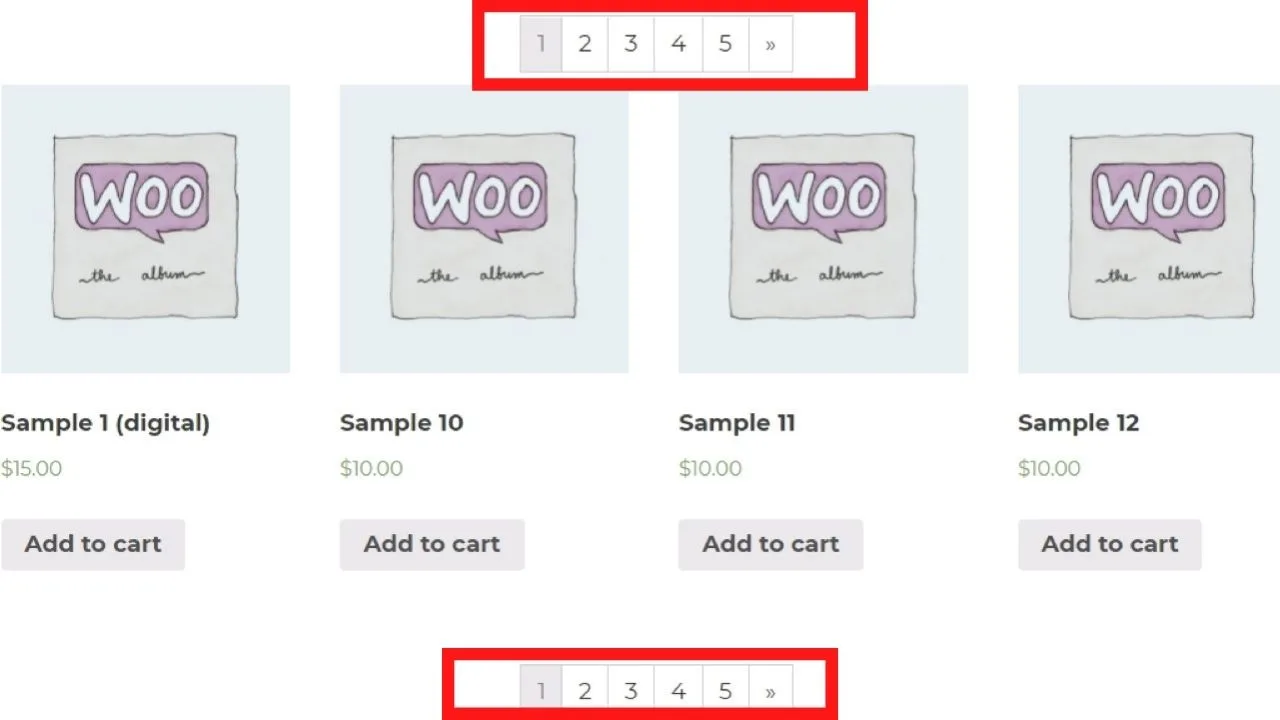
It does what the name states. Styles your buttons and you can add numeric pagination to the top and bottom of your product pages. By default, WooCommerce pagination links only show below your products.
And instead of the standard black on grey text, you can change the background color, text colors, and hover color.

This is the plugin to use to make your store more branded with your brand’s custom colors.
5. Alphabetic Pagination
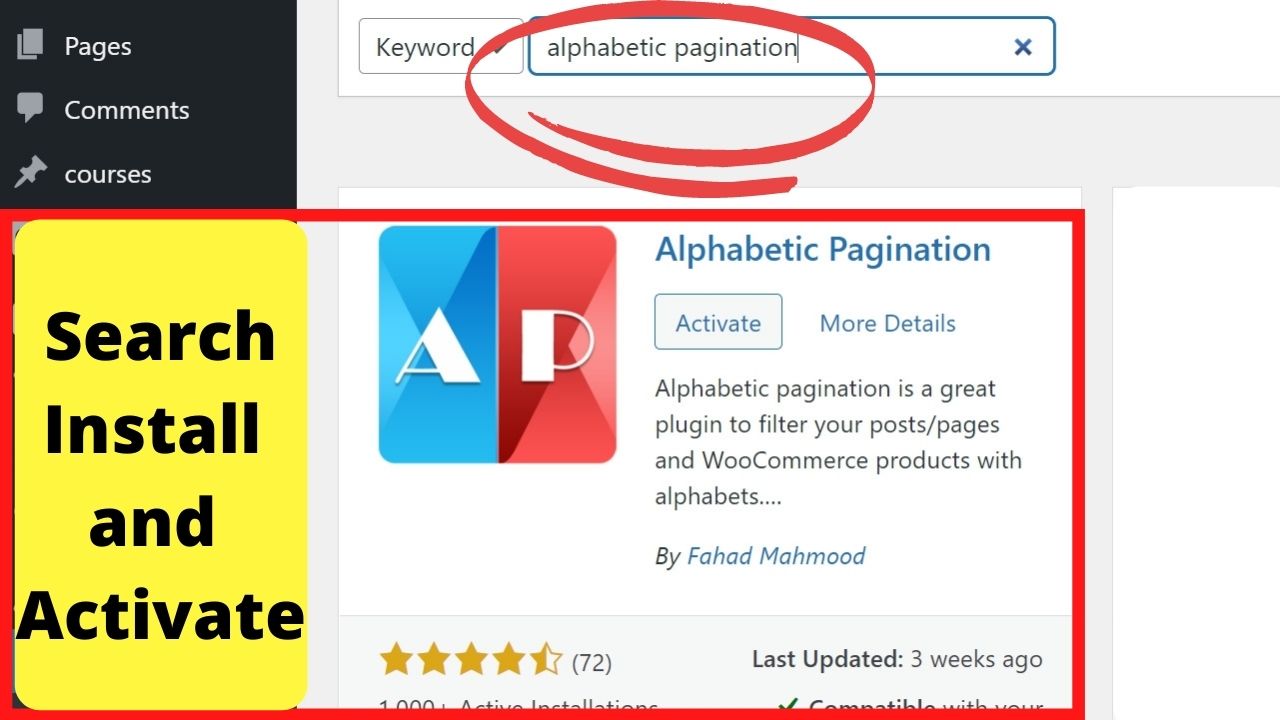

Most pagination plugins insert numbered navigation links. Very few paginate pages in alphabetical order.
One example of when this would be beneficial is for a glossary.
The type of content people would benefit from clicking a letter to see a list of words or even symptoms for troubleshooting.
There is a plugin called “Alphabetic Pagination” and that’s the purpose it serves.
To display the entire alphabet across your page, in the navigation bar, or you can set it to only show on a glossary category instead of site-wide.
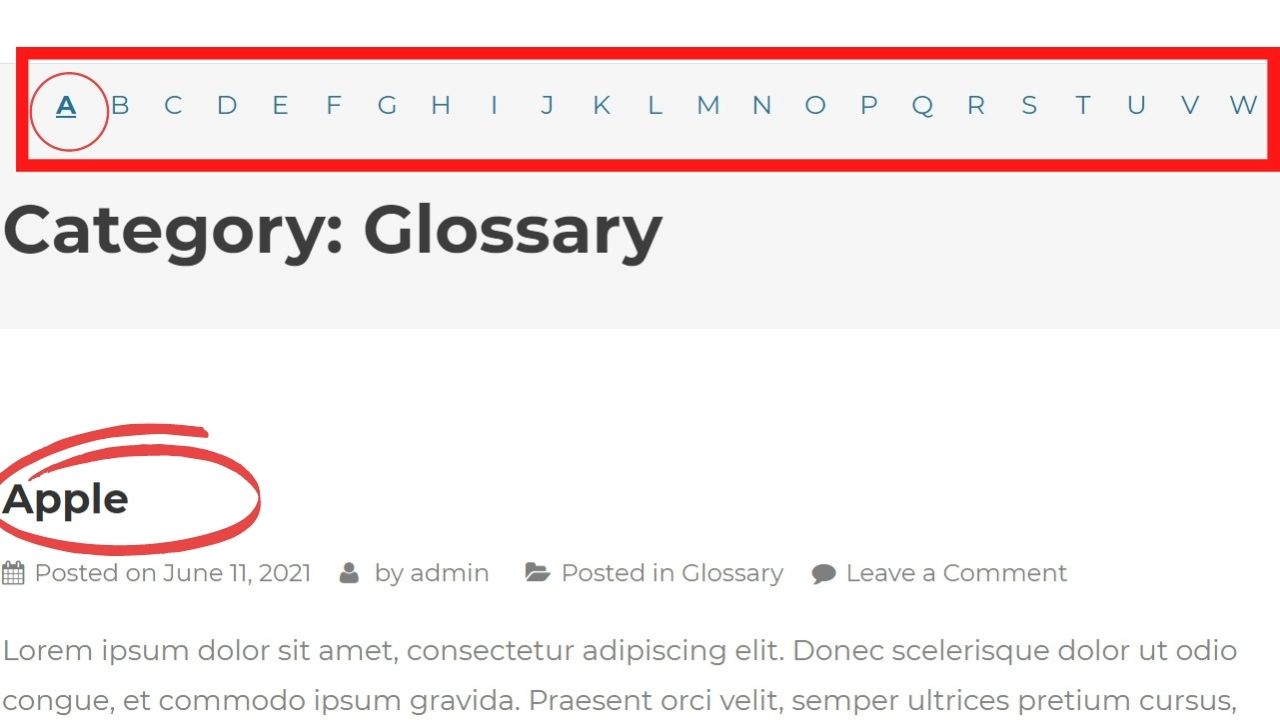

The plugin is free for auto implementation. This can be set up to only show on one category page and excluded everywhere else.
If you want to only include alphabetic pagination on a single page (such as a glossary page instead of a category) the pro version has shortcodes that let you add that anywhere.
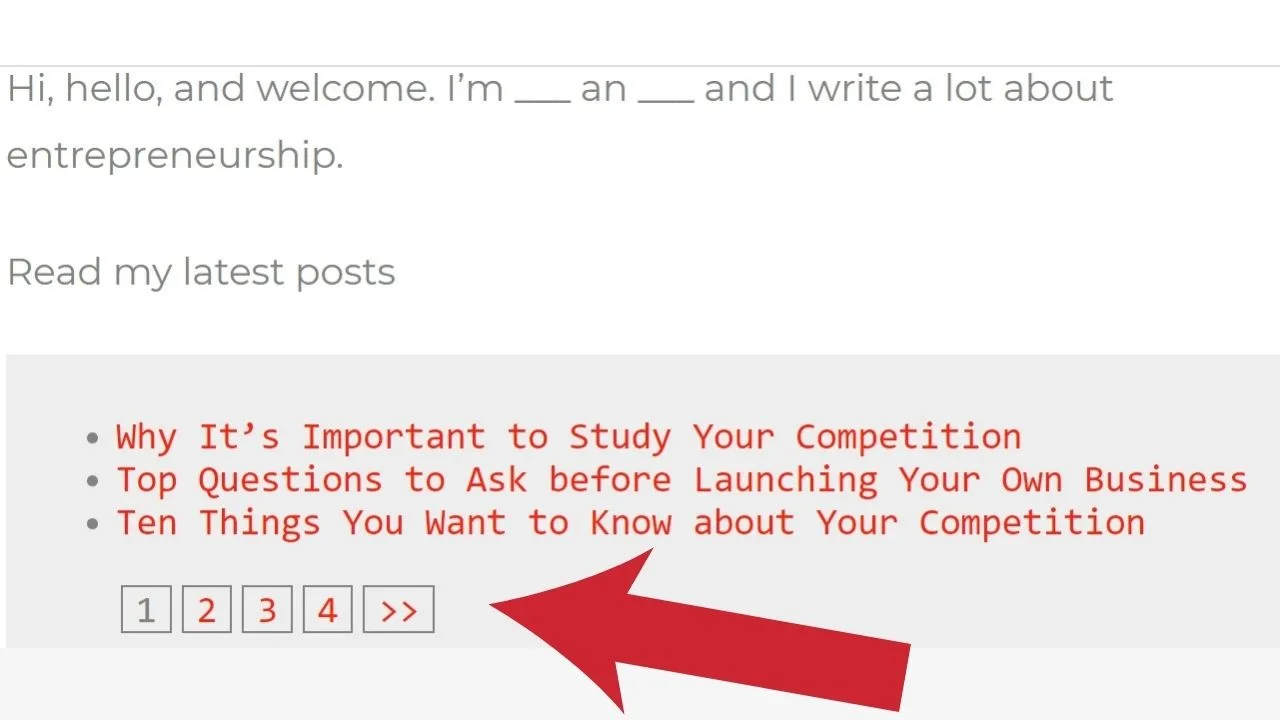
6. List Category Posts

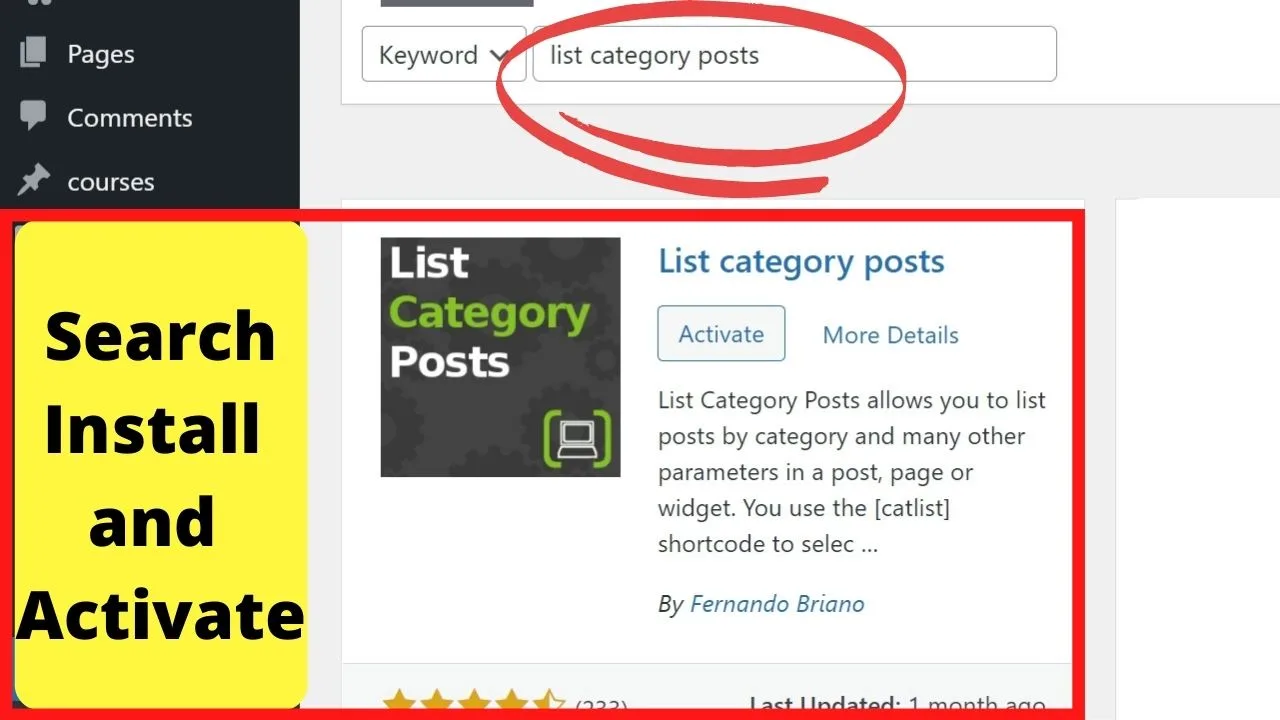
The List Category Posts plugin has a pagination feature.
With this, you can use shortcodes to insert a list of posts on a page from a single category.
Where this comes in handy is for interlinking related pages.
Like, if you’re writing a post about entrepreneurship and you have a category for business start-up posts, use the shortcode to insert a related reading section. Do the same for multi-author sites.

Once installed and activated, go to your settings menu on the left navigation menu of your WP dashboard and you’ll see “List Category Pages” has been added.
From the settings, you can set the maximum number of posts to display by adding “numberposts” in the shortcode.
As an example,
Select “true” for pagination enables it.
The max number of posts will show but instead of ending, pagination links will now be included to let users click through all the posts in that category.
This is a handy feature for getting people to click through your website, reducing bounce rate, and increasing time spent on your site. Good times!
7. WP PageNavi

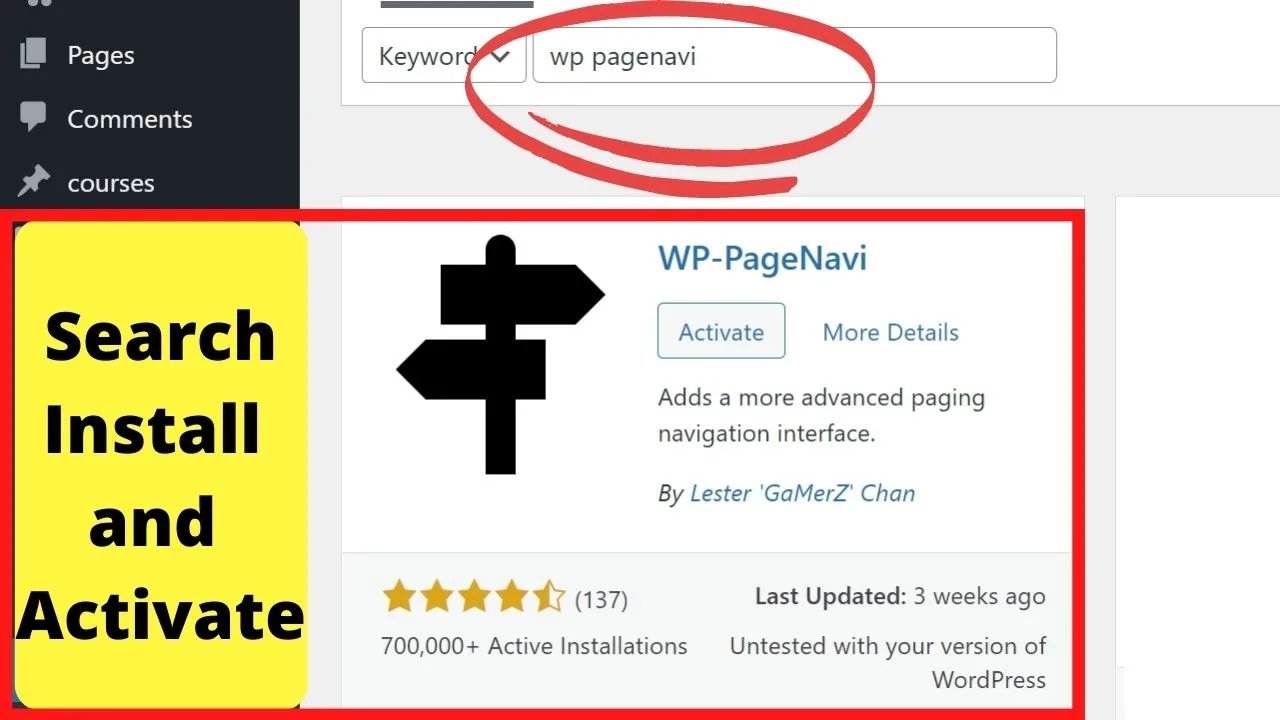
WP Pagenavi is one of the commonly used plugins when you want to add numeric pagination.
It’s designed for older themes or the free themes that default to the “Newer posts | Older posts” buttons to navigate back and forth.
Given the popularity of the plugin, a lot of WP users install this to switch to numeric pagination, then find themselves stuck trying to get it to work.
10-minutes of clicking here and there, it’s crunch time.
How to use the PageNavi plugin
Go to cPanel, find your theme in your WP uploads folder, and edit the link_template file. Replace “<?php next_posts_link” and “<?php previous_posts_link” with “<?php wp_pagenavi(); ?>”. Now, your theme should* replace next and previous links with numeric pagination from the WP PageNavi template.
The default styling is similar to WP Paginate. To use advanced styling, there’s an additional plugin called “Styles for WP Pagenavi Addon”.
Again, for it to work, you need to edit your theme files, this time replacing all the <div class=”navigation”> elements with one line of code:
<?php if(function_exists(‘wp_pagenavi’)) { wp_pagenavi(); } ?>
If you don’t know how to edit theme files or how PHP scripts work, use one of the simpler WP pagination plugins.
*We tried this on our test site on multiple themes without success.
8. CPTA Pagination

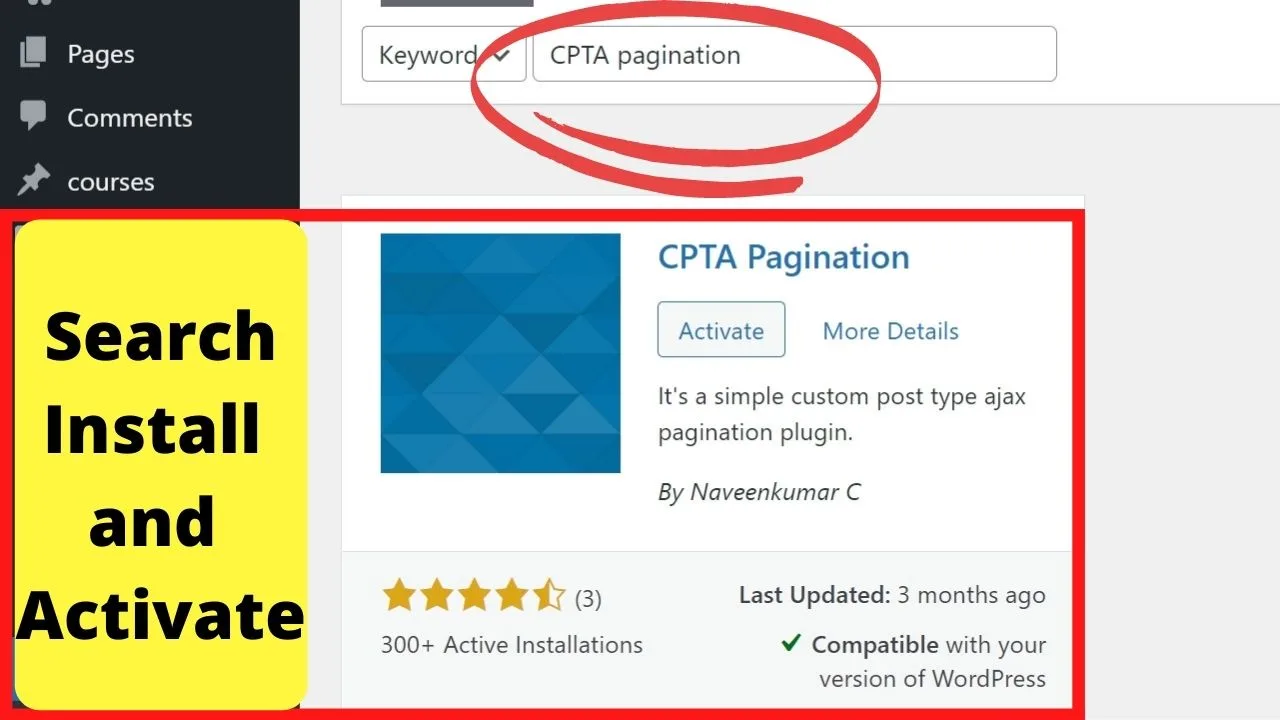
CPTA stands for Custom Post Type Ajax Pagination. This is a plugin that only works for custom post types.
Most standard WP pagination plugins are made to work seamlessly with standard post types. They don’t tend to play nice with custom post types.
Standard post types are your posts, pages, attachments, revisions, and the nav menu. Custom post types can be added to increase your WordPress site’s functionality.
An example of this is WooCommerce. The products page is a custom post type.
The CPTA Pagination plugin is exclusively for these post types.
Once installed, you can add a shortcode into your pages to pull up only some of your custom post types and have links to click through to other posts in that same category.

The shortcode below…
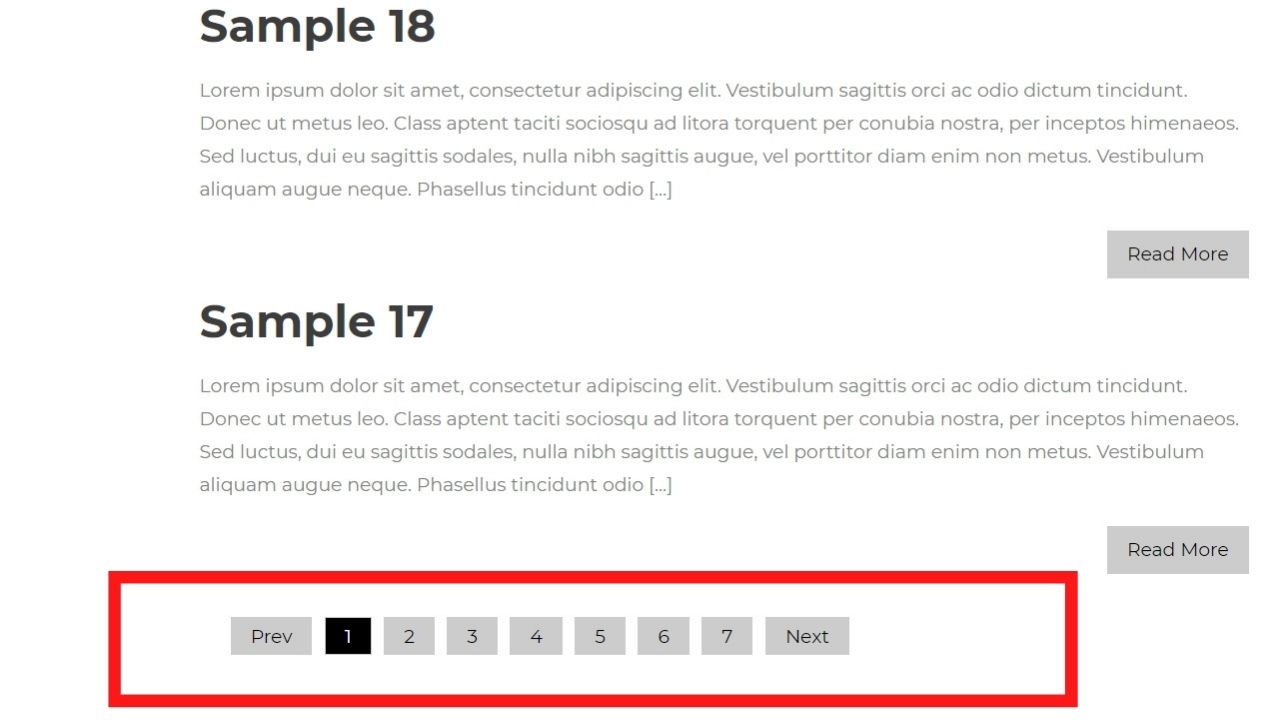
[cptapagination custom_post_type=’product’ cptataxname=’samples’ post_limit=’3′]
In this instance, it’s set to show posts from a ‘product’ post type that are listed as samples and to limit the posts to 3, then pagination links will be shown letting users click through other products in that category.
This works similar to the List Category Posts plugin in that you can insert some of your custom post types within pages using the shortcode.
This is handy if you write a “latest release” post to announce a new product. Set it to show only one, then readers can use the pagination links to click through the rest of your digital catalog.
Neat!
Alternatives to pagination
Pagination is used to improve user experience. In web design terms, it’s called a UX pattern. For navigation purposes, there are three UX patterns.
- Pagination
- Infinite scroll
- Lazy load
Pagination is beneficial on larger screens (PCs and laptops). Infinite scroll offers a better user experience on mobile.
Going back to the Google search example, pagination is used on desktop search. On mobile, it switches to infinite scroll with lazy loading (you have to tap the “load more” button).
A primer on pagination
Pagination is for linking groups of related content together. One common example of this is the Google search results.
When you reach the bottom of a search page, you find links to the next page. Numbered jump links to go from page 1 to any of the first 10 pages, or just click next and back links to navigate.
That’s pagination.
The majority of WordPress themes have some sort of pagination included for the list pages.
Those are shown on your blogroll, categories, and archive pages.
At the bottom of the list pages, there are links for older posts or newer posts. And at the end of your blog post, there are links to your previously published post or a newer post.
Some themes use numbering, just like how Google Search paginates pages.
Image search is different. That’s infinite scrolling.
Pagination vs. infinite scroll
Pagination splits chunks of content across 2 or more pages.
Infinite scroll, well, that just keeps on loading content.
Every social media website uses infinite scroll.
They want visitors hanging around because as you’ll know, scroll for long enough, something’s going to catch your attention.
Infinite scroll is handy on media-heavy websites. It loads content gradually, rather than loading an entire page with hundreds of images.
Infinite scroll is also interesting as far as ad revenue goes.
Why? Because with with infinite scroll, people are likely to stay longer on your website…
…and that usually means that more ad impressions will be generated.
And more ad impressions usually mean more ad revenue.
If you are on WordPress and would like to give Infinite Scroll a shot, I recommend you to use Bimber theme.
This theme has a built-in infinite scroll function that works right out of the box. Just activate it and you are good to go.
There are also numerous infinite scroll plugins for WordPress. However, in this case, I do not recommend using these, as they are pretty difficult to use and probably won’t work for you unless you are willing to do some heavy customization.
I tried and I failed.
Trust me, Bimber theme is the way to go if you need Infinite scroll on your WordPress-based website.
When to use pagination
Use pagination when you have content-heavy pages.
In practice, a photographer’s website could use pagination to link service pages together.
The portfolio page that’s image-heavy, have that be infinite scroll or lazy load the images, perhaps include a “load more” button rather than numeric pagination.
Pagination can be done manually by inserting page breaks. To paginate multiple pages across your entire site, that’s when to use WordPress pagination plugins.
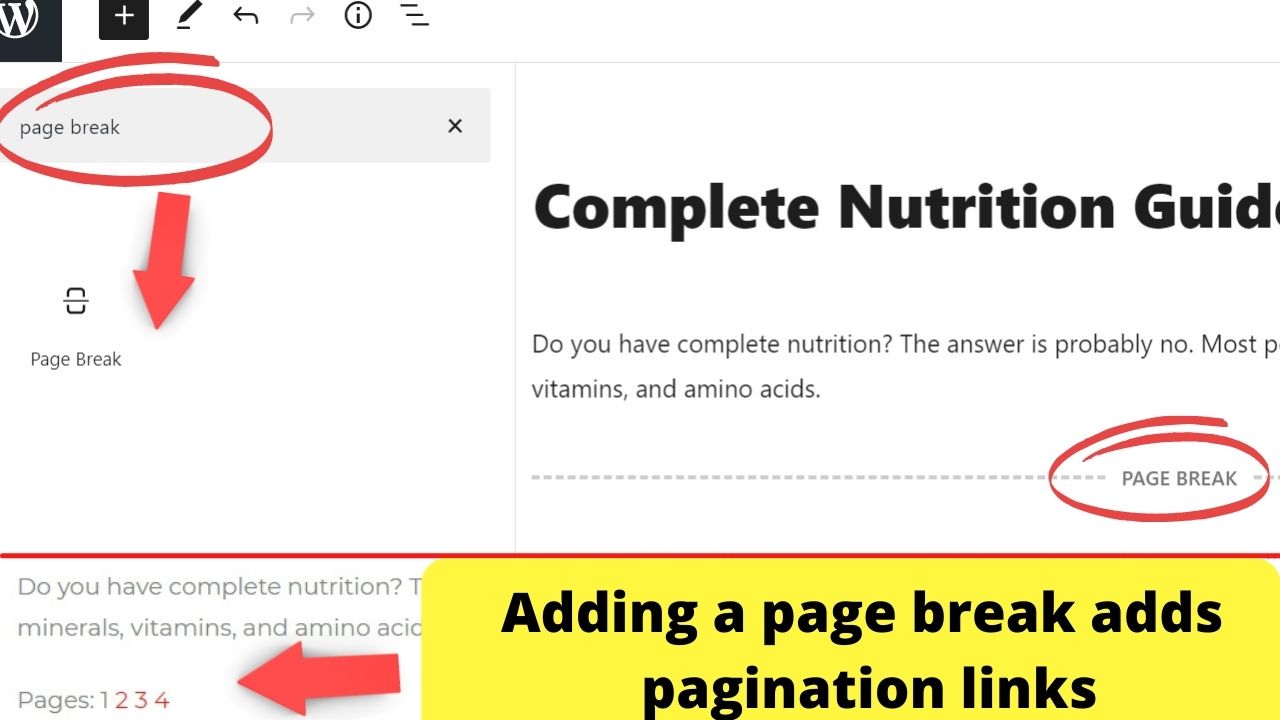
How to manually paginate your pages in WordPress
To manually paginate your pages in WordPress using the the Gutenberg (block) editor, use the “page break” block.
Insert a page break block where you would like the page to end. This will insert a clickable link and when clicked, this will then bring the user to the new (next) page.

To add a manual page break in the WordPress Classic Editor, go into the “text” mode to enable HTML editing, and insert the quick tag “<!–nextpage–>” to manually insert a page break where you want pagination links to appear.


If you don’t want to go the long way, then use these keyboard shortcut keys – alt + shift + p.


Hey guys! It’s me, Marcel, aka Maschi. On MaschiTuts, it’s all about tutorials! No matter the topic of the article, the goal always remains the same: Providing you guys with the most in-depth and helpful tutorials!

