Do you need to design an important presentation for tomorrow’s meeting? Need to point something out?
Use arrows!
In History, arrows have been used as weapons. First arrows have been made with bones, later with pinewood, and now, they are made out of pixels and with a different use.
You can find the usage of arrows in all kinds of forms and shapes, such as informational artwork.
Arrows are developed from pointing with the finger towards a direction.
Arrows can be pointing right, left, upwards, or downwards. The base of their meaning is which side they are facing.
How to make arrows in Illustrator
There are several ways to create arrows in Illustrator. Arrows can be made (or simply be inserted) with the help of the “Stroke Panel”, the “Symbols” window, “Glyphs”, the “Brush Tool” or the “Shapes Tool.”
Create a new project file for your arrows
Create a New File in Adobe Illustrator. Open your Adobe Illustrator and create a new document by clicking on the “Create New” button or open existing on the “Open” button. The window “New Document” will pop up, choose the size of the canvas.
If you are choosing to set the dimensions as in the tutorial, the canvas size is 1080x1920px. It is vertical oriented, in order to fit and compare all arrows created with different tools.
Set your document name, set chosen “Width”, and do the same for “Height”. Click on “Create”, and let’s begin.
The shortcut for creating a new file: Control (CTRL) + N (Windows) or Command + N (MAC).
How to make arrows in Illustrator using the Stroke Panel
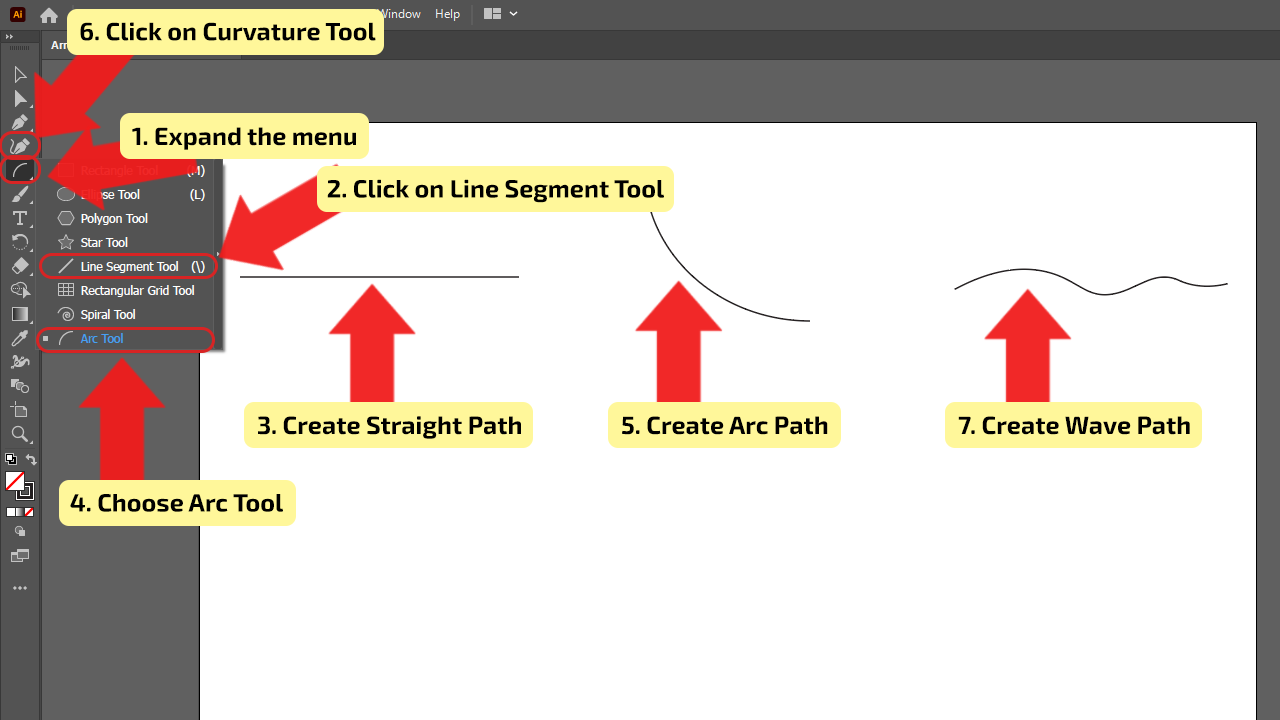
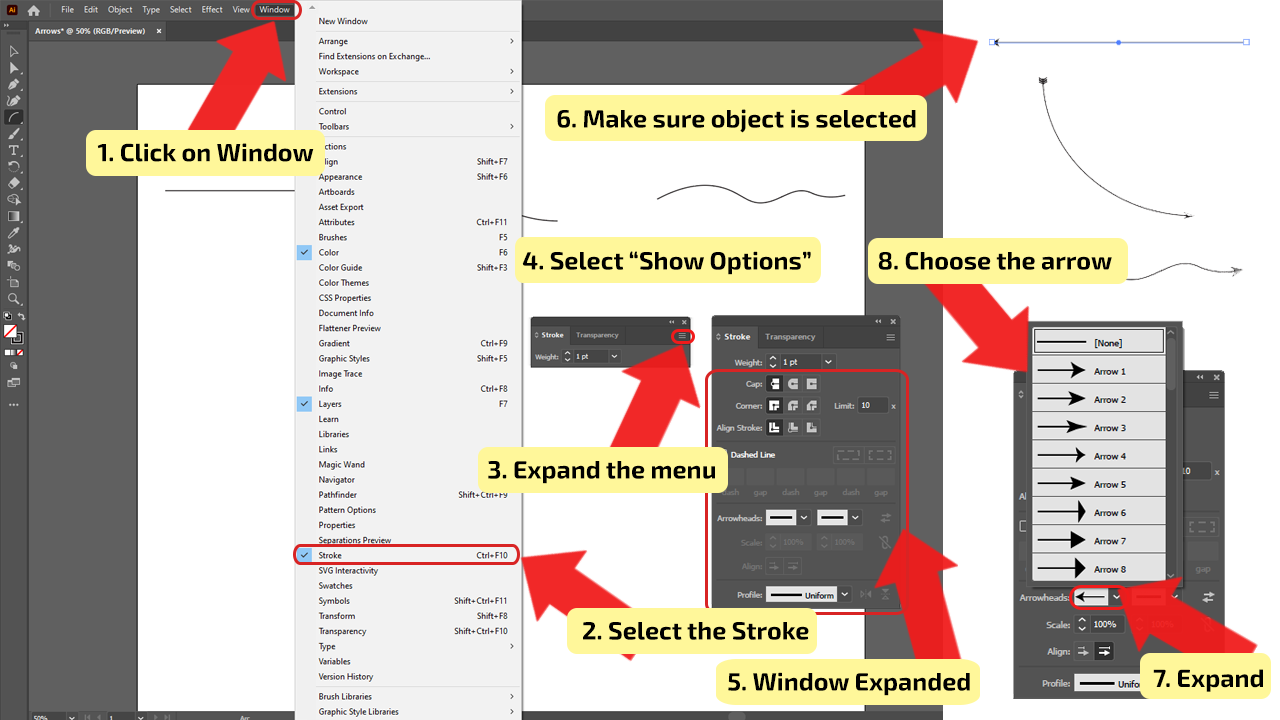
Create a path with “Line Segment Tool, or “Arc Tool” or “Curvature Tool”. Go to “Window” > “Stroke” to open up the “Stroke Panel”. Expand the menu and select “Show Options”. Select the object. Choose the arrow. Scale arrowheads, or create a dashed line in the Stroke Panel.
One of the basic options of using the Stroke Panel is controlling the weight of your stroke. You can use the Stroke Panel to control the look of joining paths, the adjustment of strokes weight when the paths are closed, or create arrows from paths.
How to make arrows in Illustrator using the Stroke Panel: Step-by-step Guide
Step 1:
Create path. To use the “Stroke Panel”, the path needs to be drawn. If you want to draw a straight line use the “Line Segment Tool”, the shortcut is \ (backslash), for line in the shape of arc use “Arc Tool” or if you want a line in the shape of a wave use the “Curvature Tool”, the shortcut is SHIFT + ~.
Step 2:
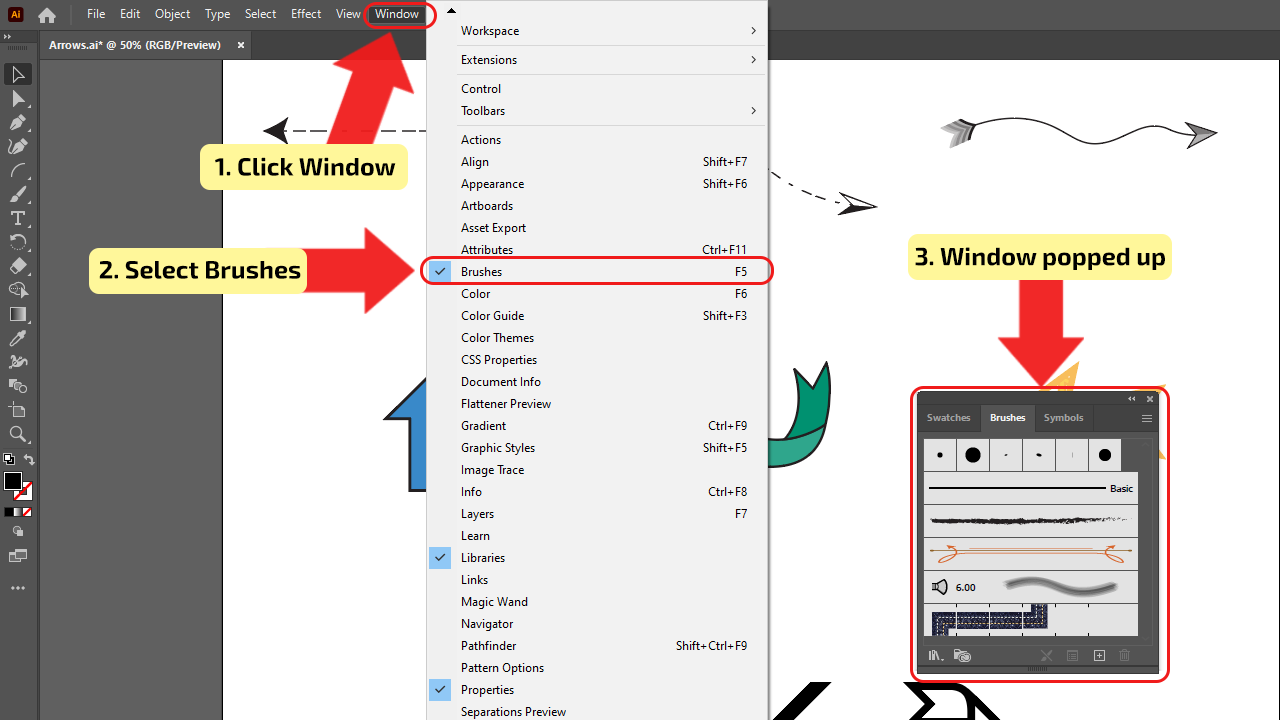
Open the Stroke panel. You can easily make arrows from any path using Stroke. To open the “Stroke Panel”, go to “Window” > “Stroke” and the window will pop up. In the window will be shown the option to change weight, to open the rest of the options, click on the “Show Options” button. Make sure the line is selected, find the option “Arrowheads” and choose the arrowhead. You can put the same arrows on the beginning and end of the line, or if you want, two different. Be creative, you aren’t limited with the design of arrows.
The shortcut for opening “Stroke Panel”: Control (CTRL) + F10 (Windows) or Command + F10 (MAC).
Step 3:
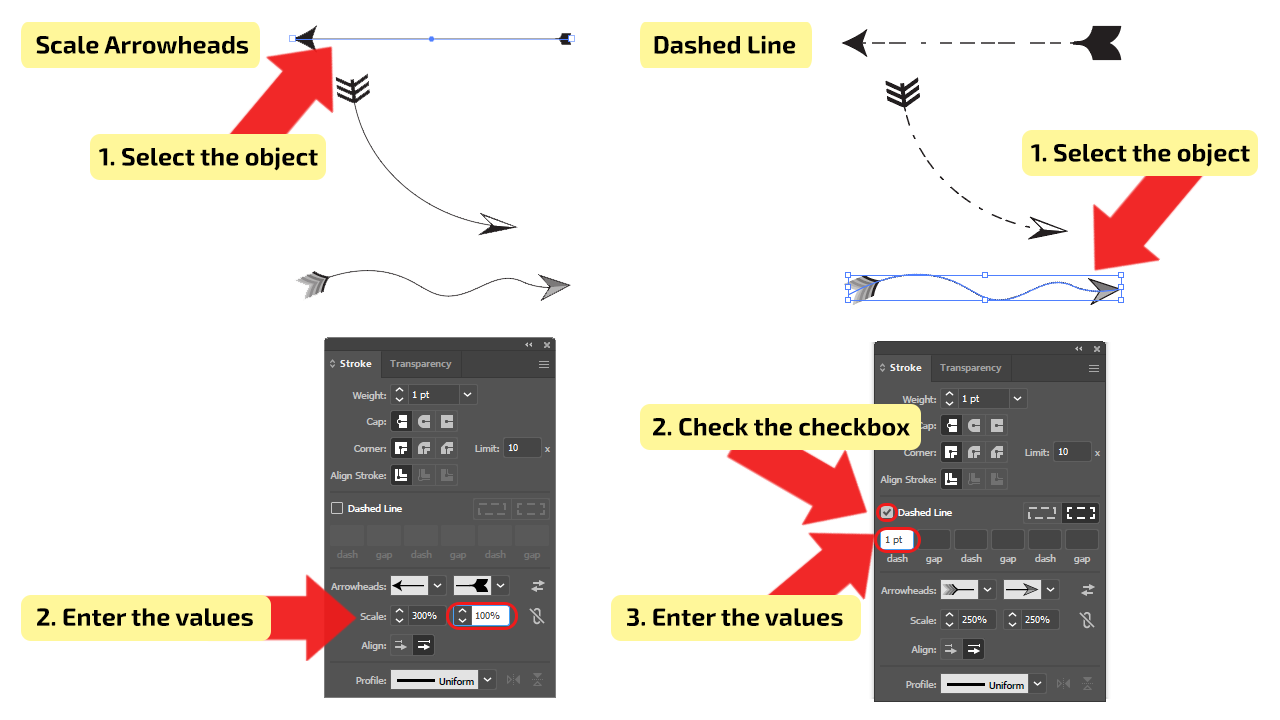
Changing the Size of Arrowheads and Adjusting Lines. If your arrowheads are too small or too big for your lines, you can change their size. On the “Stroke Panel” below “Arrowhead”, you can find the “Scale” option for both sides of the arrow. Type in the percent of how much you want to scale the arrows or use the arrows next to the boxes. If you want your arrow to be dashed, you can change it. On the panel, find “Dashed Line” and check the checkbox next to it and add values in the boxes for dashes and gaps.
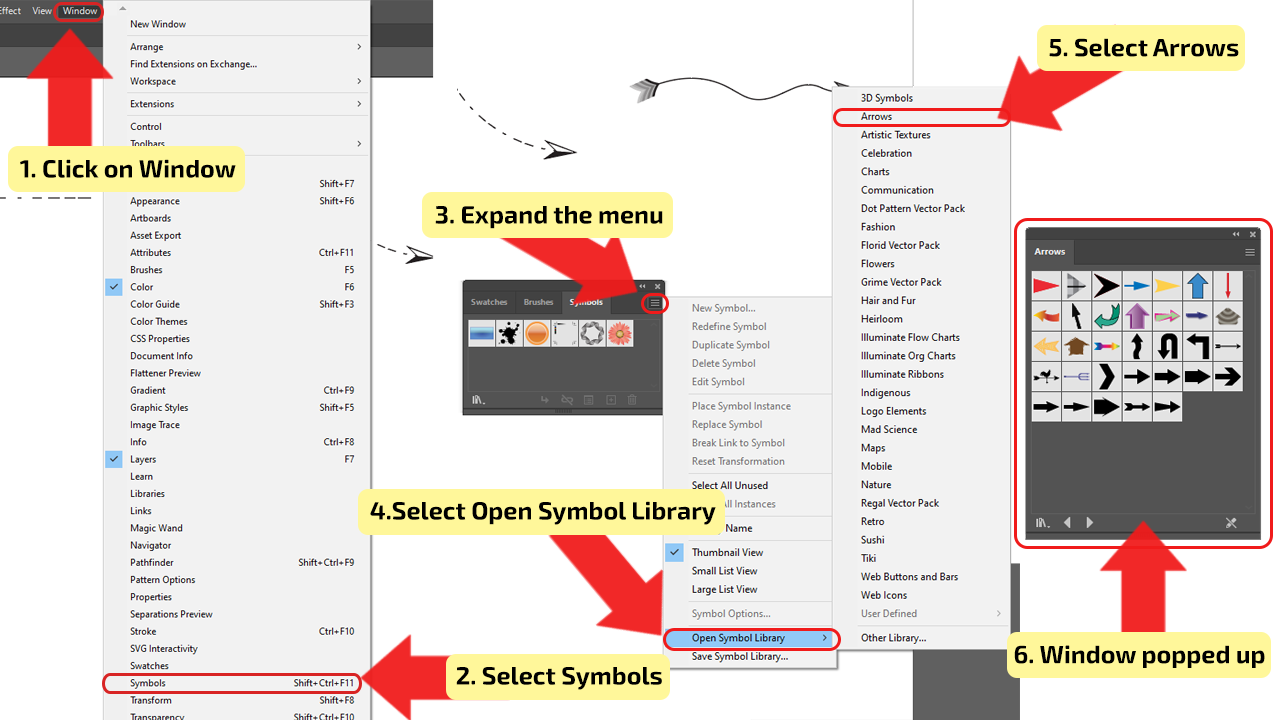
How to make arrows in Illustrator using symbols
Open up the “Symbols Panel” by choosing “Window” > “Symbols”. To open the arrow’s options, open the drop-down menu, click on the “Open Symbol Library” > “Arrows” and the library will pop up. Choose the arrow you like, drag, and drop it on the canvas. Change its size and orientation.
Symbols Panel can save you a lot of time if it’s used properly. You can find many interesting things inside this panel, in this case – arrows.
How to make arrows in Illustrator using the Symbols panel: Step-by-step Guide
Step 1:
Open the Symbols panel. With Symbols, you can use predefined arrows from “Symbols Panel”. To open the “Symbols Panel”, go to “Window” > “Symbols” and the window will pop up. To open the arrow’s options, open the drop-down menu, click on the “Open Symbol Library” > “Arrows” and the library will pop up.
The shortcut for opening “Symbols Panel”: SHIFT + Control (CTRL) + F11 (Windows) or Shift + Command + F11 (MAC).
Step 2:
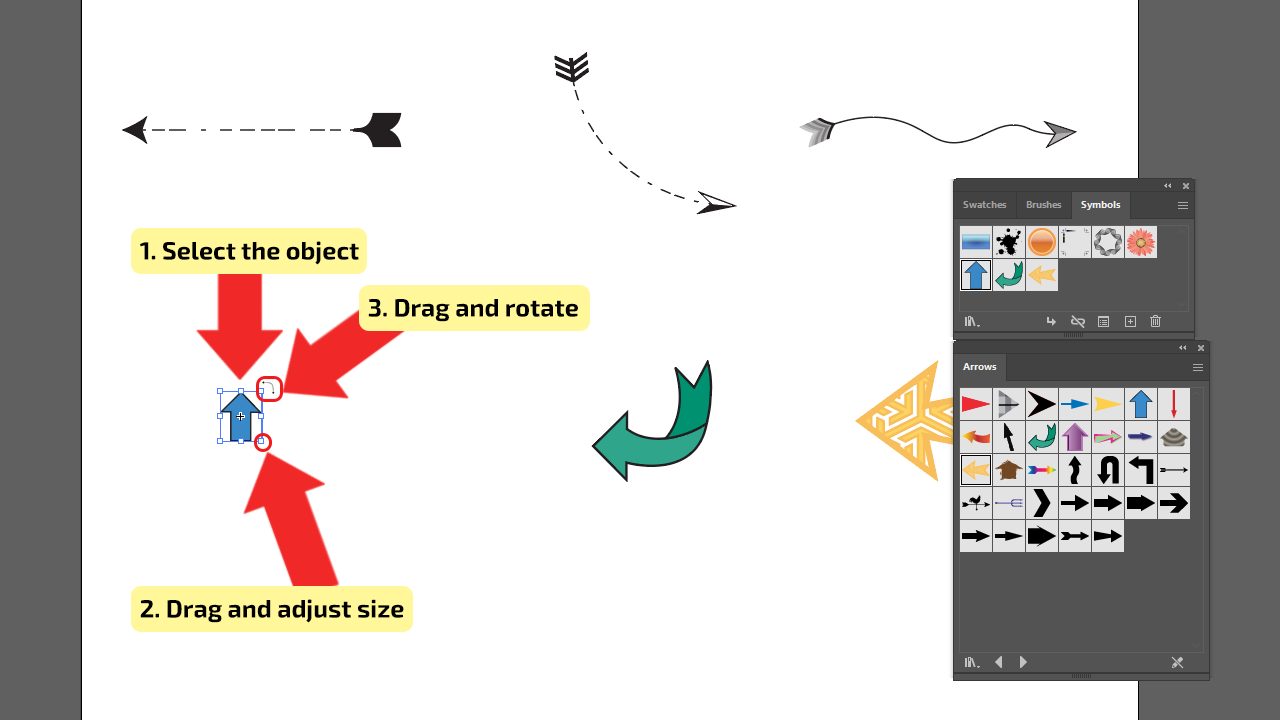
Adding Arrows. Working with Symbols is simple, you just need to drop them in the wanted place. Choose the Arrow from “Arrows Library”, selected and drag to its place and drop it.

Step 3:
Changing the Size and Orientation of Arrows. If you are not satisfied with the size and orientation of your arrows, you can change that easily. Make sure the arrow is selected. Change the size by dragging one of the dots, and make it wider or higher. To change size proportionally, hold the SHIFT and drag. To change the orientation, hover the mouse pointer above the adjusting dot, wait for the “rotation symbol” to appear, click and drag it to rotate the arrow. If you want to rotate the arrow in an increment of 45 degrees, hold the SHIFT key while rotating it.
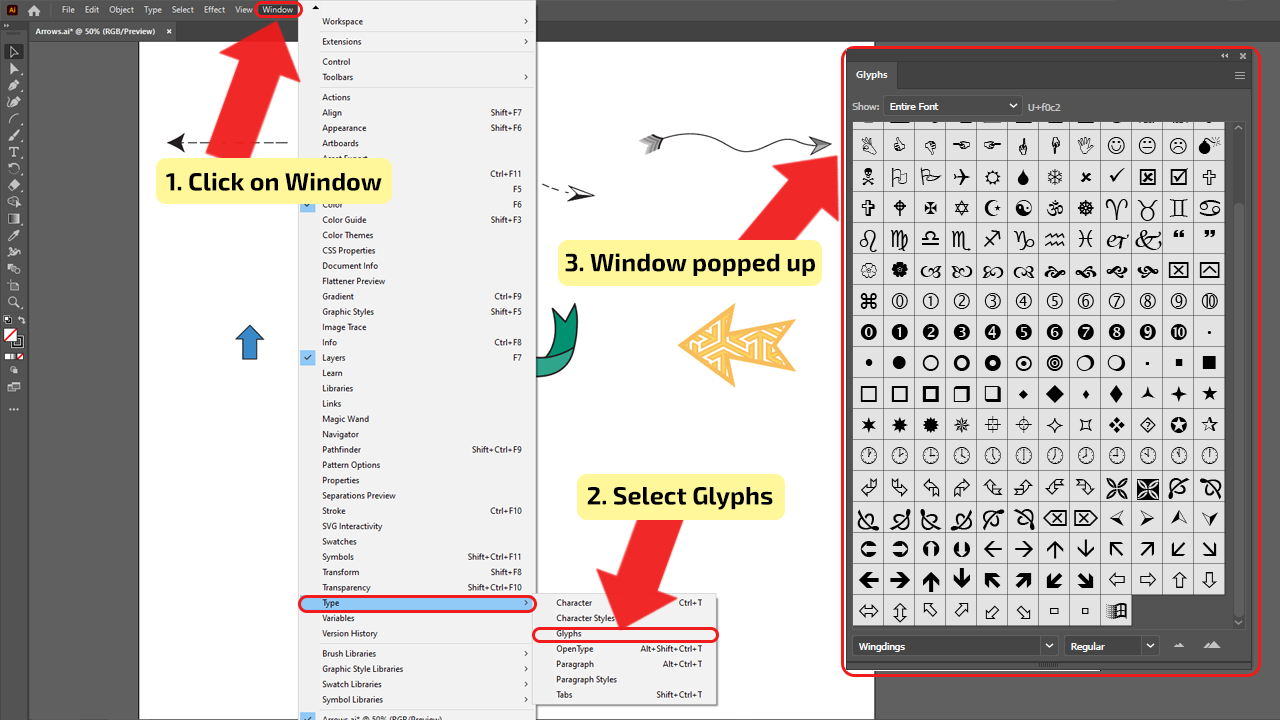
How to make arrows in Illustrator using Glyphs – Quick Guide
Go to “Window” > “Type” > “Glyphs”. In the “Show” drop-down menu select “Entire Font”. Select the font and choose the glyphs from the list. Creat text box using “Type Tool”, choose Glyph Arrow. Adjust the size by changing the font size. Convert to symbol with “Type” > “Create Outlines”
How to make (draw) Arrows in Illustrator using Glyphs – Step-by-step Guide
Glyphs are letters and symbols that make up a font. In the Glyphs Panel are placet any font characters, objects, and special symbols. If you want to check the alternatives for letters or to add special symbols, this panel is perfect for that.
Step 1:
Open Glyphs Panel. Open the “Glyphs Panel”, go to “Window” > “Type” > “Glyphs” and the window will pop up. In the window, in the “Show” drop-down menu select “Entire Font”, it will be easier to find a typeface that contains special arrow characters. At the bottom of the panel, select the font and scroll through the characters (glyphs) to search for arrows. Choose the font with compatible arrows, for example, “Segoe MDL2 Assets”, “Wingdings”, “Wingdings 3” (contains just arrow symbols), or for some emojis, you can use “EmojiOne Color” if you have it installed. If your computer doesn’t have these fonts installed, choose the one that contains arrows.
Step 2:
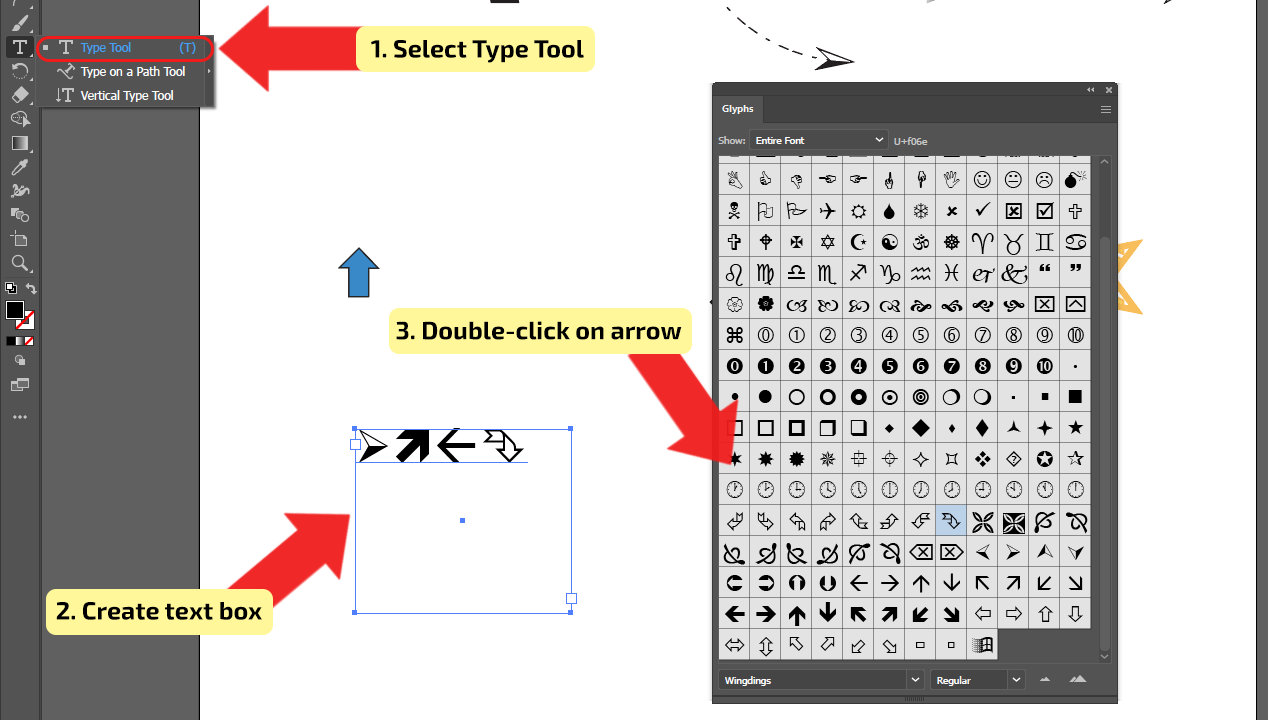
Using Glyph Arrows. Creat text box using “Type Tool”, choose Glyph Arrow, to use the chosen glyph, double-click on it, and it will appear in the text box. You are able to add arrow glyphs as many as you want, you aren’t limited. Also, you can adjust the size of arrows by changing the size of the font in the “Properties Panel”, the section for “Characters” or using the “Control Panel”. Both panels you can open in “Window” choosing “Properties” or “Control” in the drop-down menu.
The shortcut for opening “Control Panel”: Shift + Tab (Windows and MAC).
Step 3:
Converting the Arrows. When you finished creating Glyph arrows and you are satisfied with the outcome, convert the arrow from live text into a graphic icon. To convert it, select the text box and choose “Type” > “Create Outlines”. It is important to convert the live text to outlines. After converting, you are able to edit the text (arrow glyph) in the same way that you would edit the objects. The shortcut for opening “Create Outlines”: Shift + Control (CTRL) + O (Windows) or Shift + Command + O (MAC).

How to make arrows in Illustrator using brushes – Quick Guide
Go to “Window” > “Brushes” and the panel will pop up. Click on the fly-out menu and find “Open Brush Library” > “Arrows” and choose one of the options. From “Brushes Library” choose the type of arrow that you want to use, then select the “Paintbrush Tool”. Draw the arrows on canvas.
How to make (draw) Arrows in Illustrator using brushes: Step-by-step Guide
Brushes allow you to adjust the appearance of paths. Brushstrokes can be applied to existing paths, or to draw a path with the Paintbrush tool and apply a brush stroke at the same time. In Illustrator, you can find different types of brushes: Art, Bristle, Calligraphic, Scatter, Pattern, and others. In the following, it is used arrows from the open brush library.
Step 1:
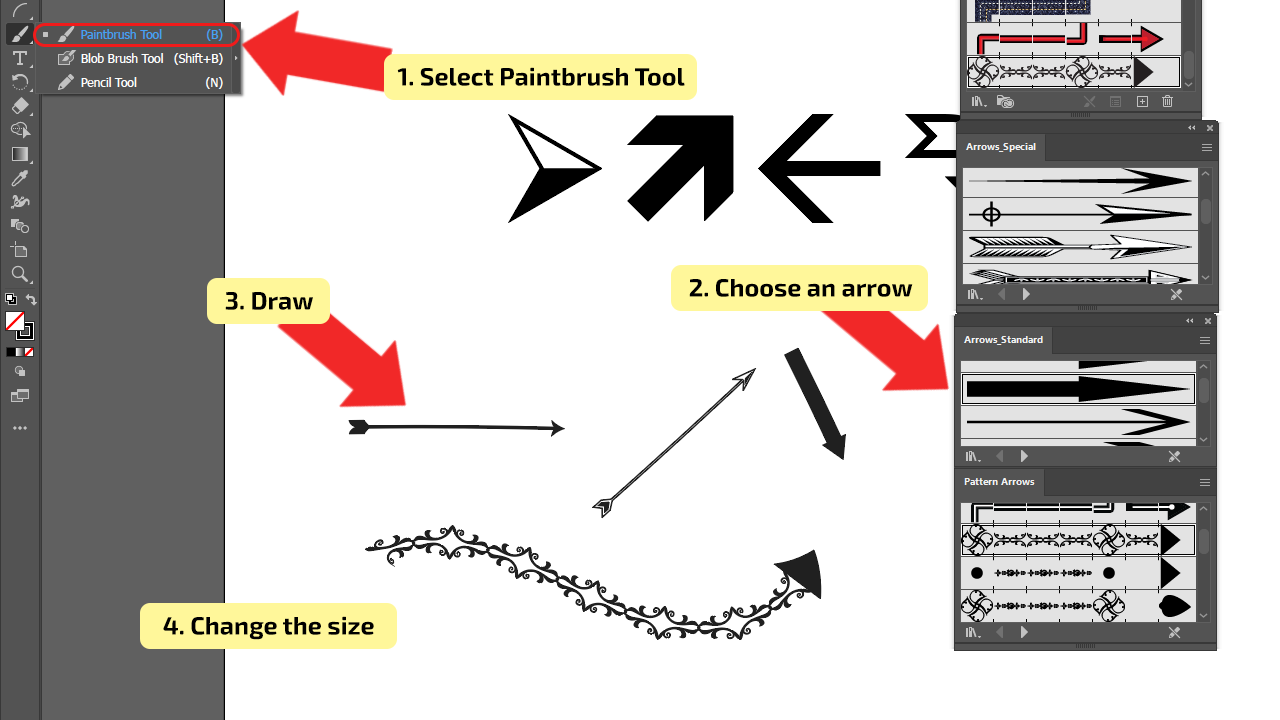
Open Brush Panel. You can draw arrows with the “Paintbrush Tool”. To be able to draw arrows, you need to open “Brushes Panel”. Go to “Window” > “Brushes” and the panel will pop up.
The shortcut for opening “Brush Panel”: F 5 (Windows and MAC)
Step 2:
Brush Library. When you open the “Brushes Panel” you won’t see a lot of predefined arrows, to see all Arrows for brushes, you need to open “Brush Library”. Click on the fly-out menu and find “Open Brush Library” > “Arrows”, you will have three options, “Arrows_Special”, “Arrows_Standard”, and “Pattern Arrows”. You can open all three libraries, in this way you can find the arrow that suits you the best.

Step 3:
Drawing Arrows. From “Brushes Library” choose the type of arrow that you want to use, then select the “Paintbrush Tool”, the shortcut is the letter “B” and start drawing the arrow. You aren’t limited to the number of different arrow types that you can use in one document. Play around and be creative. If you are not satisfied with the size of your arrow or you want to adjust it, just select it and use transform options. If you already have drawn the line with a brush and you want to transform it to an arrow, but you don’t want to draw it from the beginning, select the line and choose the type of arrow from Brush Library, when you click on it, the line is transformed and it will be shown automatically.
How to make arrows in Illustrator using Shapes
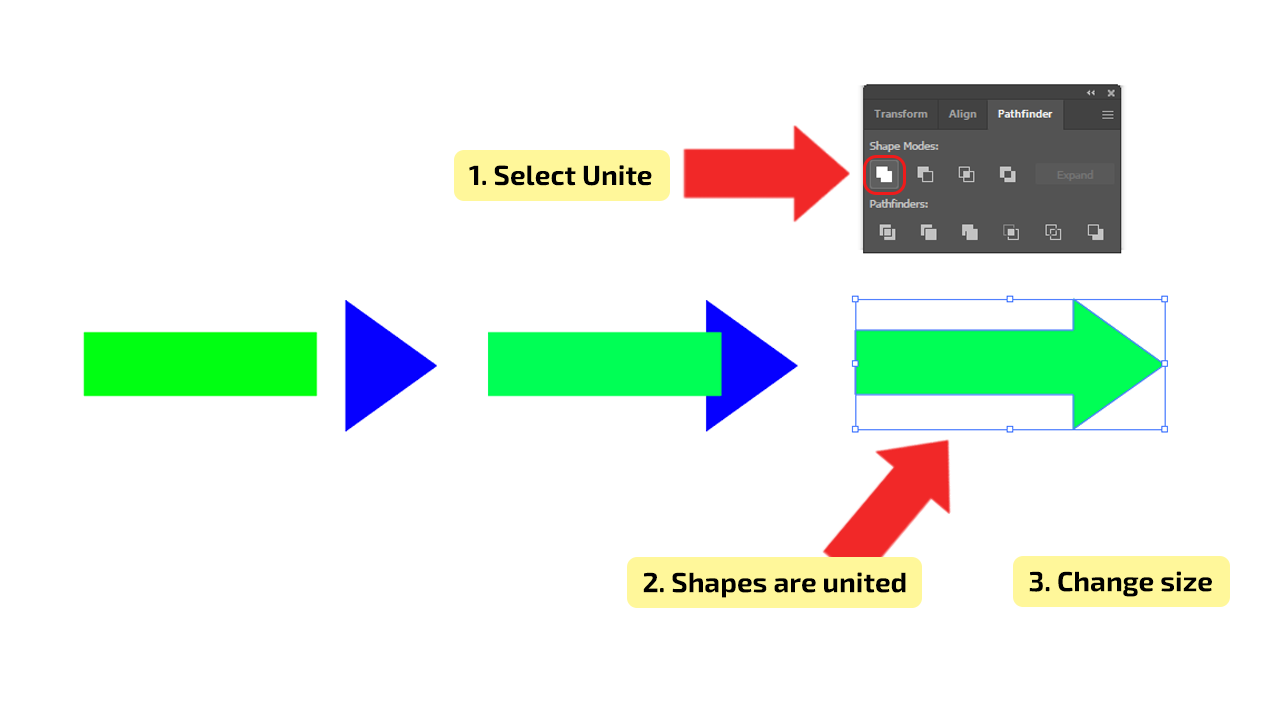
Choose “Rectangle Tool,” draw a simple rectangle. Choose “Polygon Tool”, make a polygon by setting a number of sides to 3 (triangle). Align objects so they look like arrows and make them slightly overlap. Go to “Window” > “Pathfinder”. Select both objects. Choose “Unite” in the “Pathfinder Panel”.
How to make (draw) Arrows in Illustrator using Shapes: Step-by-step Guide
Shape Tools are used to create shapes in Illustrator. The Rectangle is the default shape, but it’s not the only one. You can choose the following tools: Polygon, Ellipse, Rounded Rectangle, Star, or Flare. These tools allow you to be flexible and create simple and complex objects.
Step 1:
Create shapes. Start make the shapes that will be transformed to the Arrow. Use the “Rectangle Tool”, the shortcut is letter “M”, to draw the “body” of the arrow, and “Polygon Tool” for the arrowhead. When the “Polygon” menu pops up, adjust the number of “Sides” to three, because you need a triangle. After drawing both shapes, bring them closer, they need to overlap slightly and make an arrow shape.

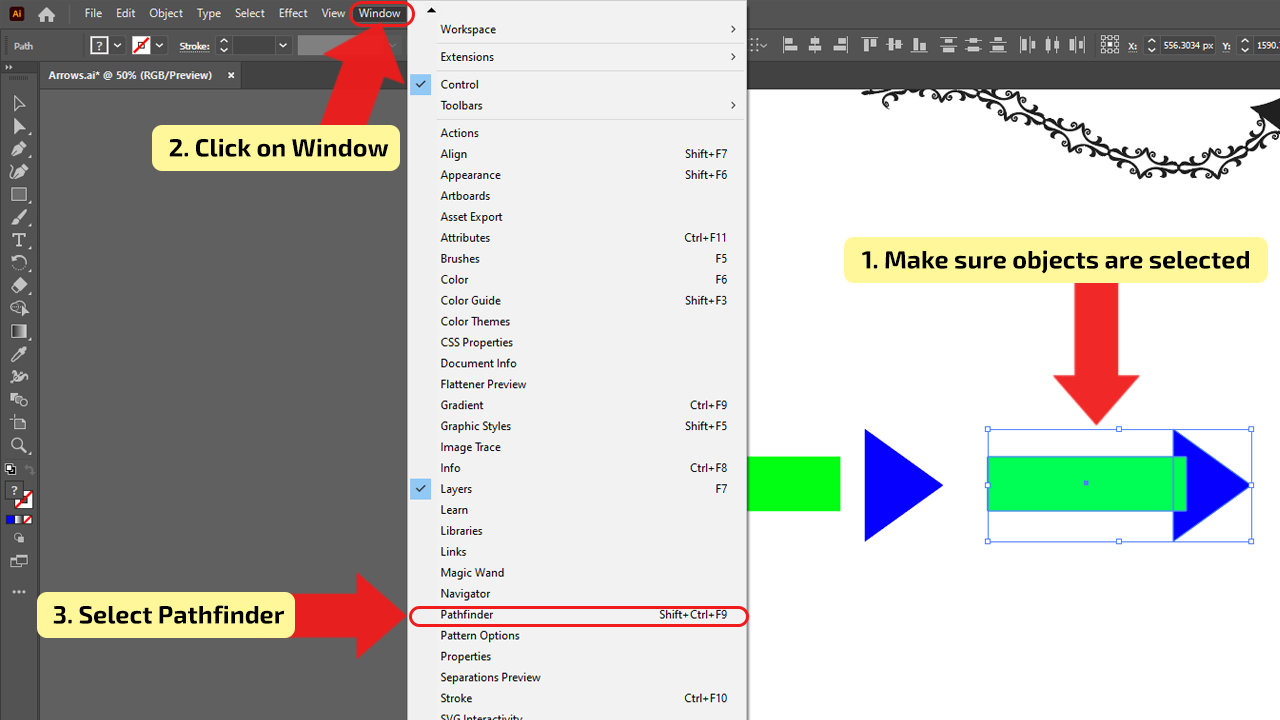
Step 2:
Uniting shapes. To complete the arrow, and unite two shapes into one, you will need to use the “Pathfinder Panel”. Open the panel by clicking on the “Window” > “Pathfinder”, or use the shortcut Shift + Control (CTRL) + F9 (Windows) or Shift + Command + F10 (MAC).
Step 3:
Finishing and Adjusting Arrow. After the “Pathfinder Panel” pops up, in section “Shape Modes”, click on the “Unite” button. Make sure that both shapes are selected. When the shapes are united and became one, you can resize it, rotate, change the color, etc.