Are you looking to create fluffy Clouds in Adobe Illustrator? If your answer is yes, you are in the right place. Stop drawing boring clouds if you don’t have to.
It will take a few minutes more and a bit of your creativity and you will have the best clouds ever. If you don’t know how and where to start, we have a solution for you, just follow the steps in the tutorial below.
How to make clouds in Illustrator
With “Ellipse Tool”, create the circles in the shape of a cloud. From two circles get a young moon shape, and place the shape to the cloud. Create a shadow on the cloud using “Pen Tool”, adjust it to a darker color. Copy the cloud and create the highlight on the top and adjust it to a lighter color.
Step 1:
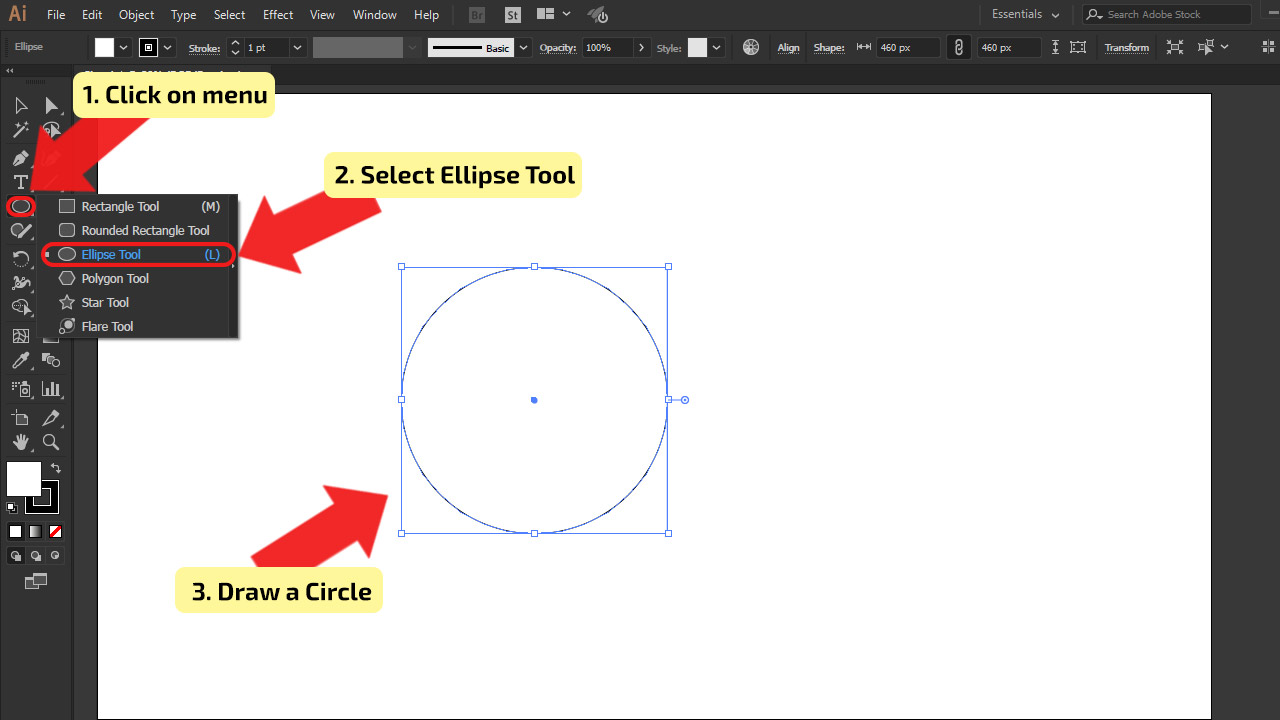
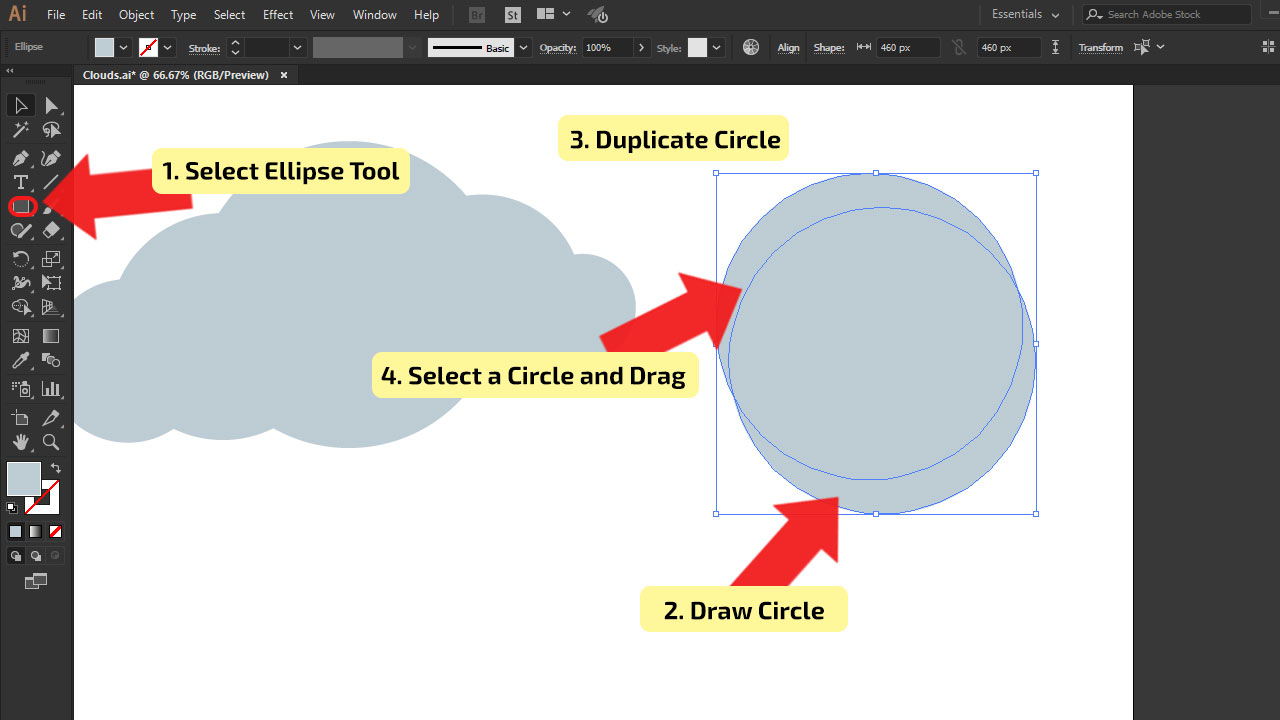
Draw a Circle. In the “Tool menu”, find “Ellipse Tool” and select it, or use the shortcut, press the letter “L” on your keyboard. Draw the circle on your canvas, by holding “Shift” while dragging the tool. Make it a bit bigger, because it’s going to be the main circle for creating clouds. In the tutorial, the circle is 460px in diameter size.
Step 2:
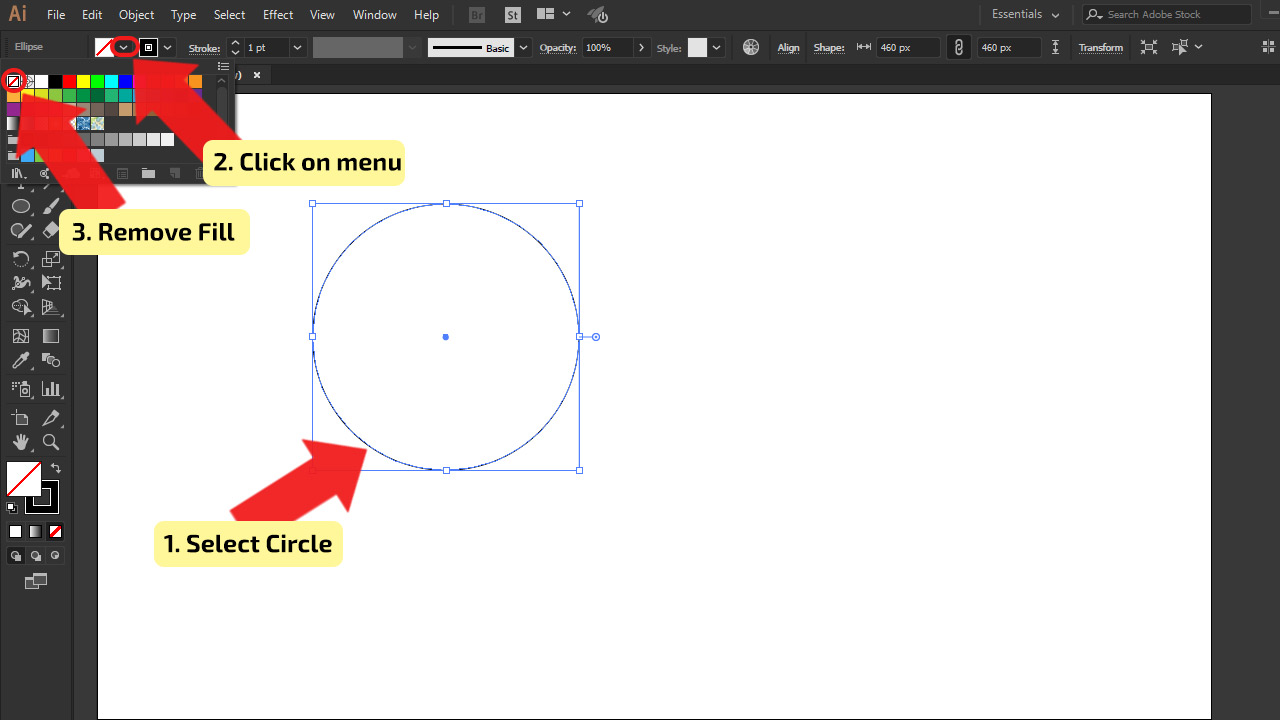
Remove the fill. Before you continue adding circles, make sure they don’t have fill. If your first circle has filI, as in the tutorial, remove it. Select the circle with “Selection Tool”, find it in “Tool Menu” or use the shortcut, press the letter “V” on your keyboard. After selecting, in the “Top Tool Menu” find the “Fill” box, click on the drop-down menu, and remove the color by choosing the [None] box. In this way, you can easily manage the circles.
Step 3:
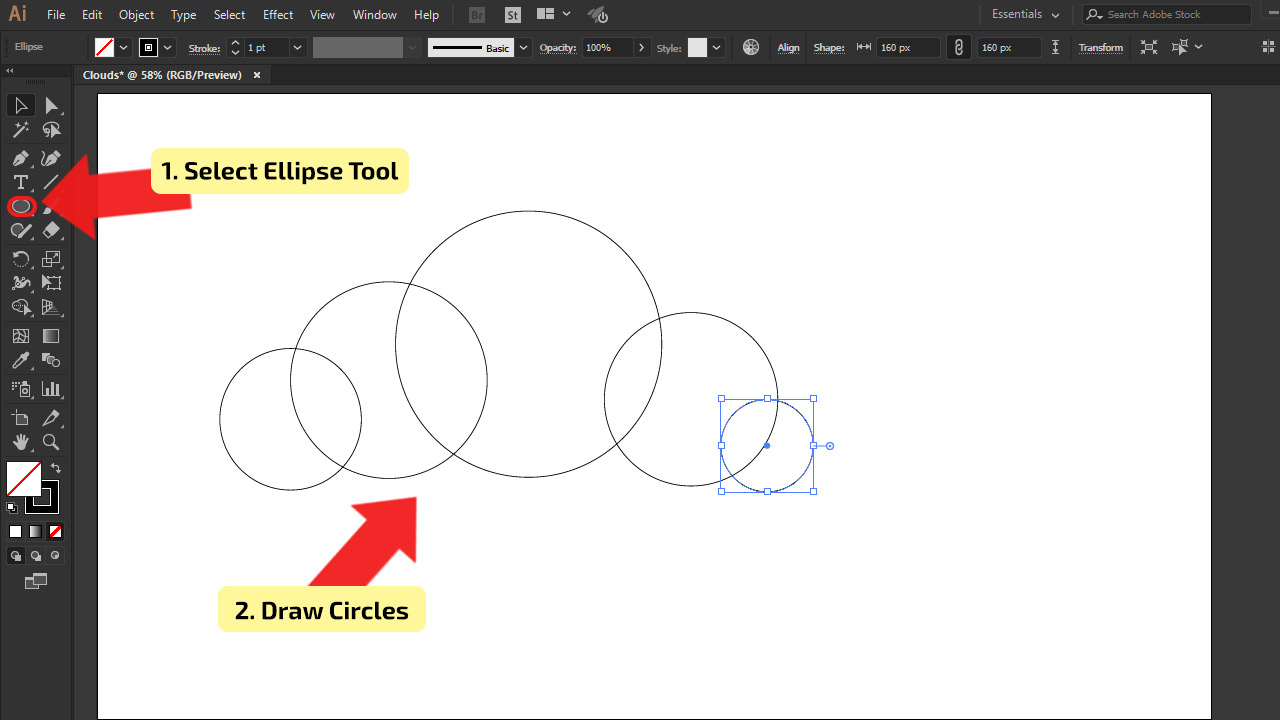
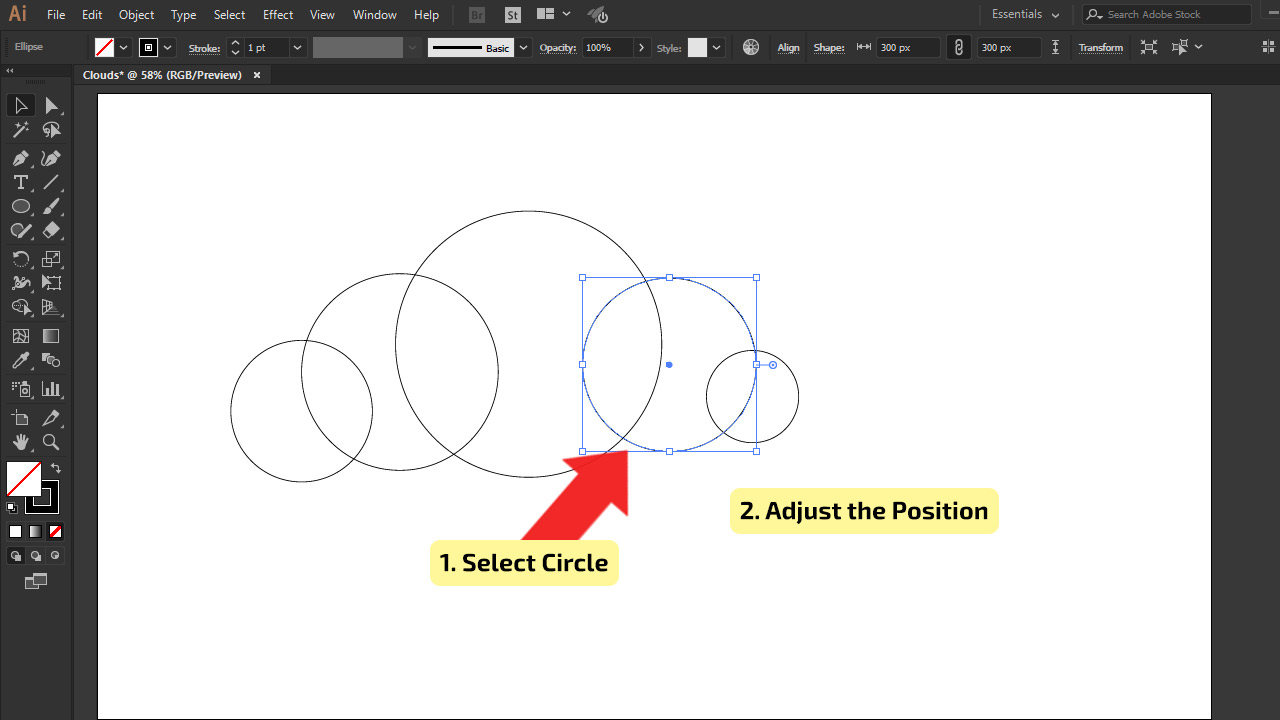
Add Circle Shapes. Use “Ellipse Tool” as explained in ”Step 1”, and draw smaller circles on both sides of the main circle. They need to be of different sizes. On the left side of the circle add two circles. First, add a circle 340px diameter size, then one smaller 245px diameter size. For the right side of the main circle, repeat adding circles, but with different diameter sizes. The middle one can be 300px and the smaller one 160px, like in the tutorial. You aren’t limited by the number of circles for the cloud.
Step 4:
Adjust the circle shapes. Before you continue with creating a cloud, you need to adjust its shape. Select the circle that you want to move using “Selection Tool” and drag it to the wanted place. Repeat this until you get the perfect cloud. If you are not satisfied with the size of the circles, you can adjust it by selecting circles, one by one, and in the “Top Menu” find the “Shape” section. Change the numbers in the “Ellipse Width” and “Ellipse Height” boxes, make sure they are linked so if you change one size, it will automatically change both.
Step 5:
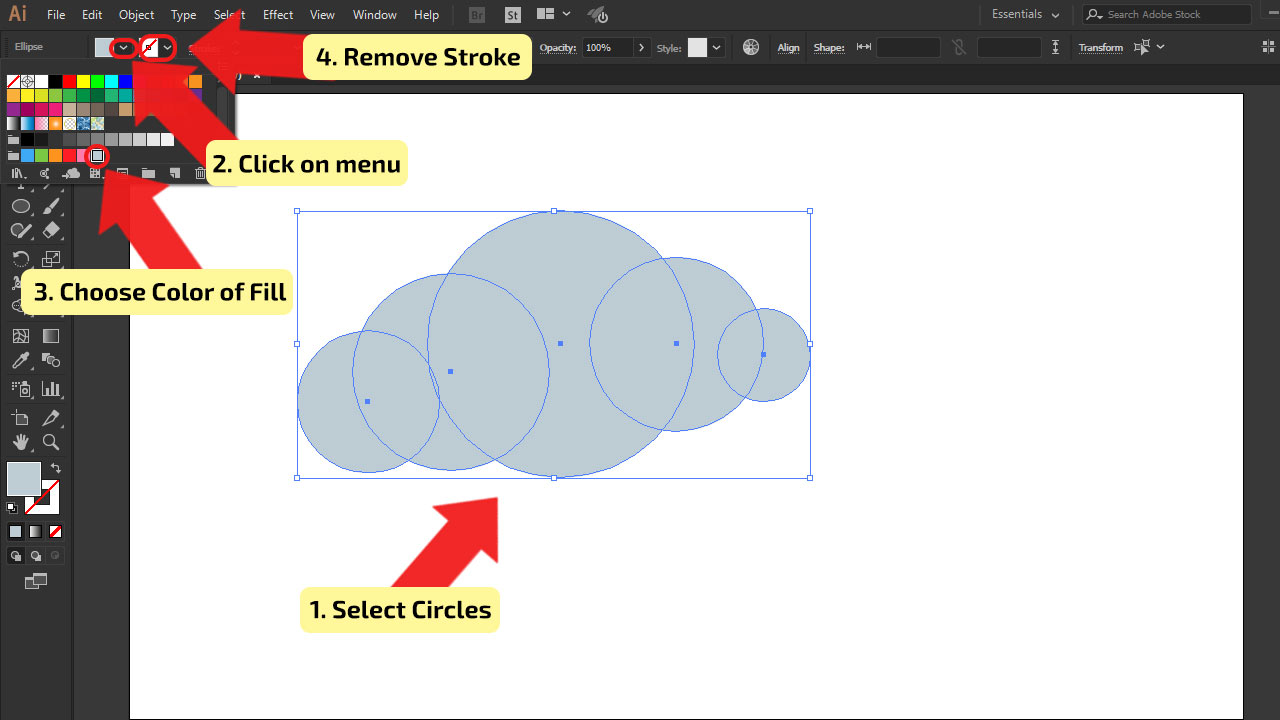
Add the fill and remove the stroke. In “Step 2” was explained how to remove fill, in the same way, you will remove the “Stroke”, and add the “Fill”. Select all circles with “Selection Tool”. After selecting, in the “Top Tool Menu” find the “Fill” box, click on the drop-down menu, and choose light blue color, and in the “Stroke” box remove the color by choosing the [None] box.
Step 6:
Create a Highlight. Using “Ellipse Tool” create a circle shape. Create a copy of the shape, by selecting it, pressing Control (CTRL) + C (Windows) or Command + C (MAC), then paste it with Control (CTRL) + V (Windows) or Command + V (MAC). Drag a copy of the circle shape a bit underneath an original circle, creating the shape of a young moon in between them.
Step 7:
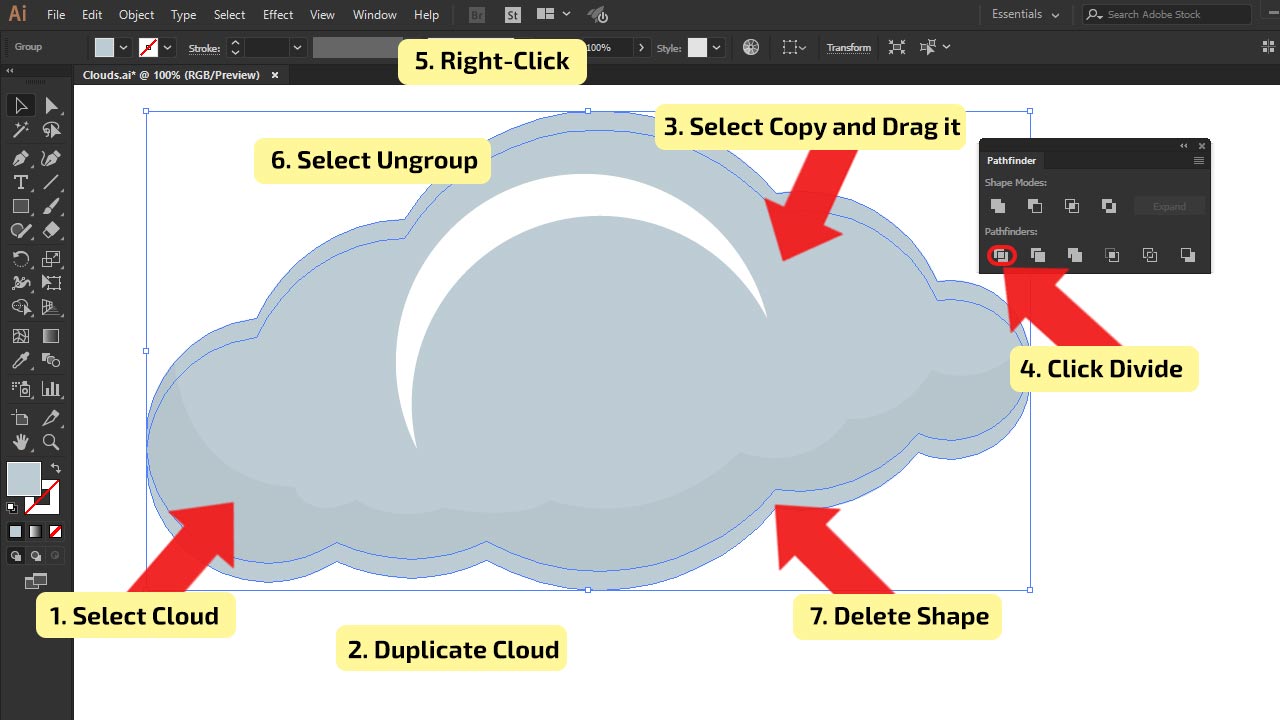
Divide the circles. The first thing you need to do is to open “Pathfinder”. Click on “Window”, the drop-down menu will be shown, select the “Pathfinder” and the window will pop up. Select the circles and in the “Pathfinder menu” choose “Divide”. With this option, shapes will be divided but grouped. To be able to use one of the shapes, you need to ungroup them. With right-click, open the drop-down menu and select the “Ungroup”, make sure the shapes are selected.

The shortcut for opening the “Pathfinder” window is: Shift + Control (CTRL) + F9 (Windows) or Shift + Command + F9 (MAC).
Step 8:
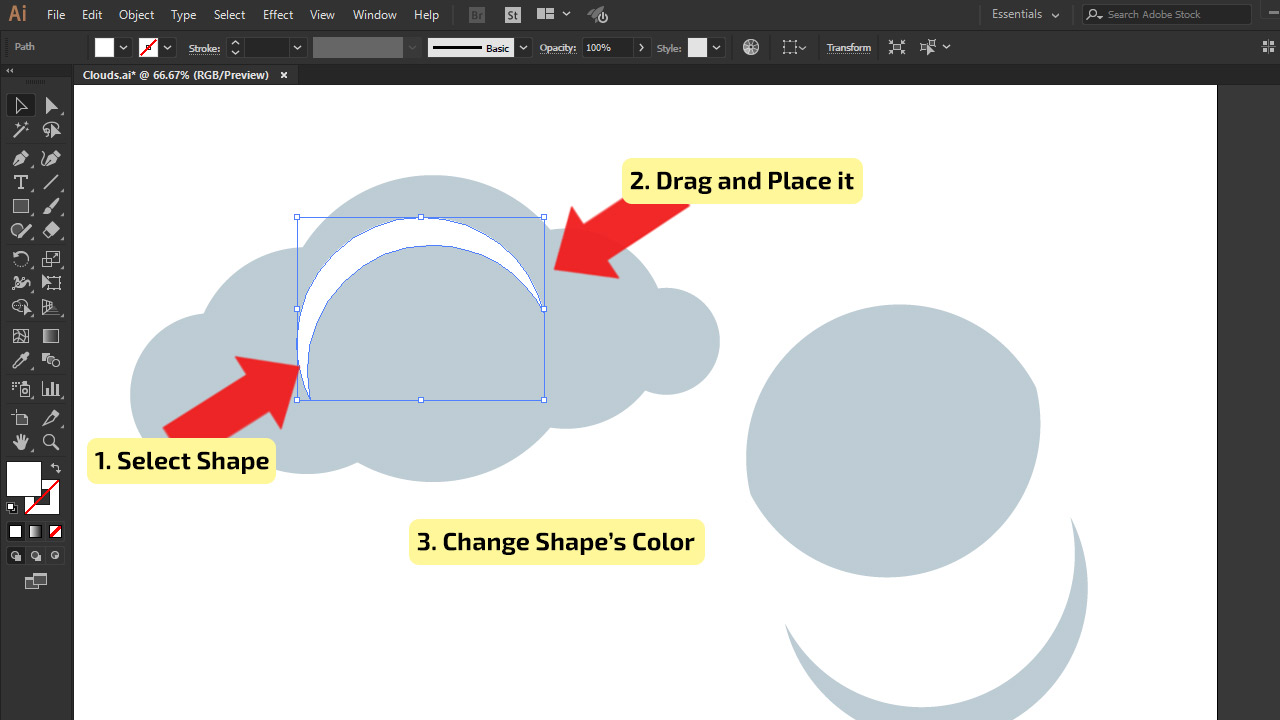
Move and adjust the shape. Select the shape and drag it to the cloud. If the size of the shape isn’t suitable, resize it by dragging one of the corners and holding the “Shift”, so the proportion will stay the same. After placing the shape, change its color to white.
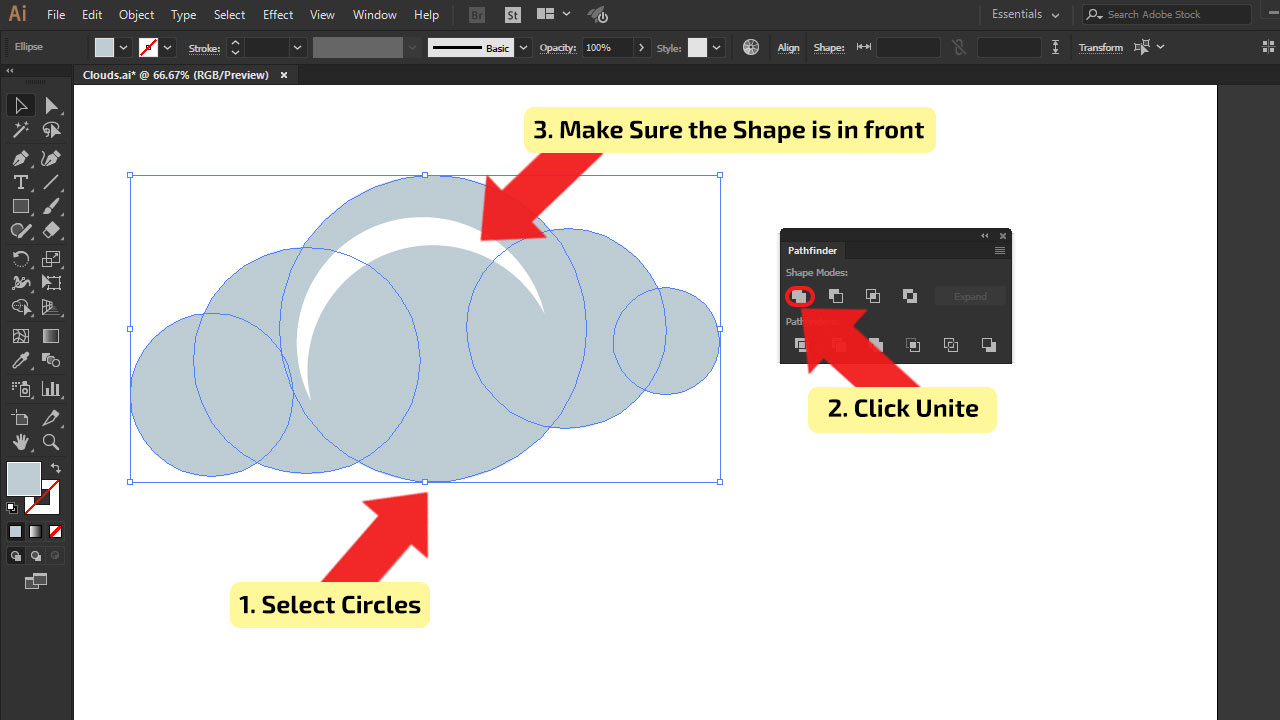
Step 9:
Unite the cloud. Select the circle shapes and in the “Pathfinder” window click on the “Unite” button. If the highlight shape of the cloud disappears, send the cloud shape to the back. In the main menu, click on “Object”, the drop-down menu will be shown, select “Arrange” and in the fly-out menu choose the “Send to Back” option.
The shortcut for “Send to Back” option is: Shift + Control (CTRL) + [ (Windows) or Shift + Command + [ (MAC).
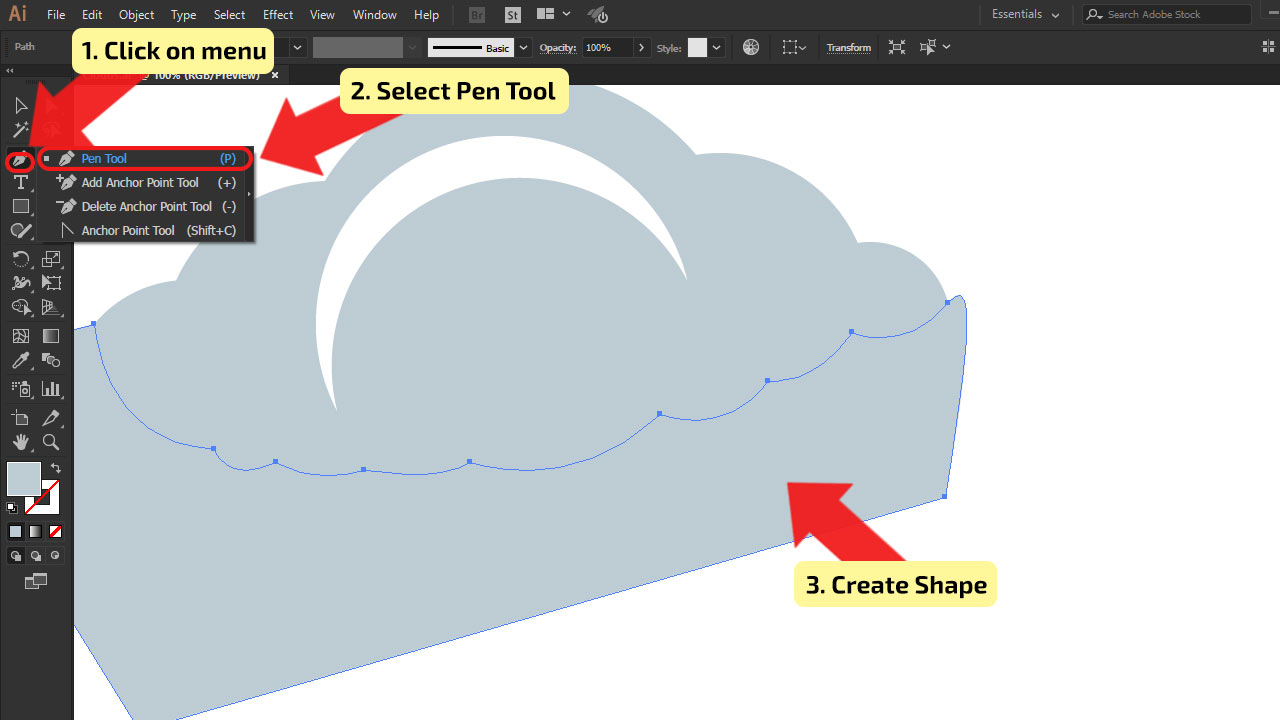
Step 10:
Add a shadow to the cloud. In the “Tool menu”, find “Pen Tool” and select it, or use the shortcut, press the letter “P” on your keyboard. Create the shape on the cloud as shown in the tutorial, so the cloud has a shadow.
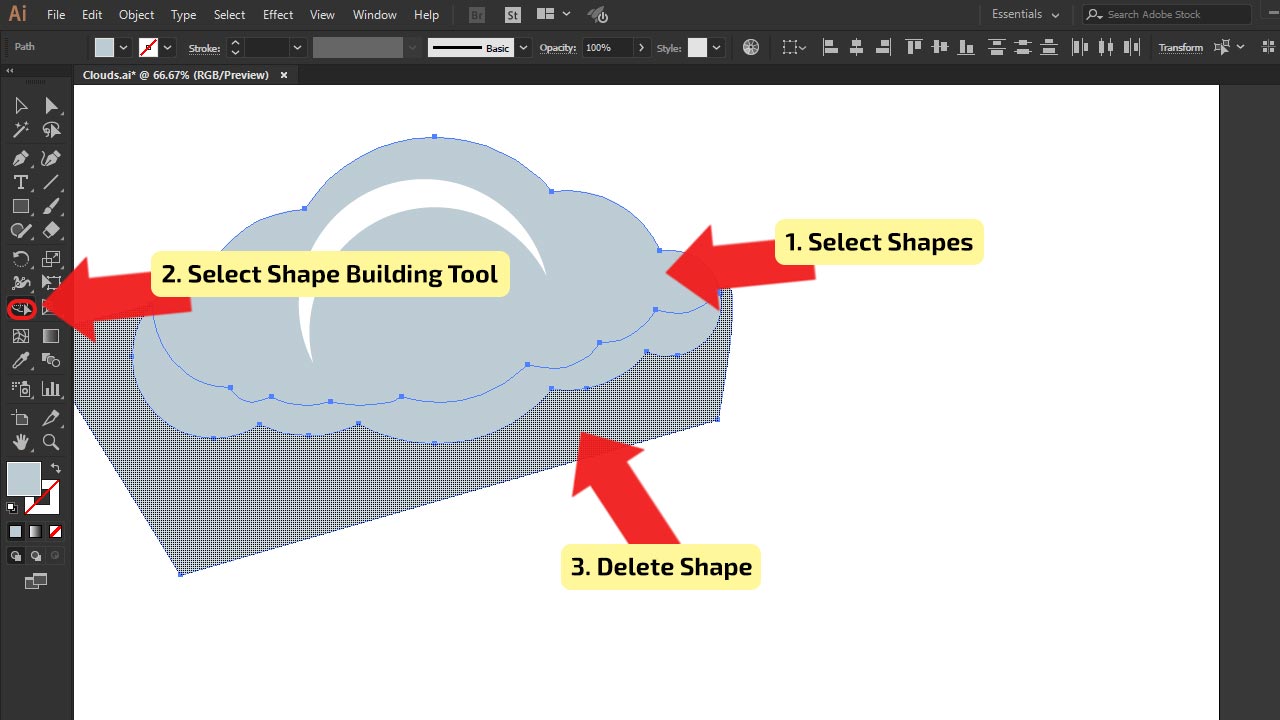
Step 11:
Finalize the shape. Select the cloud shape and the last added shape, using “Selection Tool”. In the “Tool menu”, find “Shape Building Tool” and select it, or use the shortcut Shift + M. Delete the shape that is outside of the Cloud area, as shown in the image below.
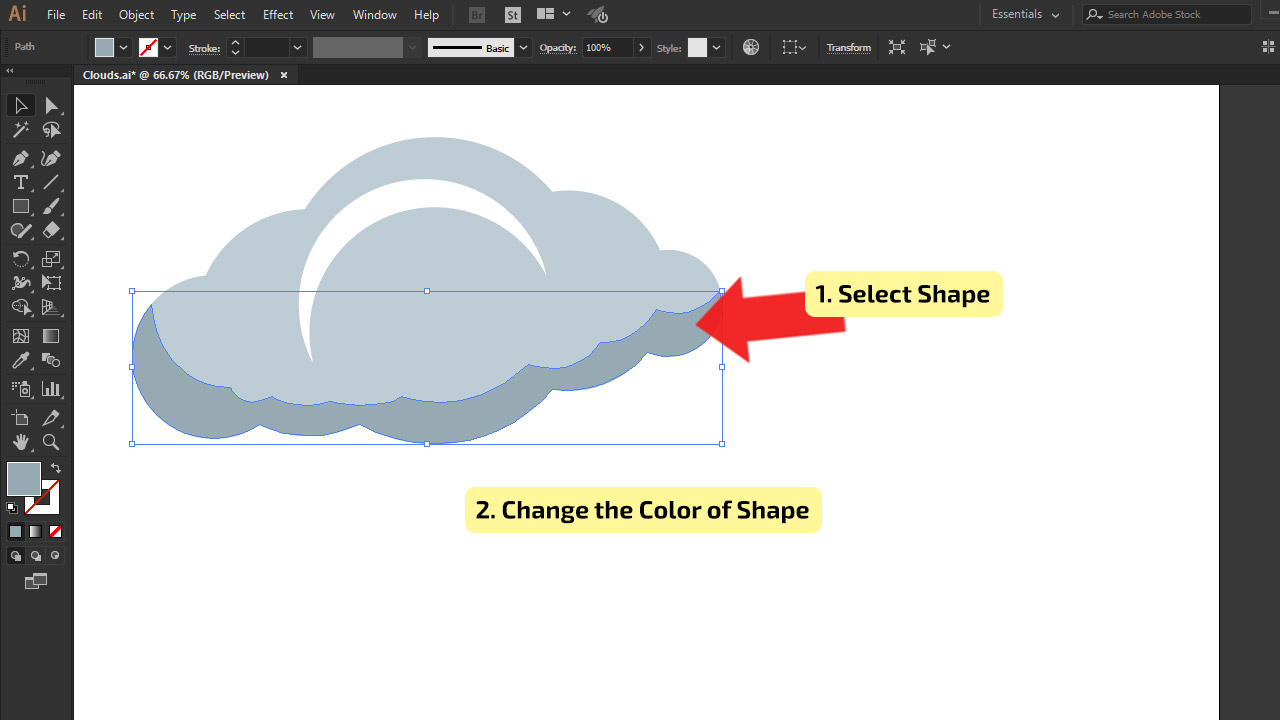
Step 12:
Adjust the color of the shadow. Select it and change the color to darker blue, it doesn’t need to be a lot darker than a cloud, just enough to have a difference.
Step 13:
Create a Highlight Shape. Select the cloud shape and copy it. Move it a bit down, as shown in the tutorial. Then select the new shape and cloud shape, in the “Pathfinder” window, click on the “Divide” button. Shapes are divided but grouped. Now you need to ungroup them. With right-click, open the drop-down menu and select the “Ungroup”, make sure the shapes are selected. Delete the shape underneath the cloud.
Step 14:
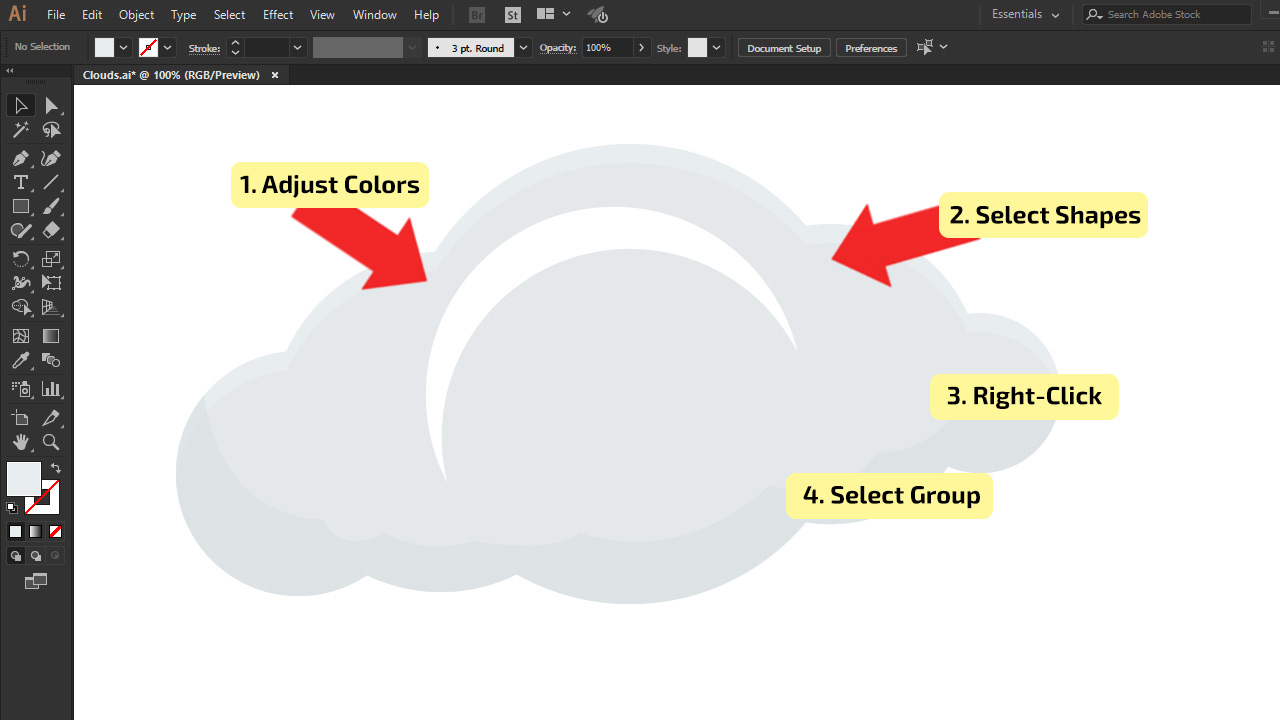
Change Color of Highlight Shape. Select the highlight shape and change the color of the fill to a lighter blue. Use the color picker so you can easily manipulate the colors. In the top menu, you can change “Opacity” and adjust the visibility of the shape.

Step 15:
Adjust the colors. When you are done with adjusting the highlight shape, and you are still not satisfied with the outcome, you can change the colors of all shapes. You can make them darker or lighter, as it’s done in the image below. It doesn’t need to be blue, you can create it with shades of orange, for example. Select all the shapes and click the right-click to show the fly-out menu and choose the “Group” option. In this way, you will be able to move your cloud without leaving one of the shapes in some other place.
Step 16:
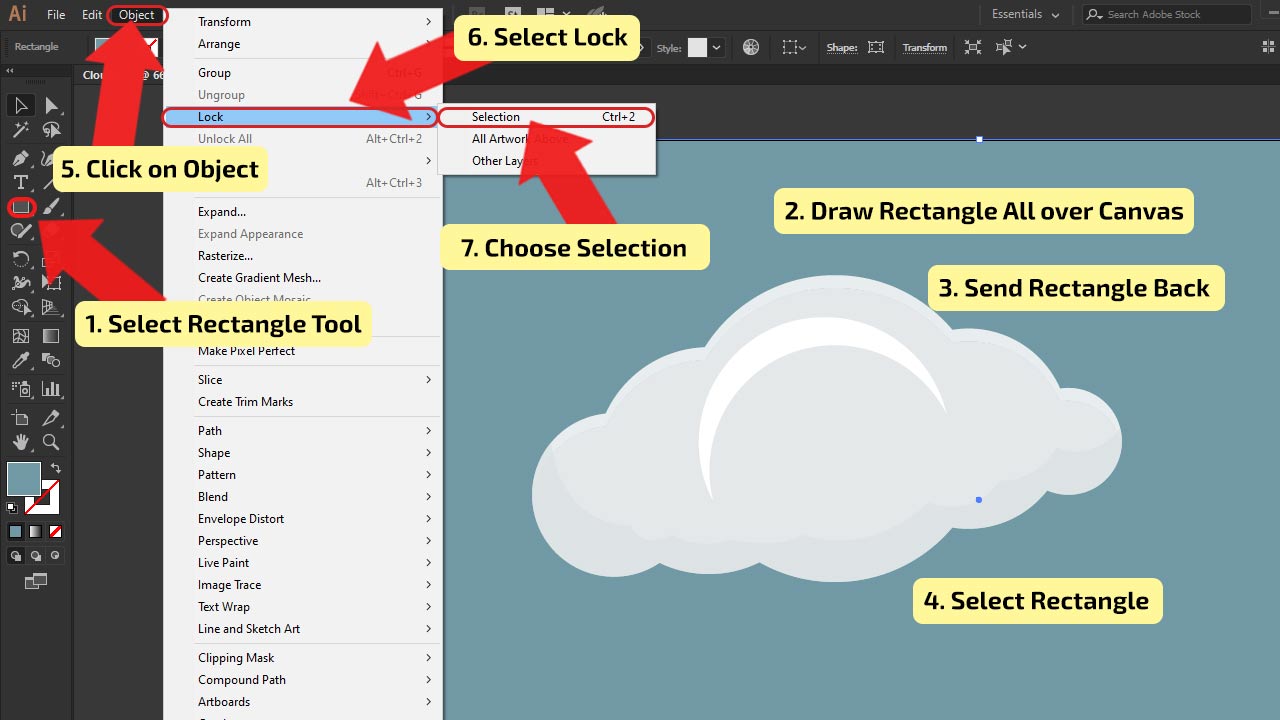
Add a background. In the “Tool menu”, find “Rectangle Tool” and select it, or use the shortcut, press the letter “M” on your keyboard. Draw the rectangle all over your canvas. Choose the color and if it’s in front of cloud shape, send it back, using the “Send to Back” option. Select the rectangle, in the main menu click on “Object”, in the drop-down menu, choose the “Lock” and its menu, click on “Selection” or use the shortcut Control (CTRL) + 2 (Windows) or Command + 2 (MAC). The background will be locked and you can select the objects that are in front of it without selecting the background.
The shortcut for the “Send to Back” option is: Shift + Control (CTRL) + [ (Windows) or Shift + Command + [ (MAC)
Step 17:
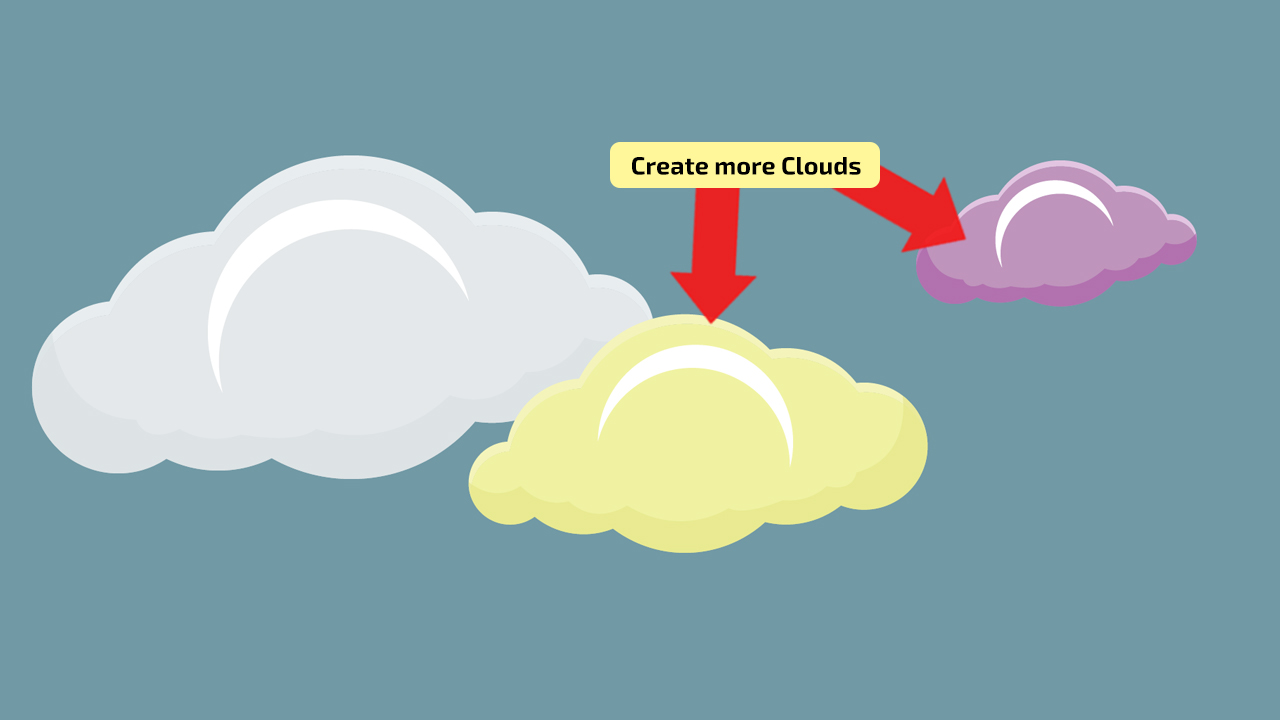
Add more clouds. To add more clouds to your design, follow the steps from the top, and don’t be shy to express your imagination. Change their colors, size, and the number of circle shoes when creating clouds.