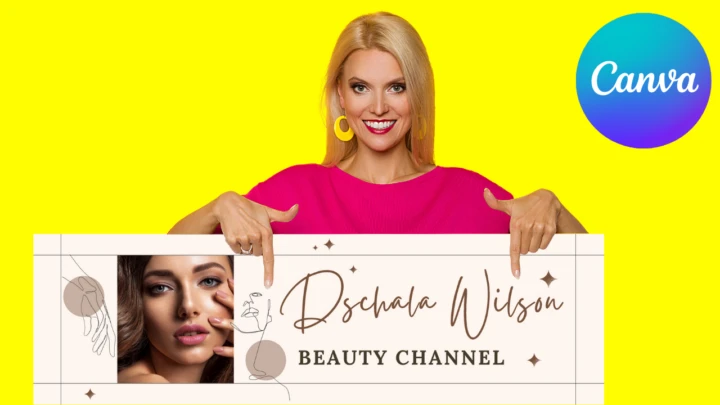
Wow! How do you get so many profile views on your LinkedIn account?
Did you use some kind of voodoo magic to persuade potential clients to connect with you?
If you know how to create an eye-catching LinkedIn banner, you’ll be able to achieve this feat almost effortlessly.
So, if you’re raring to find out what makes a good LinkedIn banner and how to create one from Canva, you’re in the right place.
How to Create a LinkedIn Banner in Canva
First, create a design file with a 1584 x 300 px dimension. You can also search for templates through the search bar on the home page. Then, add a brand logo or photo describing your line of business, other graphic elements, and text before you save and upload it to your LinkedIn page.
Creating LinkedIn Banners in Canva — Basic Methods and Steps to Remember
As mentioned earlier, LinkedIn banners serve as the window to what you or your business offers to potential clients.
Think of it as an extension of the branding that your business or brand logo portrays.
Here’s how you create LinkedIn banners in Canva using 2 methods:
Creating Custom LinkedIn Banners from Blank Templates
Step 1: On Canva’s home page, create a new design file in 2 ways.
First, you can head directly to the Custom Size button and encode in the boxes the dimensions of your design.
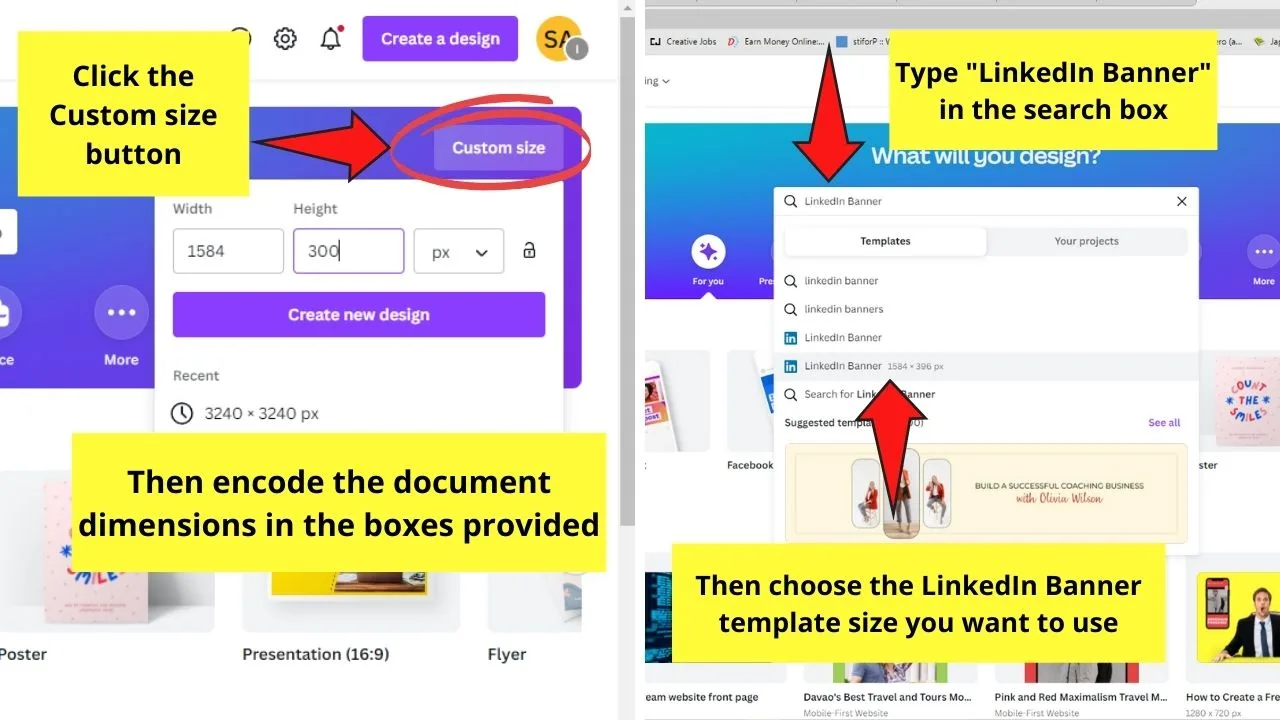
Ideally, for your LinkedIn banners to look good both on mobile and on desktop, use the 1584 x 300 px size.
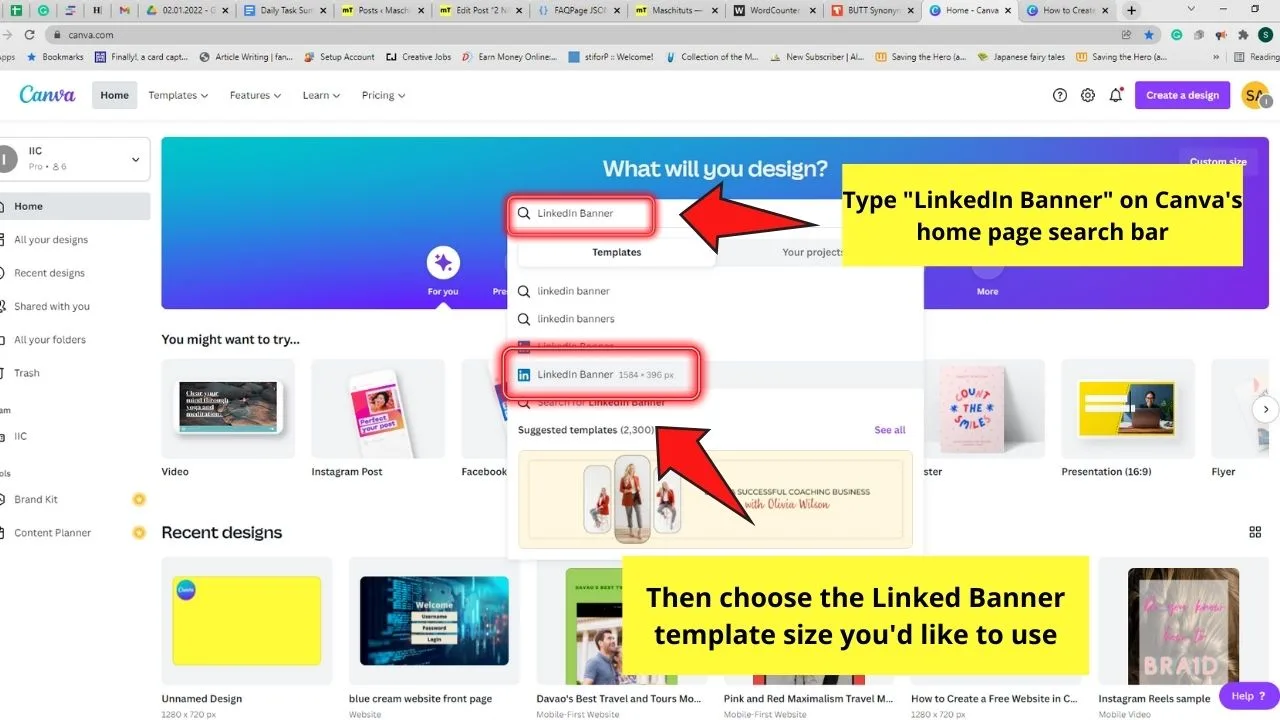
The second way how you can open a new design is by heading to the search bar and typing in it “LinkedIn Banner.”
Now, you’ll then see two size options for LinkedIn banner: 2000 x 600 px and 1584 x 396 px.
Both sizes are good for LinkedIn banners, but for this example, we’ll go with the smaller size.
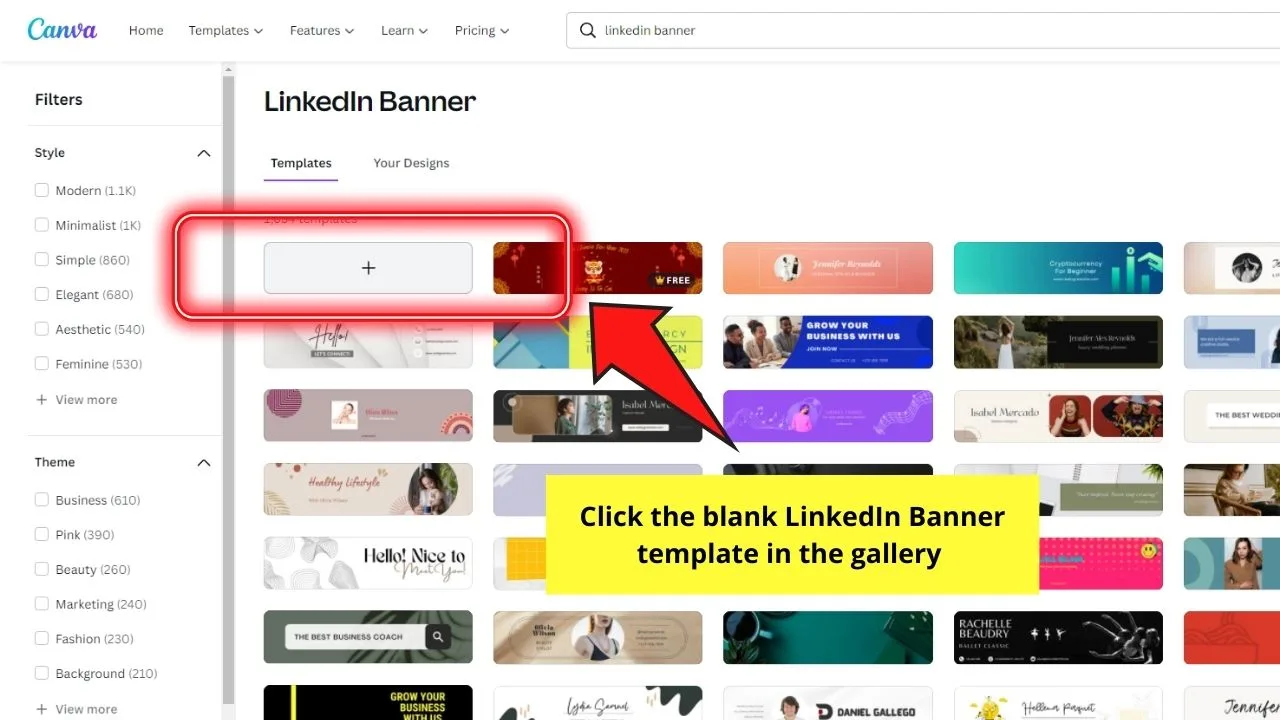
Then, in the template gallery that appears, click the blank LinkedIn banner template.
Step 2: Once you’re on the editor page, click on any part of the canvas. You’ll then see the rainbow-colored color picker tile on the editor page. Select it.
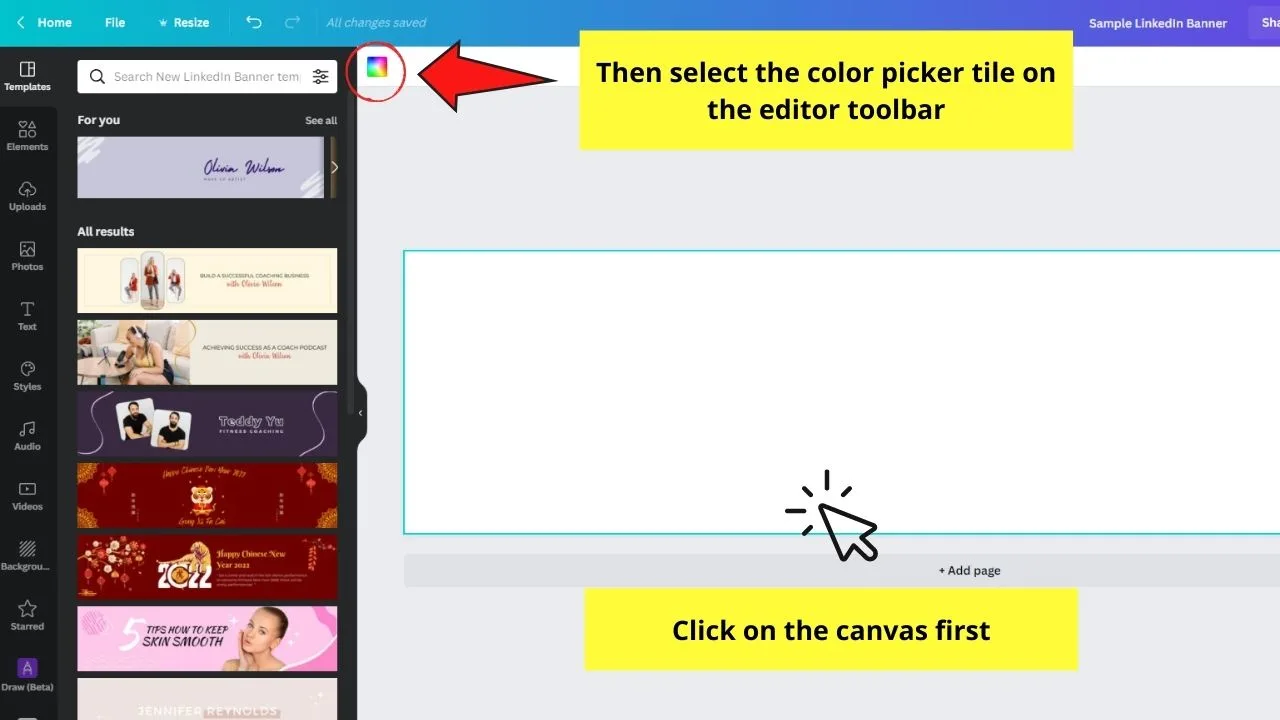
A color gallery will then appear, allowing you to select from Canva’s default colors. If you prefer to create a custom hue, just choose the rainbow-colored “+” tile and find the shades of color you want to use.
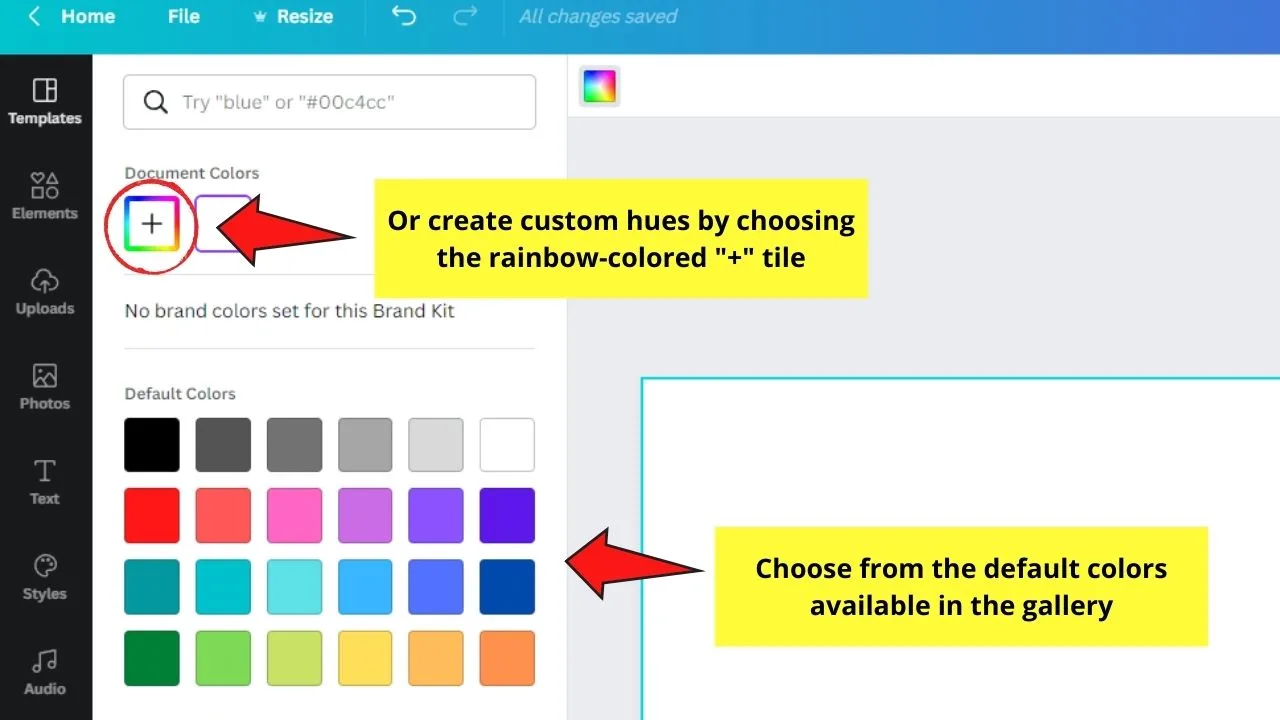
You can click Styles under the More tab. Then, click the Colors category and select what shade you’ll use from the various color palettes available.
Whatever method and color you choose, click on it so it’ll occupy the space of the canvas.
Step 3: If you want to add some kind of division to the colors in your background, head to the Elements tab and select a shape from the Lines & Shapes category.
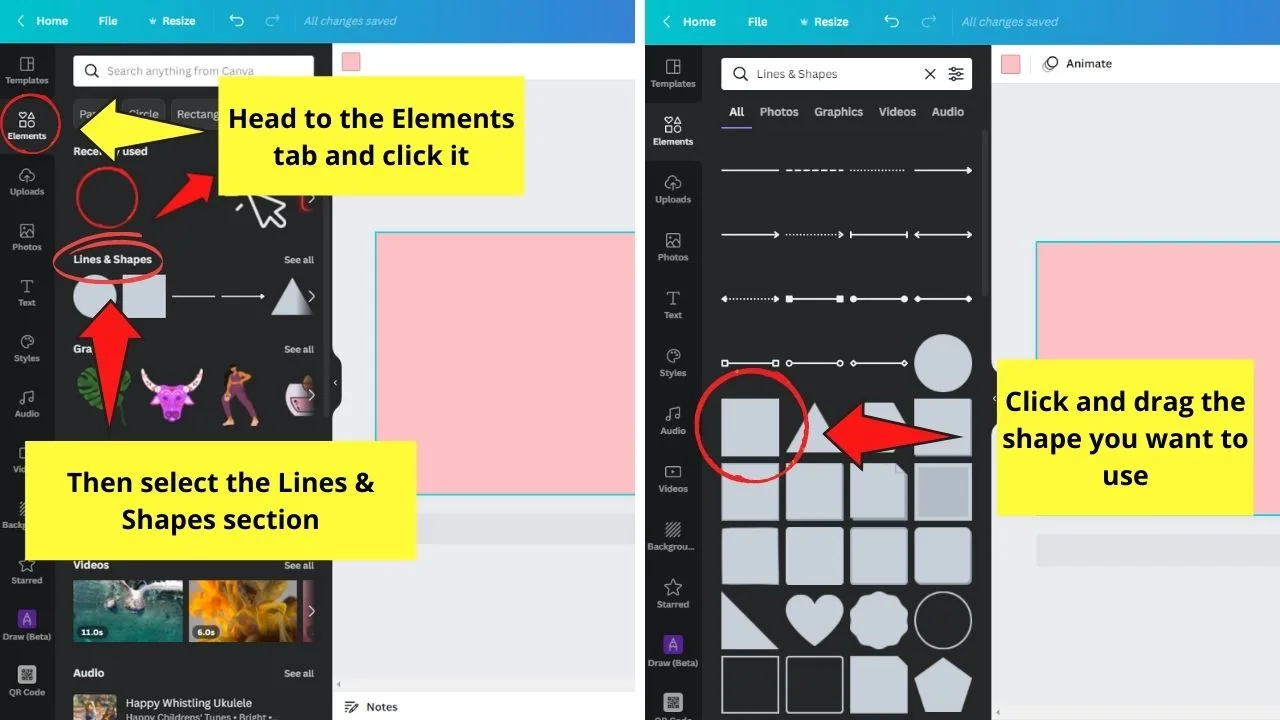
For this example, we’ll use a square. Then, resize the square like you how you typically edit an element in Canva until you achieve the look you want.
You can even rotate the shape to create a much more fun division style for your banner background.
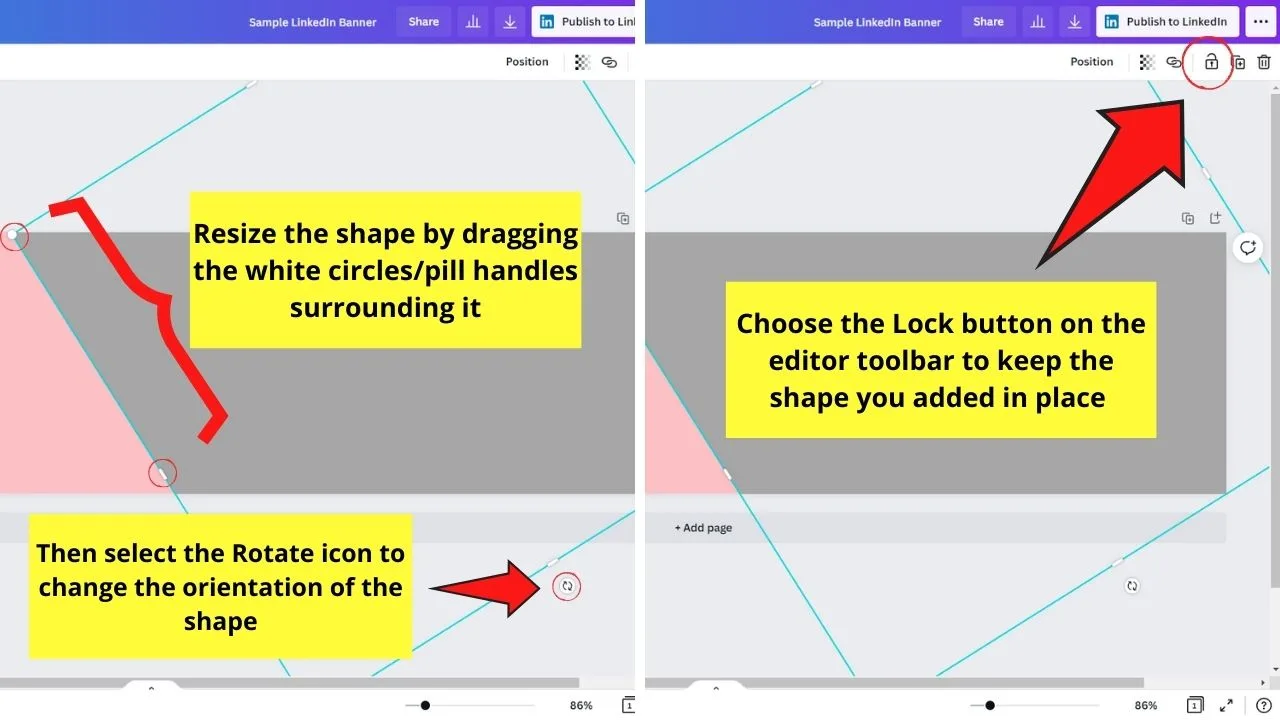
Then, to prevent altering the positioning of the shape, click on it and select the Lock icon.
But, if you just want a plain background, skip this step entirely.
Step 4: After assigning your background color, it’s time to add some photos to your LinkedIn Banner.
The best picture you’ll use should either be the logo of your brand (business page) or a photo of yourself (personal page).
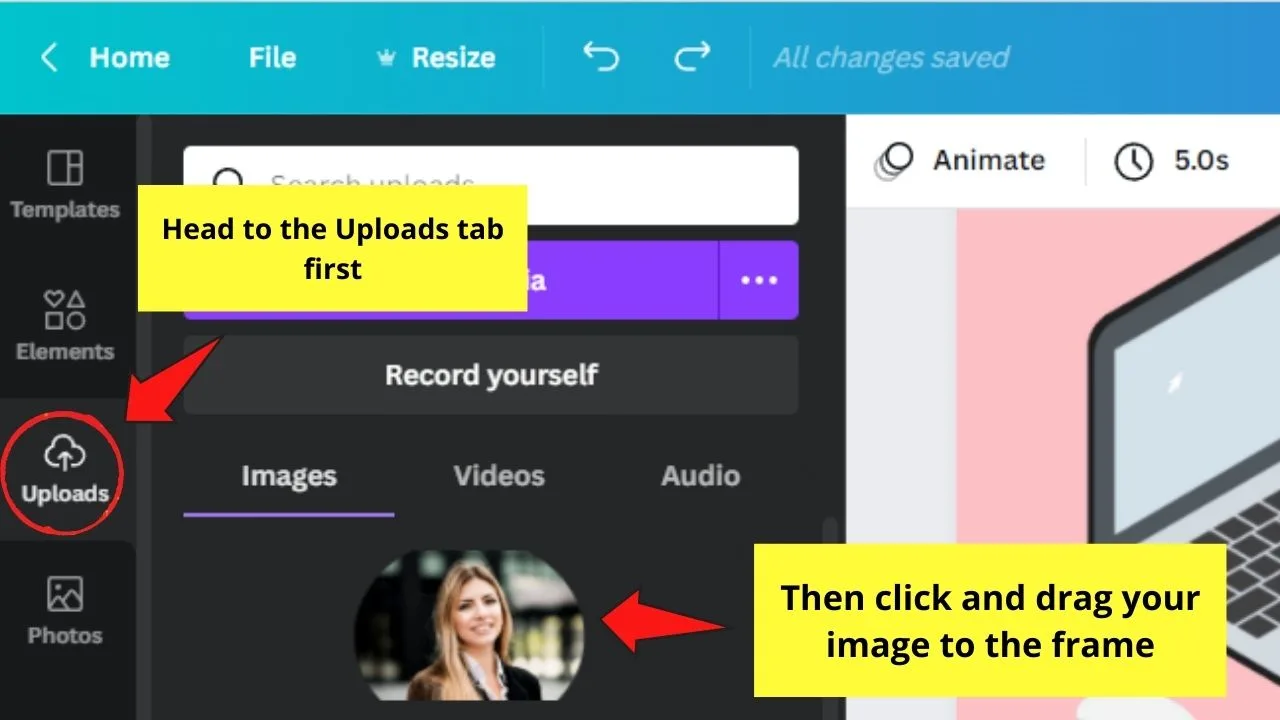
To import pictures to Canva, head to the Uploads tab on the left side panel. Then, click the Upload media button to begin the import process.
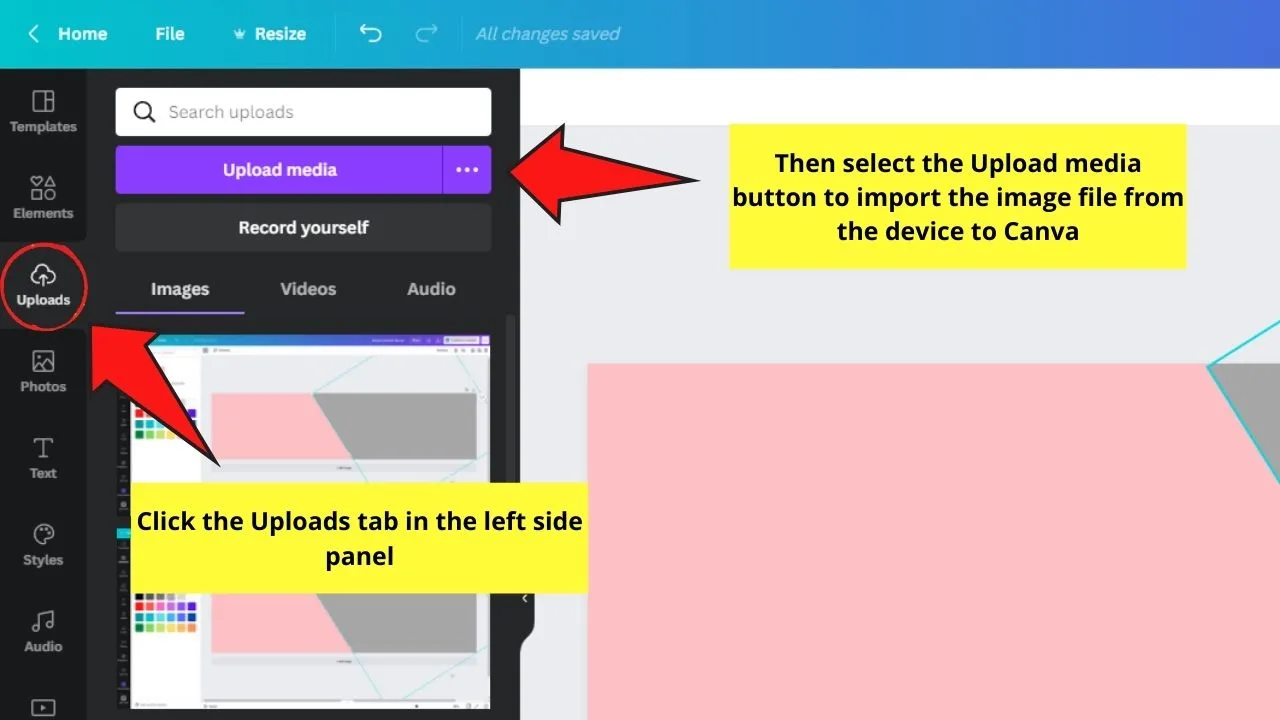
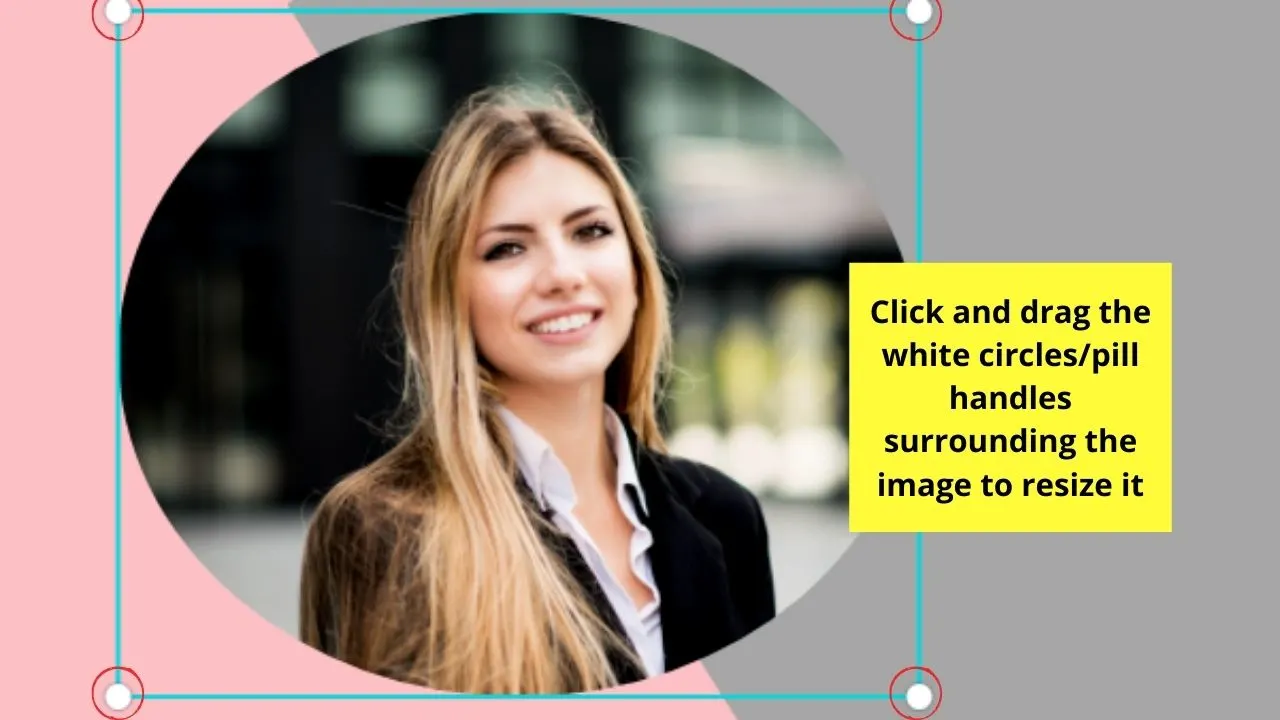
Once the picture’s successfully uploaded in Canva, click and drag it to the canvas. Resize it by dragging the white circles or pill handles surrounding it.
Step 5: If you want to remove the background of the picture, click on the photo, select the Edit image button, and click the Background Remover tool.
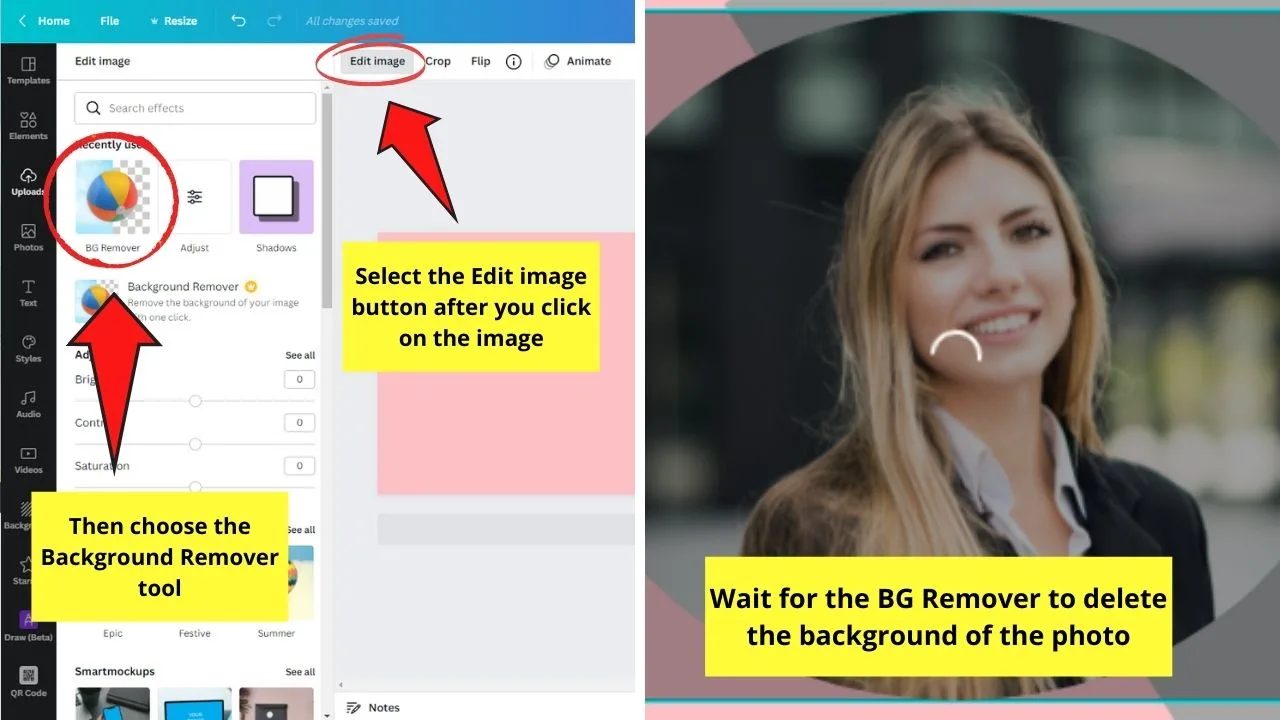
Just allow Canva to analyze the photo for a few moments. Once the background’s successfully removed, proceed with resizing and positioning the image on your design.
But, the Background Remover tool’s a Canva Pro-exclusive feature. If you’re on Canva free, you’ll have to use a third-party site like remove.bg to remove the image’s background.
You can watch this simple tutorial of removing the backgrounds of photos through the remove.bg site.
Step 6: Now, it’s time to add graphic elements to your design. To do this step, head to the Elements tab.
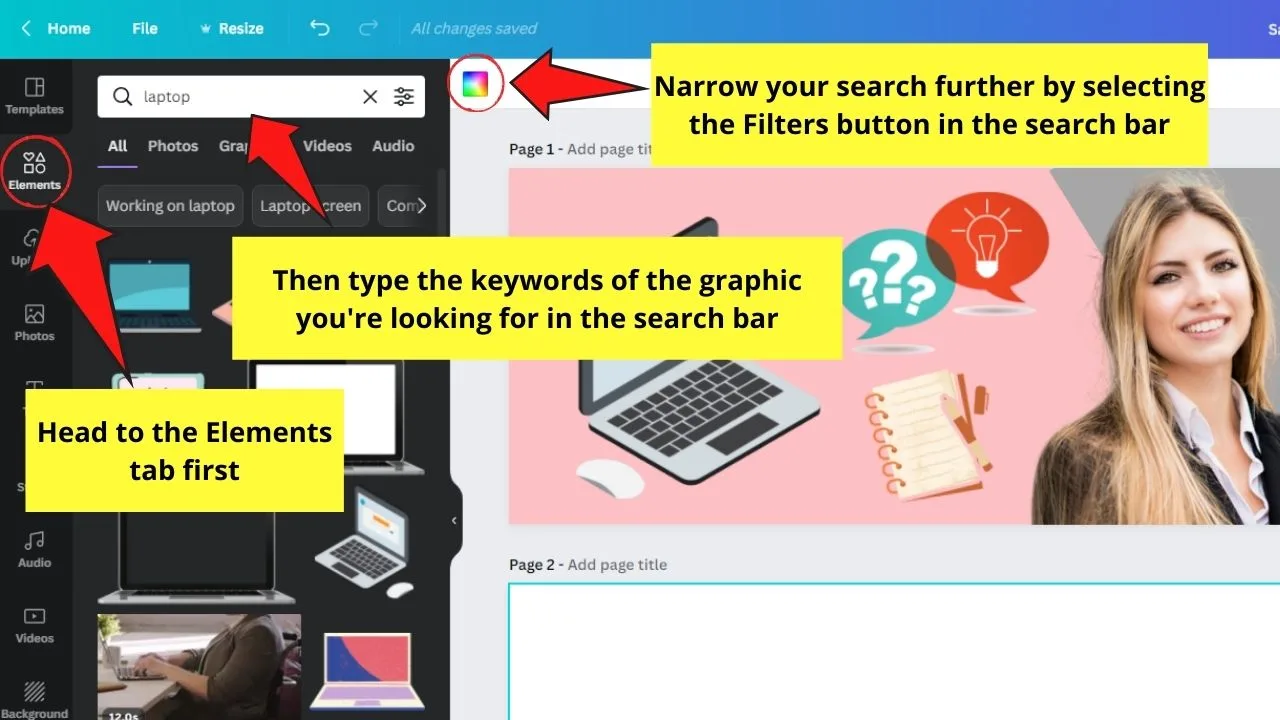
Since there are various categories in the Elements tab, simplify your search by typing in keywords on the search bar.
You can even narrow the search further by activating the Filters option found at the rightmost part of the search bar.
Whatever element you select, make sure it goes in with what your LinkedIn page is about.
Click and drag it to the canvas and proceed with editing the graphic you chose like any other element in Canva.
Continue adding, editing, and positioning those elements until you achieve the look of the banner you’re aiming for. You can even play around with the layering of the design elements you selected.
Step 7: Now, if you want to add the brand logo you designed in Canva on top of the photo you added earlier (if you haven’t done this yet), select it from the Uploads gallery.
Click and drag the logo to the canvas, position it, and resize it accordingly.
Step 8: Once all the graphic elements on your banner design are in place, it’s time to add text.
There’s no limit on what information you want to add to your design — call-to-action, contact information, or a list of what services you offer.
One way to do this step is to head to the Text tab on the left side panel and choose from the various font combinations and text boxes available.
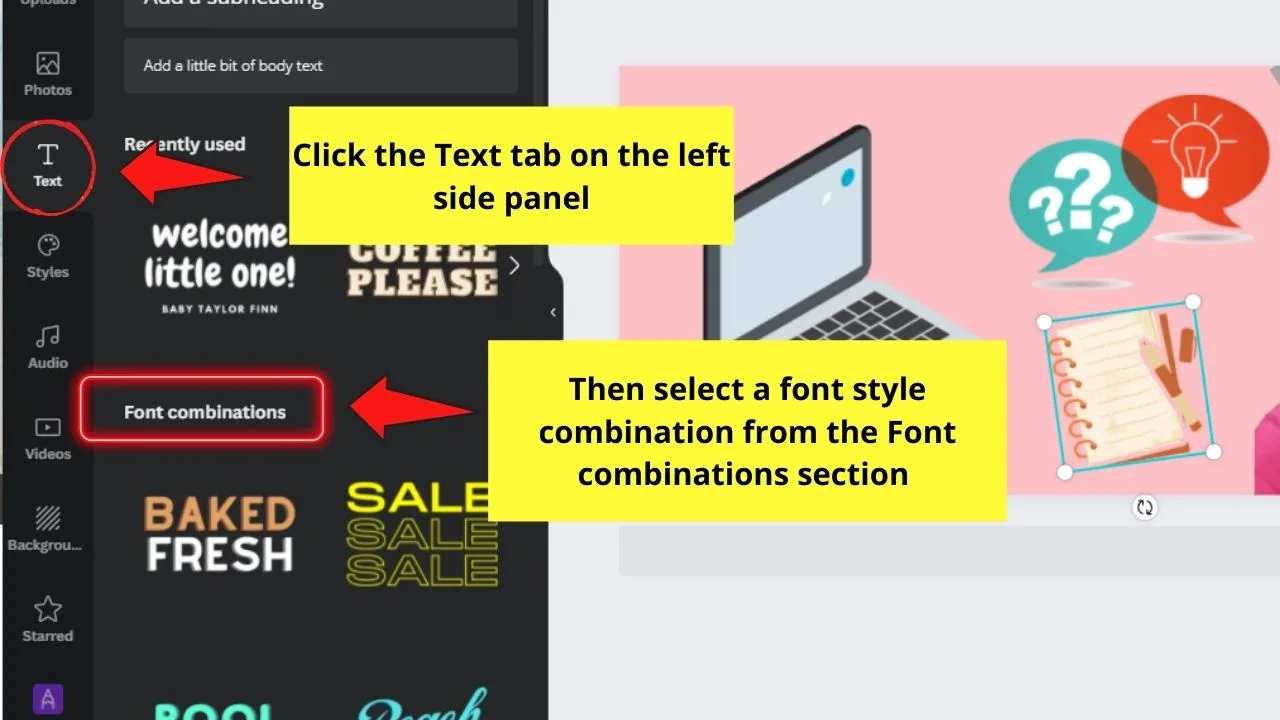
You can also directly add text boxes in Canva by pressing T on your keyboard.
Resize the text box to how small or big you want it to be.
Now, if you want to make your text stand out more, fill the text box with color. This step also adds extra flair to your banner design.
Then, change the font style by clicking on a particular text box and selecting the Font style button on the editor toolbar.
But, if you’re not too sure about how to combine text styles, head to the More tab on the left side panel, click Styles, and choose the Fonts category.
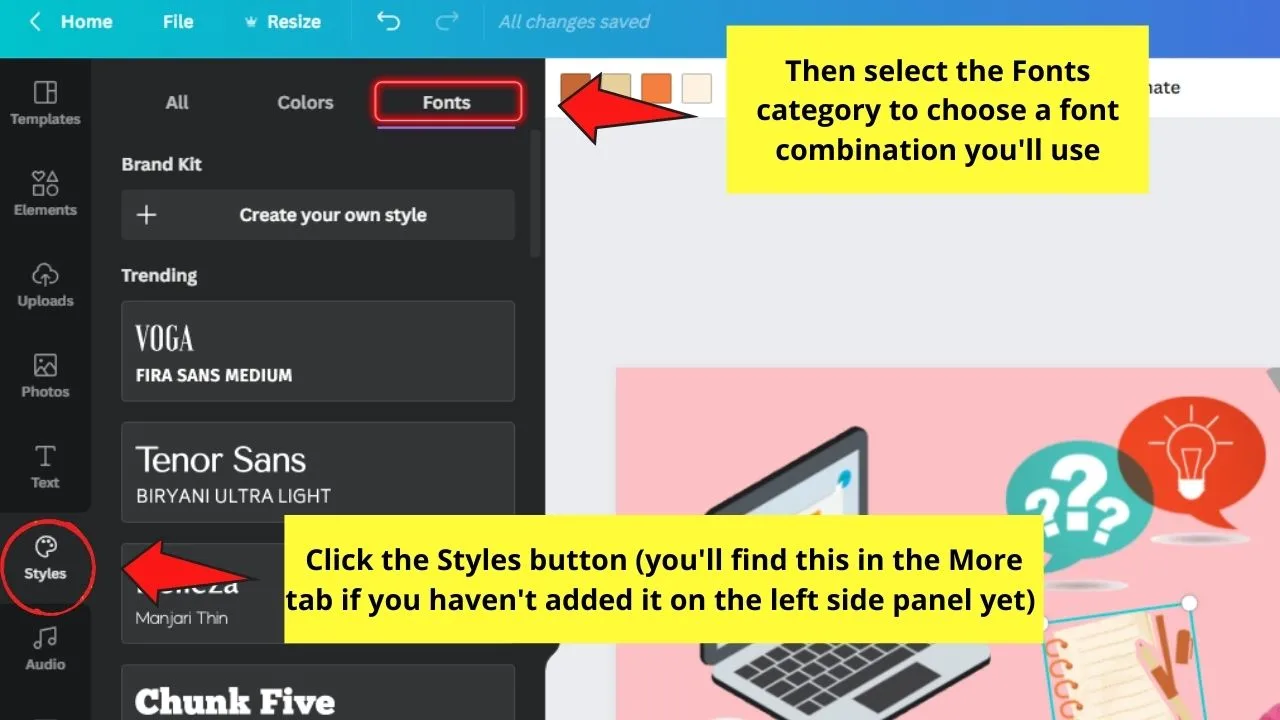
From there, select a font style combination to use.
Step 9: Once you’re satisfied with the look of your LinkedIn Banner, proceed with clicking the Download button.
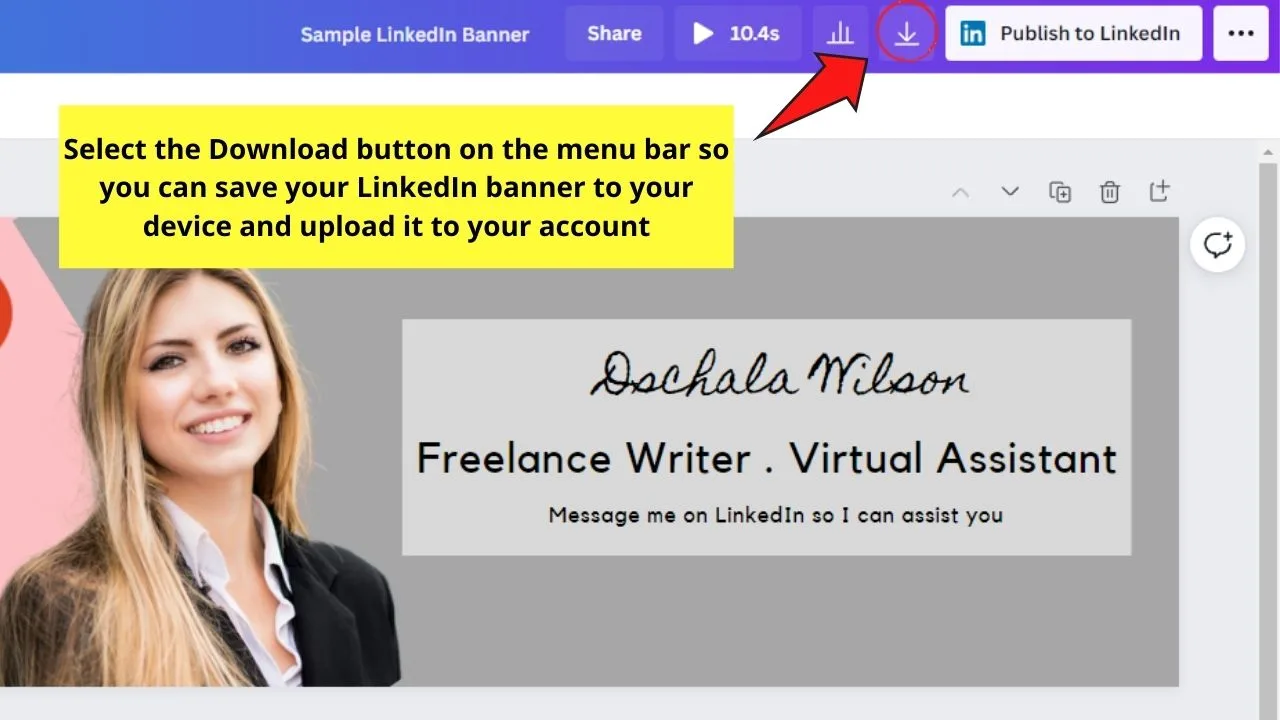
Once you’ve successfully saved your LinkedIn banner to your device, upload your newly-designed banner on your LinkedIn page.
Designing a LinkedIn banner from scratch can be quite daunting for newbies.
So, if you’re not too sure about what a good LinkedIn banner looks like, you can proceed with method number 2.
Customizing Pre-Designed LinkedIn Banner Templates
Step 1: On Canva’s home page, head to the search bar and type in it “LinkedIn Banner.” Again, as there are 2 options to choose from, select the LinkedIn Banner option with the 1584 x 396 px size.
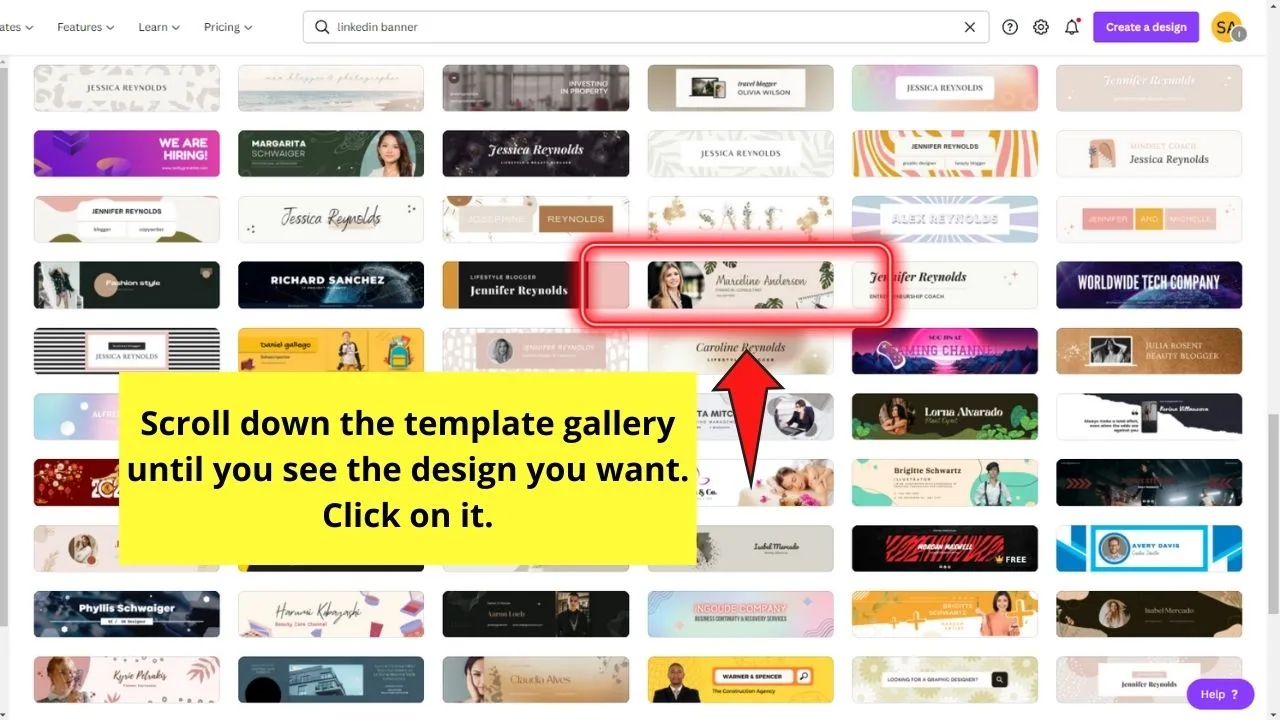
Step 2: You’ll then be redirected to the templates gallery for LinkedIn banners. This time, scroll down until you see the LinkedIn Banner design you want to use. Click on it.
Step 3: Once you’re on the editor page, begin customizing the LinkedIn banner template.
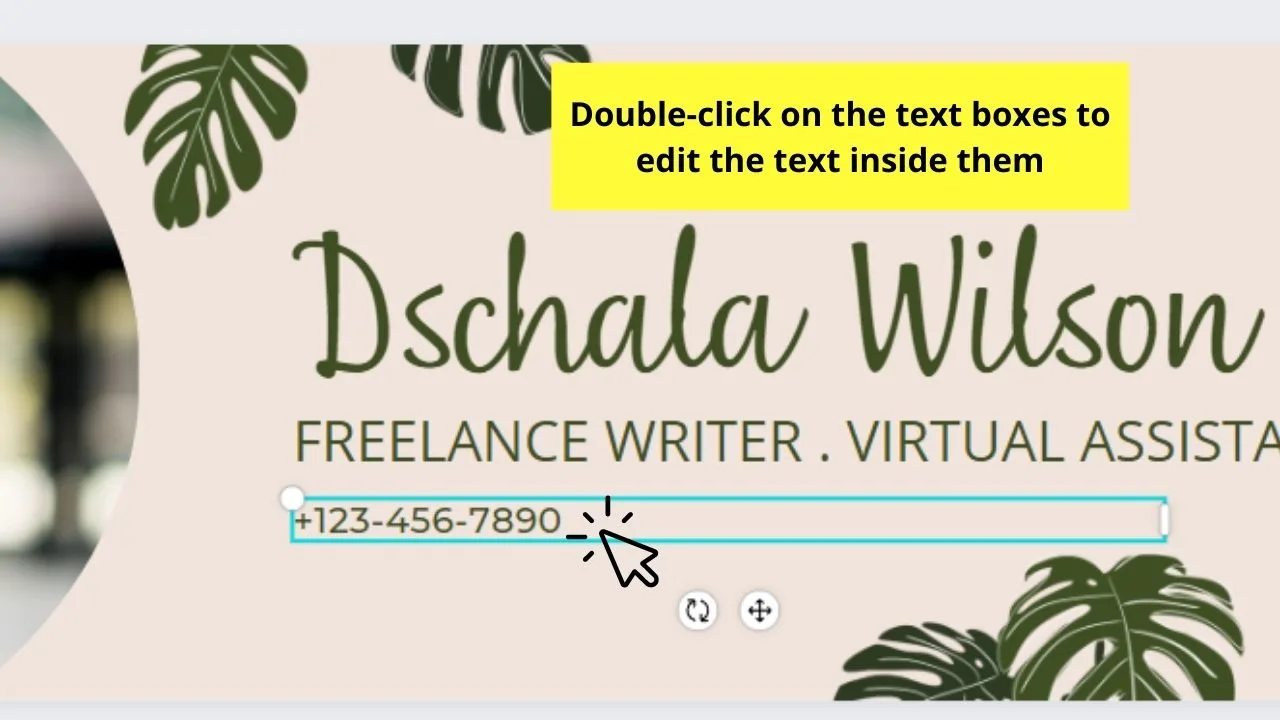
You can begin by changing the text components of the design. Double-click and edit the text boxes accordingly.
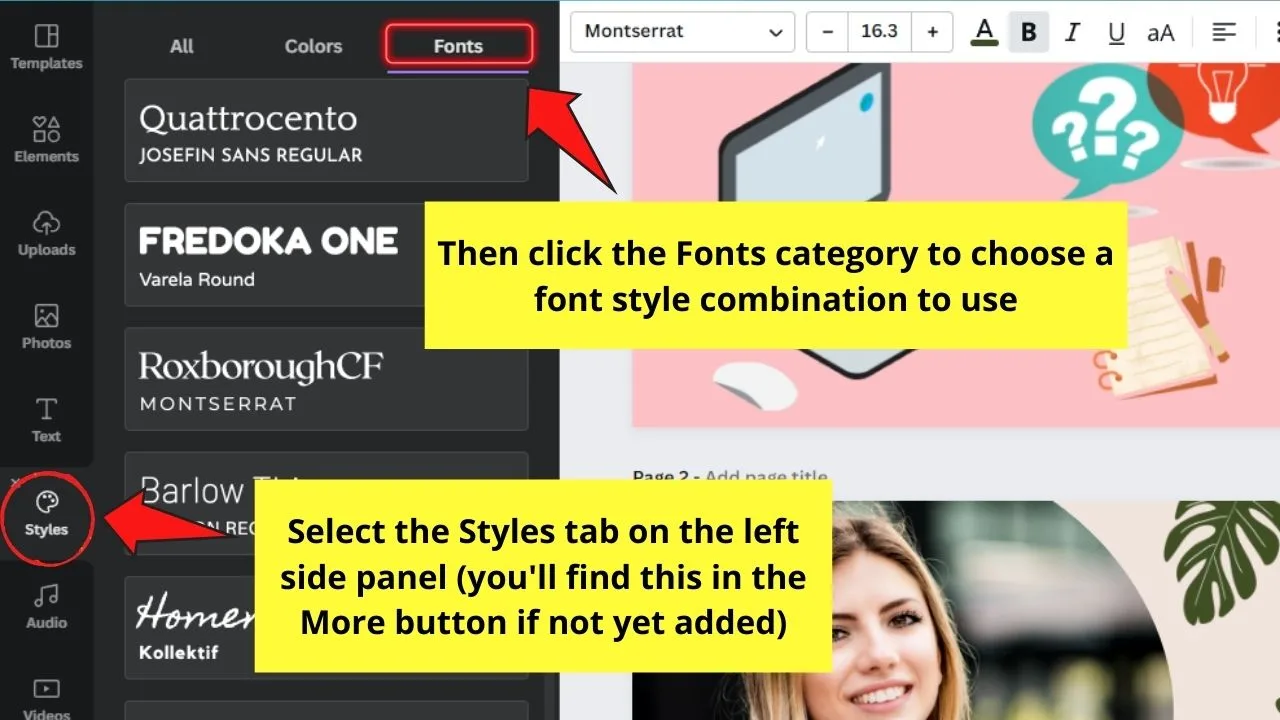
You can also change the font styles used by heading to the Styles button under the More tab on the left side panel.
After clicking the Styles menu, choose the Fonts category. Then, choose the font style combination you fancy.
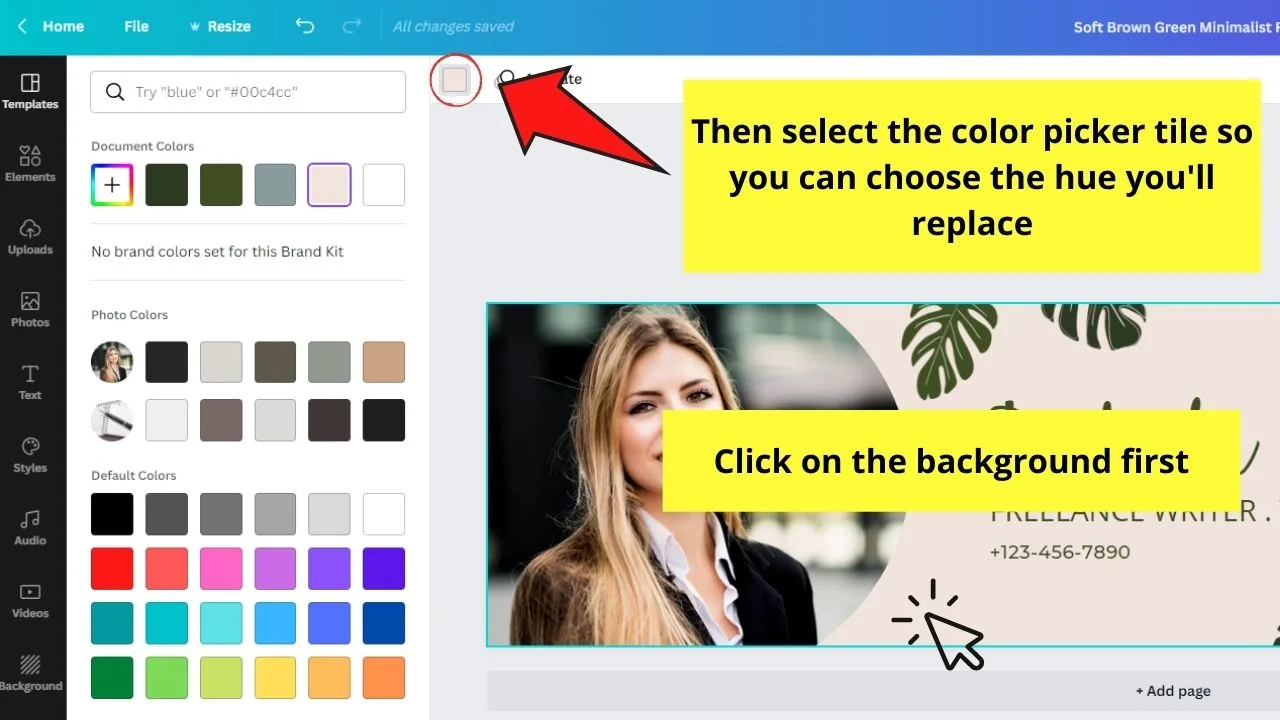
Step 4: If you want to change the background, click on it and choose the color picker tile from the editor toolbar — that is if plain colors are used.
If a picture’s been used as a background and you don’t want to keep it, just click it and press Delete on your keyboard. Then, proceed with how you’d change the background color in Canva.
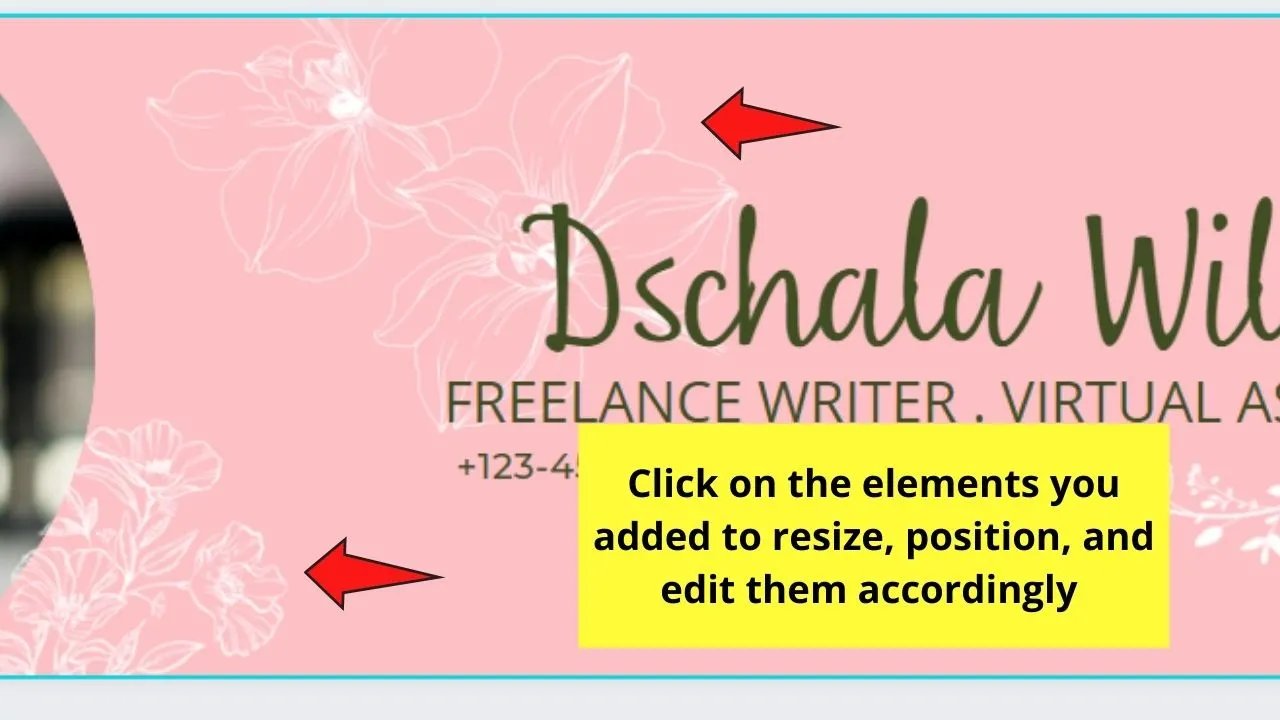
Step 5: Customize the LinkedIn banner template further by removing graphic elements that you don’t want.
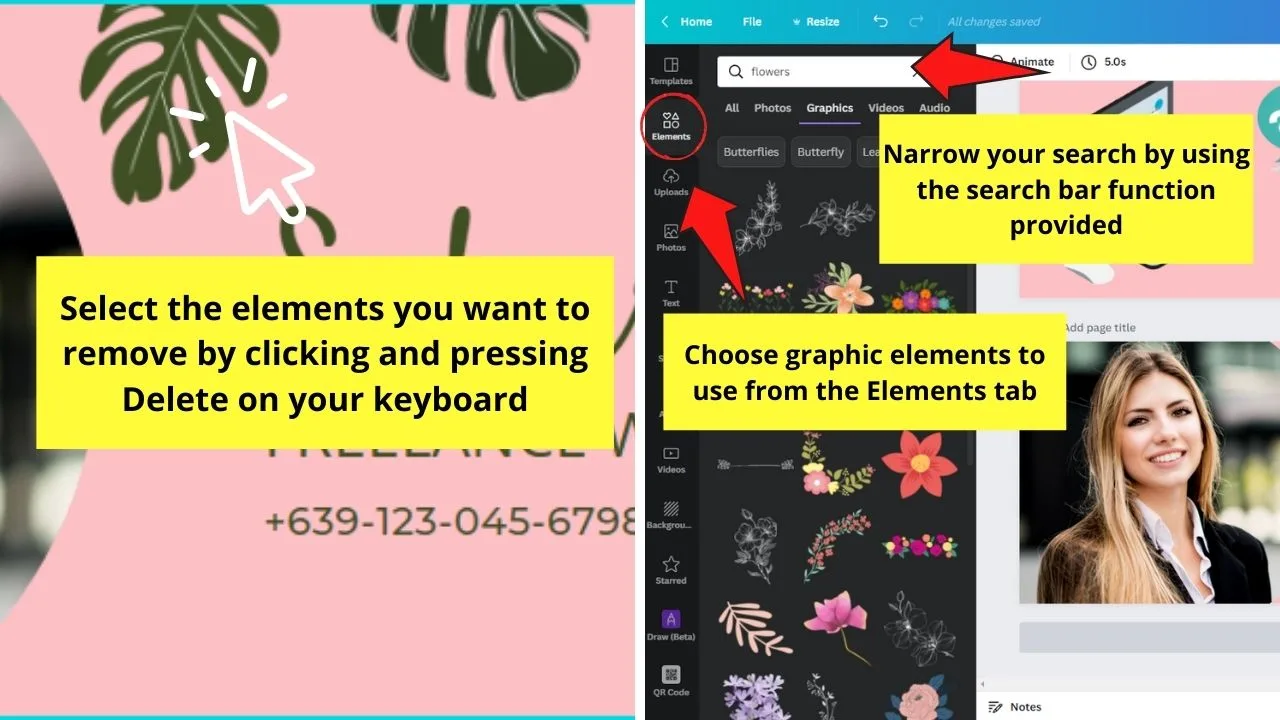
Add new ones by selecting the Elements tab on the left side panel and proceeding with editing them accordingly.
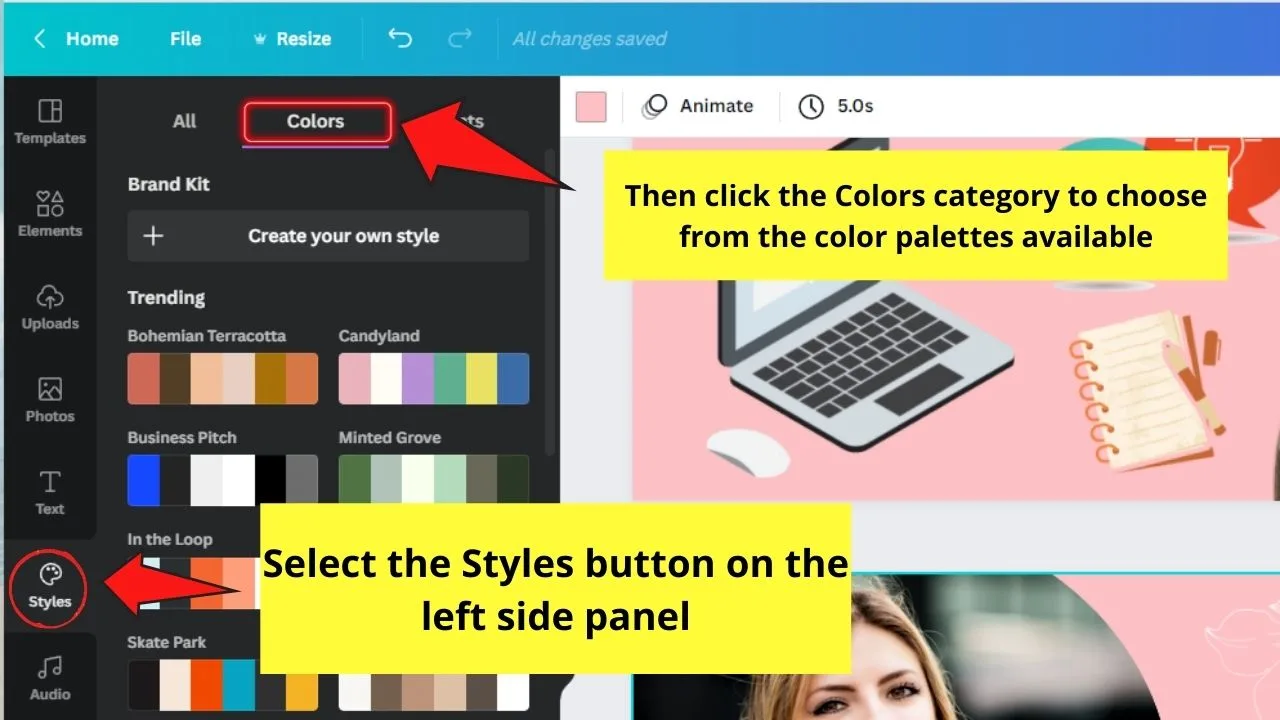
Step 6: Now, to make the color scheme of your LinkedIn banner more cohesive (or if you’re unsure with color combinations), head to the More tab.
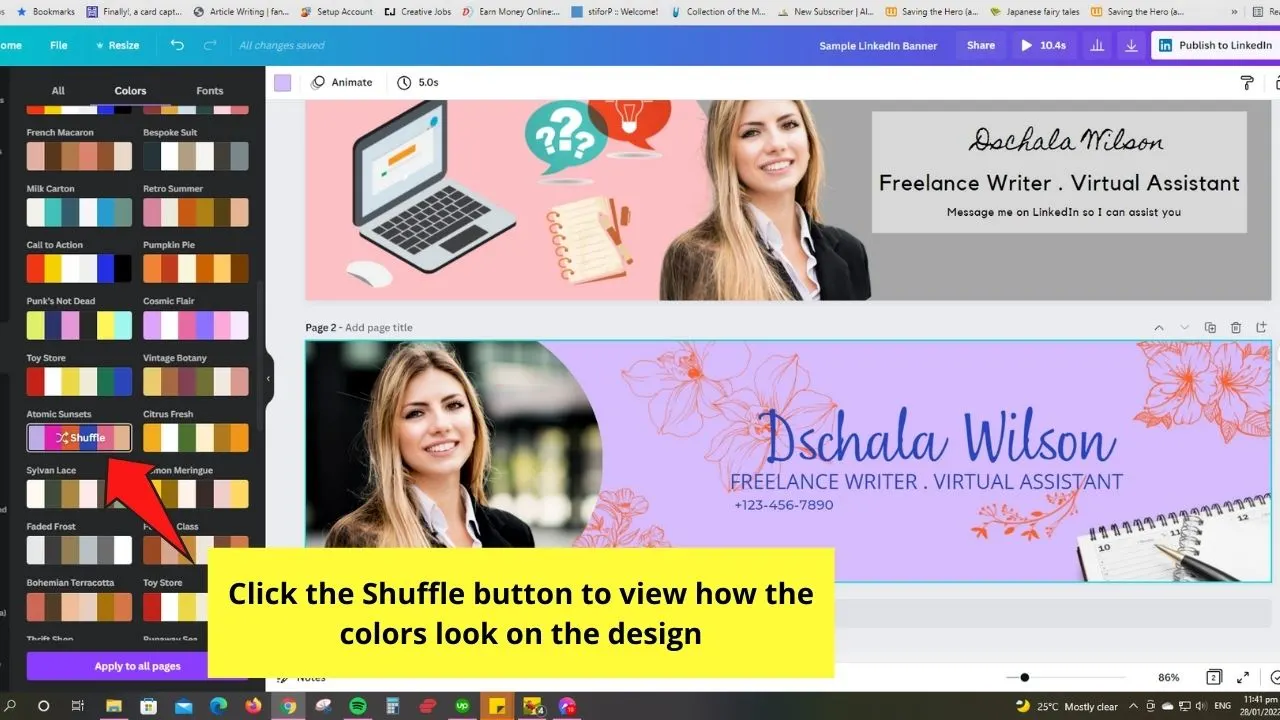
Select the Styles button, and head to the Colors category. Scroll down to choose a color palette.
Click the Shuffle button to have a better view of how the colors look on the banner.
Step 7: Swap out the photos used by deleting whatever’s used on the banner.
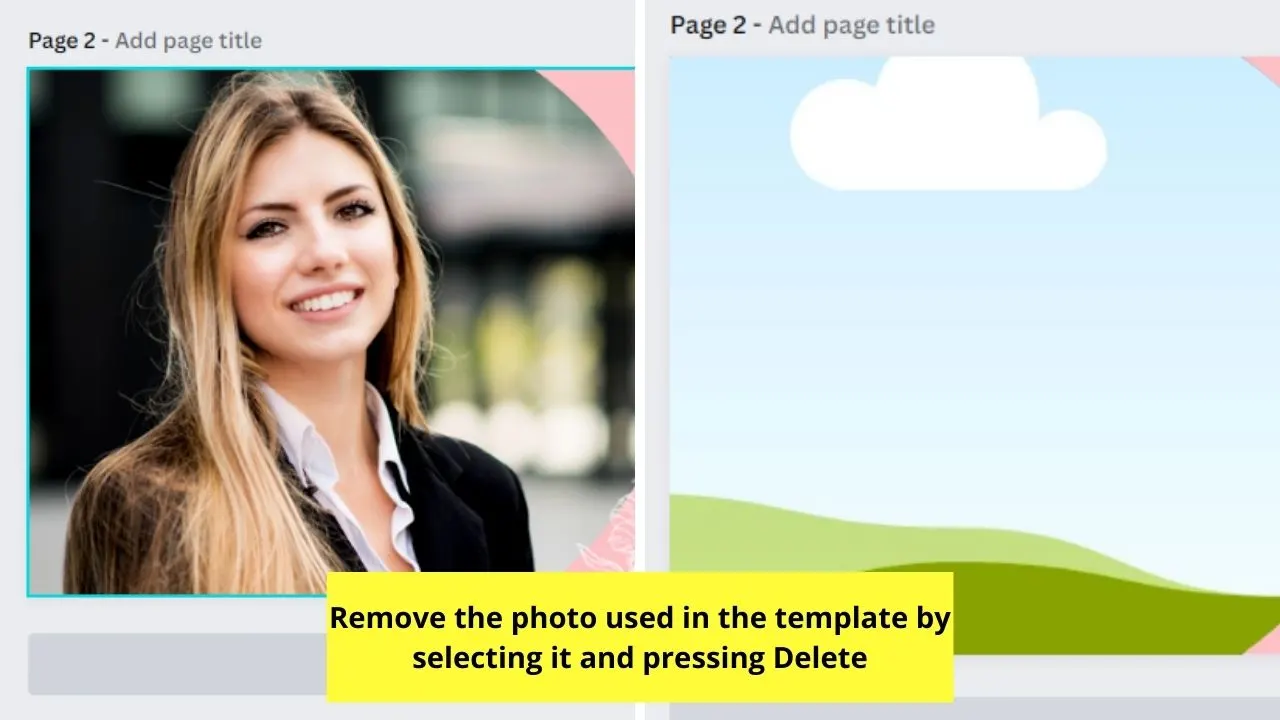
Then, replace those pictures with your image from the Uploads tab or use the brand logo on it instead.
Step 8: Once you’re satisfied with your LinkedIn banner design, save it on your device by clicking the Download button.
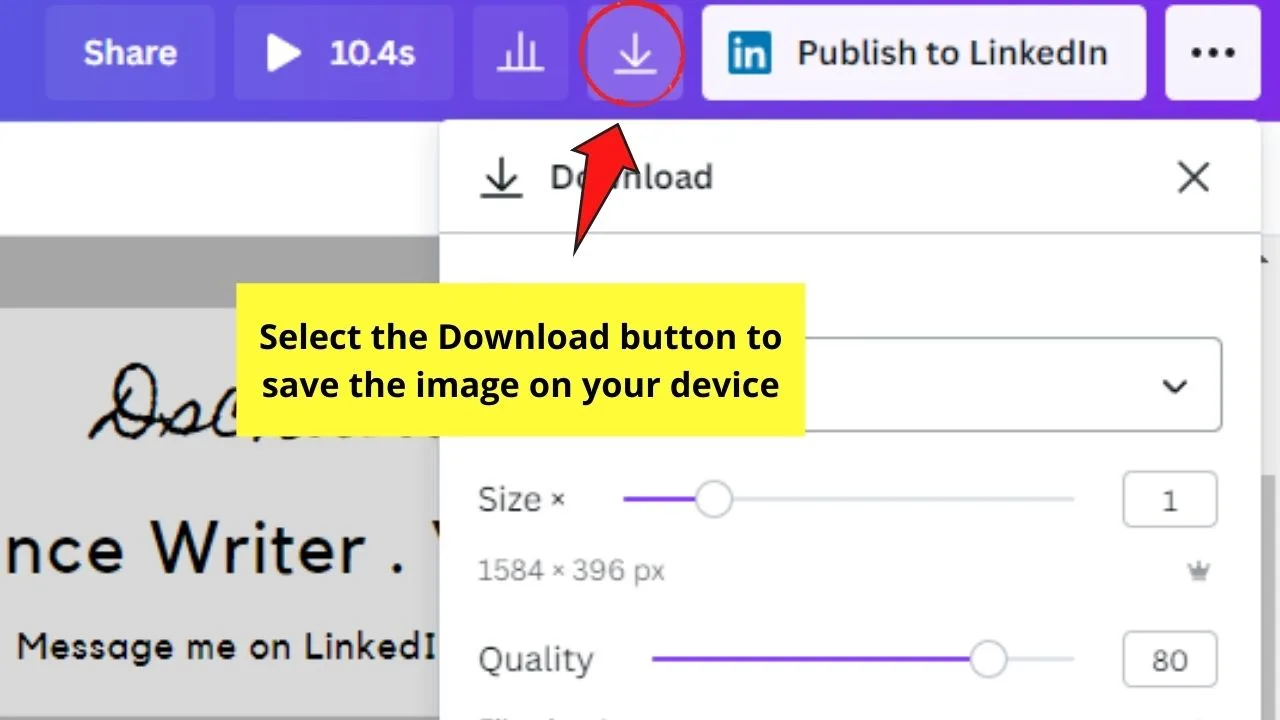
Follow the steps for downloading your LinkedIn banner as an image accordingly. Then, log in to your LinkedIn account and upload your new banner to your profile.
Very simple, right? Whatever your skill level is with graphic designing, you won’t have to fret if you know how to use Canva.
Frequently Asked Questions about How to Create a LinkedIn Banner in Canva
What’s the ideal size for a LinkedIn banner design?
The ideal size for LinkedIn banners is 1584 x 300 px. But, in Canva, the default size used for LinkedIn banner templates is 1584 x 300 px. You can even use the 2000 x 600 px, but it might not look good when viewed on mobile screens.
What are the components that make you say a LinkedIn banner’s good?
First, your LinkedIn Banner should use eye-catching colors and graphics. It should relay to your viewers a specific message — call-to-action, services, contact details, and even a company’s mission and vision. Regardless of what you put there, keep your design neat and simple.
What file formats should you use for saving your LinkedIn banner?
Since LinkedIn banners entail graphic components, save them in PNG or JPG formats. Yet, if you want to preserve the animation of the stickers you used on your LinkedIn banner design, you can save it in GIF format as well.

Hey guys! It’s me, Marcel, aka Maschi. On MaschiTuts, it’s all about tutorials! No matter the topic of the article, the goal always remains the same: Providing you guys with the most in-depth and helpful tutorials!
