
Ease. That is the first word that pops out in our minds whenever we hear the word Canva.
Though Canva’s still considered a graphic design tool, its user-friendly tools and features allow even newbies to easily create design templates they can use for various projects.
But, if there’s one thing that sets Canva apart from the rest of the graphic design apps available, it’s the ingenious way with which it saves your projects.
So, if you’re a budding creative and would want to use Canva without worrying about unsaved designs, better stay tuned and keep reading this article.
You’ll be surprised with how easy this step is compared to the rest of its peers.
How to save in Canva?
Technically speaking, you can choose to save your designs in Canva in two ways. Either you allow the software to automatically save all the changes you’ve made, or you can do this step manually. If you choose to save manually, all you need to do is click on the “File” tab on the taskbar. From there, you can save your design as it is or in a folder if you’re creating several projects at a time.
Step by step guide in saving Canva designs
Generally, saving your projects in Canva doesn’t have to be a headache for you. As mentioned earlier, there are two basic ways you can do this step: automatic or manual.
Automatic saving
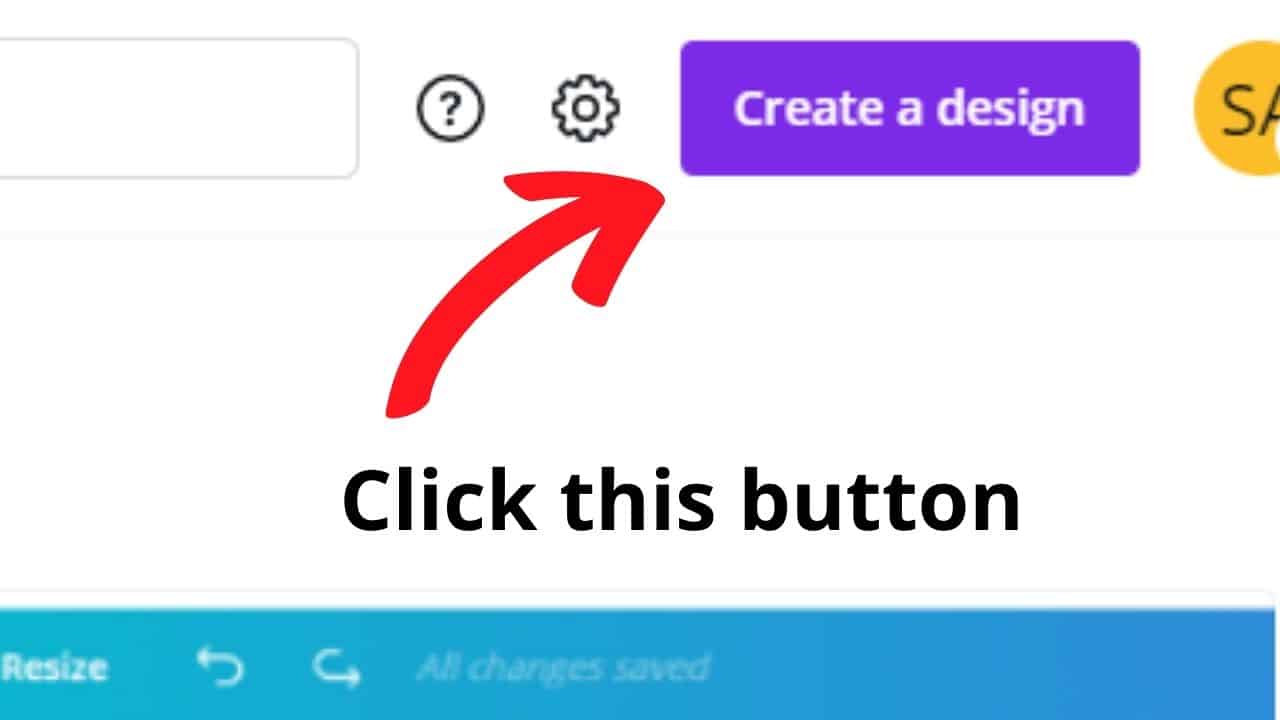
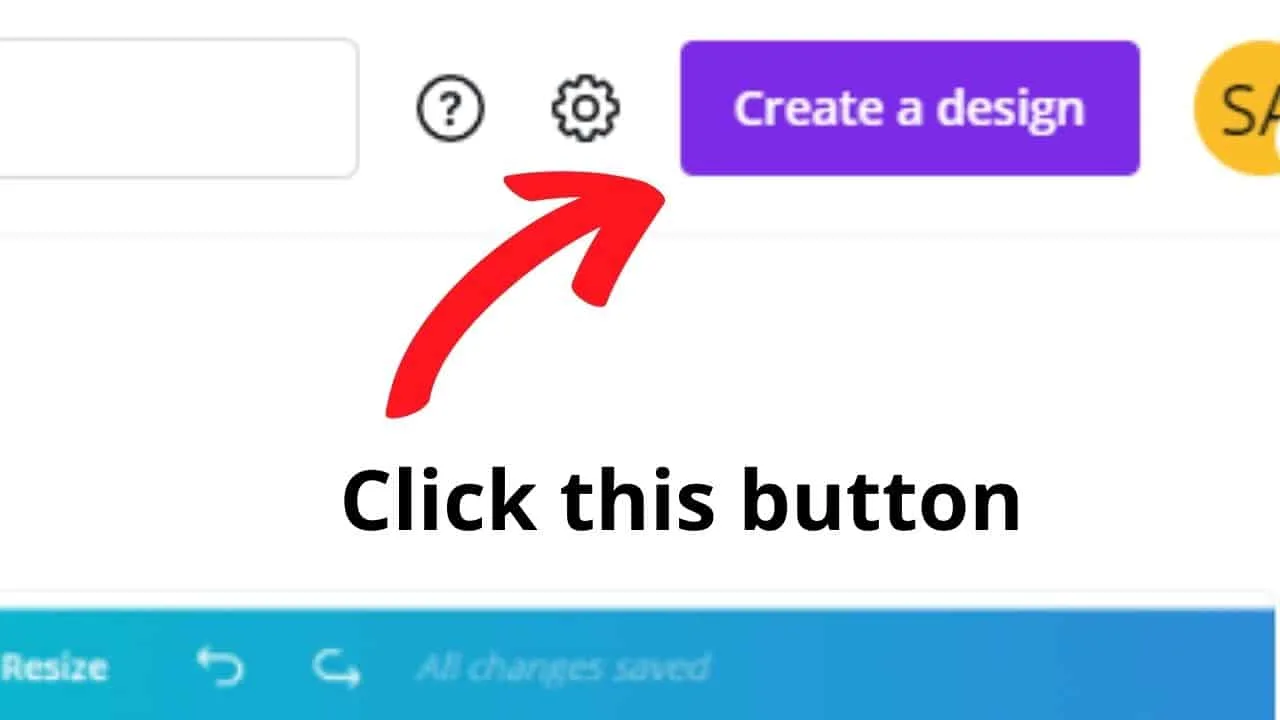
- Click “Create a design” on Canva’s homepage to create a new project template.
2. Check the top left corner of Canva’s taskbar. You will notice right next to the “Resize” tab the words “All changes saved.”

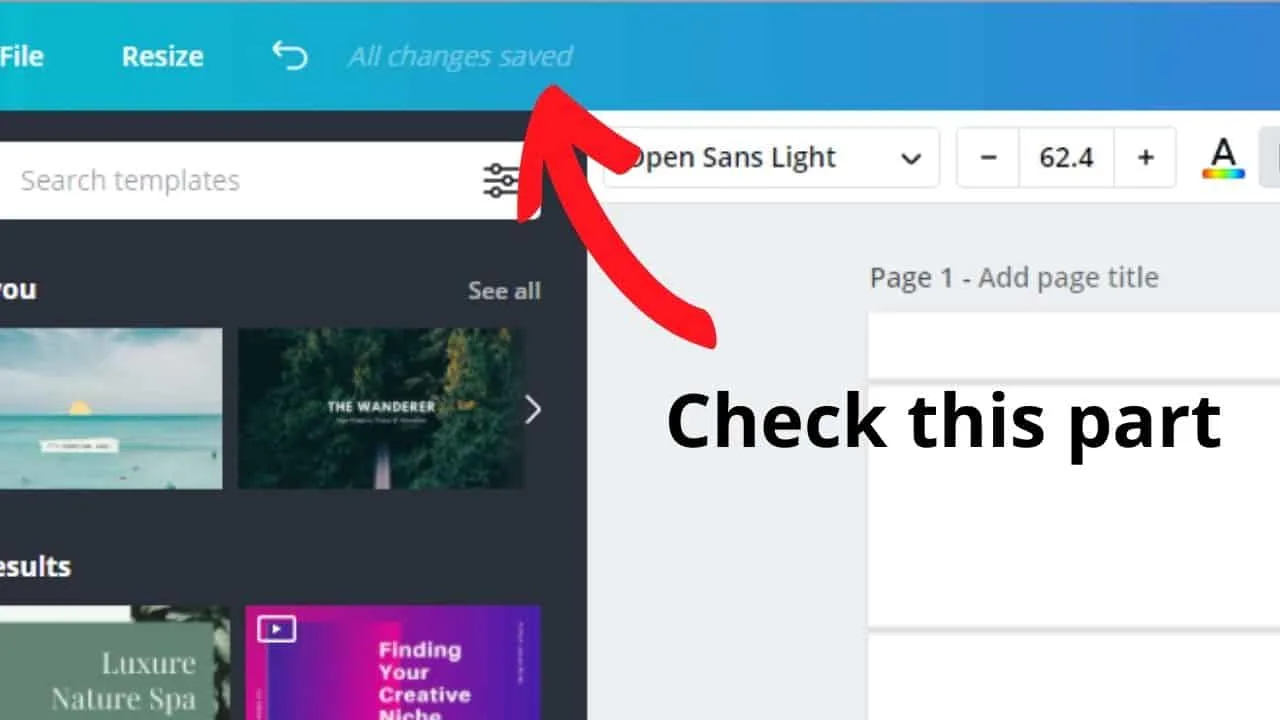
3. Add an element, picture, or text to your project template. As soon as you’ve done so, the “All changes saved” text you’ve seen earlier will change to “Saving changes.” This indicates that it’s in the process of retaining all the work you’ve done at the moment.
But, if you want to be absolutely sure you’ve saved all the recent work you’ve done on your project, you can still do the process manually. Here’s how it’s done.
Manual saving
- After adding the last touches to your design, head over to the taskbar above the template and click on “File.”
- From the dropdown menu that appears, search for the “Save” option.

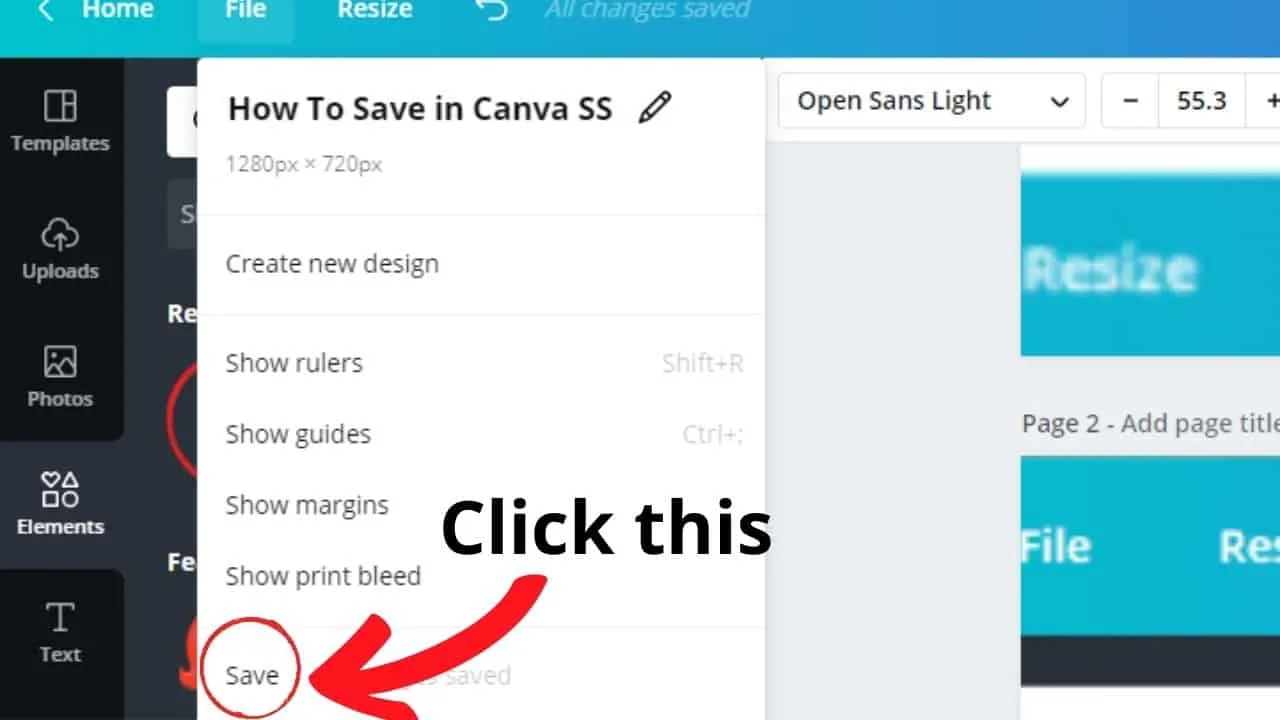
3. If the “All changes saved” text doesn’t appear, you can simply click save to keep the changes.
4. If you’re working on different designs at a time, head over to the “Save to Folder” option. Click on this and find the folder where you want to place your current template.
You can also watch this video here to check out the whole process in real-time.


Saving Canva designs as images on your device
Basically, you don’t need to worry too much about saving your files on Canva.
Just like typical cloud services or Google Docs, the app automatically keeps any changes you’ve made to your work without you lifting a finger.
You only need to focus on creating your design, and Canva will readily do the rest of the storing process for you.
But, what if you want to save a digital copy of your design on your devices? Is that option also available in Canva?
Well, it’s a big yes! Canva definitely allows its users to save their designs on any device they’d want to. Be it one’s mobile phone, tablet, or PC, you don’t have to worry about having a digital copy of your project.
So, how does this exactly work? Let’s start learning in a jiffy here.
First off, once you’ve finished creating your design, head over to the “Download” option on the top right corner of the taskbar. If you can’t find the word itself, click on the down arrow found on the same area of the taskbar.

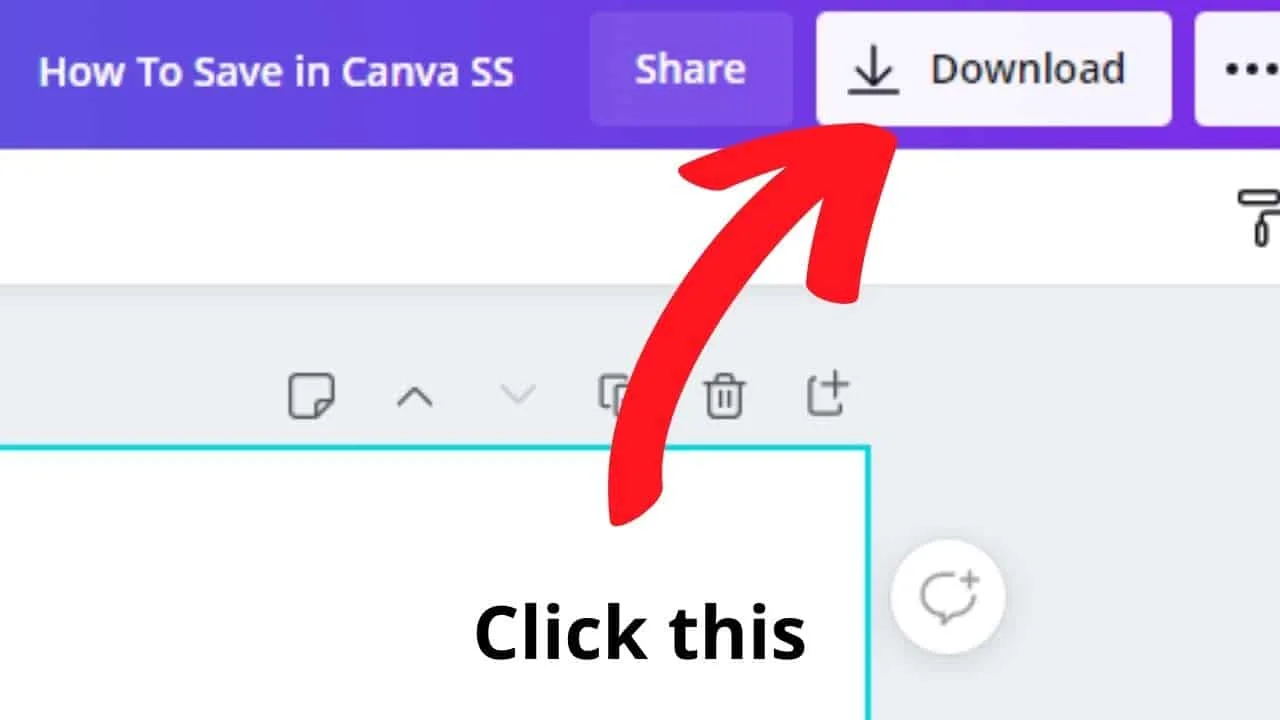
After clicking either of the two options, you can tweak the parameters of how you want your image to appear on your device.
But, if you’re not too keen on this and you simply want to have a copy just in case you can’t access your Canva account, you can simply hit on the options mentioned above.
After which, wait for the exporting process gradient to complete.
Once the download process is done, you can then see a prompt announcing that you successfully saved your project on the device.
Now, check the Camera Roll folder of your phone (Downloads folder in case you’re using a laptop or PC).
If you didn’t use any premium elements or photos on your design, you’ll automatically find the downloaded image in this folder.
However, if you’ve used even a single premium element or photo on your project, you’ll find two options on the dropdown menu after clicking the “Download” option.
The first choice you’ll see is the “Pay and Download” button. Usually, you’ll find the price of the premium photo or element you’ve used above this option.
If you’ve got a credit card or online payment option linked to your Canva account, then you don’t have to worry about a thing.
Go ahead and tap on it, and the amount indicated will automatically be deducted from your payment method chosen.
But, what if you’re only using the free account, and you don’t want to pay a single cent. Can you still download your design as an image?
Fortunately, Canva is very considerate as it allows free users to avail of the said feature as well.
The only difference is that the saved image will have a watermark on it.
This isn’t so much a bummer if you’re only planning to use them as samples for your portfolio.
To download a design with premium components on it, click on the light grey “Download a free watermarked draft” text found beneath the purple “Pay and Download” button.
Once you’ve done it, the exporting process gradient will once again appear to show you the progress of the download.
If there aren’t any connection or technical issues involved, you should still see your saved image in the Camera Roll or Downloads folder of your device – with the Canva watermark on it, of course.
Now that you know how to save your Canva designs as images on any device, you won’t have to worry about securing a copy of your file for emergency purposes.
But, what if you want to save your Canva design on another platform, say, for instance, social media. Is that option even available?
Well, head over to the next section to find out.
Can you save your Canva designs on other platforms?
As Canva wants to market itself as a very flexible tool for its users, the app allows users to save their projects on other platforms as well.
Let’s take Mailchimp as an example.
If you’re not familiar with this platform, it’s a marketing platform that allows you to easily manage your marketing campaigns and share them with your clients.
With that said, you’ll need to easily transfer your designs from Canva to Mailchimp then. How to go about with the process then?
So, after you’ve finished creating your design, head over still to the “Download” button on the taskbar. From the dropdown menu that appears, look for the “Mailchimp” option.
Once you’ve clicked on “Mailchimp,” sign in to your Mailchimp account. After this step, choose what folder you’d like to save your design in.
The same process applies if you’re planning to save your designs on other social media platforms as well.
So, now that you know the different ways to save your designs in Canva, are you more excited to work with such an intuitive platform?
If you do, you better start using Canva now!


Hey guys! It’s me, Marcel, aka Maschi. On MaschiTuts, it’s all about tutorials! No matter the topic of the article, the goal always remains the same: Providing you guys with the most in-depth and helpful tutorials!

