

Looking for the simplest way to make a Cube in Adobe Illustrator?
Or did you find methods that are fast and manageable, but the cube doesn’t look realistic? With simple edits, you can achieve the effect of a realistic cube.
Just follow the steps as laid out in our tutorial, and your cube will be finished in no time. There are a lot of ways to create a Cube in Adobe Illustrator.
How to make a cube in Illustrator
To make a cube in Illustrator, draw a rectangle with the “Rectangle Tool” and make a copy. With the “Shear Tool,” create a slanted image of a square. Draw a third square for the top. Use the “Scale Tool” to stretch the square’s width, add an anchor point on the top, and transform it into a cube.
Step 1: Create a Square
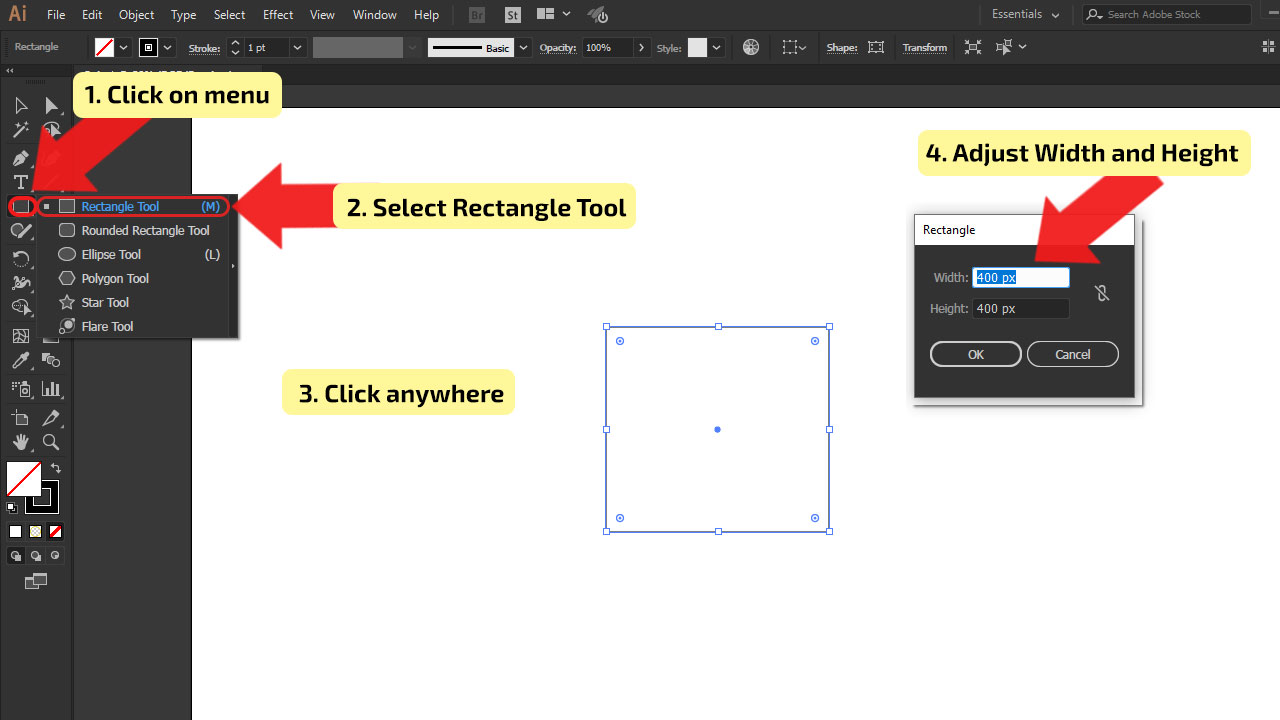
In the “Tool menu,” find “Rectangle Tool” and select it, or use the shortcut by pressing the letter “M” on your keyboard. The first way to draw the square is by holding “Shift” while dragging the tool over the canvas. The second way is to click anywhere on the canvas after you choose the tool, and the “Rectangle” window will pop up where you will adjust “Width” and “Height.” In the tutorial, the size of the square is set up to 400x400px. Feel free to use another size of the square.
Step 2: Duplicate the Square
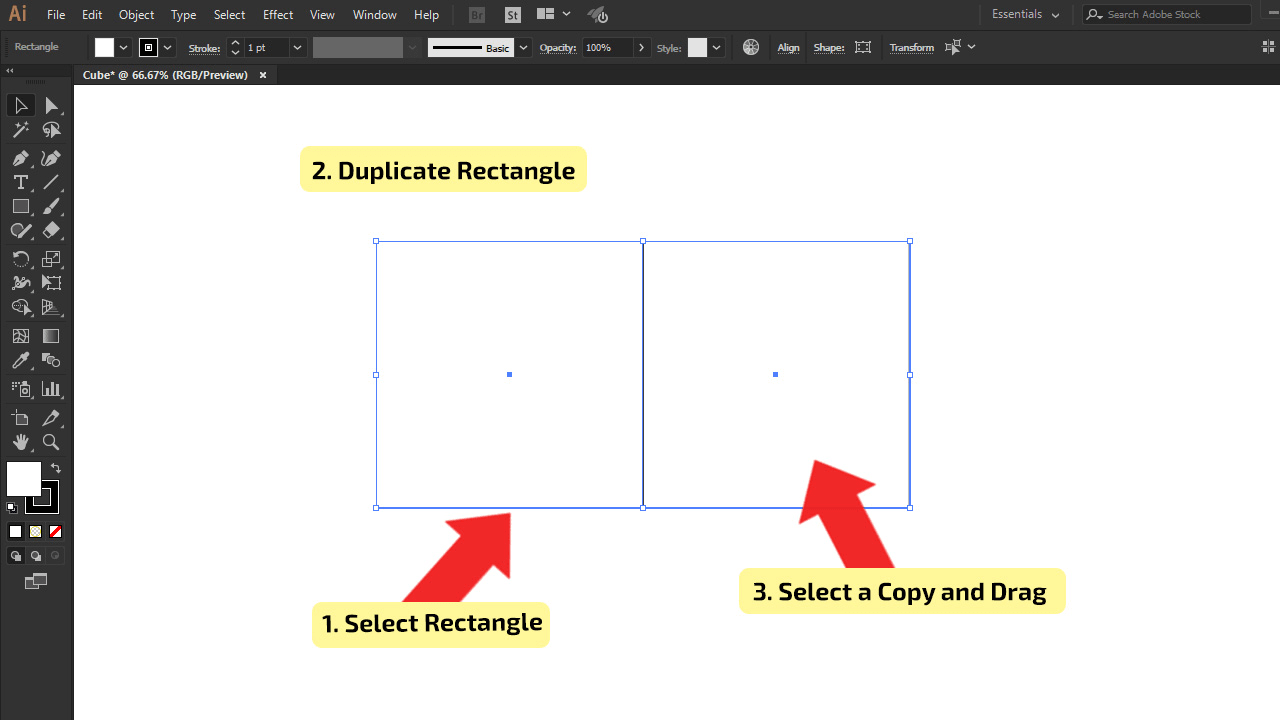
Select the square with “Selection Tool,” find it in the “Tool Menu,” or use the shortcut by pressing the letter “V” on your keyboard. After selecting, create a copy of the shape by selecting it, pressing Control (CTRL) + C (Windows) or Command + C (MAC), then paste it with Control (CTRL) + V (Windows) or Command + V (MAC). Drag a copy of the square to the left side of an original circle; one side of each square needs to overlap, as shown in the image below.
Also, there is another way to create a copy of the square. Select it, press and hold “Alt,” and drag it to its place.

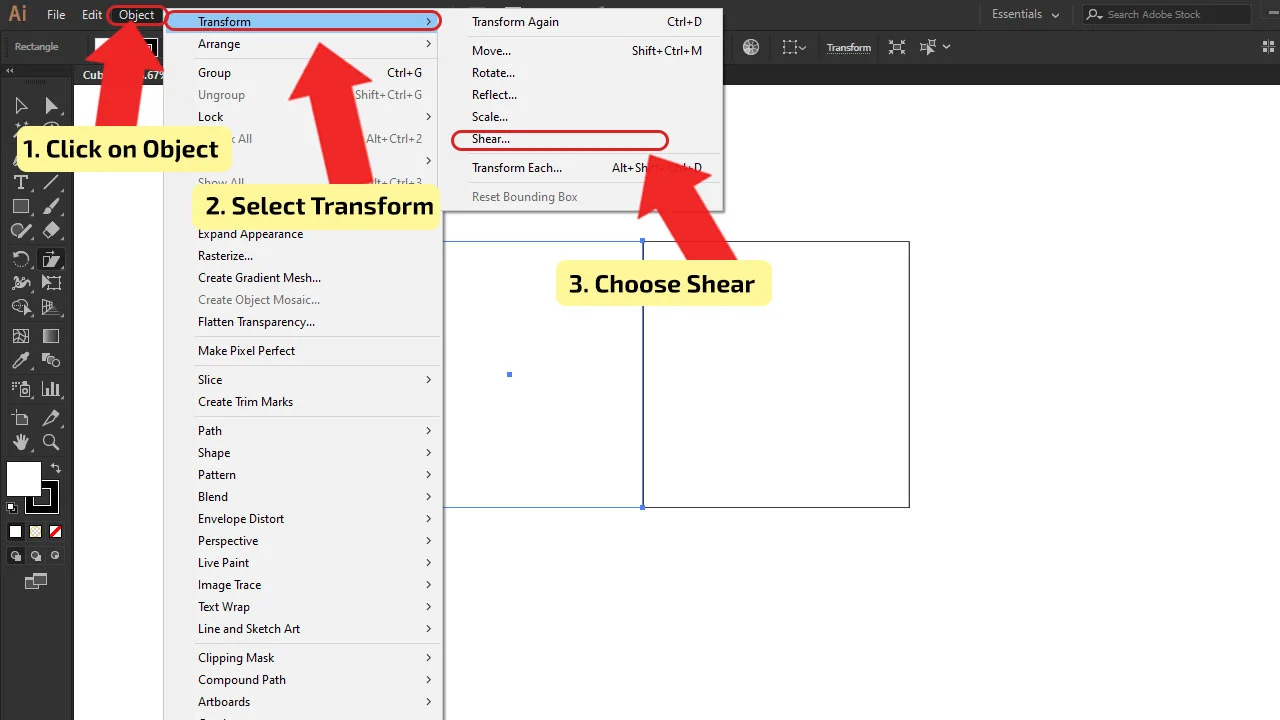
Step 3: Open the Shear Tool
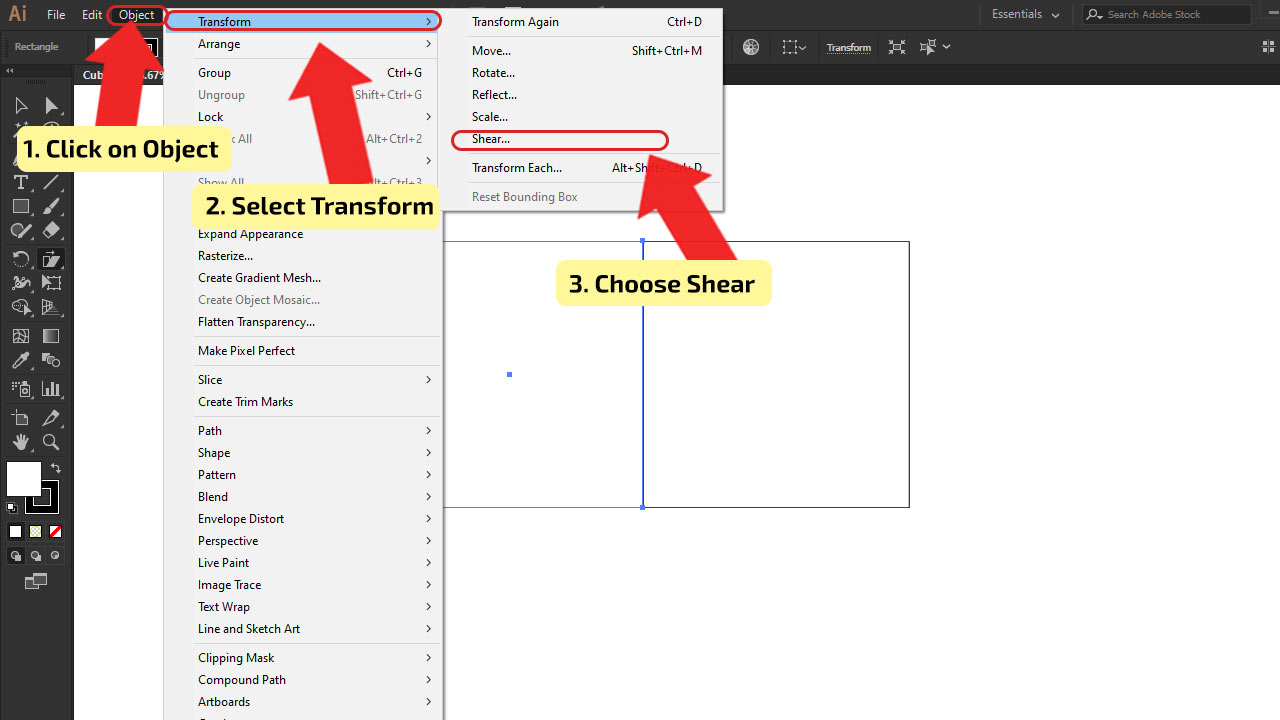
This tool is used for creating a slanted image of an object; it can be done by the horizontal or vertical axis. It will help to create an illusion of a 3D object. To open “Shear Tool,” in the main menu, go to “Object,” and the drop-down menu will be shown. Click on “Transform” and choose “Shear”. The second way to open the “Shear Tool” is to find it in the “Tool Menu.”

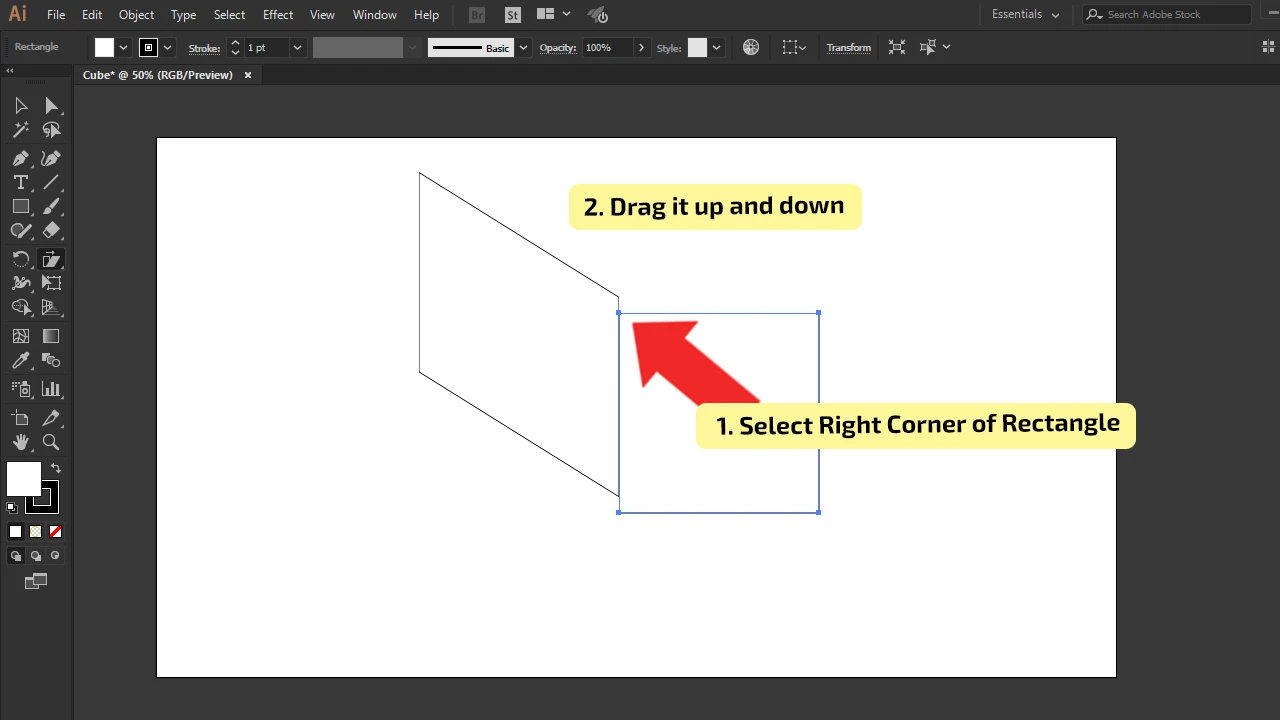
Step 4: Adjust the Squares


Select one of the squares with the “Selection Tool.” Using the “Shear Tool”, click on the top right corner and move it down the vertical axis by dragging it up and down. After you set up the first square, do the same with the second one. Make sure the squares are overlapping. With a third square, they are going to create an illusion of a cube.

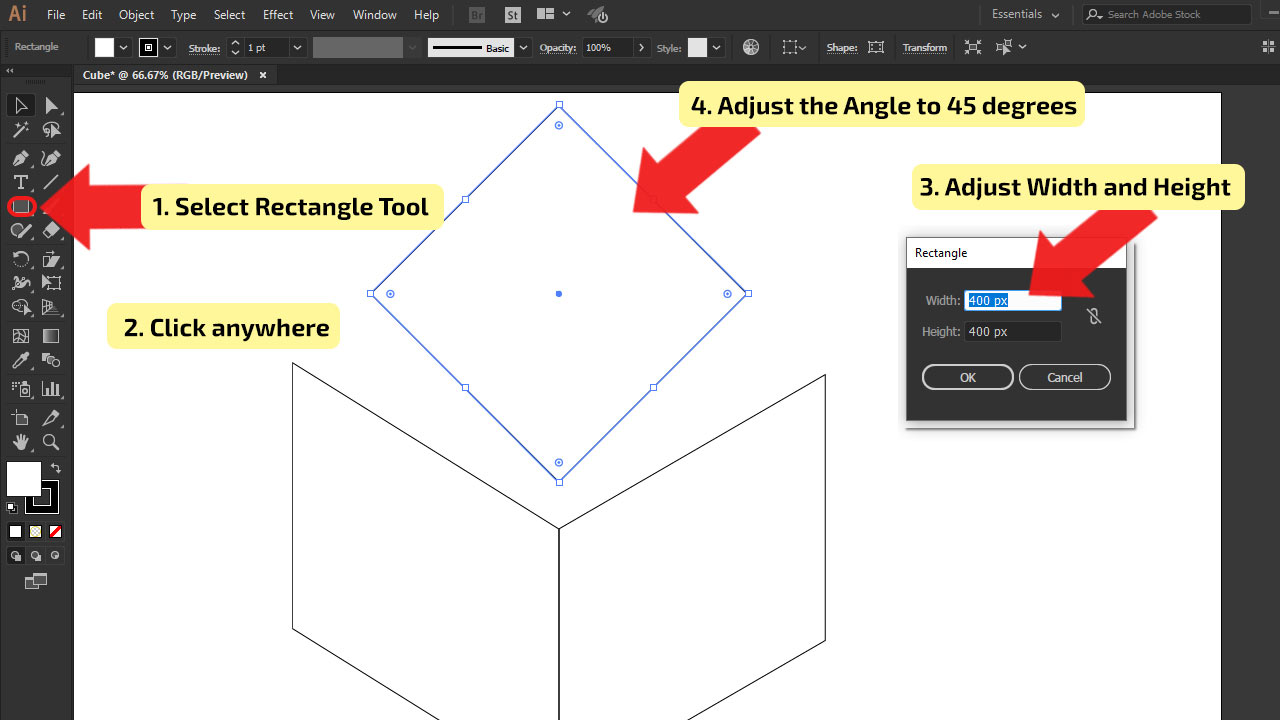
Step 5: Make a Third Square
In the same way, as explained in the first step, make a third one. Use the “Rectangle Tool” and draw the square by holding “Shift” while dragging the tool over the canvas. Adjust the size of the square to be the same size as the other two, 400x400px. After you draw a square, rotate it and set the angle of rotation to 45 degrees.

The shortcut for the “Rectangle Tool” is the letter “M” on your keyboard.
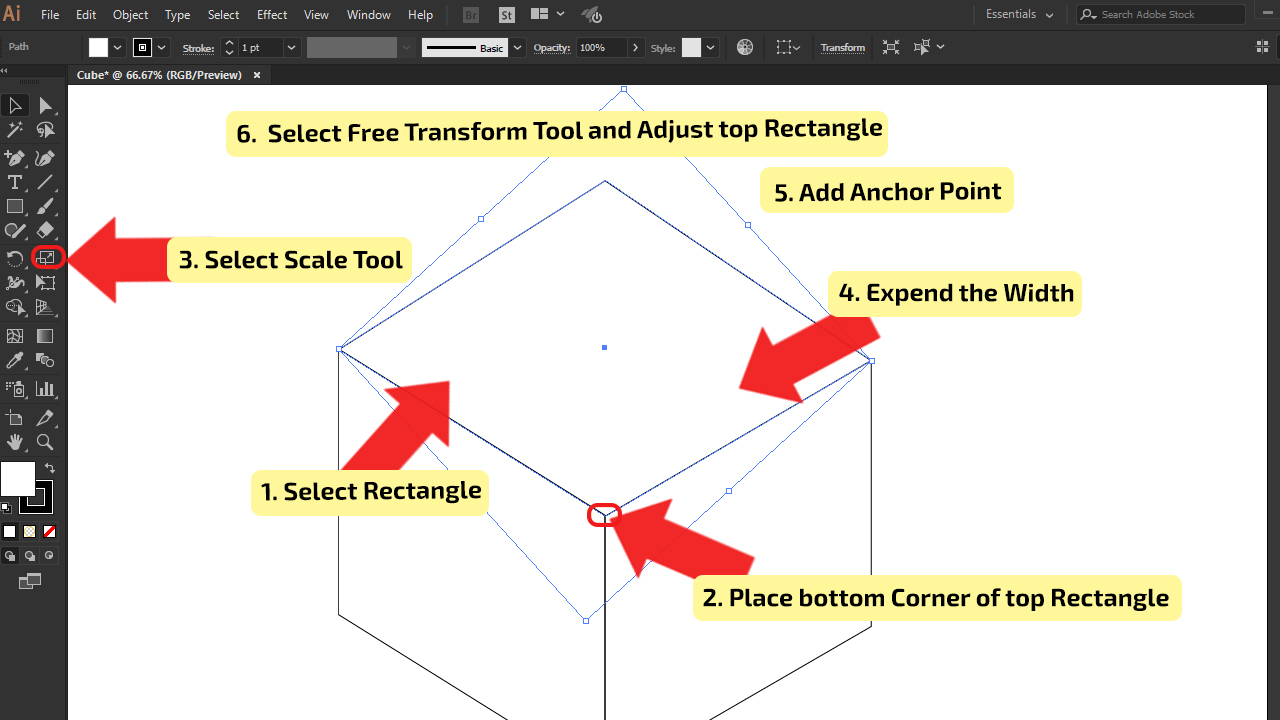
Step 6: Adjust the Top Square
Select the top square and move it; the bottom anchor point should be overlapping the top middle corner point of the first two planes. Make sure the square is still selected, then click on the “Scale Tool” in the “Tool Menu.” Expand the width of the square to be equal to the adjoining squares. Add an anchor point to the top corner of the new square using “Add Anchor Pont Tool,” then select “Free Transform Tool.” Click the top corner and move it down the vertical axis until it rests in the angle that the two adjacent squares make.
To use the shortcut, click on the following letters and symbols on your keyboard:
- the “Scale Tool” is the letter “S”
- the “Add Anchor Pont Tool” is the “+”
- the “Free Transform Tool” is the letter “E”.

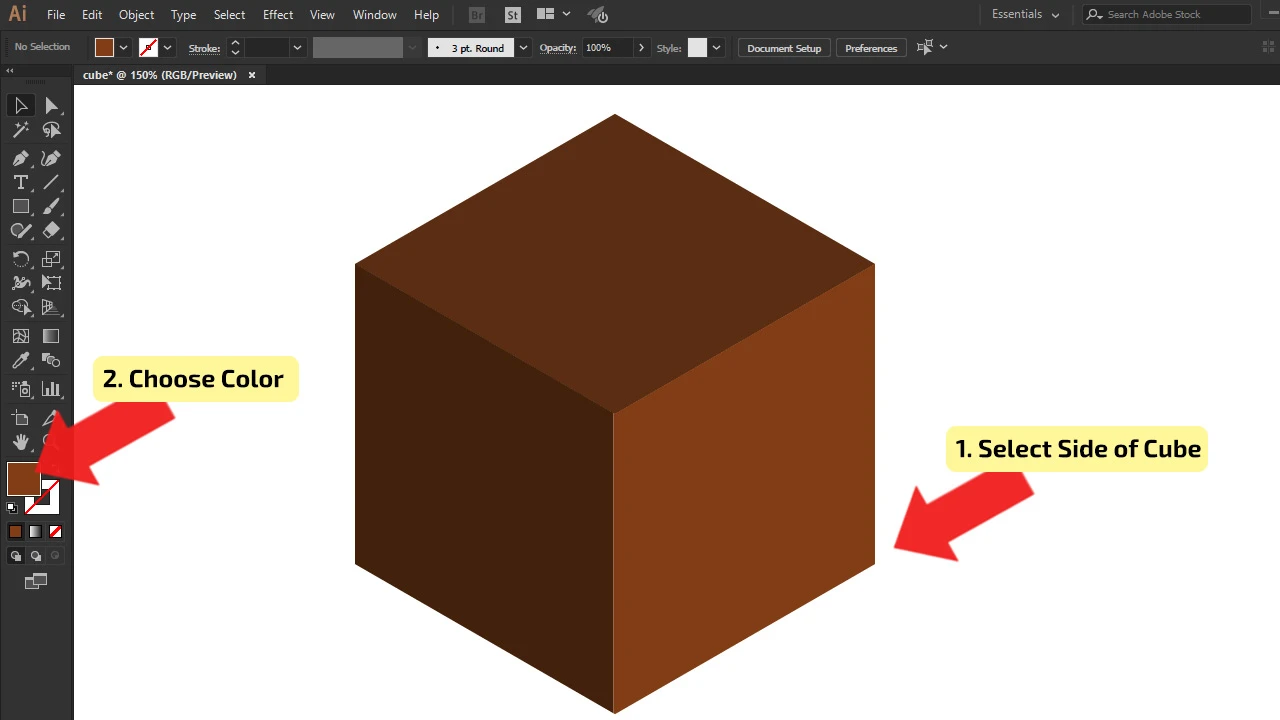
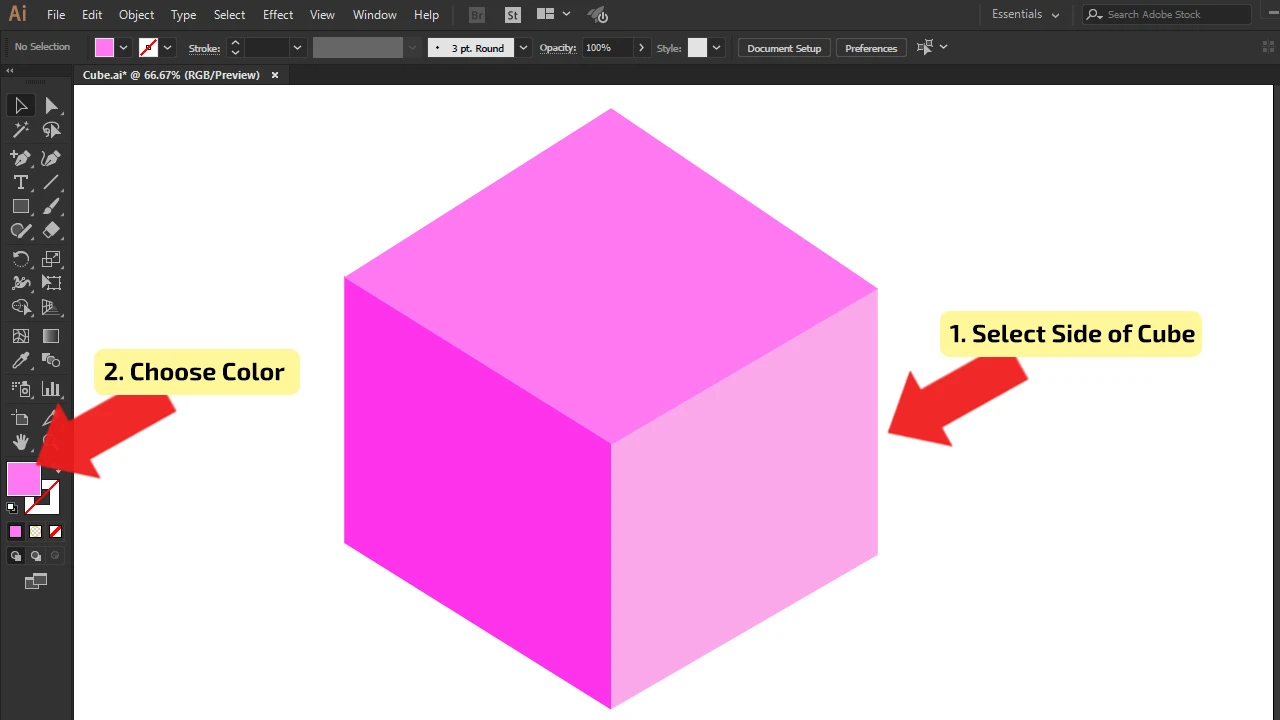
Step 7: Adjust the Color of the Cube.
To make sure that the cube looks realistic, you need to think about the source of light, from which side it is coming, and how bright it is. In the image, light is coming from the right side of the cube, which means that the side of the cube closer to the source is going to be the brightest, the top square will be a bit darker, and the left side of the cube will be darkest. To change the color of each side of the cube, select them one by one. Select the first, for example, the lightest, and choose the color by double-clicking on the “Fill” box in the “Tool Menu.” The “Color Picker” window will pop up, and select the color. After adding the fill color, remove the stroke color. Repeat the step with the remaining cube sides.

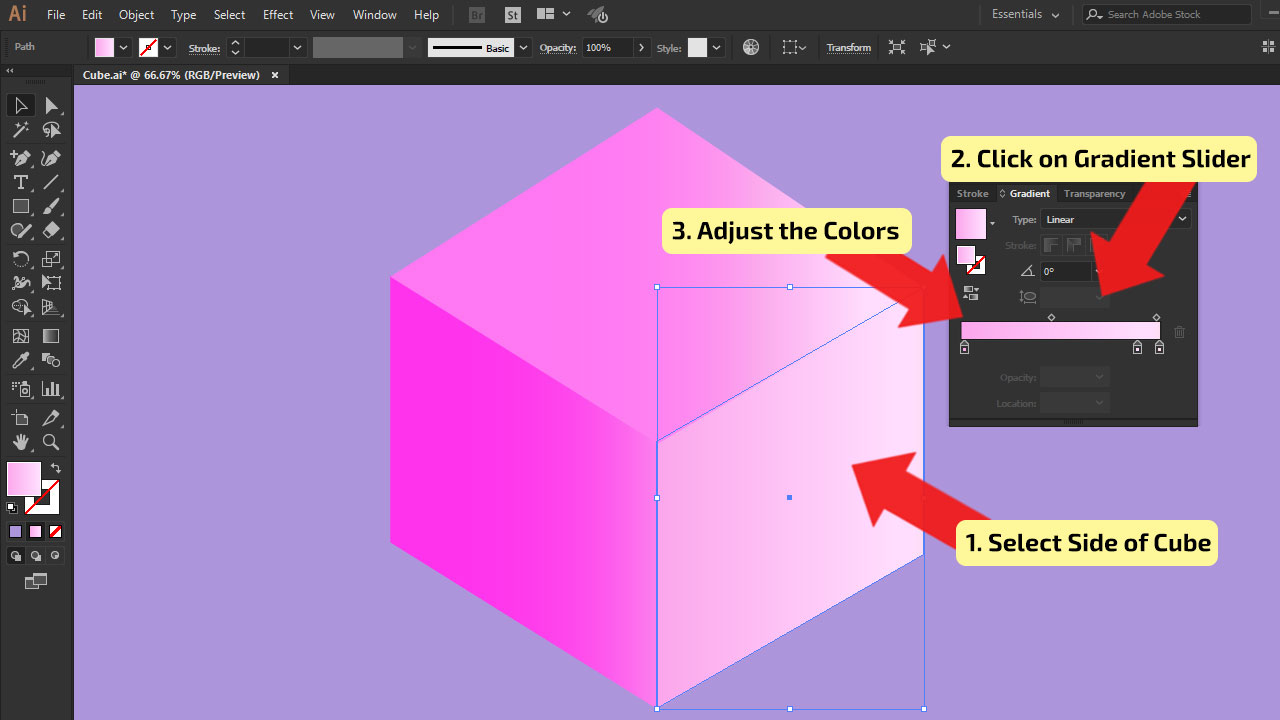
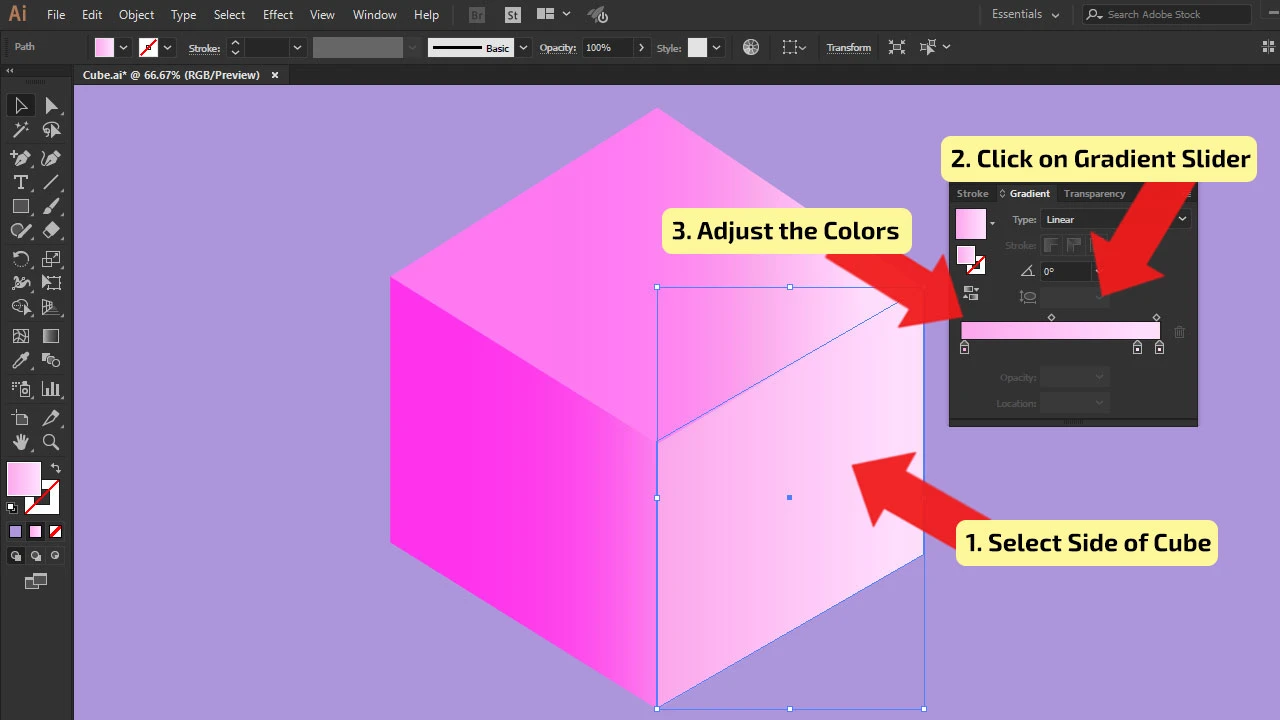
Step 8: Fine-tune Your Cube.
If you aren’t satisfied with the realistic sight of the cube, you can adjust it using the “Gradient Tool.” Open it by clicking on the “Window” on the main menu, and in the drop-down menu, select “Gradient,” and the window will pop up. Make sure one of the sides of the cube is selected, then in the “Gradient” window, click on “Gradient slider” and adjust the colors and brightness. Adjust the cube until you are satisfied with its look.
The shortcut for the “Gradient” window is Control (CTRL) + F9 (Windows) or Command + F9 (MAC).

How to make a cube in Illustrator using hexagons
To make a cube in Illustrator using hexagons, draw a hexagon with the “Polygon Tool,” rotate it for 90 degrees, make a copy, and place it on top of the original. Separate hexagons using “Divide” in the “Pathfinder” panel, then delete the top part. Draw a line from the bottom anchor to the middle one. Adjust the colors of the cube.
Step 1:
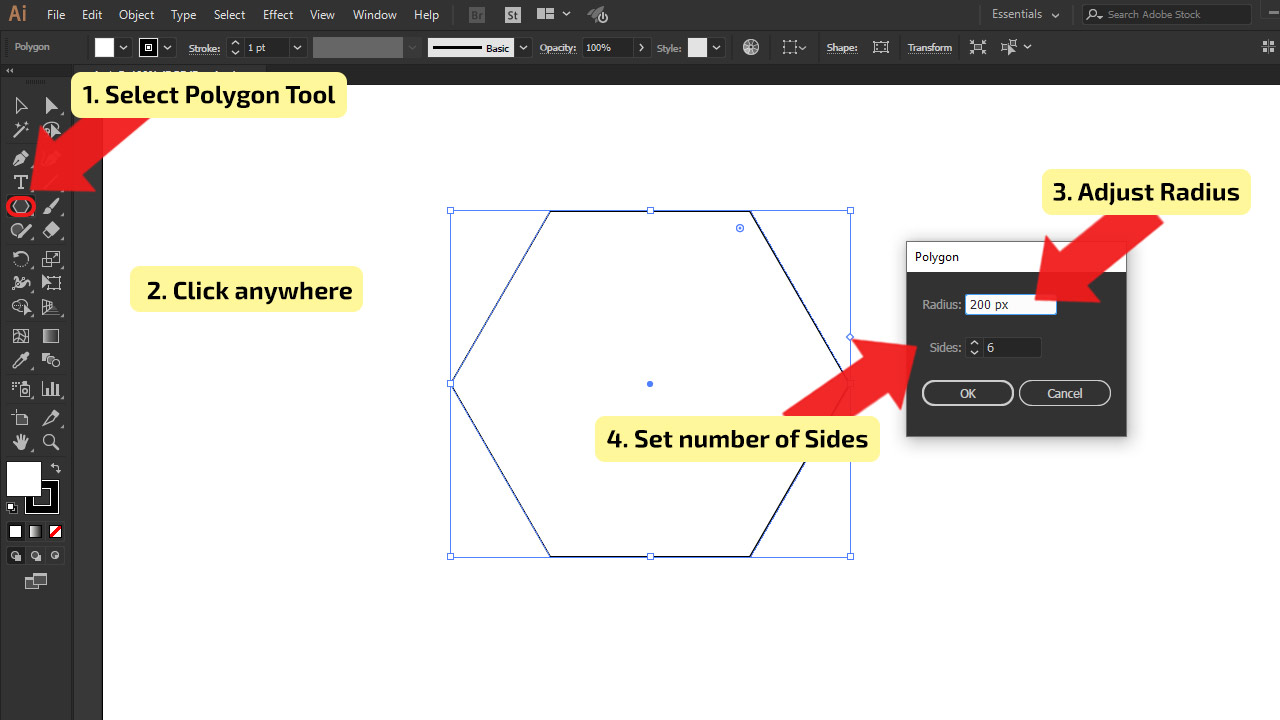
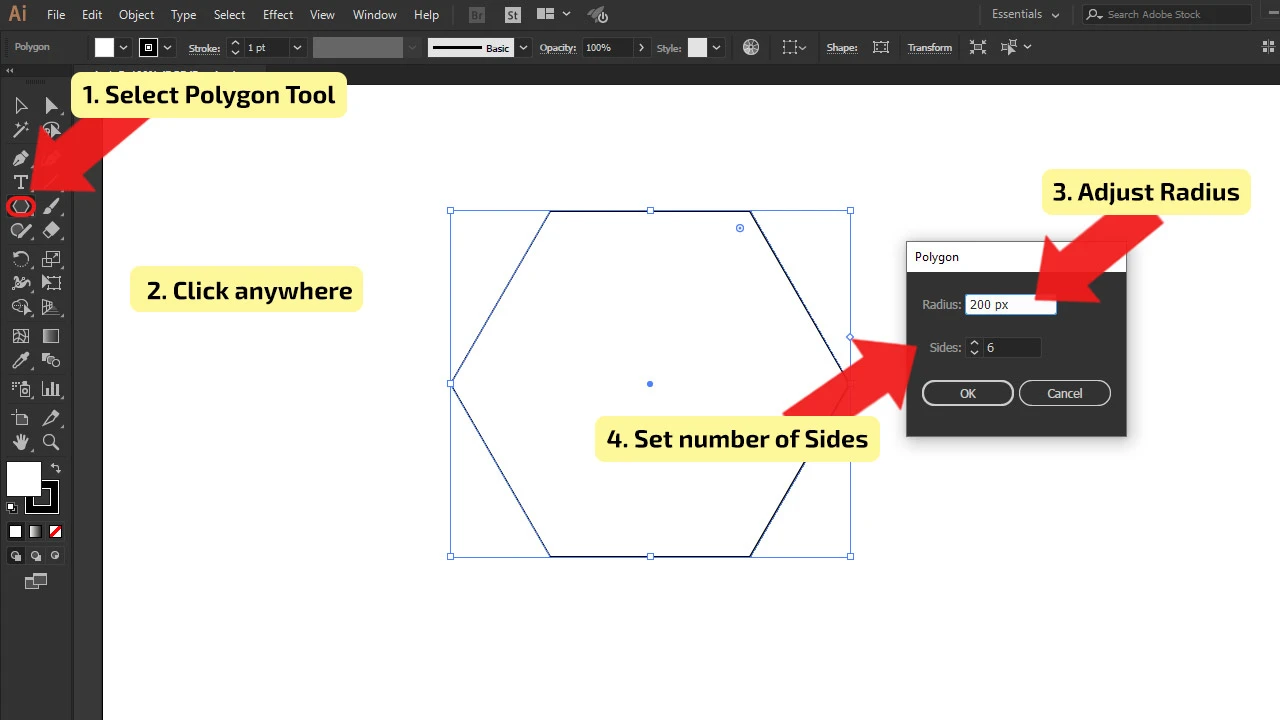
Create a Square. In the “Tool menu,” find “Polygon Tool” and select it. The first way to draw the hexagon is by holding “Shift” while dragging the tool over the canvas. The second way is to click anywhere on the canvas after you choose the tool, and the “Polygon” window will pop up where you will adjust “Radius” and “Sides.” In our tutorial, the size of the radius is set to 200px, and the number of sides is six because we need a hexagon shape.

Step 2:
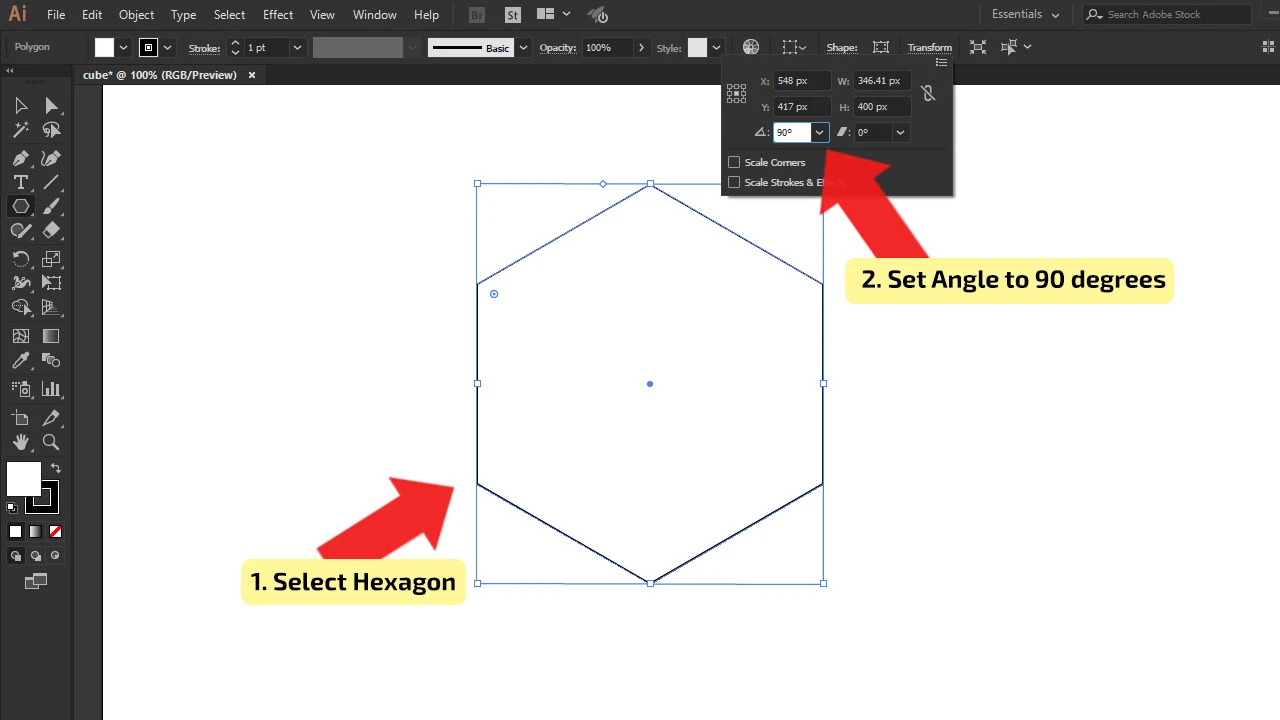
Rotate the Hexagon. Select the hexagon with “Selection Tool,” find it in the “Tool Menu,” or use the shortcut by pressing the letter “V” on your keyboard. After selecting, in the top menu, find “Transform,” click on it, and the window will pop up. Find the box next to the “Angle” symbol and enter the 90 degrees.

Step 3:
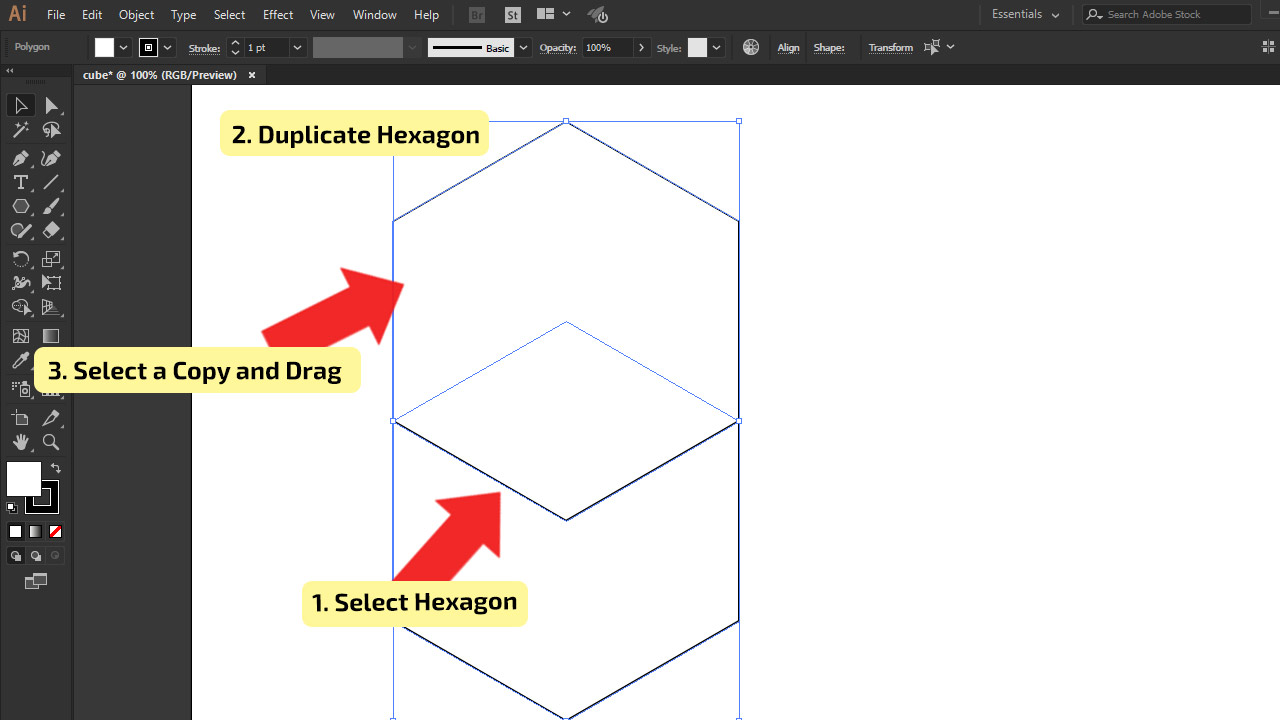
Duplicate the Hexagon. Select the hexagon, as done in the previous step. After selecting, create a copy of the hexagon by pressing Control (CTRL) + C (Windows) or Command + C (MAC), then paste it with Control (CTRL) + V (Windows) or Command + V (MAC). Drag a copy of the hexagon and place the bottom two anchors on the top anchors of the original shape. It should be placed as presented in the image below.
Step 4:
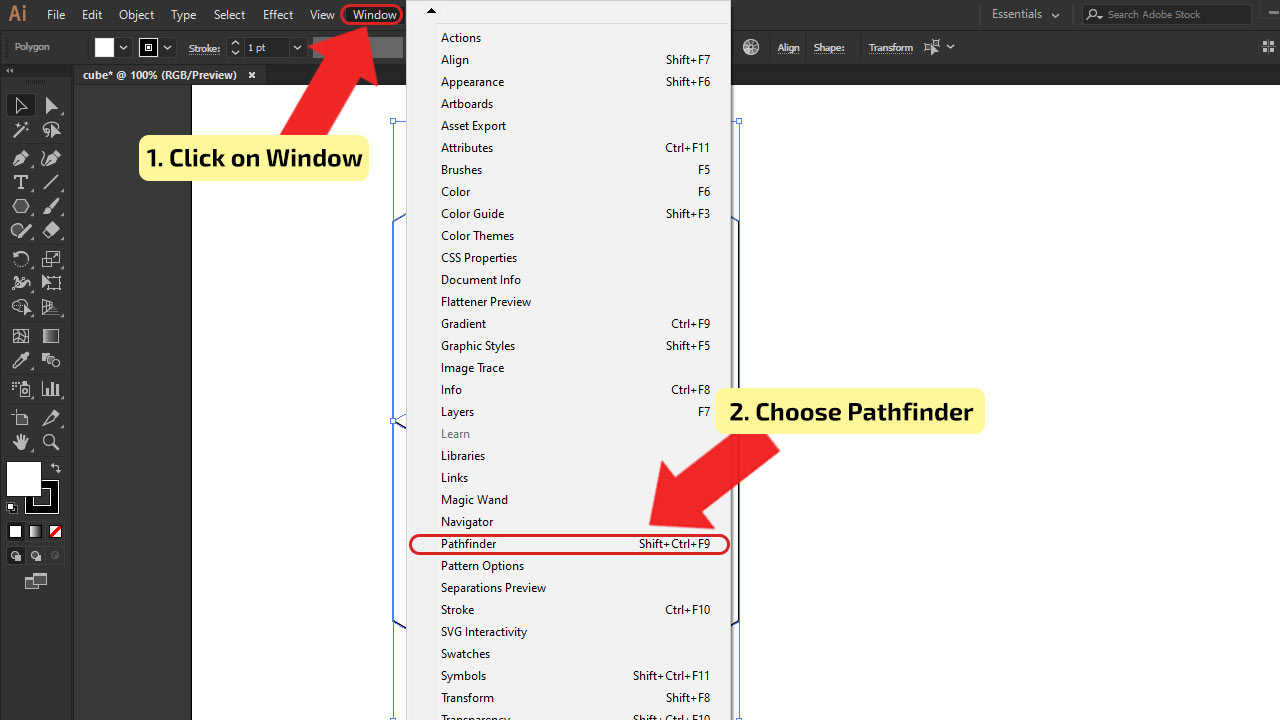
Open the Pathfinder Panel. To open “Pathfinder Panel,” in the main menu, go to “Window,” and the drop-down menu will be shown, click on “Pathfinder,” and a window will pop up. The second way to open these options is to use a shortcut, Shaft + Control (CTRL) + F9 (Windows) or Shift + Command + F9 (MAC).

Step 5:
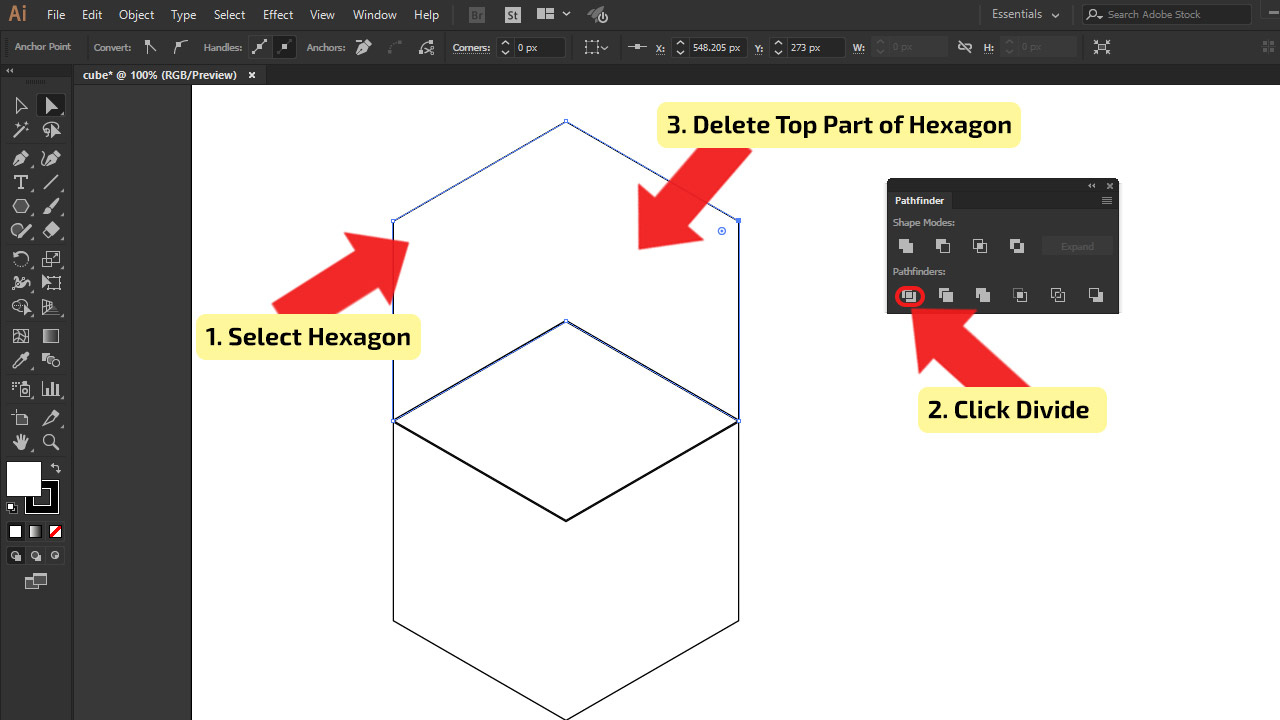
Adjust the squares. Select one of the hexagons with the “Direct Selection Tool.” Using the “Pathfinder” panel, separate hexagons into three parts. In the “Pathfinders” section, click on the “Divide” button. After the separation, select the top part and delete it.
The shortcut for the “Direct Selection Tool” is the letter “A”.

Step 6:
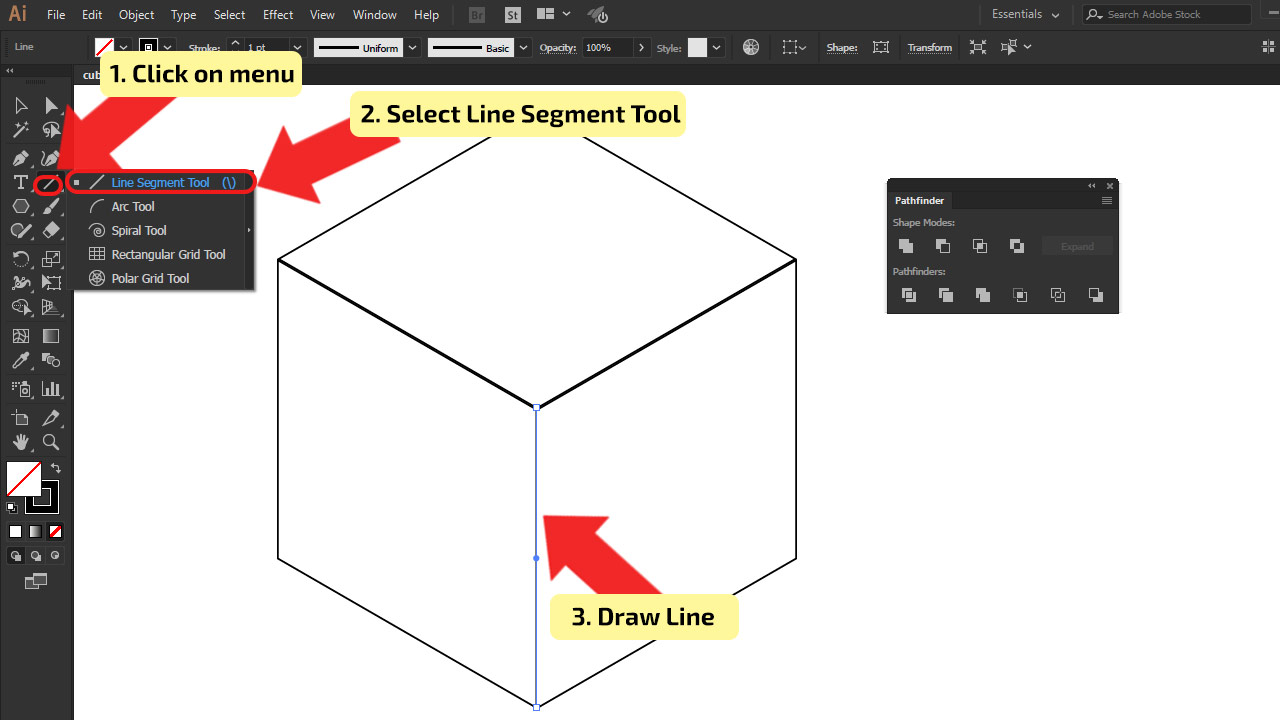
Draw the line. Since the other two parts are perfectly aligned, draw a line with the “Line Segment Tool.” The thickness of the line should be as hexagons (If they aren’t the same thickness, adjust it). Draw the line from the lower anchor of the hexagon and drag it vertically upwards to the middle anchor point. With this, you will get the shape of the cube.
The shortcut for the “Line Segment Tool” is the symbol “\” on your keyboard.

Step 7:
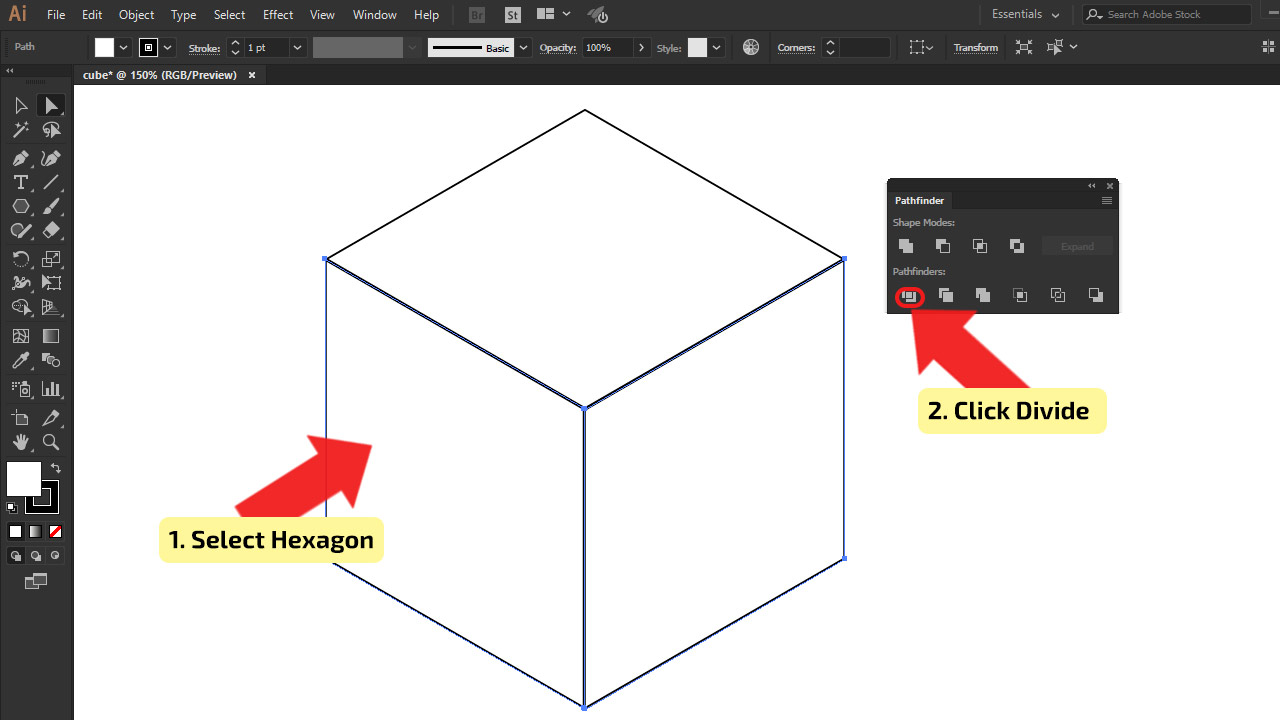
Adjust. Select the bottom part of the hexagons. Now you need to separate it, by using the “Pathfinder” panel in the “Pathfinders” section; again, click on the “Divide” button. Before the separation, make sure that you use the “Direct Selection Tool” to select the hexagon.

Step 8:
Adjust the color of the cube. After adjusting, add colors to each side of the cube. While choosing the colors, make sure that the cube looks realistic. Think about the light source as explained in the previous steps.
In the image, light is coming from the right side of the cube; that’s why that side of the cube is the brightest, the top square is a bit darker, and the left side of the cube is the darkest.
To change the color of each side of the cube, select them one by one. Select the first, for example, the lightest, and choose the color by double-clicking on the “Fill” box in the “Tool Menu”. The “Color Picker” window will pop up, and select the color. After adding the fill color, remove the stroke color. Repeat the step with the remaining cube sides.
Also, if you prefer the gradient, as used in the first part of the tutorial, apply it to this cube as well. After adding and adjusting the color of the cube, select all three sides of the cube, click on the right-click, and the drop-down menu will appear. Choose “Group,” and they will be as one object, grouped.


Hey guys! It’s me, Marcel, aka Maschi. On MaschiTuts, it’s all about tutorials! No matter the topic of the article, the goal always remains the same: Providing you guys with the most in-depth and helpful tutorials!

