

Creating tables can be quite a daunting task for not-so-tech-savvy people, especially if you have to create one in Google Docs.
Some would even probably think that you’ll have to create a table using Google Sheets first and then paste it into Google Docs afterward.
But, inserting tables and eventually editing the rows in Google Docs is such an easy feat once you get the hang of how the process goes.
So, here’s how you can edit rows in a table in Google Docs.
How to Edit Rows in a Table in Google Docs
- After inserting a table in Google, tap a cell in the row you want to edit.
- To add a row in the table, right-click on the said row or head to the “Format” tab on the menu bar to select either “Insert row below” or “Insert row above.”
- To delete a row, either right-click or head to the “Format” tab on the menu bar and choose “Delete row.”
- To make a row bigger or smaller, position the cursor at the border of a particular row and drag it upward or downward.
- If you want to merge cells in a particular row, highlight those cells, right-click, and select “Merge cells” in the dropdown menu.
Editing Rows in Google Docs — Tricks and Tips You Should Know
As you can see above, editing rows in Google Docs isn’t as daunting as it seems.
Whether you’re an expert or a newbie, you only need to know what tabs to click for you to begin viewing multiple tables and editing their rows.
Granting that you’ve already inserted a table in your Google Docs document, here’s how you can begin with the row editing process.
Also, if you are working with tables that contains a lot of data, please don’t forget that you can always zoom in or out in Google Docs to make sure you can see all the data just fine.
Adding Rows in Google Docs
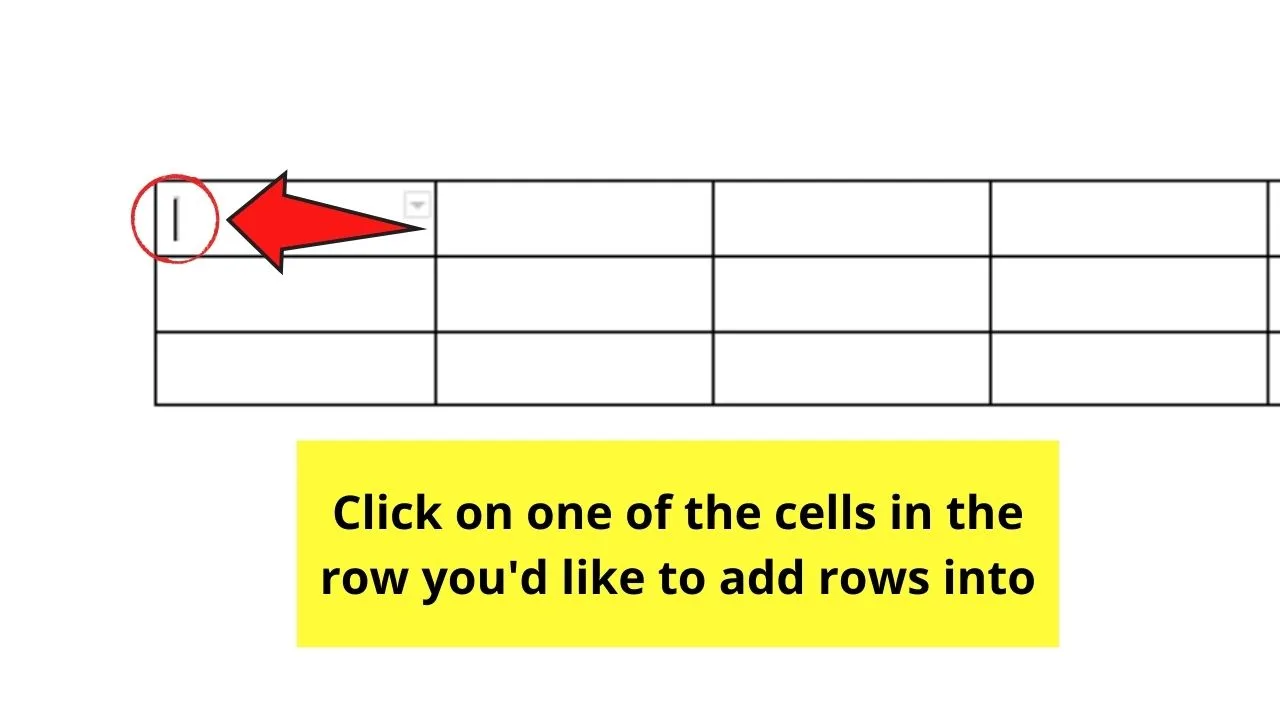
Step 1: On the table you inserted, click on a cell of a particular row that you’d like to adjust.

Step 2: Now, it’s time to add a row either above or below the one where you placed your cursor into.
However, as easy as this step is, there is a long method and a shortcut on how you go about this step.
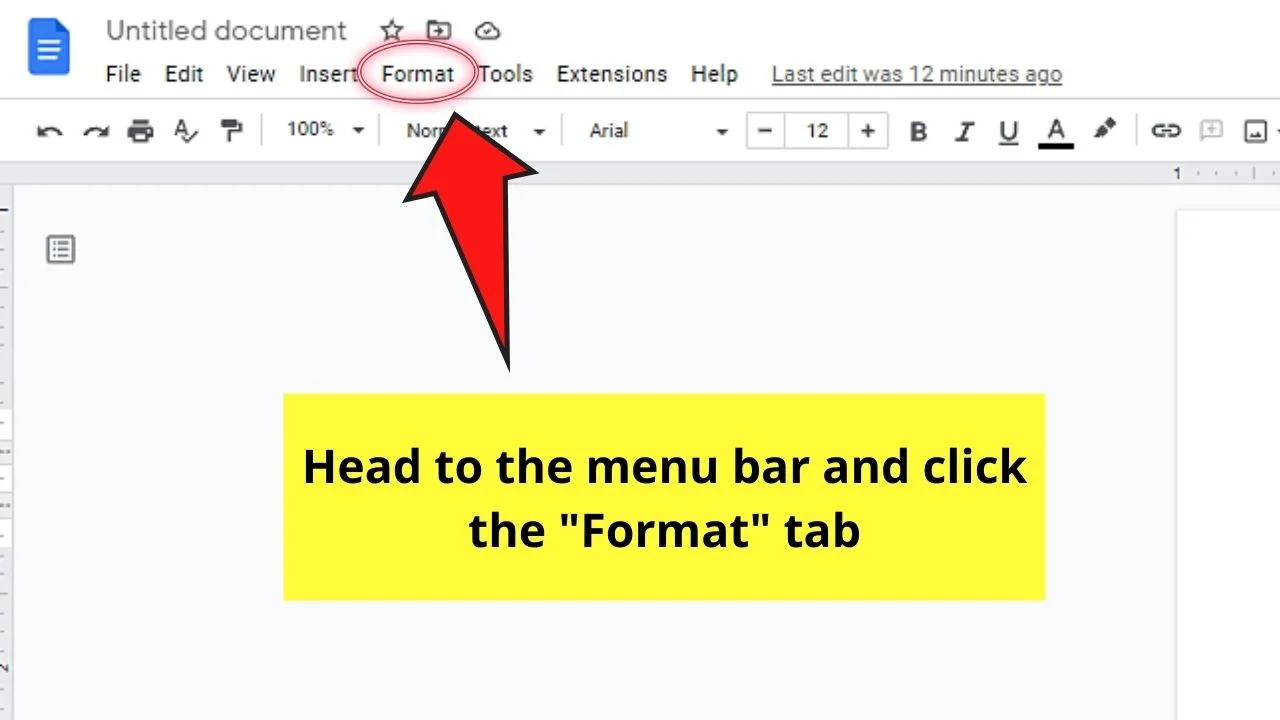
If you prefer to use the long method of adding rows, head to the “Format” tab on the menu bar and click it.

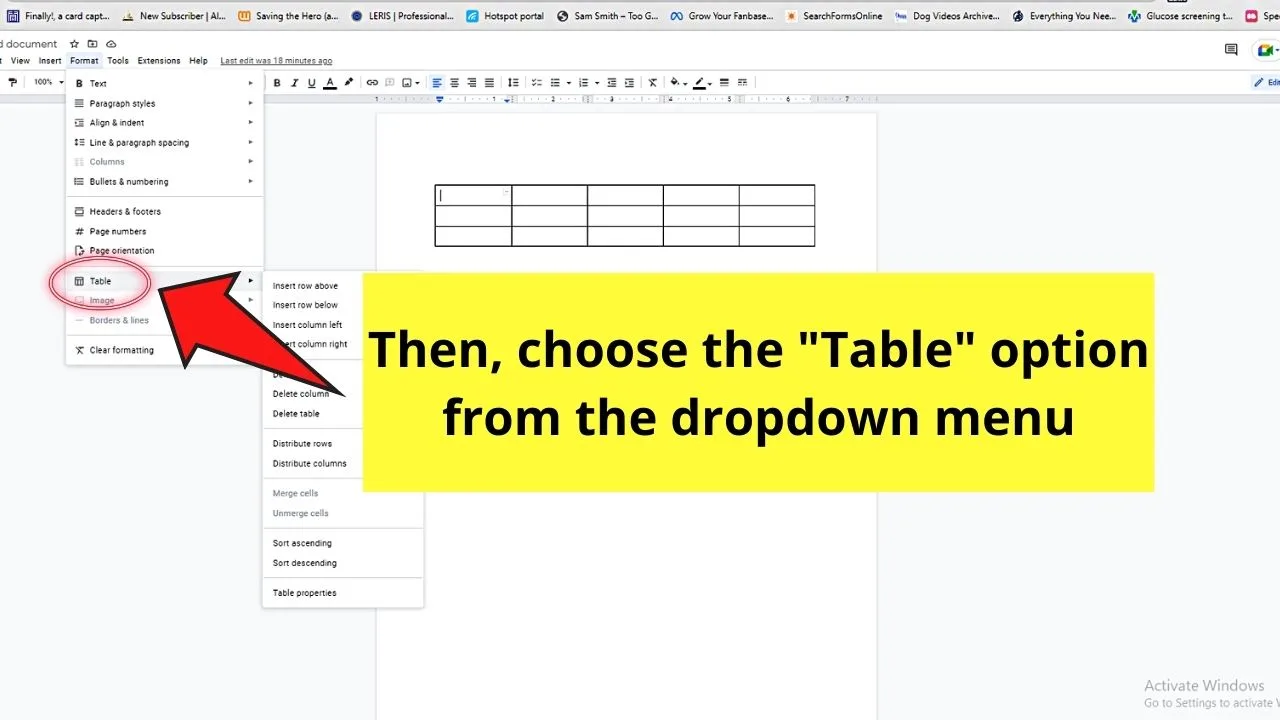
Then, in the dropdown menu that appears, choose the “Table” option. This will lead to another dropdown menu appearing beside it.
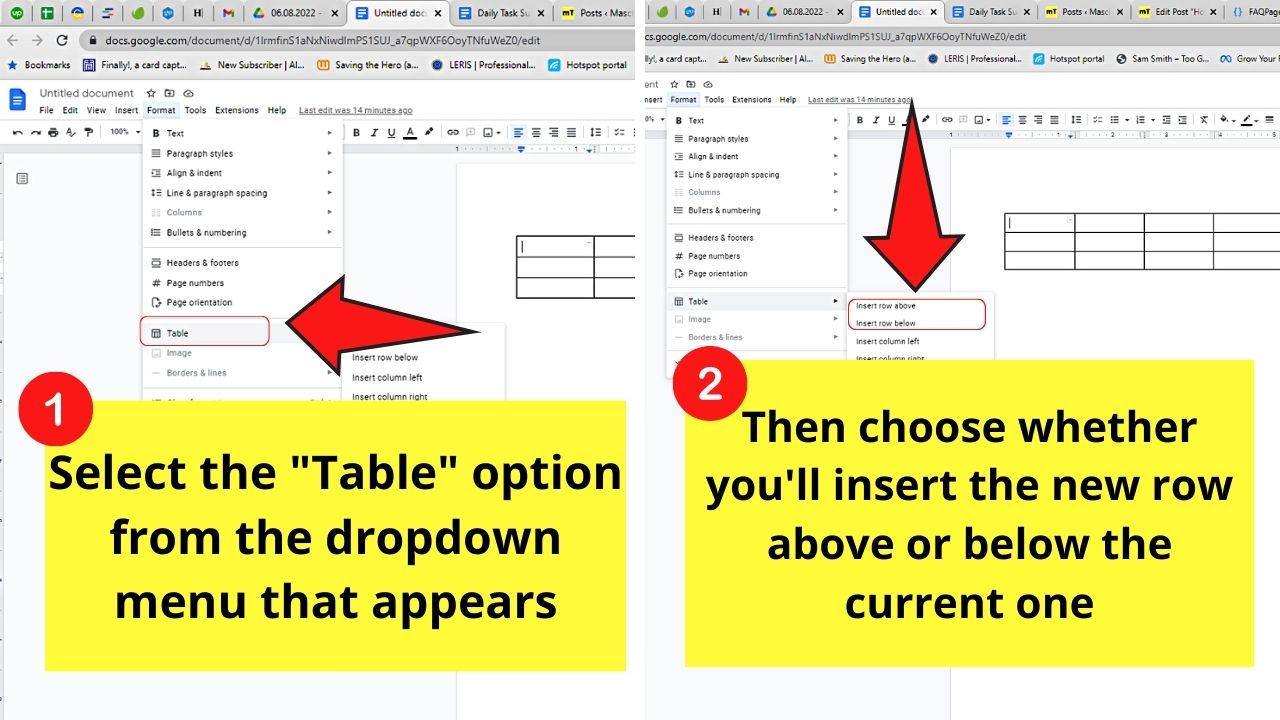
On the second menu, select either “Add row above” or “Add row below” depending on where you want the new row to appear.


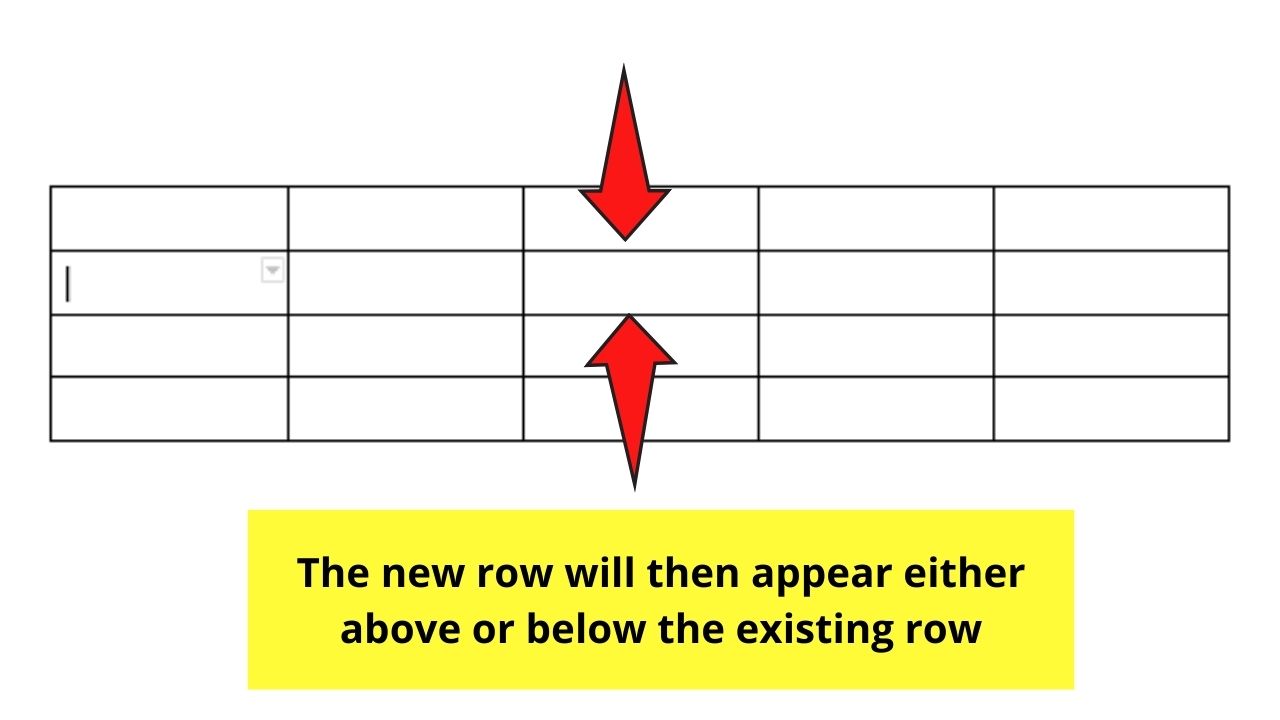
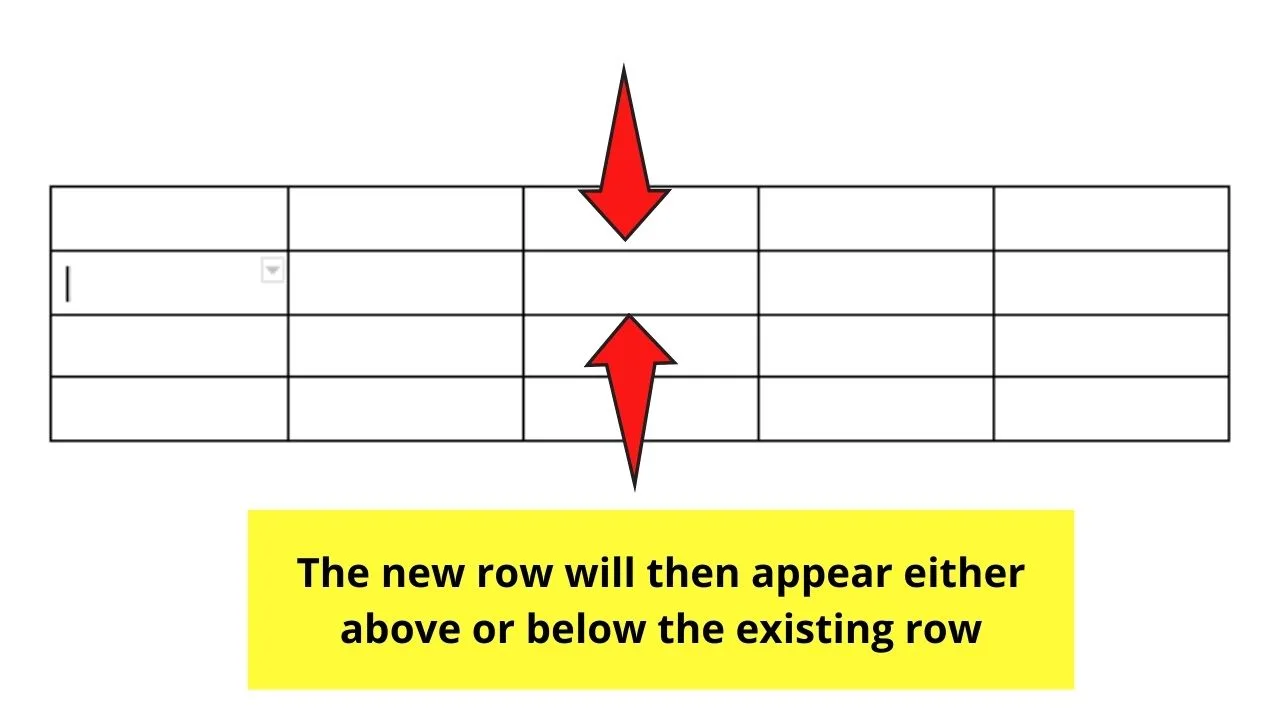
Step 3: Now, if you find the first method too lengthy a process, you can opt to right-click on the cell where you positioned the cursor.
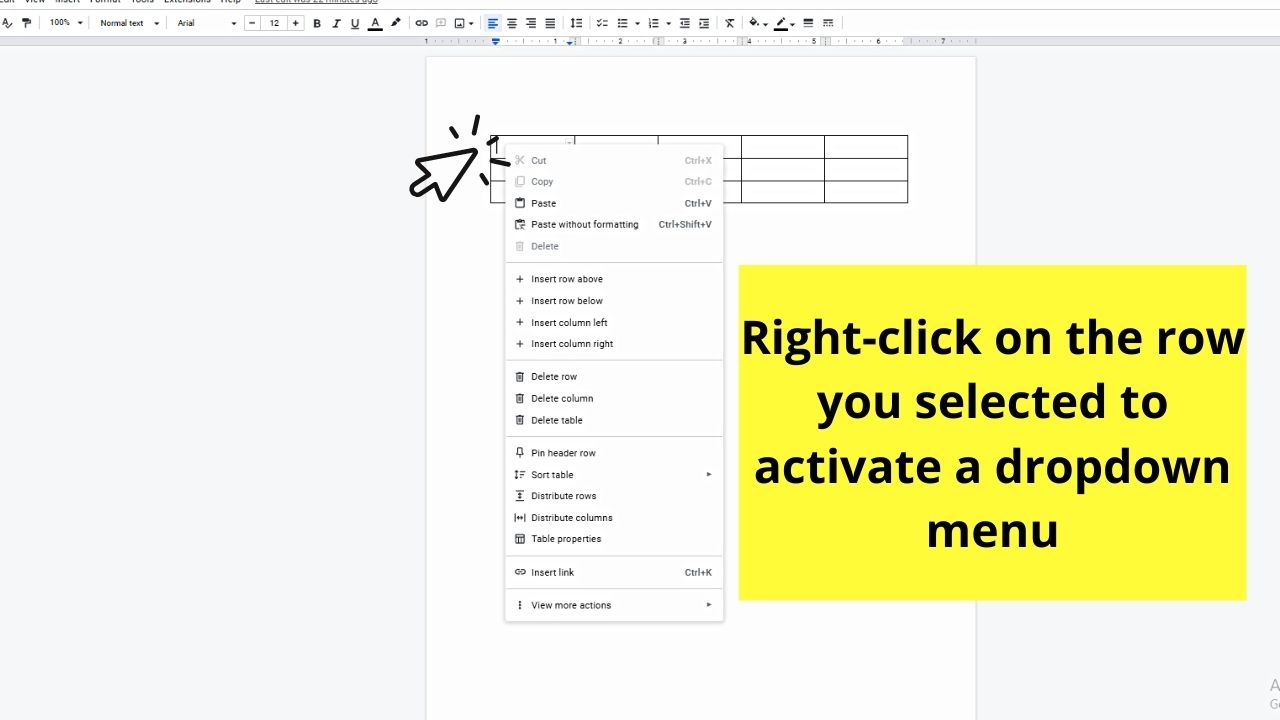
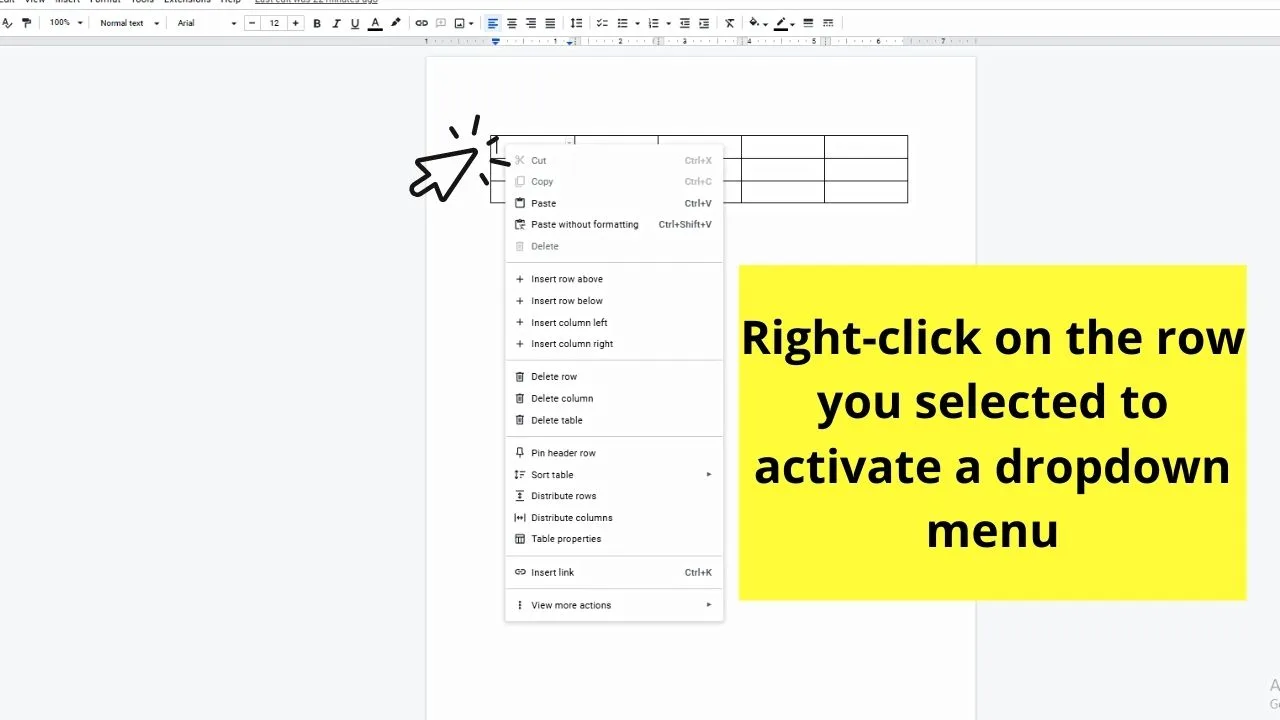
Then, on the dropdown list that appears, choose “Add row below” or “Add row above.”
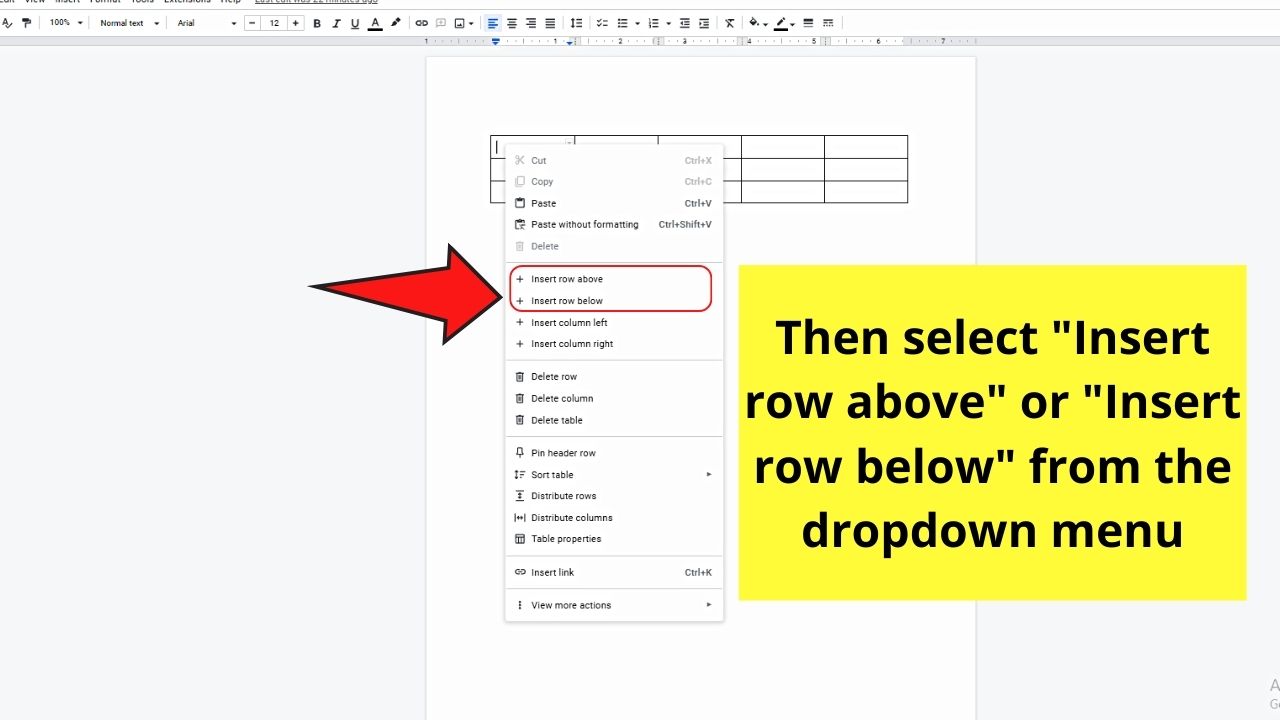
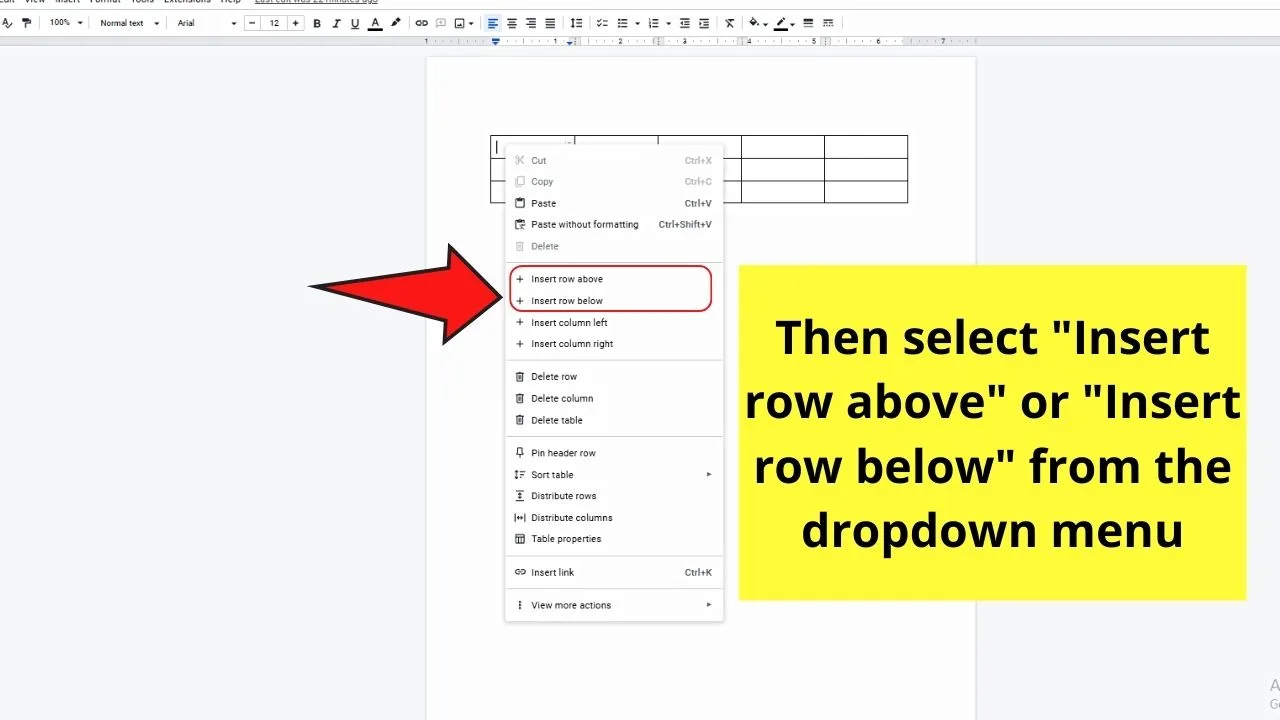
A new row below or above the current row you selected will then appear.
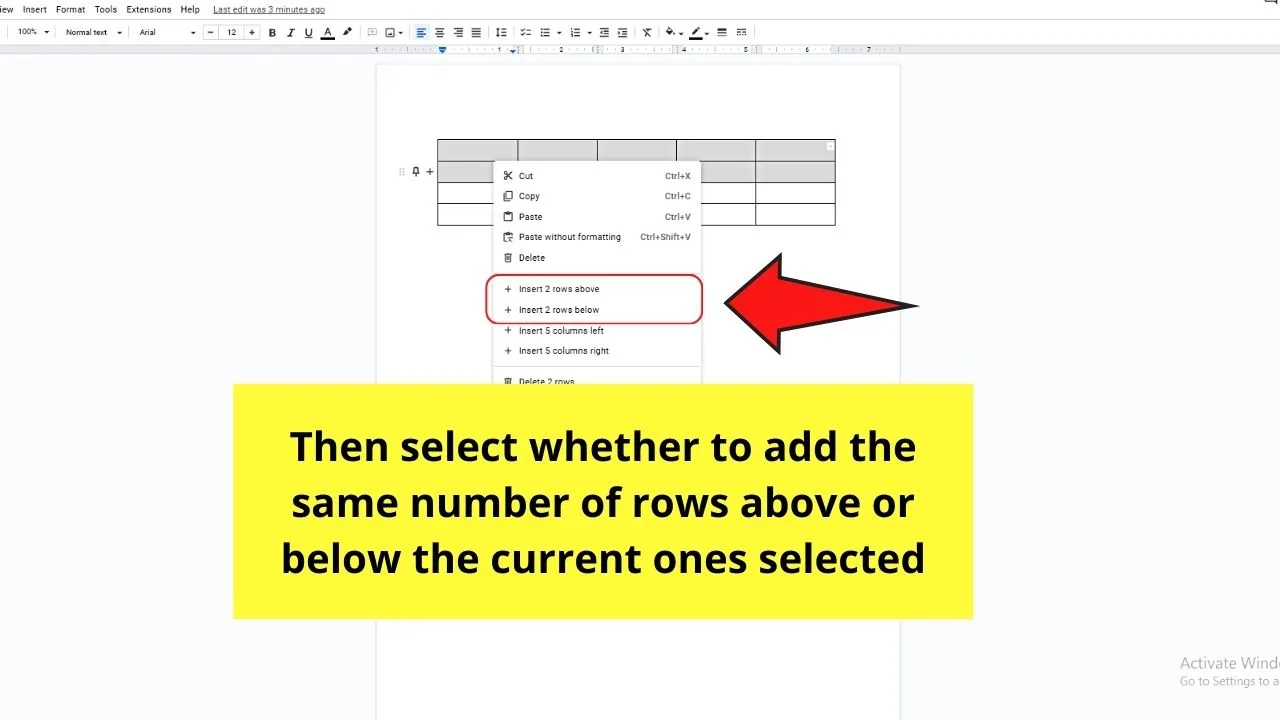
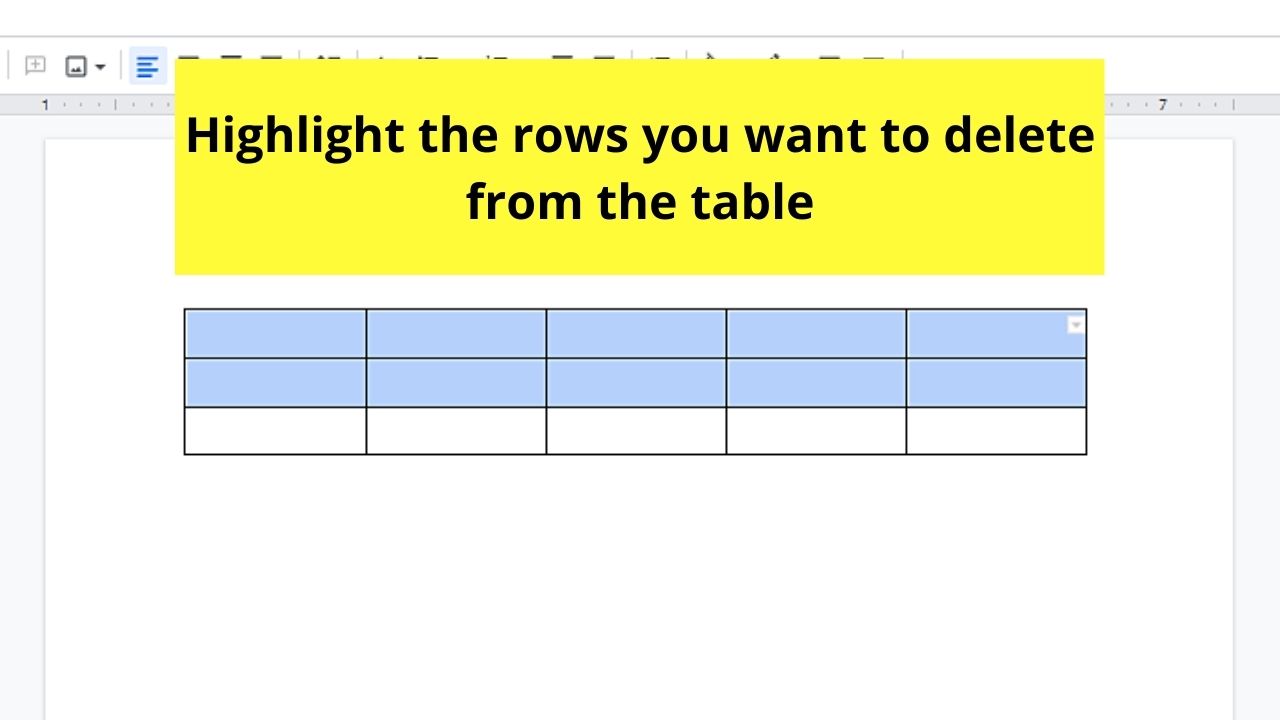
Step 4: Now, if you want to add multiple rows to your Google Docs table, simply highlight a particular number of rows in the said table.
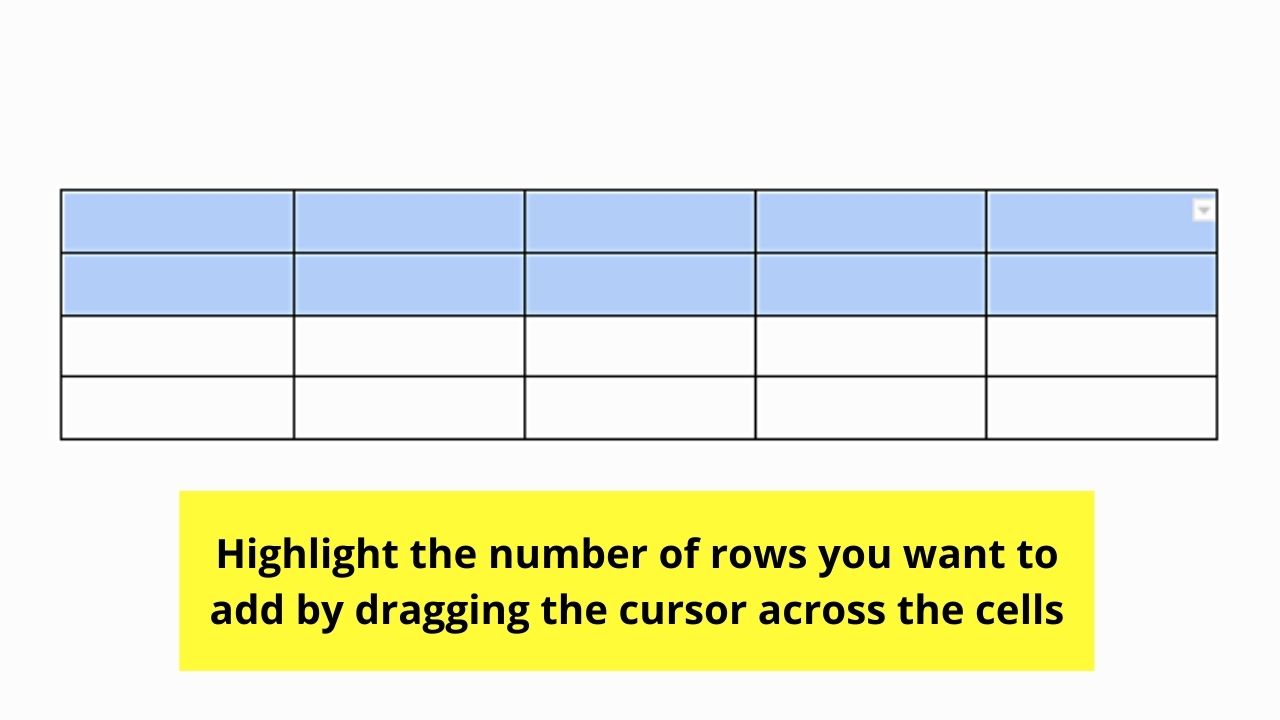
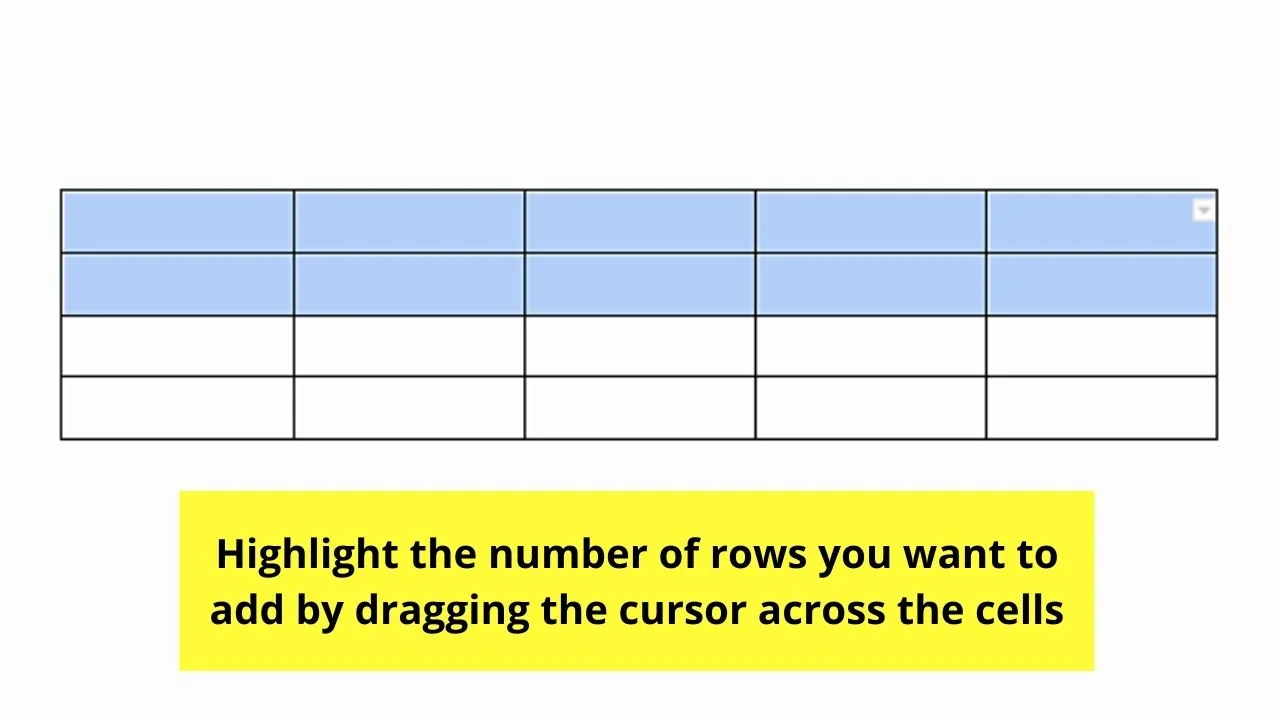
Then, right-click on those selected rows and choose either “Add rows above” or “Add rows below” to add the same number of rows above or below them.

Pretty easy, huh?
But, what if I accidentally added more rows than needed to my table. Can I still delete them?
Deleting Rows in Google Docs
Granting that you’ve already inserted a table in your Google Docs document, here’s how you can delete excess rows.
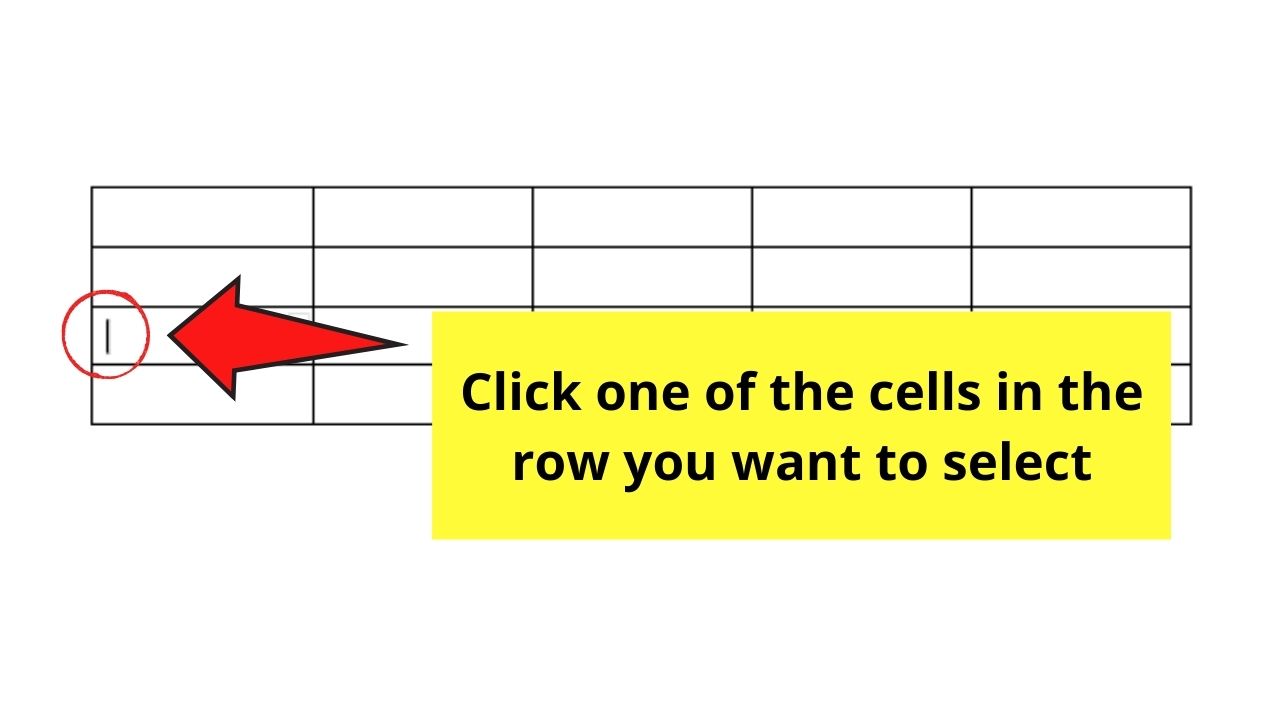
Step 1: Click a particular cell on the row you want to edit to select it.

Step 2: Once that cell’s highlighted, you can begin deleting the row to which it belongs.
The first method is to click “Format” in the menu bar before selecting “Table.”
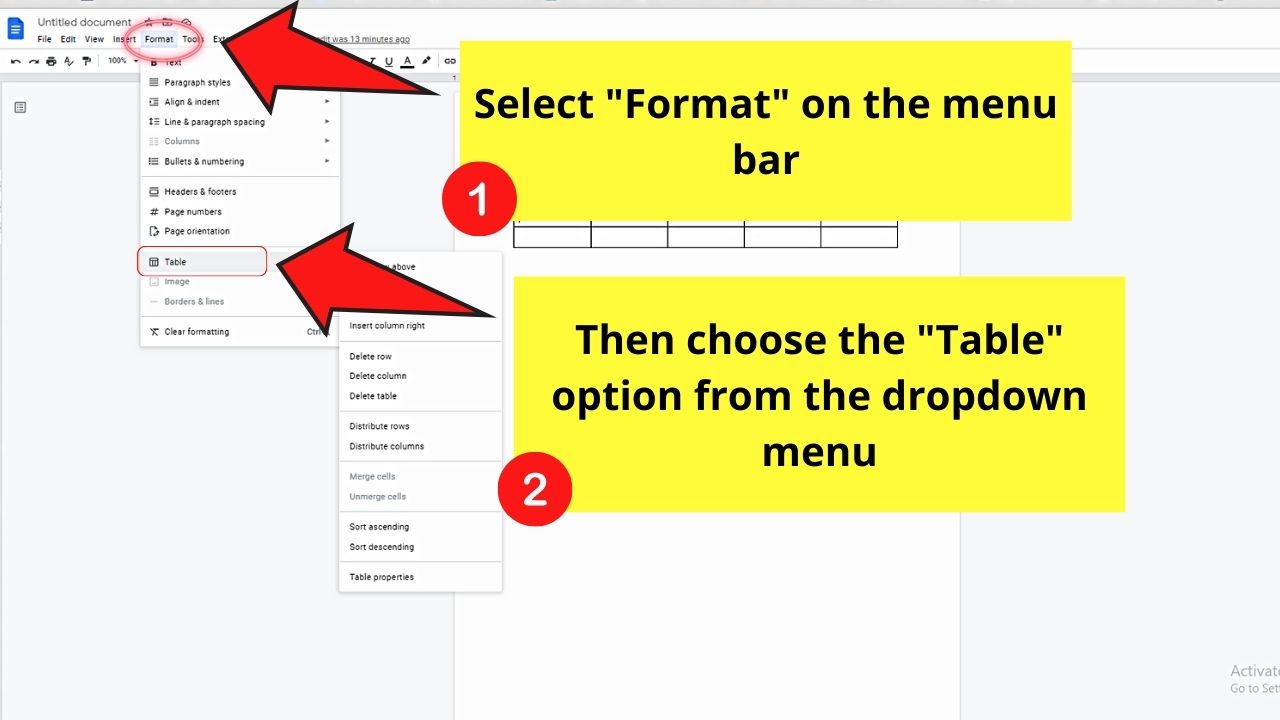

Then, choose the “Delete row” option.
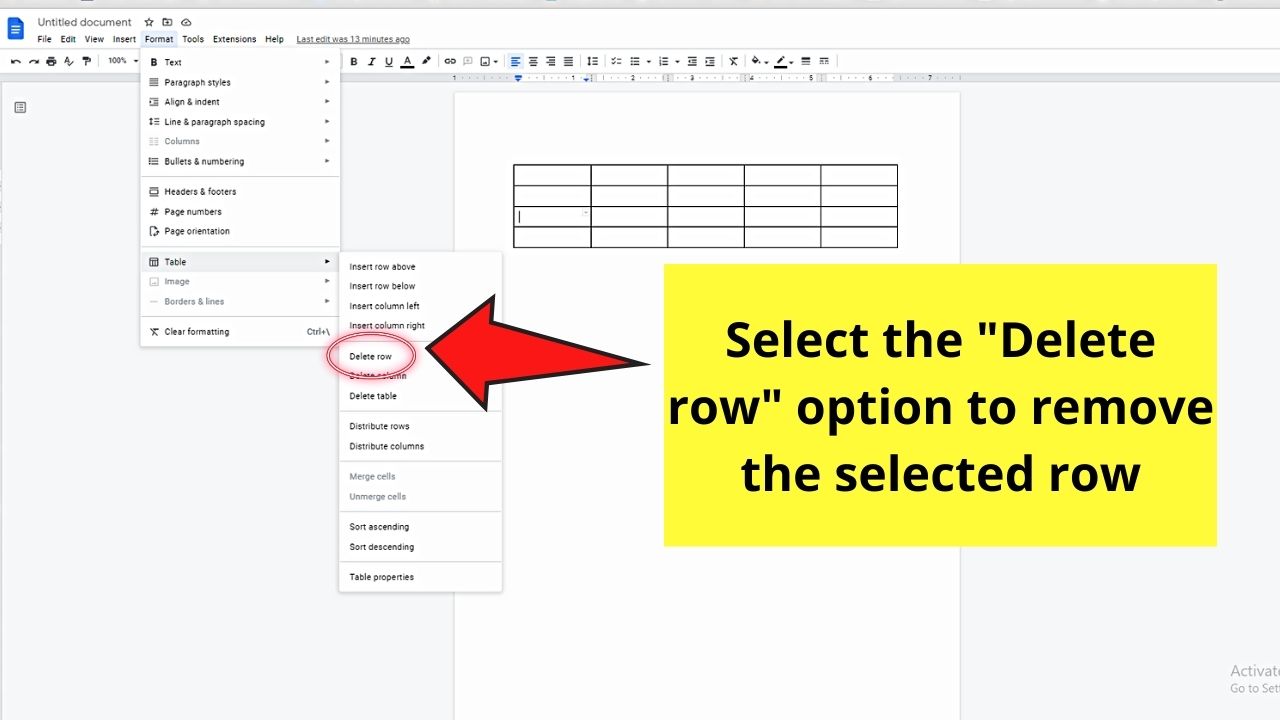
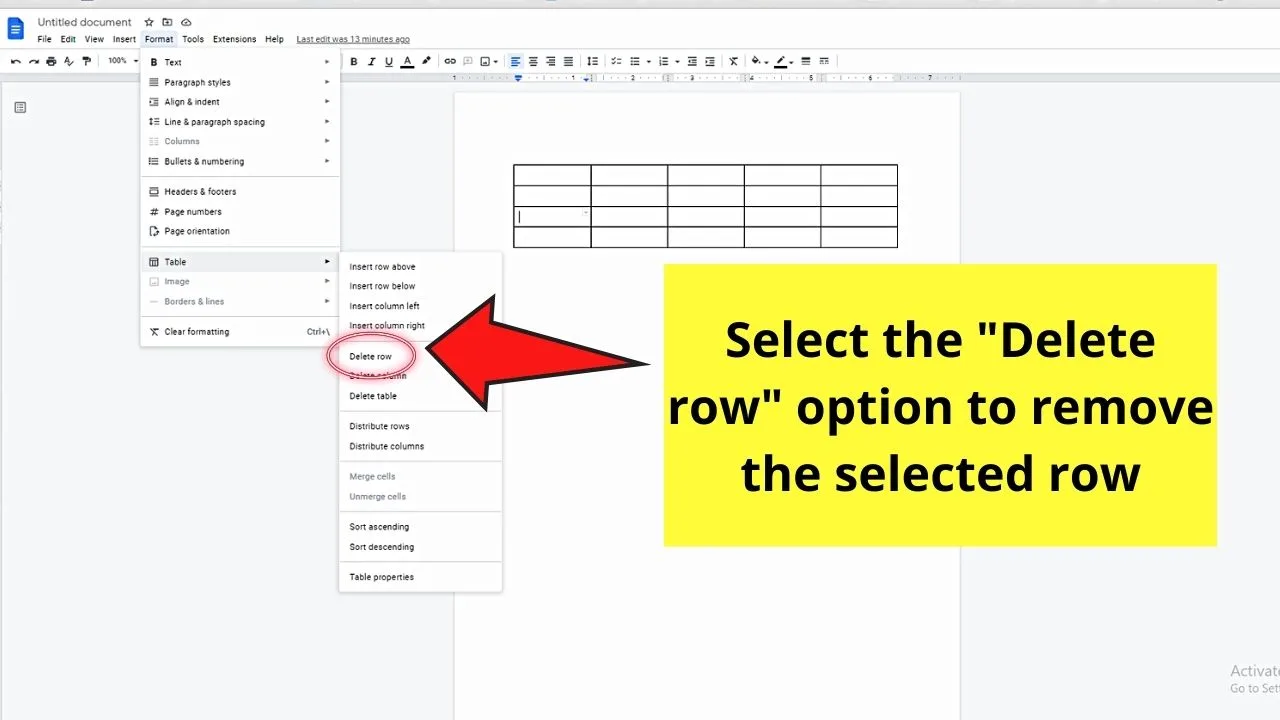
Step 3: If you prefer a more direct method of activating the “Delete row” option, right-click on the selected cell to make a dropdown menu appear.


Then, select the “Delete row” option.
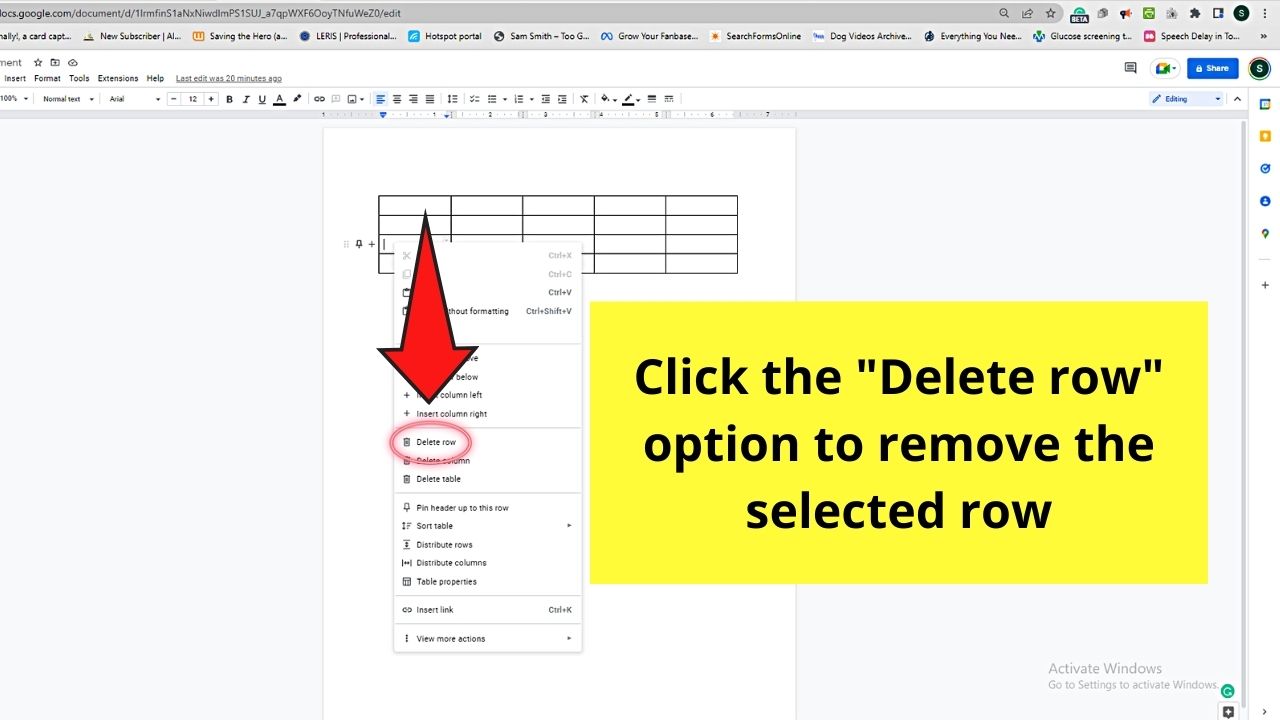
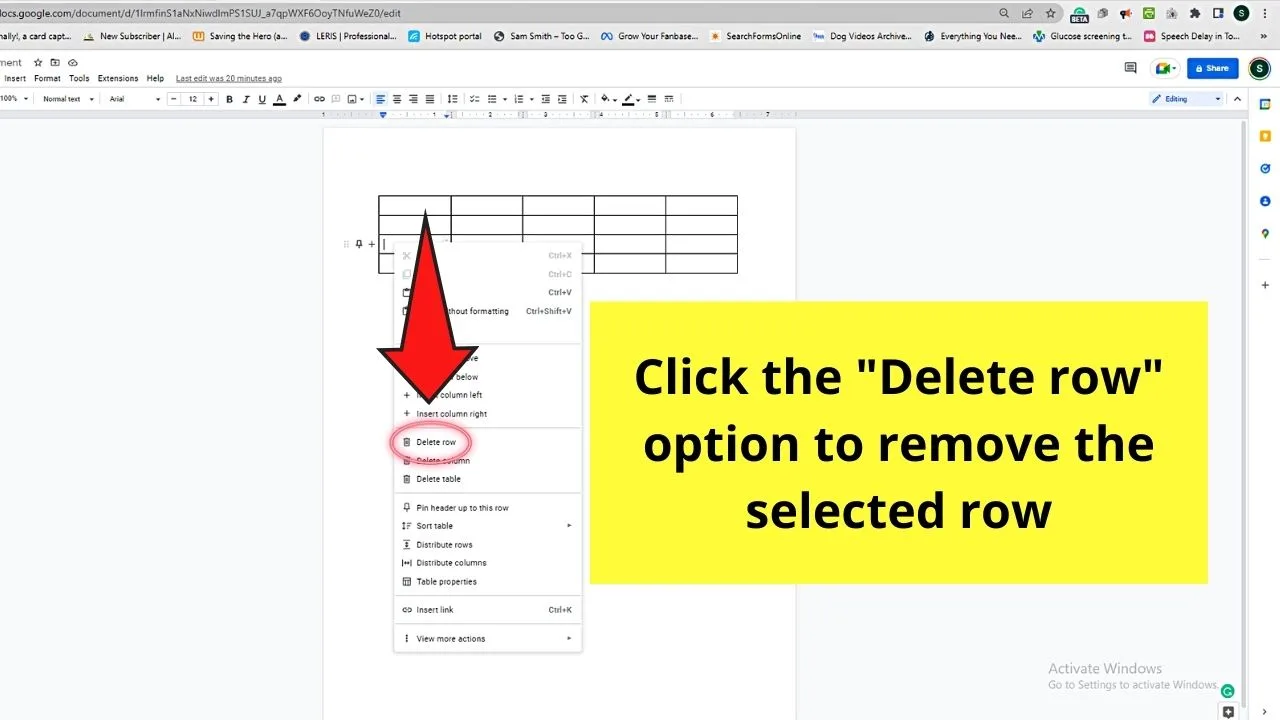
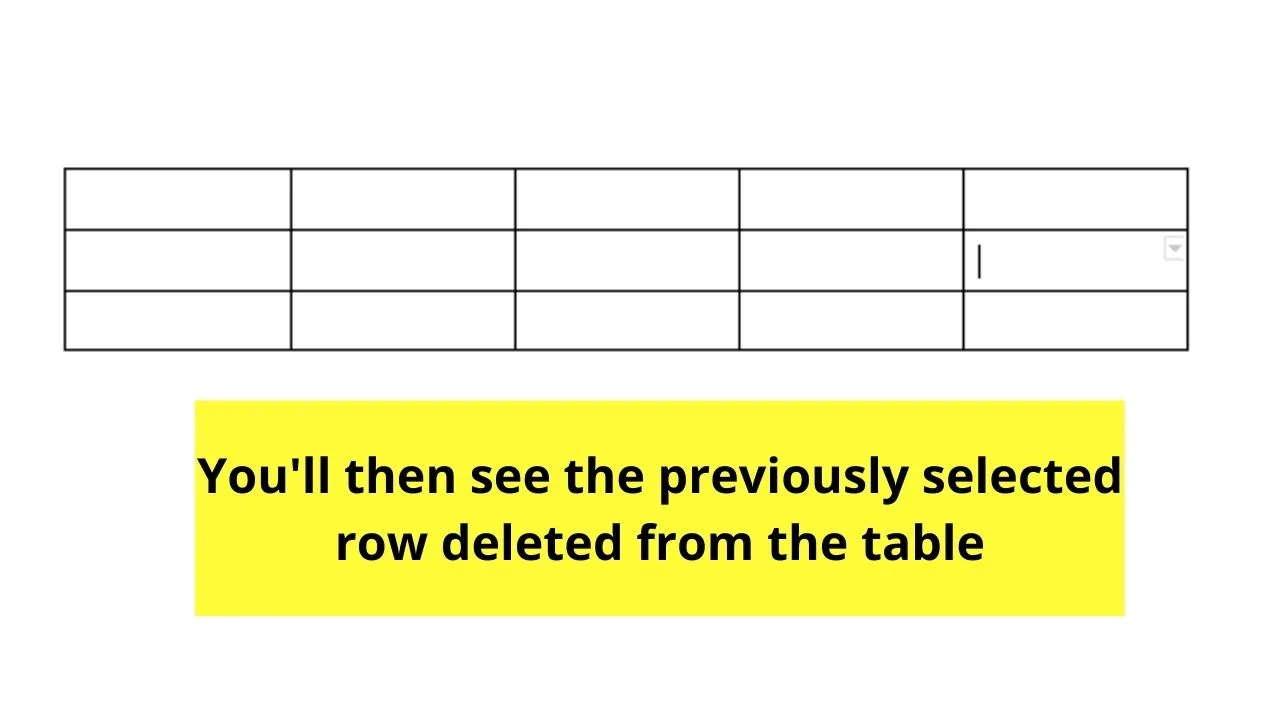
Automatically, the row where your blinking cursor’s positioned disappears.

Step 4: To delete multiple rows at a time, select those rows by dragging the cursor over them until they’re highlighted in blue.
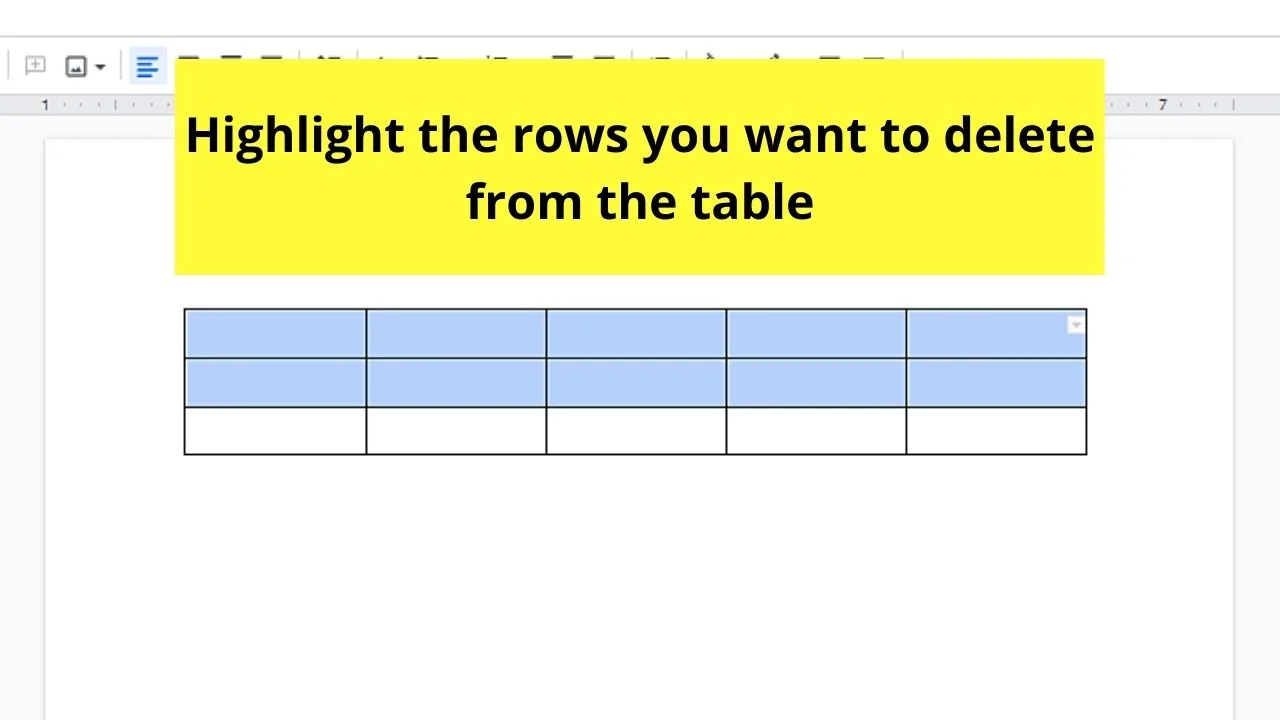
Then, right-click on the row you selected and choose “Delete rows.”
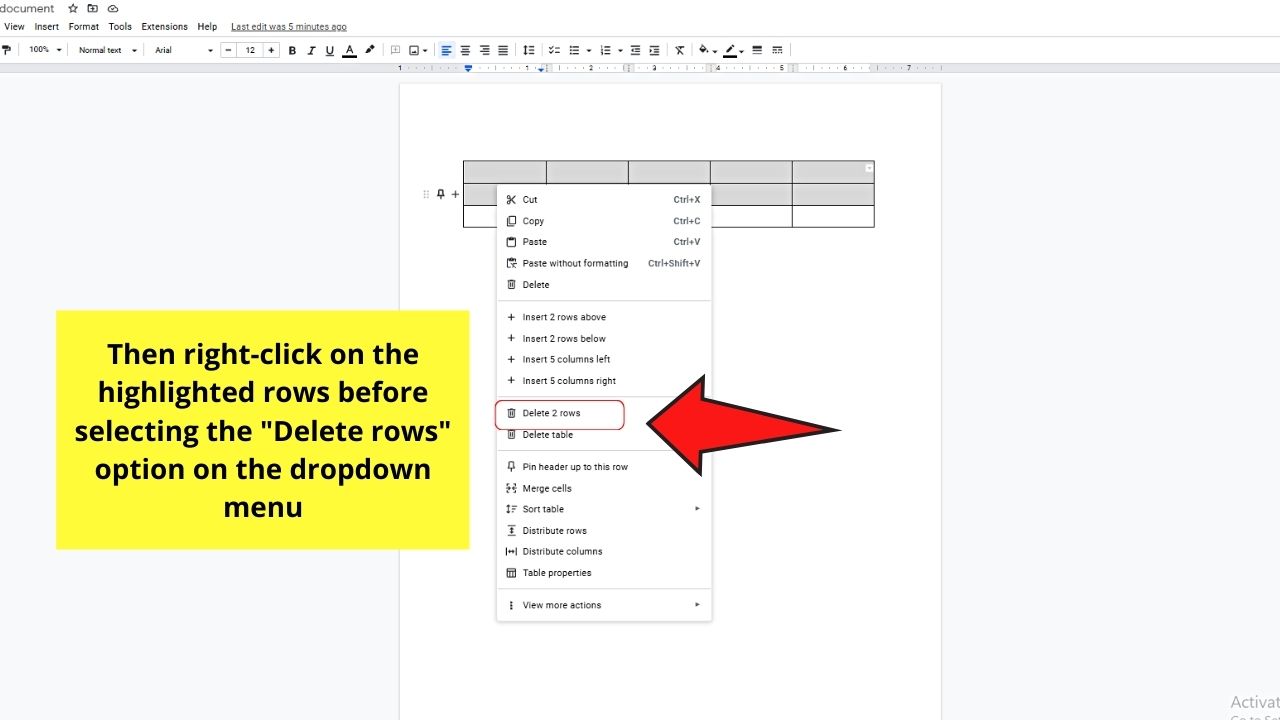
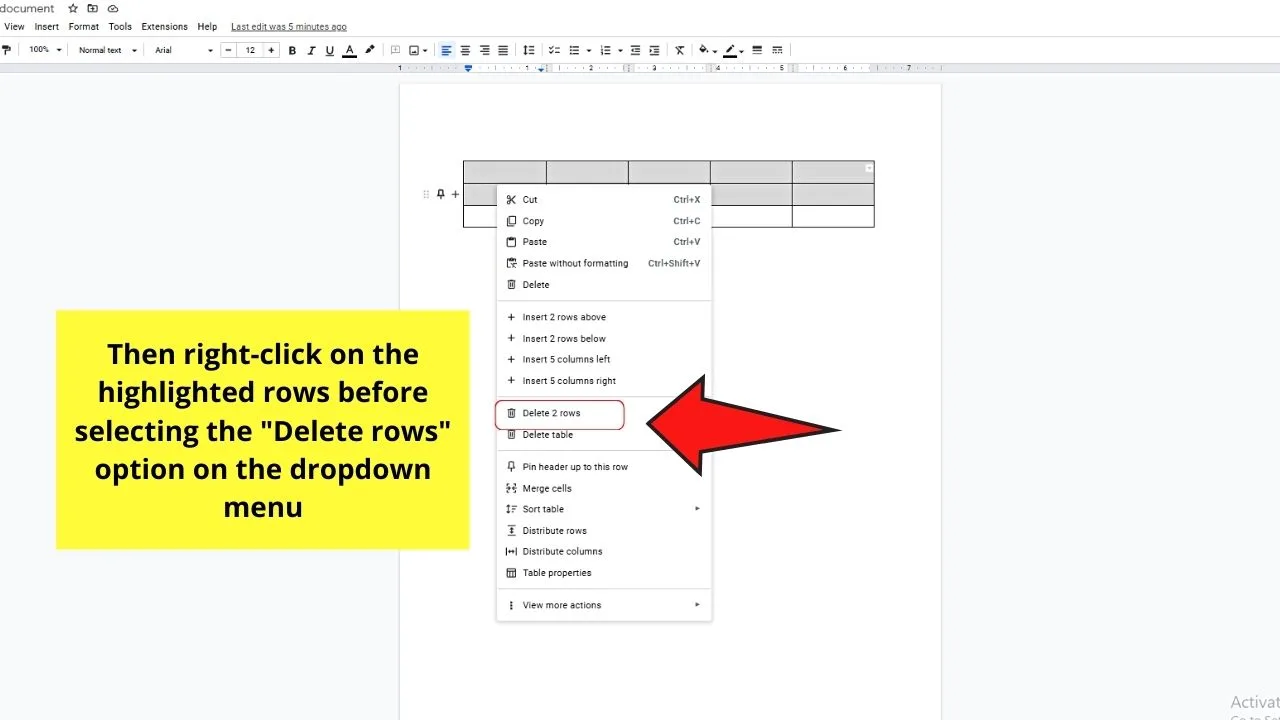
You can also do this step by clicking “Format” > “Table” > “Delete row” after you select the row you want to remove.
Now that you know the basics of adding and deleting rows in Google Docs, let’s move on to a much more advanced editing process.
Making Rows Bigger or Smaller in Google Docs
When you say resizing rows in Google Docs, we’re talking about the row height.
Now, there are 2 ways to adjust the row height. Let’s start with the more precise methods of the two.
Method 1: Adjusting Row Height in “Table Properties”
Step 1: Place the cursor on a cell of the row you want to adjust its size.

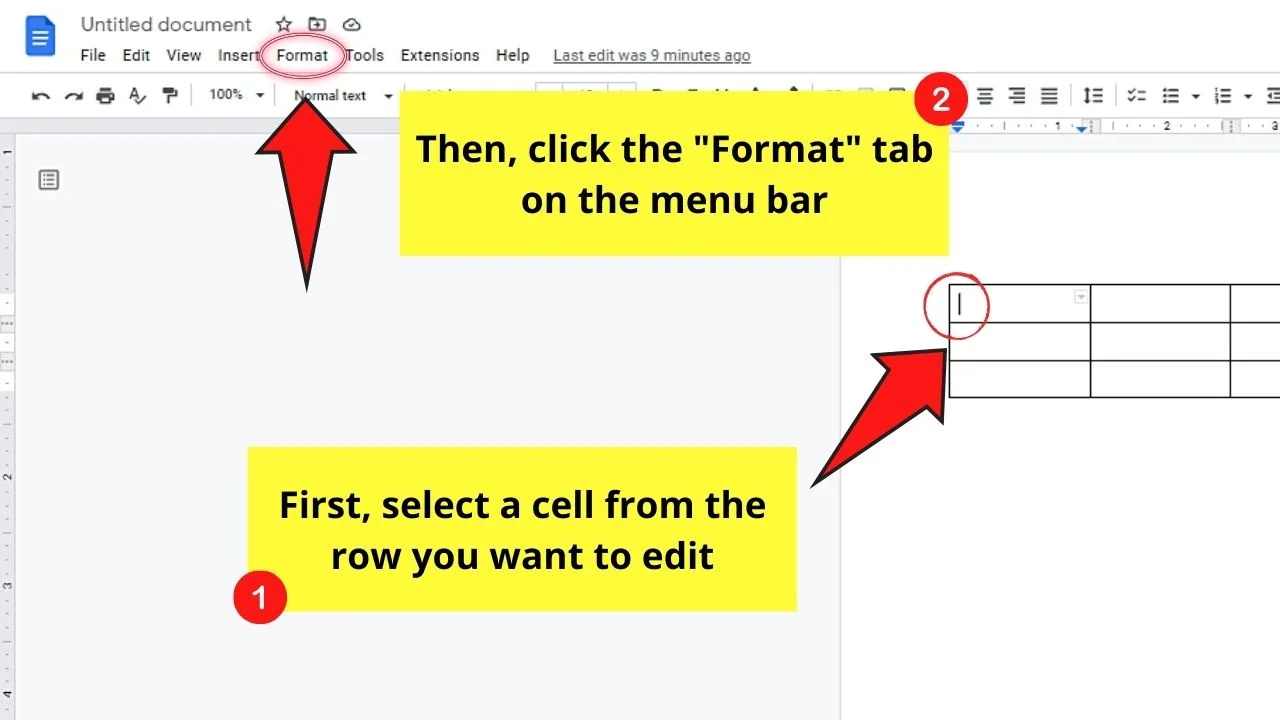
Step 2: Now, click “Format” found on the menu bar.
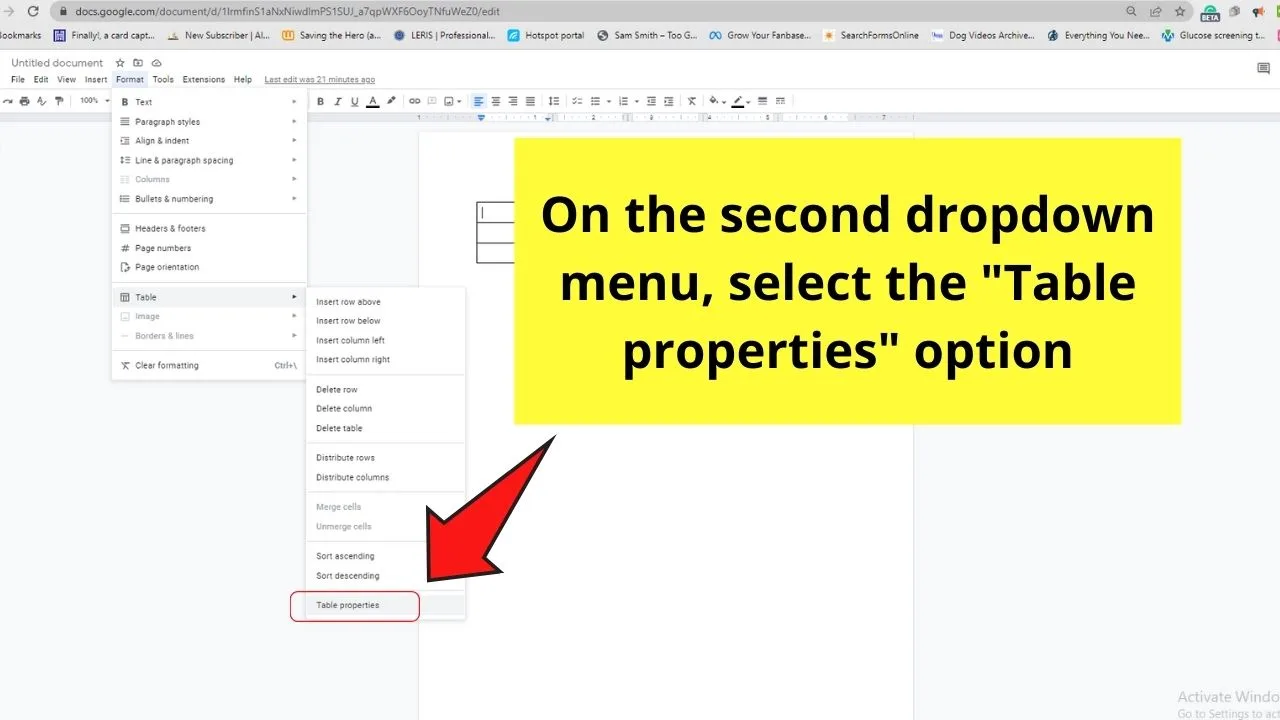
Step 3: On the dropdown menu that appears, select the “Table” option.

This will then activate another dropdown menu beside it.
Step 4: Keep scrolling down until you see the “Table Properties” option. Click to select it.

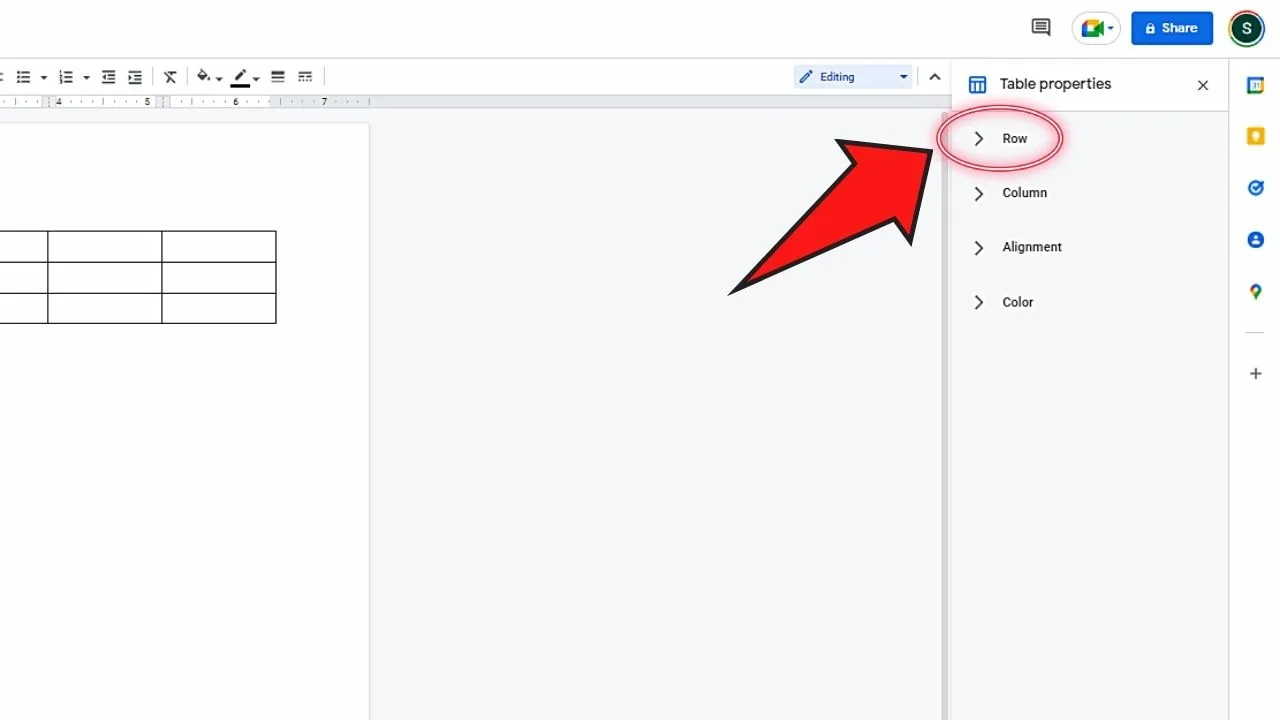
Step 5: You will then see a sidebar appear to the right of the Google Docs page.
From the 4 options available, choose the “Row” category and click the “>” button.

Step 6: Tick the “Minimum row height” box and type a number inside the box.
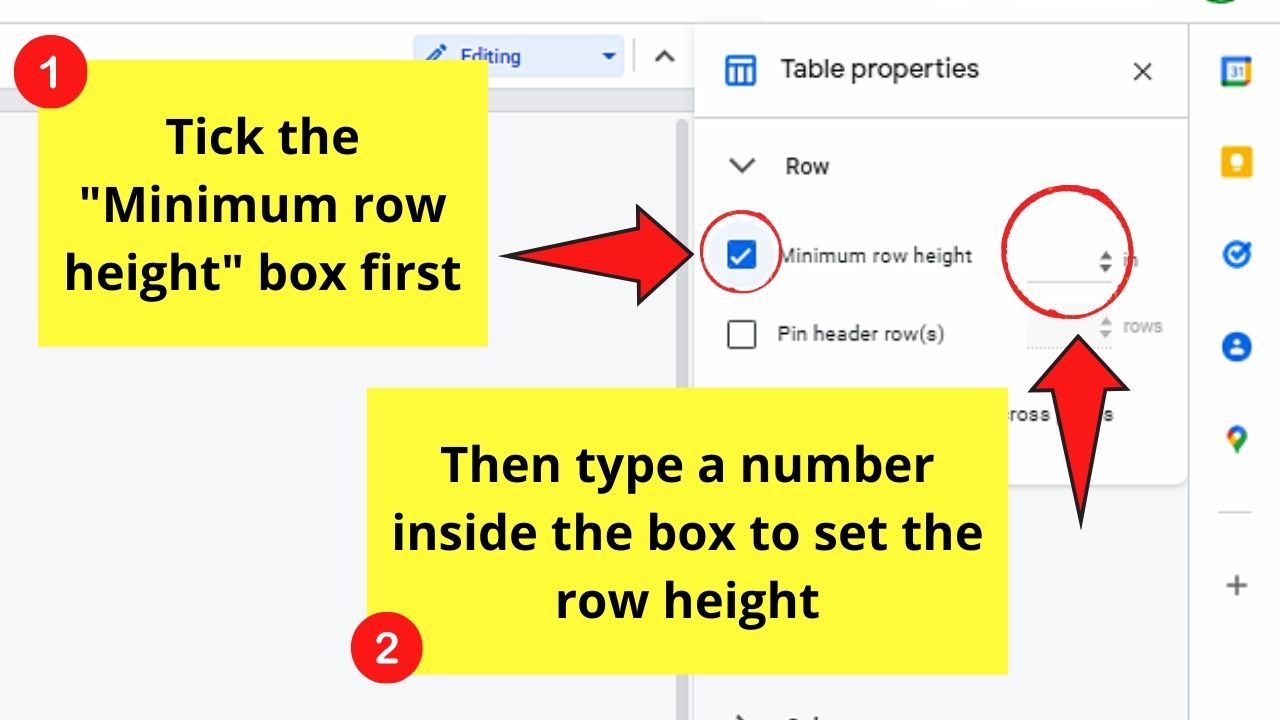

You decide what number you put. If you want to make the row bigger, type in a larger number.
If you want to make your row smaller, type in a number of smaller value.
The changes you create with the row size will then appear automatically on your Google Docs table.
Now, if you don’t want to go through a maze of dropdown menus, then the second method below is for you.
Method 2: Adjusting Row Height by Manual Resizing
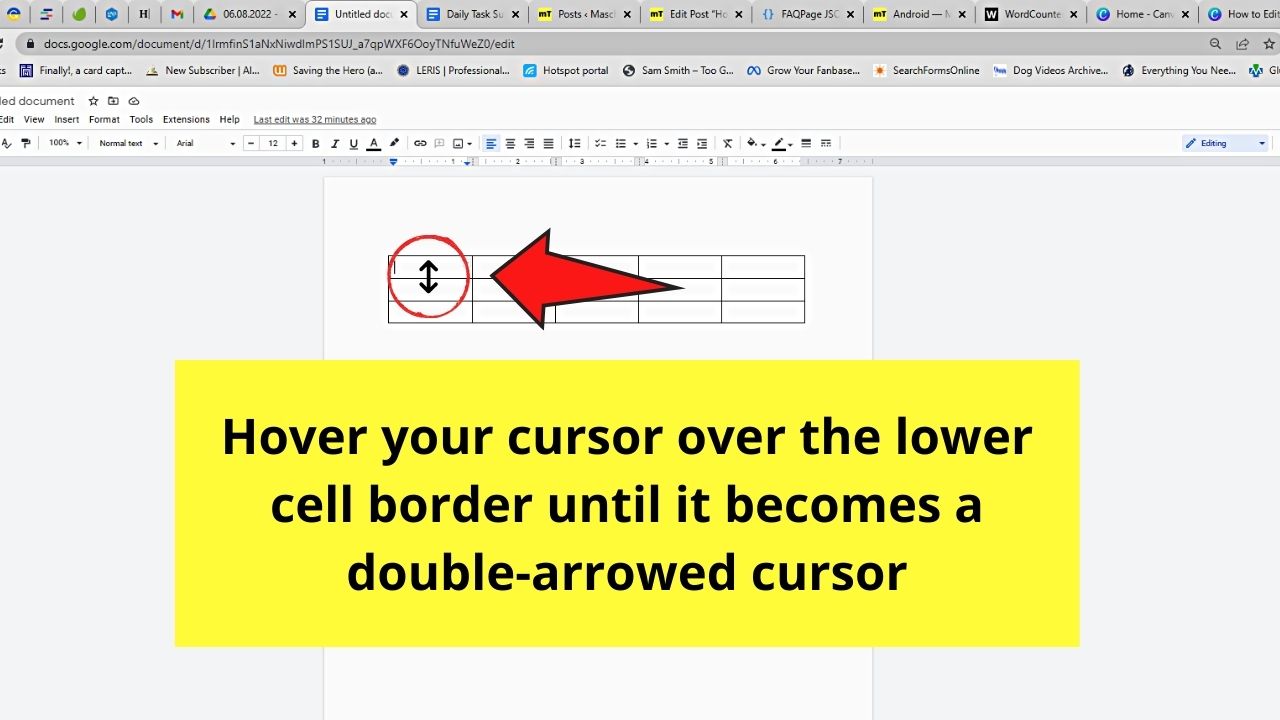
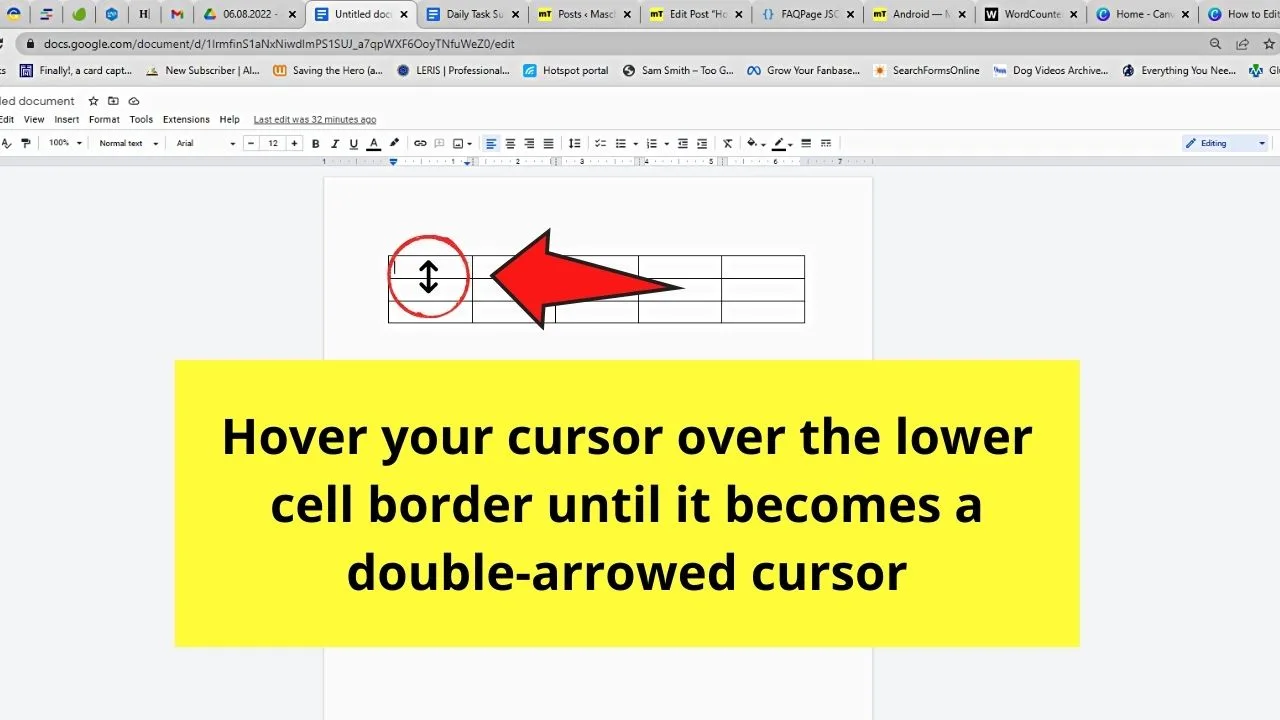
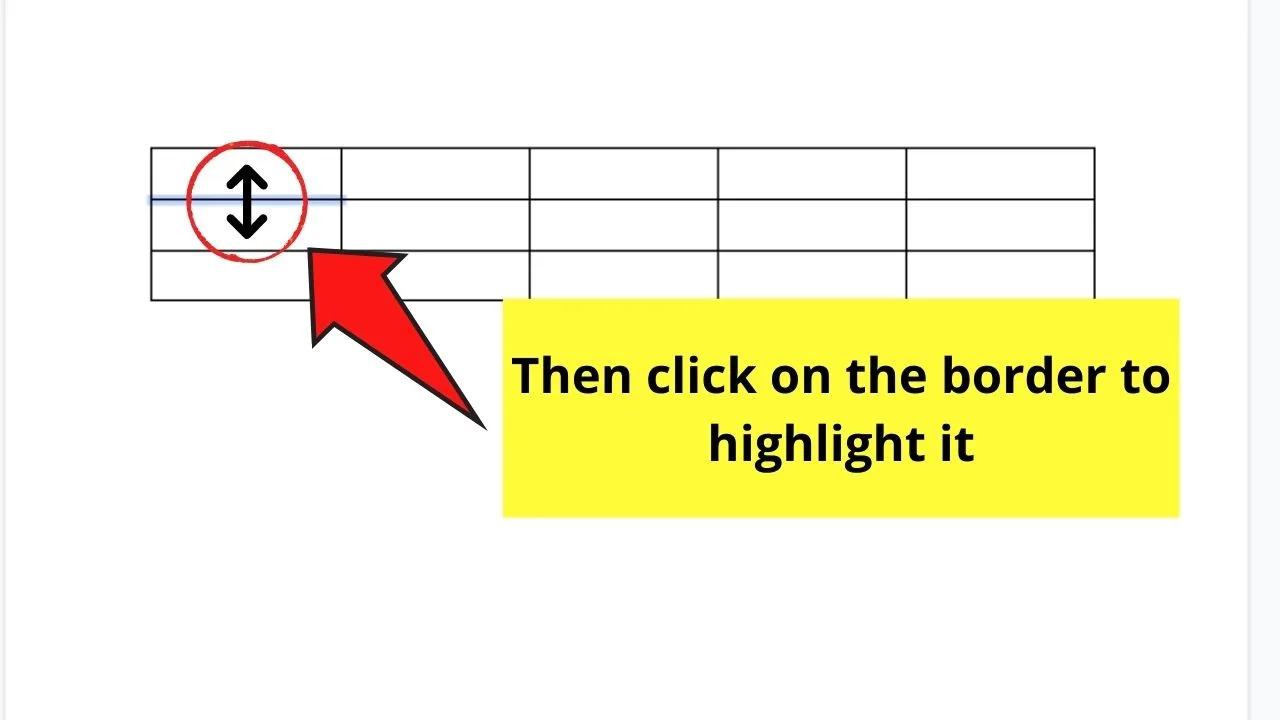
Step 1: On the table you inserted, position your cursor on the border of the cell in the row you’re editing. Do so until you see the cursor shift into a double-sided arrow.
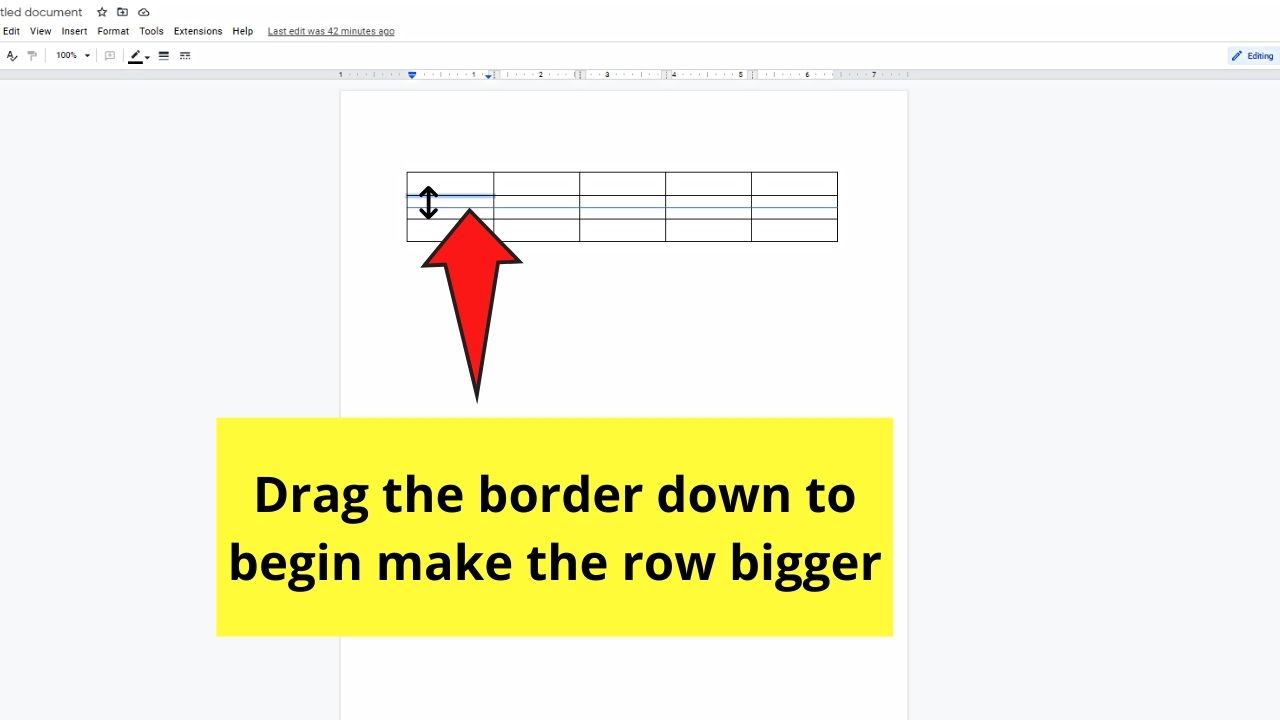
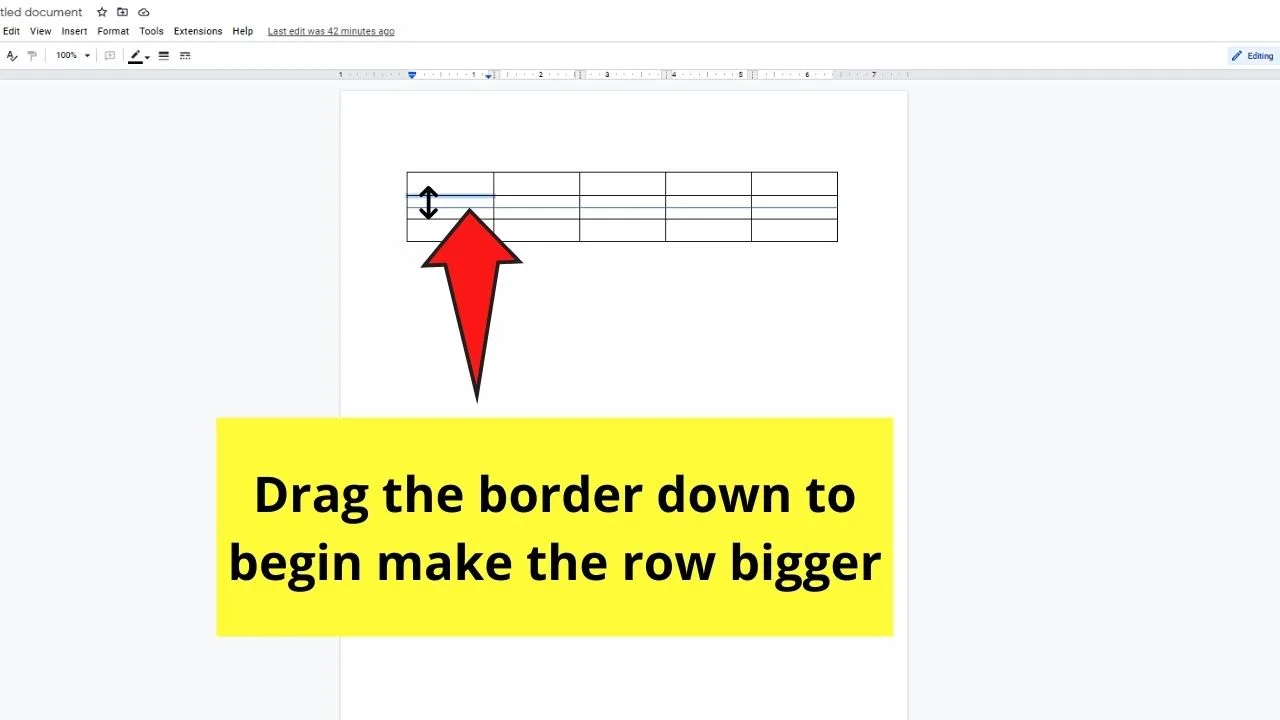
Step 2: To increase the row height or to make the row bigger, click on the border. It will then be highlighted in blue.
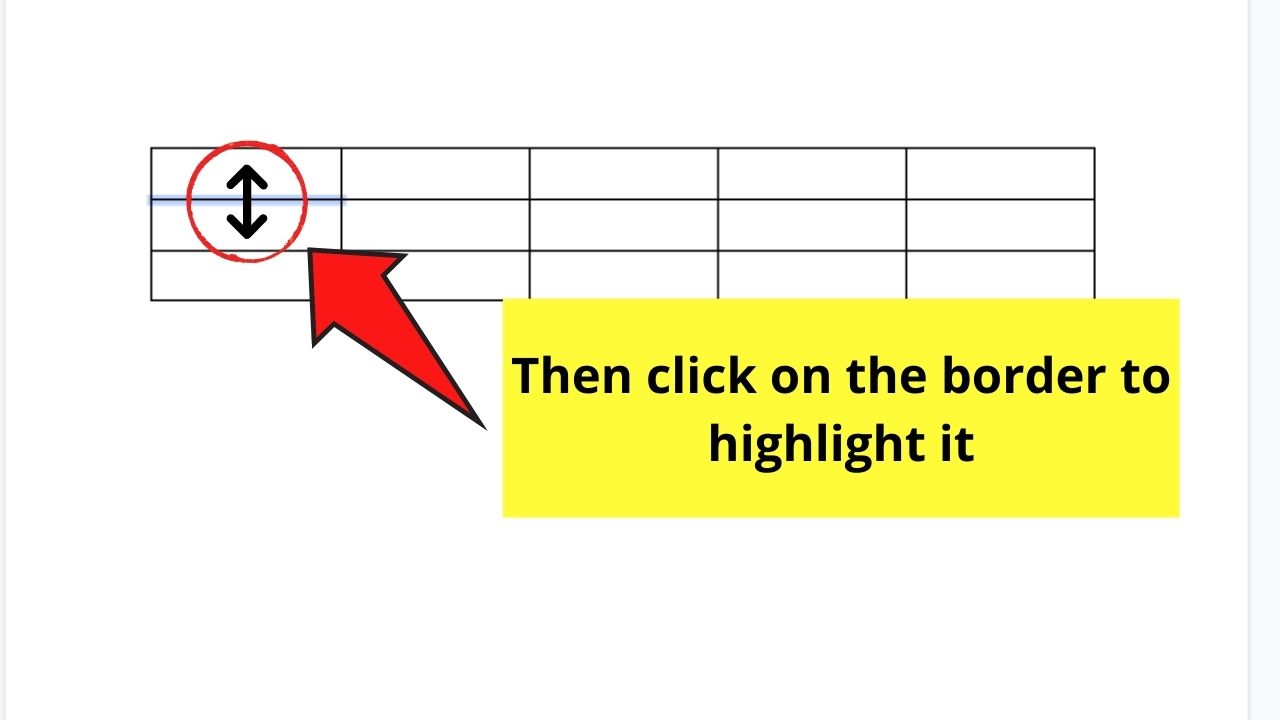
Then, drag the border downward to adjust the row size. After which, release the said line to stop adjusting the row size.
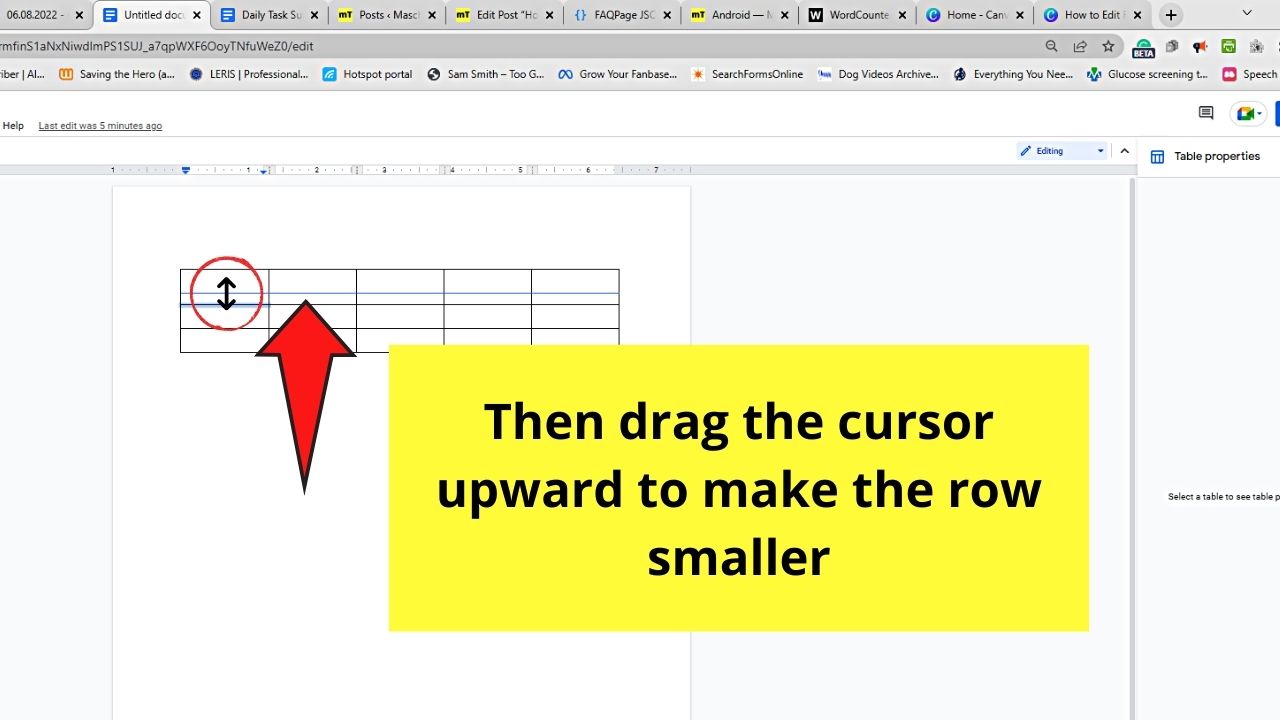
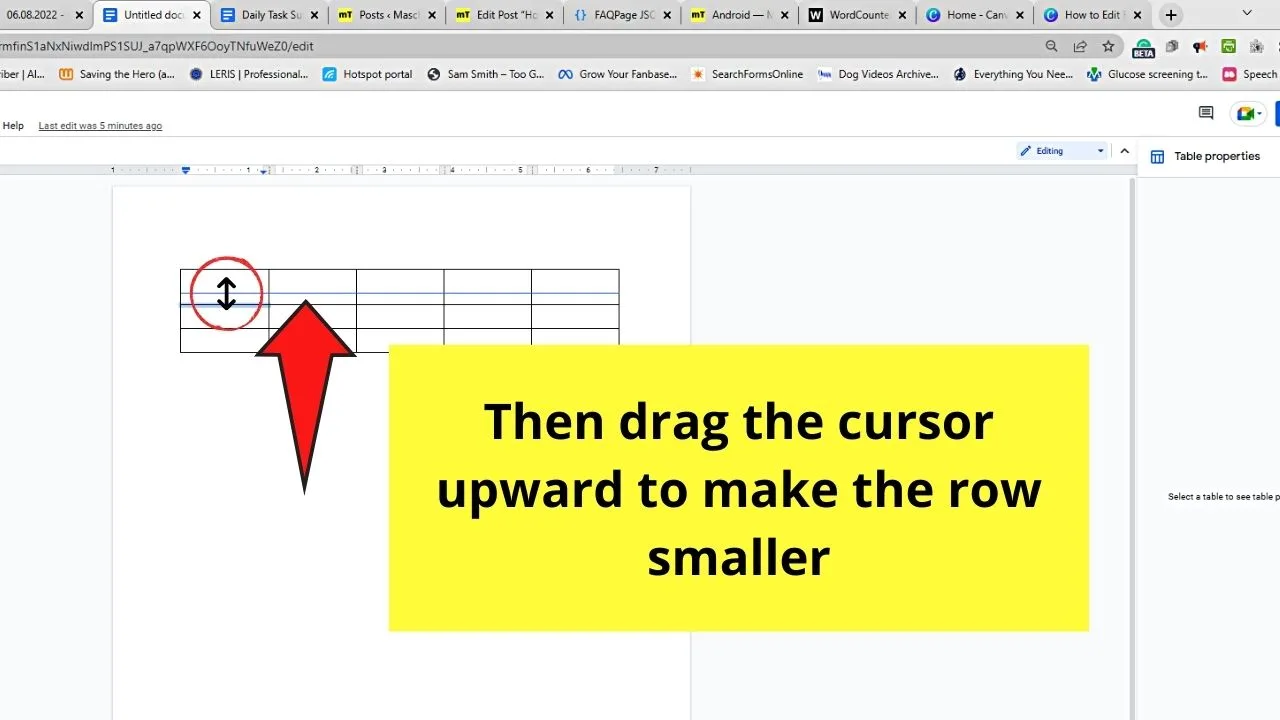
Step 3: Now, if you want to make the row smaller, click on the border again once the double-sided arrow cursor appears.

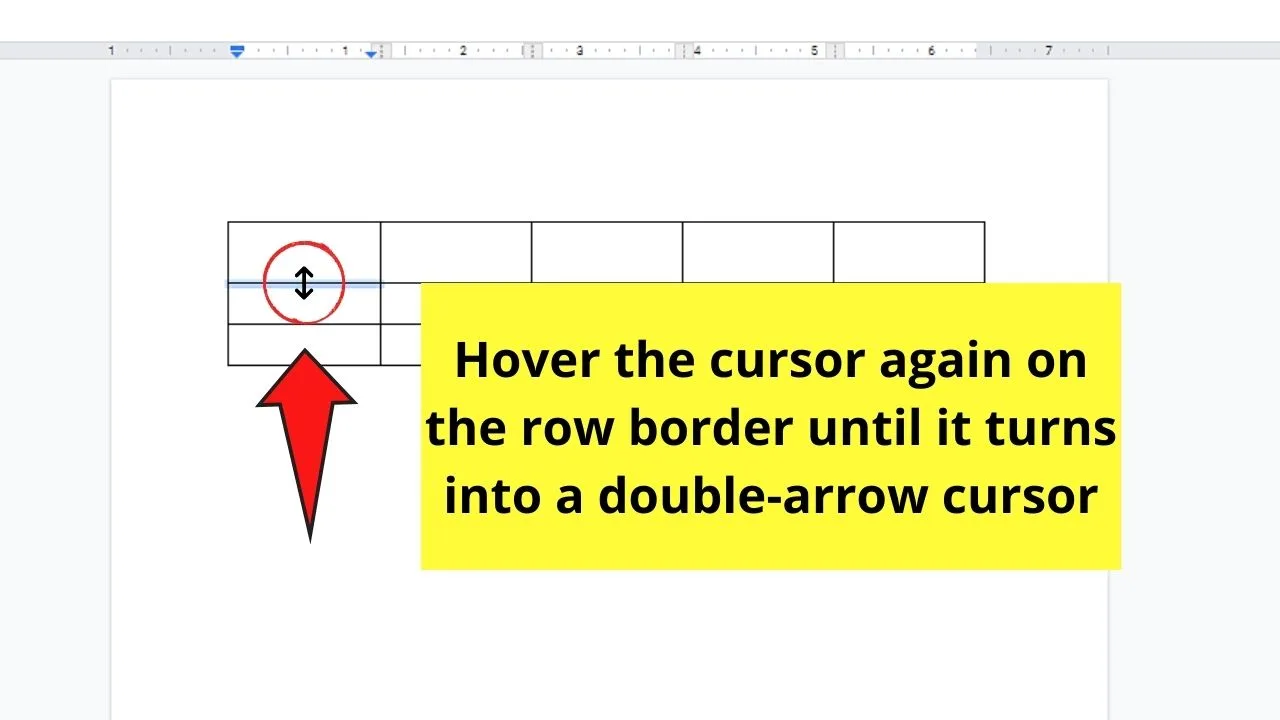
Then, drag the line upward to make the row size smaller. Release once you achieve the size that you want.
Very nifty, right?
But then again, there is still one editing task that you should master — merging cells in a row.
Merging Cells In Google Docs
Simply put, merging cells in Google Docs means you’ll combine the cells of a particular row or column in a table.
It’s like erasing the border lines between those cells to combine them. Whether you want to merge the cells in a row or column, the process is the same.
But, as we’re talking about editing rows in Google Docs, let’s focus more on how to merge cells in a particular row.
Step 1: On the table you inserted, drag your cursor over two or more cells in a row you want to merge to highlight them.

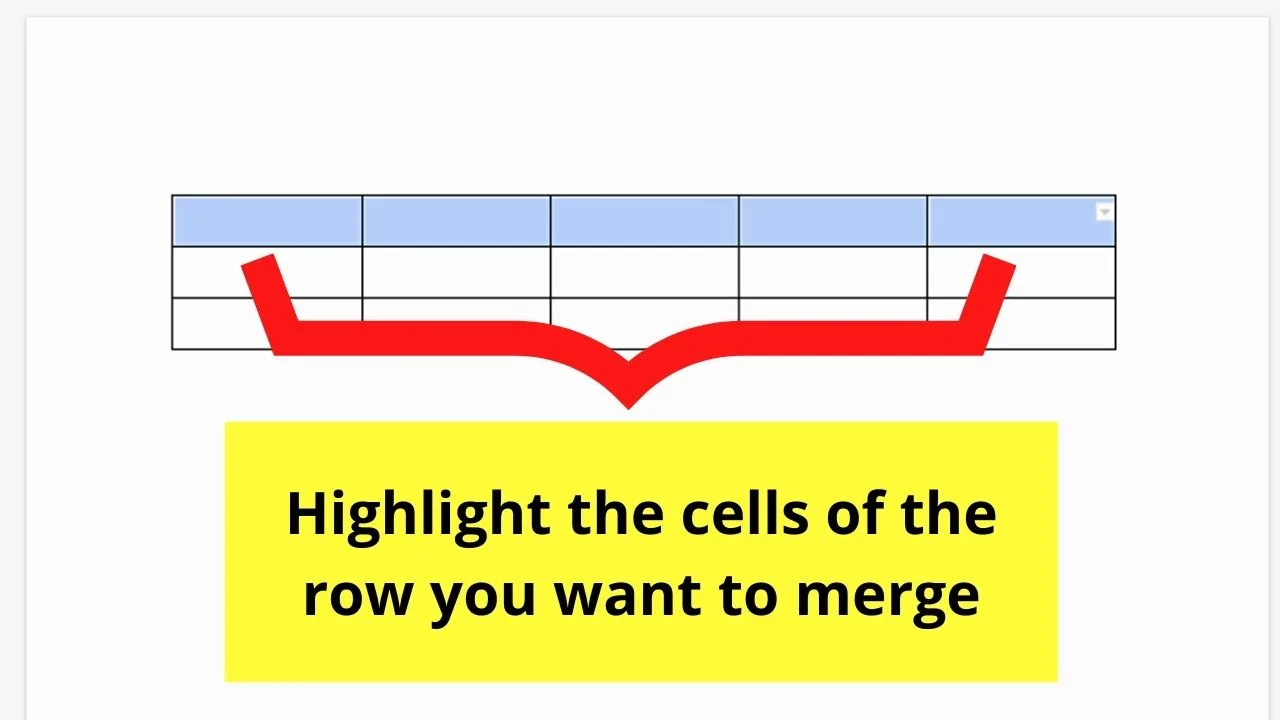
Step 2: After selecting the cells, right-click on them. A dropdown menu will then appear.


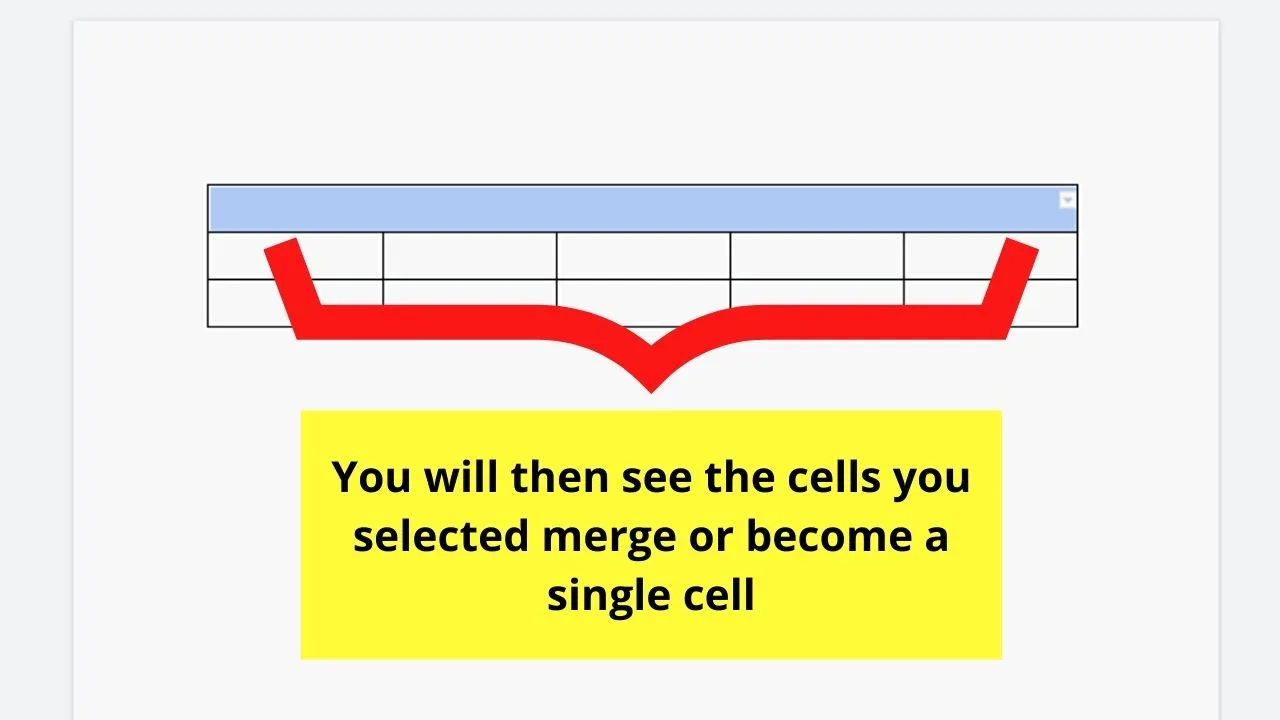
After which, select the “Merge cells” option. Automatically, the previously separate cells in the row will become one.
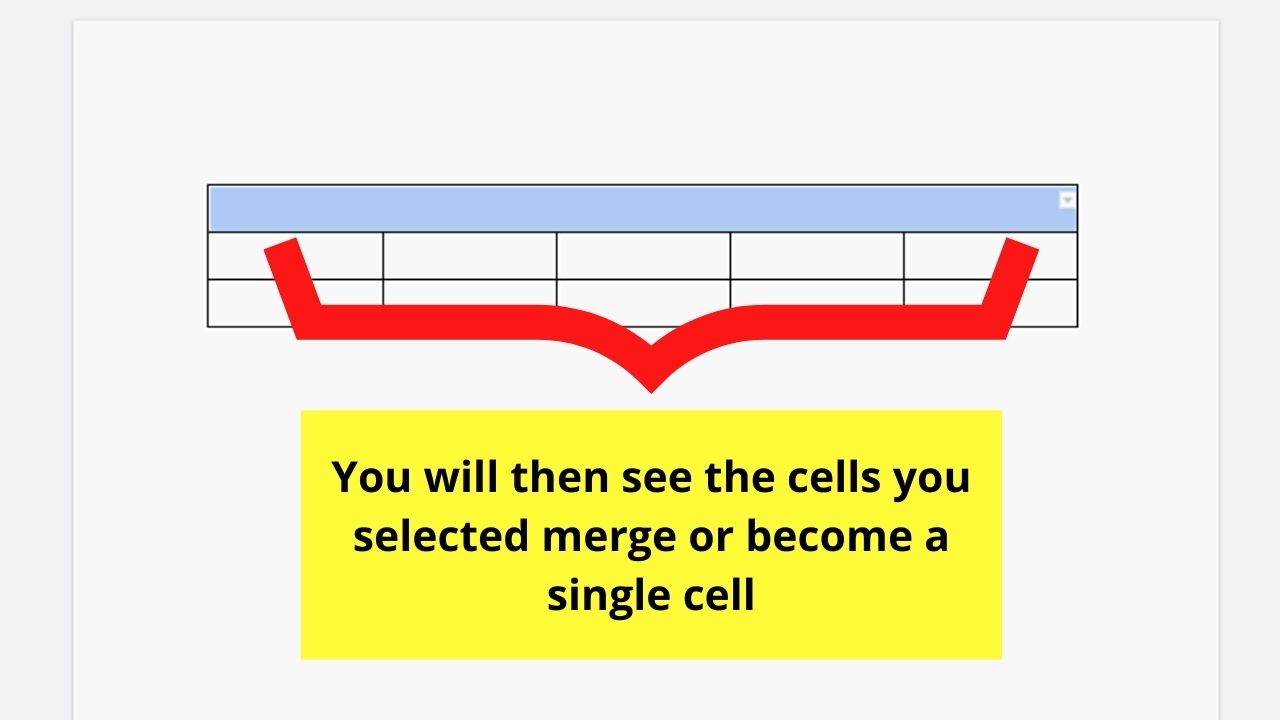
Keep repeating these 2 steps until you merge all the cells in the table you want to merge.
Now that you’ve learned all about these editing processes for the rows in a Google Docs table, are you ready to try them out yourself?
Frequently Asked Questions about How to Edit Rows in a Table in Google Docs
Is it possible to unmerge cells that you’ve merged in Google Docs?
It is possible to unmerge the cells you combined in Google Docs. Just highlight the merged cell, then right-click before selecting the “Unmerge cells” option in the dropdown menu.
How do you add a table in Google Docs?
To insert a table in Google Docs, you first have to place the cursor on the page. Then click “Insert” in the menu bar. From the dropdown menu, select the “Table” option. Then, highlight the number of boxes corresponding to how many cells you want your table to have in the next dropdown menu.
Can you sort the table’s contents in Google Docs?
To sort the contents of a table in Google Docs, you first hover your cursor over the column heading for a menu to appear. Click “Sort table” and select from either “Sort ascending” or “Sort descending.” After you click your sorting format, the table’s contents will automatically be alphabetized.
How do you adjust the cell settings of an entire table in Google Docs?
To adjust the cell settings of an entire table in Google Docs, drag the cursor across the table to select the cells. Then, click “Format” before selecting “Table.” Then, select “Table Properties” in the second dropdown list to activate the sidebar to the right of the page.


Hey guys! It’s me, Marcel, aka Maschi. On MaschiTuts, it’s all about tutorials! No matter the topic of the article, the goal always remains the same: Providing you guys with the most in-depth and helpful tutorials!

