
Oh, the horror: “The uploaded file exceeds the upload_max_filesize directive in PHP.” This error means that your server upload limit needs to be increased.
When installing a new WordPress theme or plugin, you will often encounter this error.
The WordPress upload limit can be set to a different value, though. So, there is no need to worry.
For admin users, the file size error indicates the change needs to be done in the PHP.ini file.
Administrators can set WordPress upload limits for different user roles by applying filters in the functions.php file.
How to change the WordPress upload limit
To change the WordPress upload limit, use the MultiPHP INI editor or adjust the .htaccess file in your hosting account. Alternatively, you can use the Increase Maximum Upload File Size plugin or edit the theme template functions.php file to change the WP upload limit.
How to check the current WordPress upload limit
Changing your server configuration is a bit of a hassle. To be certain that you need to increase the file upload size, check it is required before making edits.
On WordPress, it is easy to check. The file size limit is shown in your media library uploader.
On your left sidebar, under “Media,” click “Add new.”
On that page, there is a line that reads: “Maximum upload file size: ## MB”. (## will show your upload limit, such as 50 MB or 512 MB).
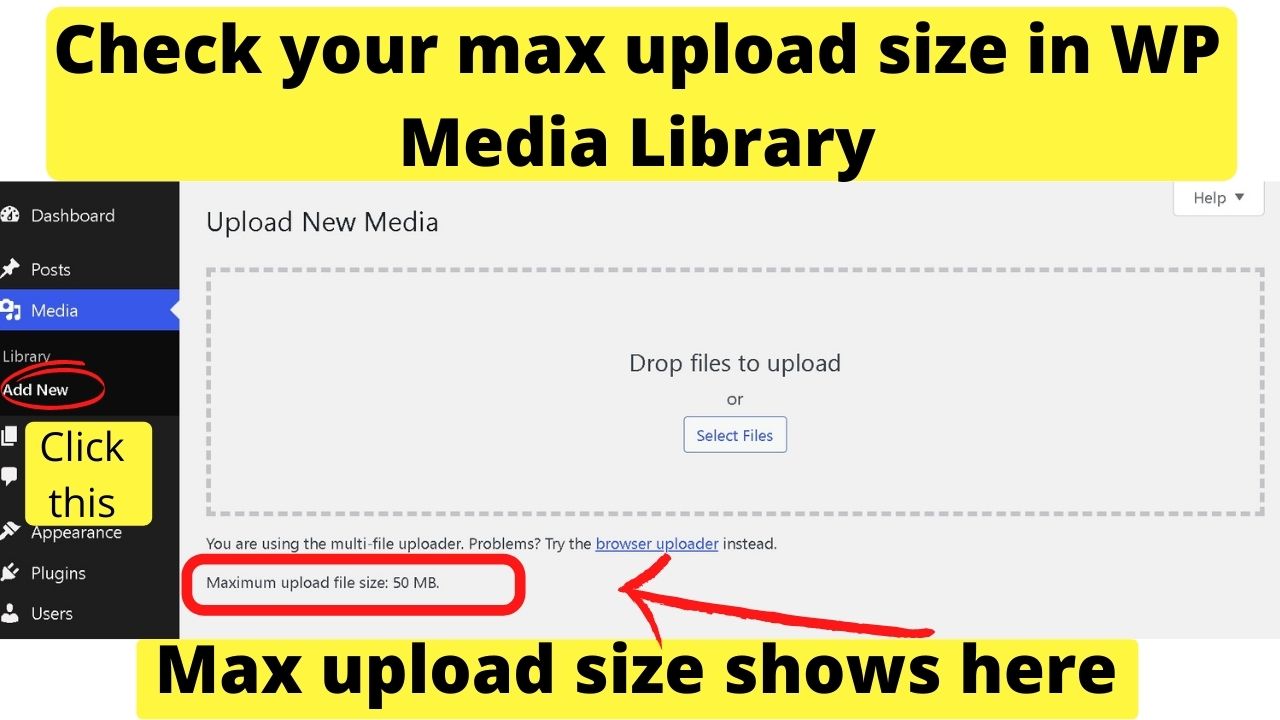
If the file(s) that you want to upload is larger than the maximum upload size shown here, you need to change the WordPress upload limit within your hosting account.
This only applies to the file sizes you want to upload to your media library uploader, though.
If you are trying to upload a plugin or theme exceeding the file size allowed, it could be related to your max post size or execution times.
Use “Site Health” for more details on the file sizes allowed
Go to the “Tools” menu on your left sidebar and click “Site Health.”
Scroll down and click the tab for “Media Handling.” The file size upload limits are shown there.

1. Edit the .htaccess file
This method is not reliable with all versions of PHP. It depends on the version of PHP that your server is running. On the latest version (7.4 currently), the MultiPHP INI Editor software will edit this file.
A note in your .htaccess file will tell you to use that in cPanel.
“To make changes to this file, use the cPanel MultiPHP INI Editor”
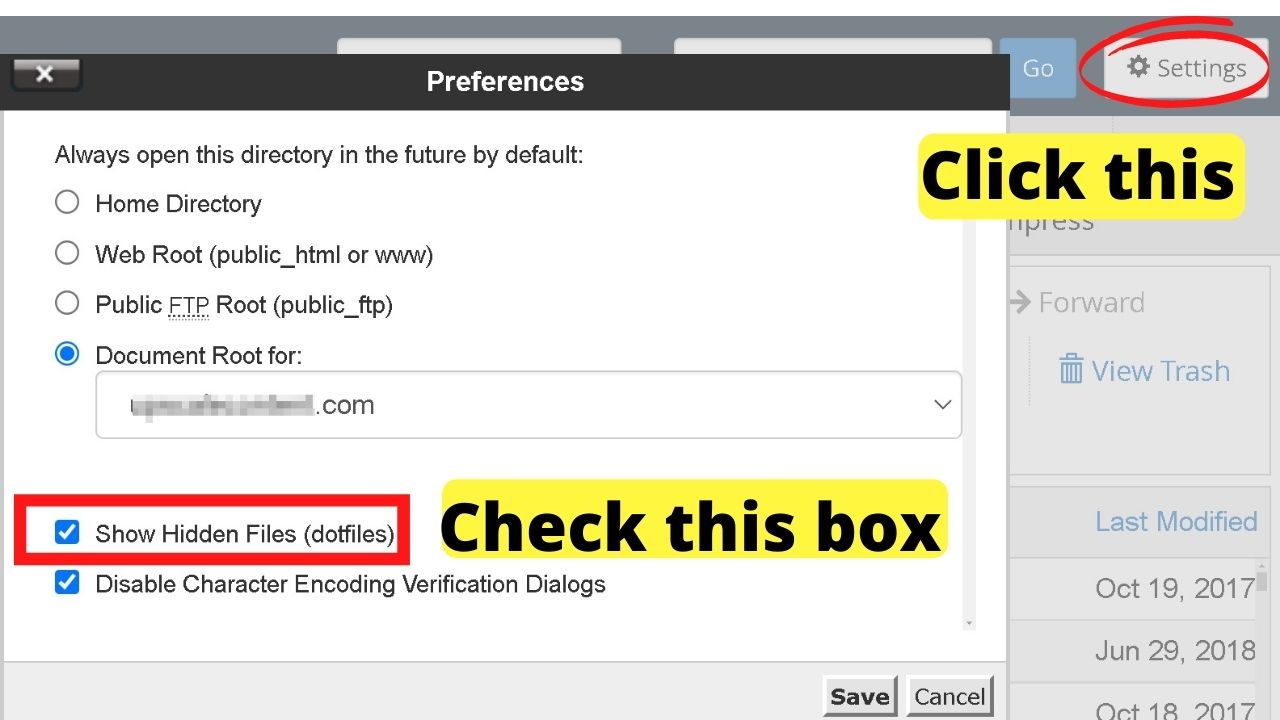
The .htaccess file is usually hidden. If you have not changed the settings in the File Manager to show hidden files (dotfiles), you need to do that first.
Log into cPanel, click on File Manager, then at the top right corner, click on “settings.” Check the box to show hidden files.
Once this is done, go to the domain’s root directory, where you want to change the upload size. The .htaccess will now show. The file will be in your public_html folder if you have one domain.
Right-click on the .htaccess file and click edit.
The line of code to look for is
php_value upload_max_filesize 512M
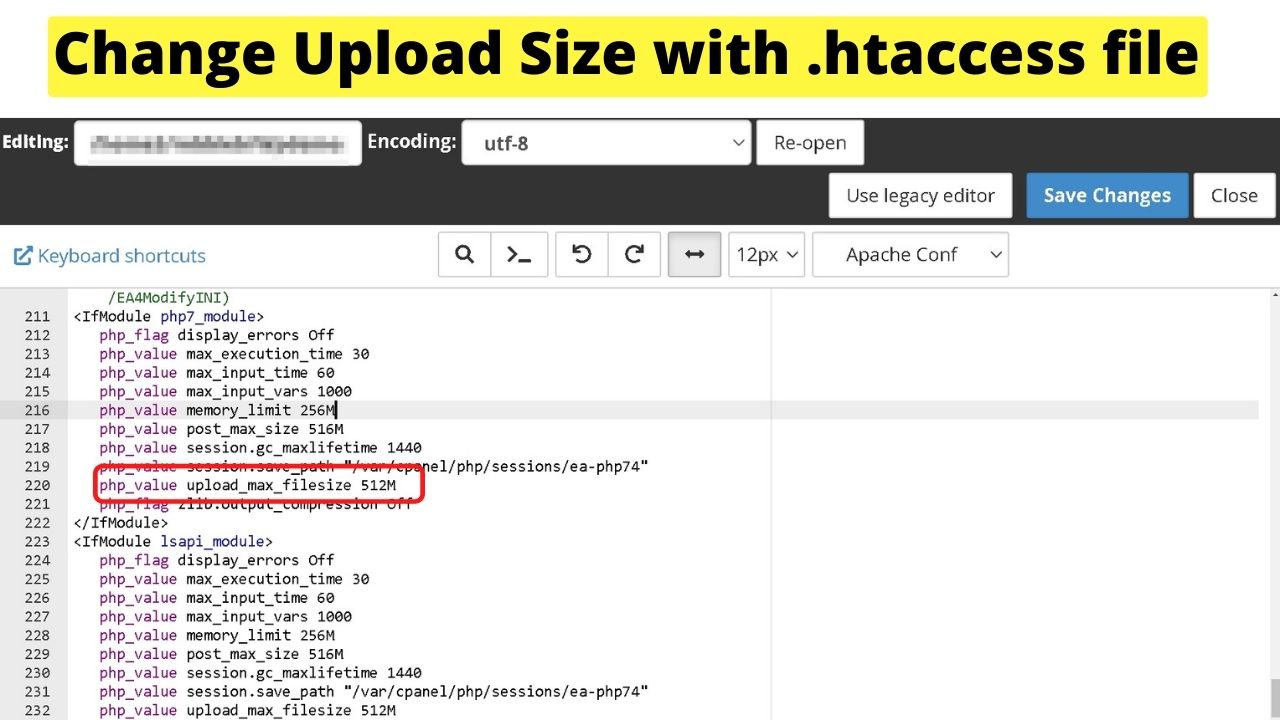
The value (512M) in the above example varies by hosting provider.
The “M” after the numeric value represents megabytes. In PHP language, only an M is used rather than MB.
Whichever upload limit you need, try changing the values here.
For example, if your file shows a “php_value upload_max_filesize 10M”, and you need to upload a file that is 50 MB in size, change the value from 10M to 50M or slightly higher.
The value of your file size upload should not be greater than your max post size upload. Leave breathing space for the rest of the content in posts.
2. Use MultiPHP INI Editor
If the .htaccess file edit does not take, this likely will.
Go to your hosting account and log into the cPanel. Scroll down to the Software section and select the MultiPHP INI Editor.
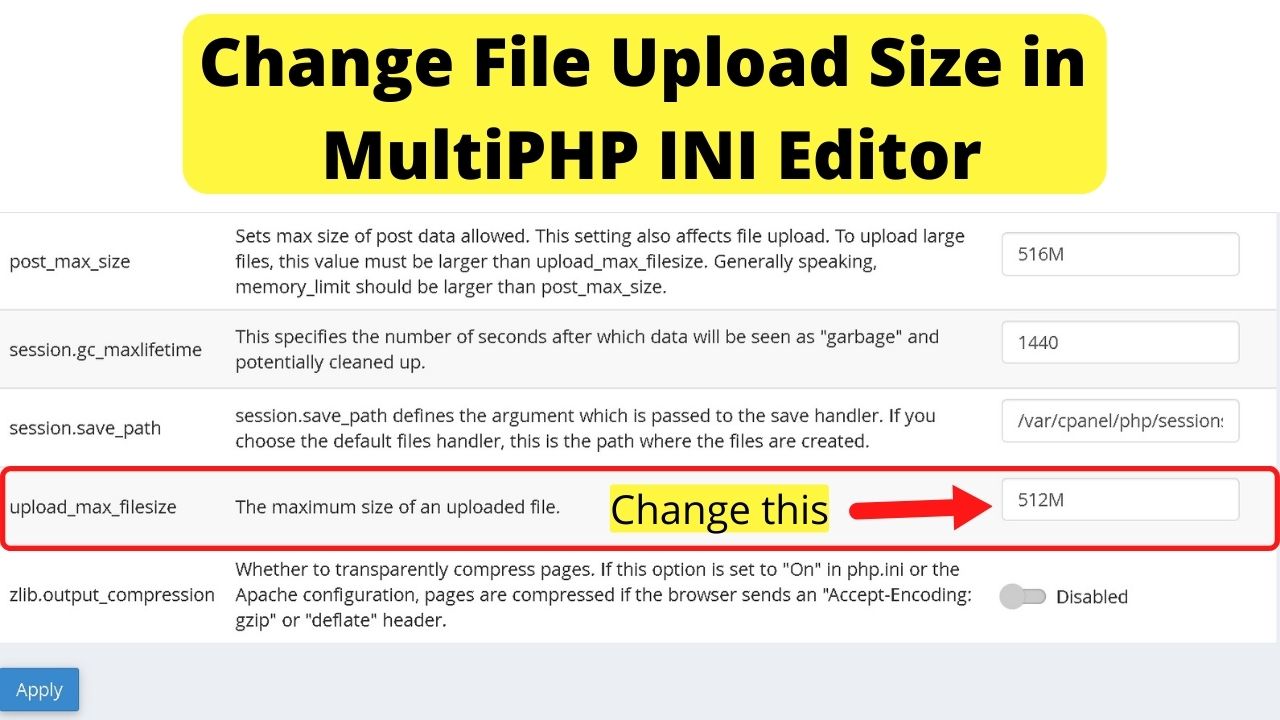
The default view is basic mode. Editor mode is for applying custom PHP scripts. Use the Basic mode, as you do not need to add scripts to change the file size limits.
Scroll down the page where it reads “upload_max_filesize” in the box for that field, and input the new values you want for your WordPress upload limit.
3. Edit the Functions.php file
Every WordPress theme has a functions.php file. Sometimes, just like the .htaccess file edit does not always work, this is the same. It works sometimes, but it is unreliable.
Give it a try anyway by going to your Theme Editor. (Appearance > Theme Editor). Select the “functions.php” file.
Scroll to the bottom and add the following few lines of code:
@ini_set( ‘upload_max_size’ , ‘##M’ );
@ini_set( ‘post_max_size’ , ‘##M’ );
@ini_set( ‘memory_limit’ , ‘##M’ );
Replace the ## with the numeric values you need, such as 64M. Then click save.
How to change the WordPress upload limit for individual users
By adding filters to the functions.php file, you can set a different upload limit for anyone other than admins.
In your “Appearance” menu, select the “Theme Editor” option, then select the functions.php file.
Add this code:
function filter_site_upload_size_limit( $size ) {
if ( ! current_user_can( 'manage_options' ) ) {
$size = 1024 * 10000;
}
return $size;
}
add_filter( 'upload_size_limit', 'filter_site_upload_size_limit', 20 );
The $size parameter uses bytes rather than megabytes. What this filter is doing is limiting the upload size for anyone other than a site admin.
It is a handy filter to use on multiuser sites or when you find someone on your team is getting too keen on uploading memory-hogging media files, such as gifs.
Contributors, authors, and editors can have their WordPress upload limit restricted to less than what a site admin can upload.
4. Install the Increase Maximum Upload File Size Plugin
Despite the name of this plugin, it will let you change the upload limit to any value up to the limit set on your server. Up it or lower it.
The recommended use is to keep it on the lowest upload that you need regularly, then increase it on-demand as you need to.
Go to Plugins on your left side menu and select “Add New.”
Search by keyword for “increase maximum upload file size.”
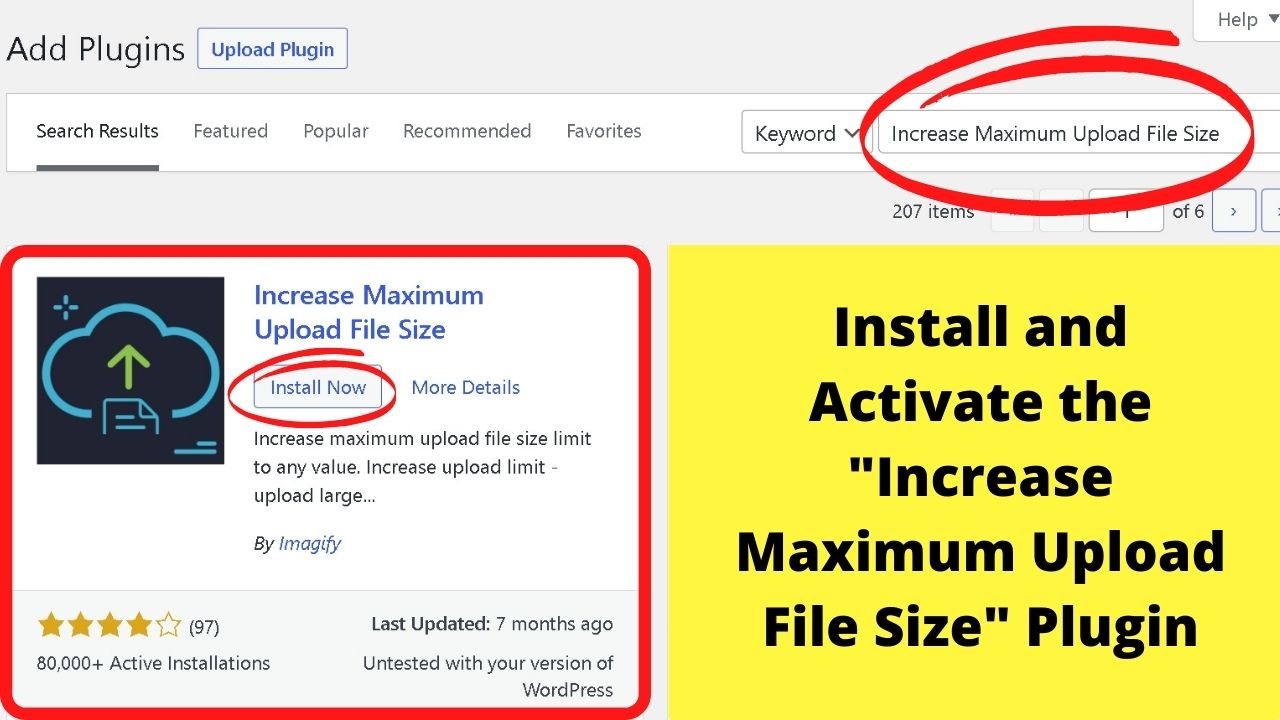
Click install, then activate the plugin.
Once that is done, your site will have two upload limits. One set for WordPress, the other for your hosting provider.
Only admins can access plugin settings, so this plugin does the equivalent of the WP filters (described in the previous method) to change the upload limit for individual users.
Call your web host’s tech helpline
When you pay for hosting, support is included. How much support you get varies by provider. For tech support, changing the upload limit will take them a few minutes. It will not be a hassle for them.
If you find yourself doing battle with server configuration, phone the support helpline.
They can usually pinpoint the error quickly and help change the WordPress upload limit for you or advise you of your hosting plan limitations that could be the culprit for upload errors.
Frequently asked questions on how to change the WordPress upload limit
How much memory do WP uploads need?
Most shared hosting plans’ default values go up to 128M, 256M, or 512M. If you need to raise the upload limit by a significant amount, such as higher than 1024M, then it is likely time to upgrade to a new hosting plan.
Will changing the WordPress functions.php file change the server configuration?
Filters can be applied to theme functions.php but cannot override the server configuration (PHP.INI). This is why you can add filters to set a lower value for other user roles yet have a higher limit for site admins. Use MultiPHP INI Editor for upload limit increases. Lower them with WP filters.