

Hey! I want to add a personal touch to the Canva template I created recently. Is there any way to do so?
Well, aside from the creative streak you’ve splashed on your template design, adding photos to your project ultimately makes it pop out more.
But how? Well, you only need to know how to add photos to Canva to put another layer of your personality into your project.
Here’s how we do it here in Canva:
How to Add Images in Canva
To add images to Canva, choose “Upload” from the left sidebar and click “Upload Media.” Now, locate and select your photo and click “Open.” Your photo will then be uploaded to Canva’s Media Library.
As Canva’s intuitiveness is known for making it one of the greatest tools you can use, you don’t need to fret when it comes to adding photos to Canva.
But, you MUST know the basics of adding images to Canva if you’re going to succeed with designing.
To start with, know that there are 2 methods on how you can add photos to Canva:
How to Upload Photos on Canva Desktop
Step 1: After creating a new design file by tapping the Create a Design button, head over to the left-side menu of the editor page.
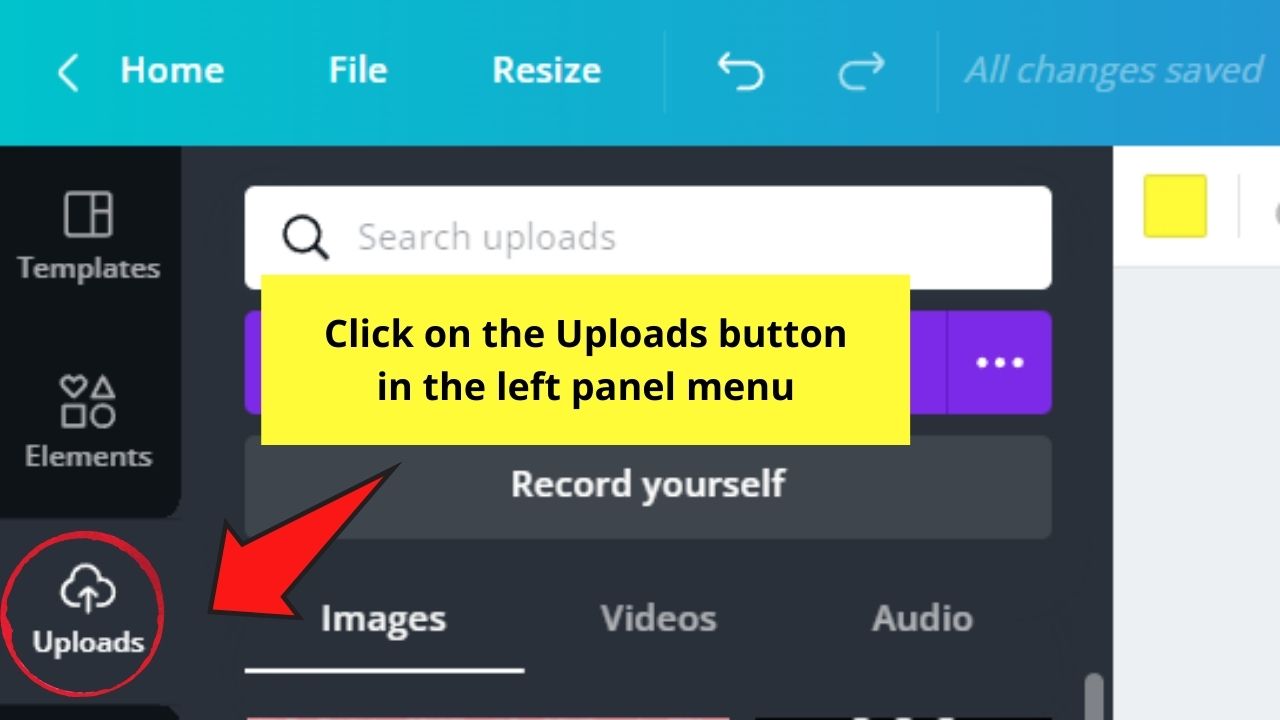
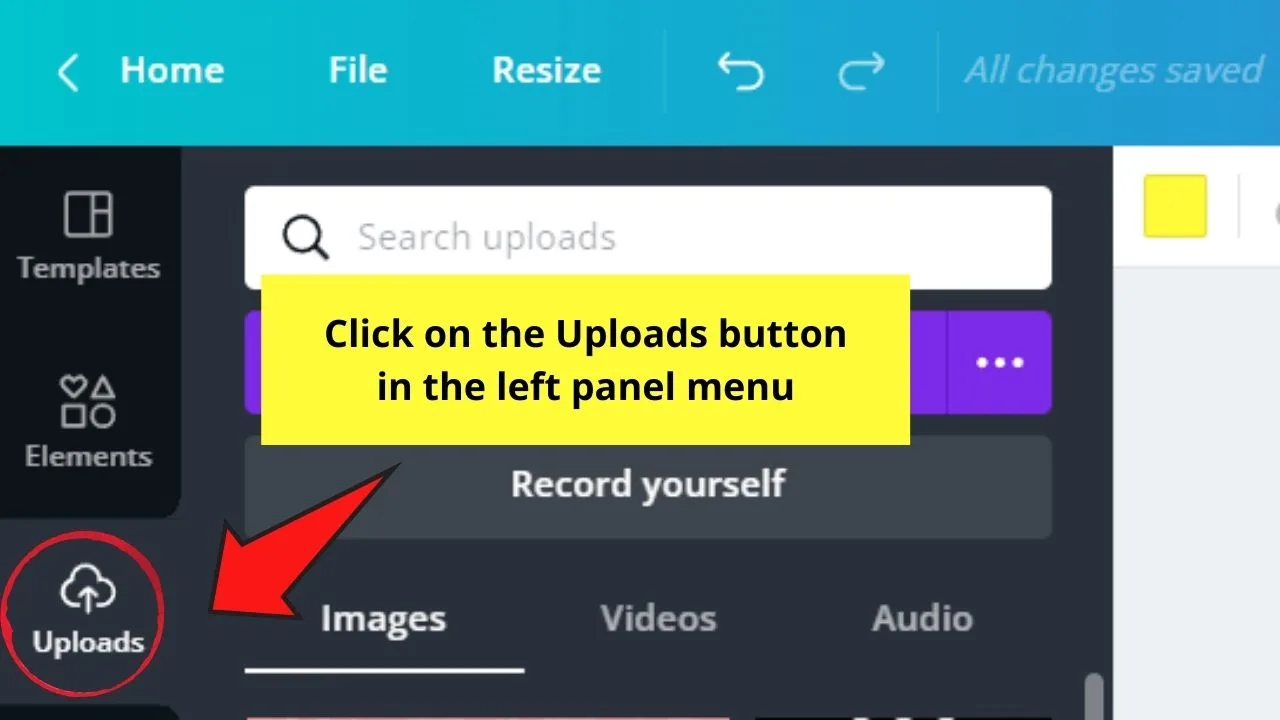
Continue scrolling until you see the Uploads button. Activate it by tapping on it.
Step 2: In the Uploads panel, you’ll then see a purple Upload media button. Click it so a dialog box appears.

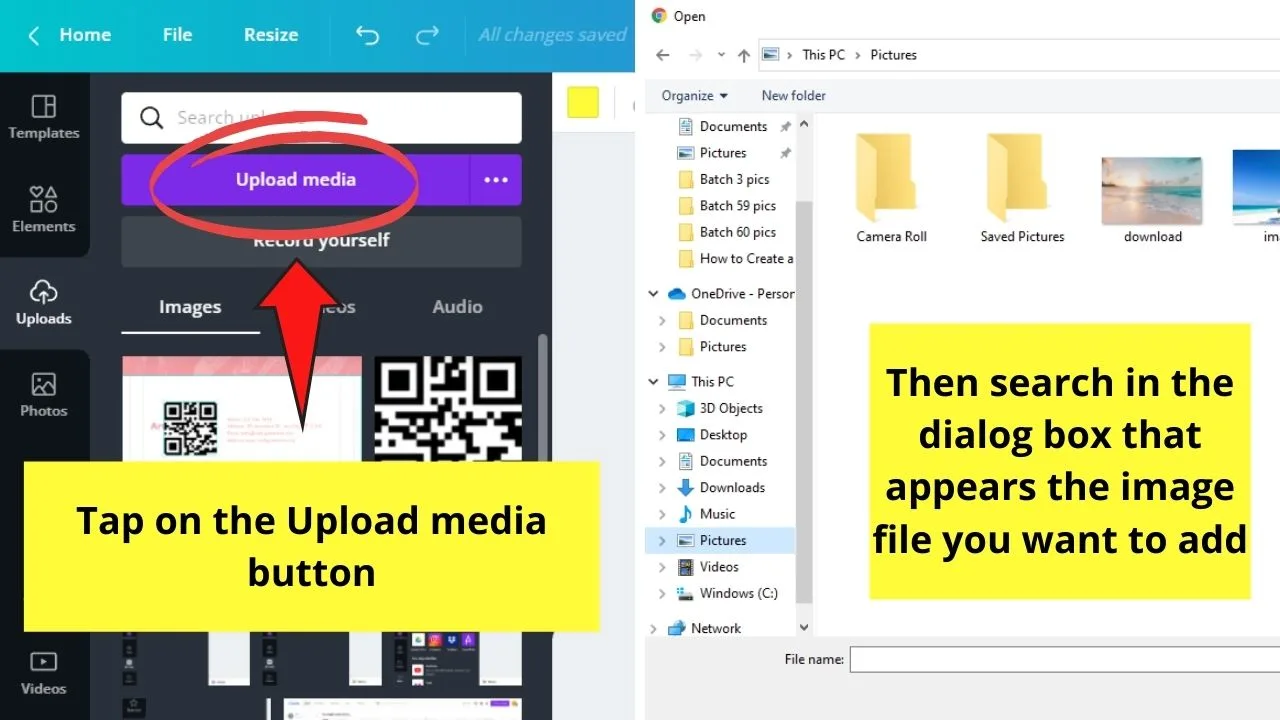
This dialog box will then show you the files on your computer or device.
Head to the folder where you stored your image, tap on the photo file, and click the Open button. This will then jumpstart the import process.
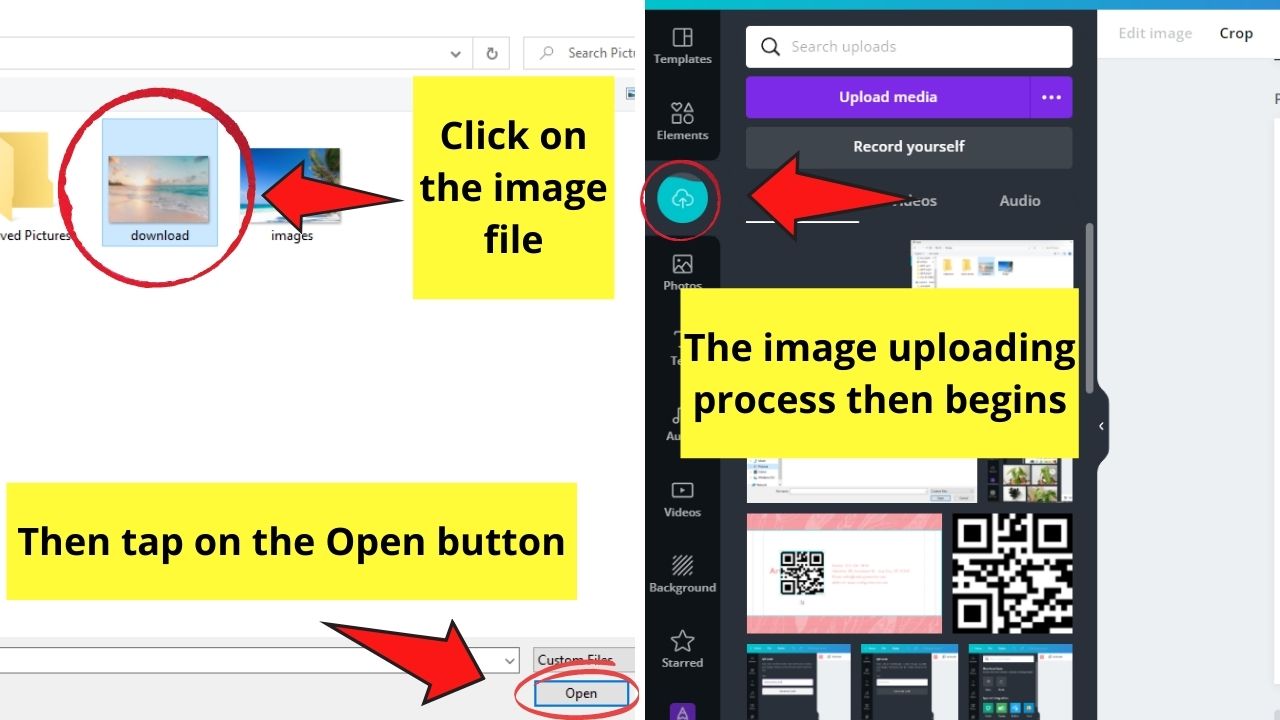
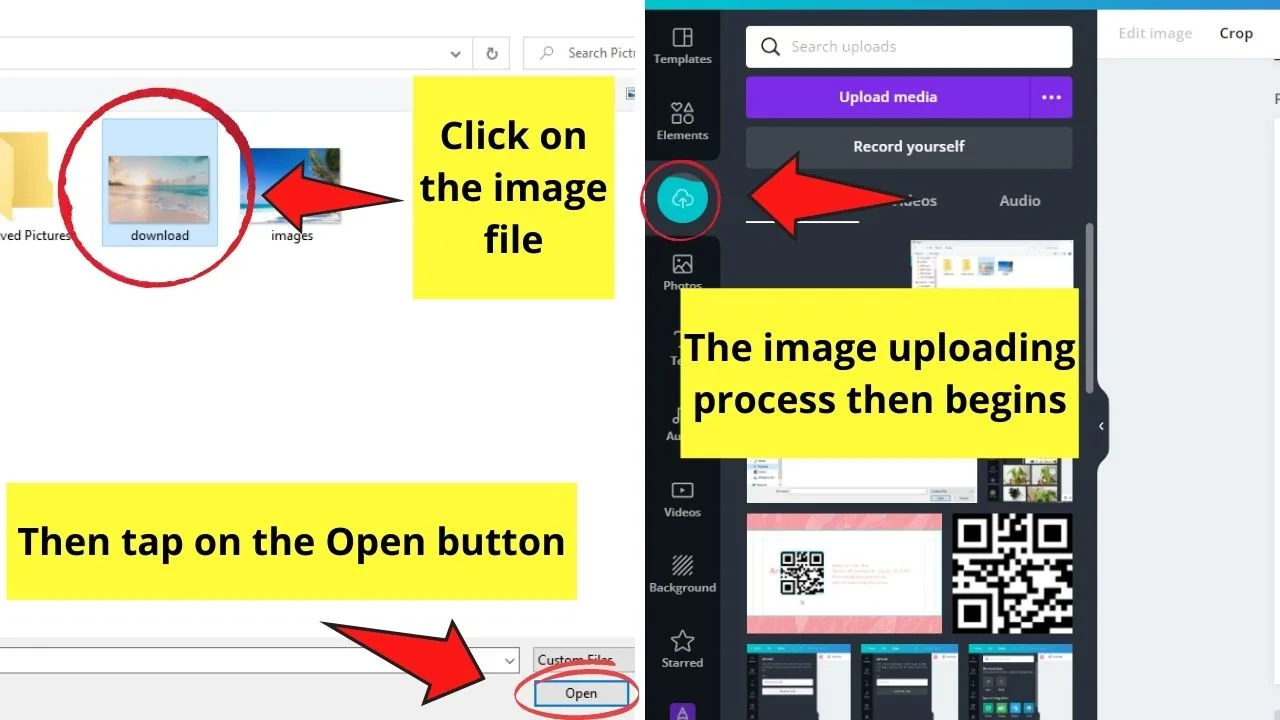
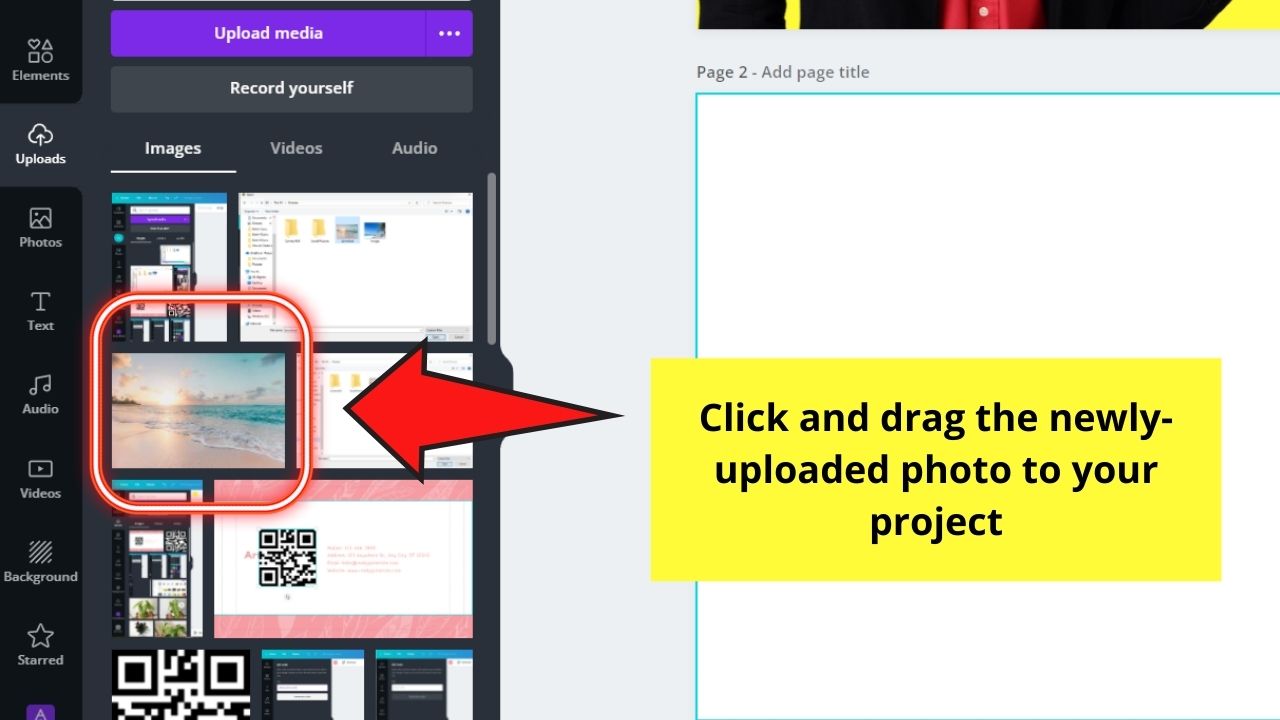
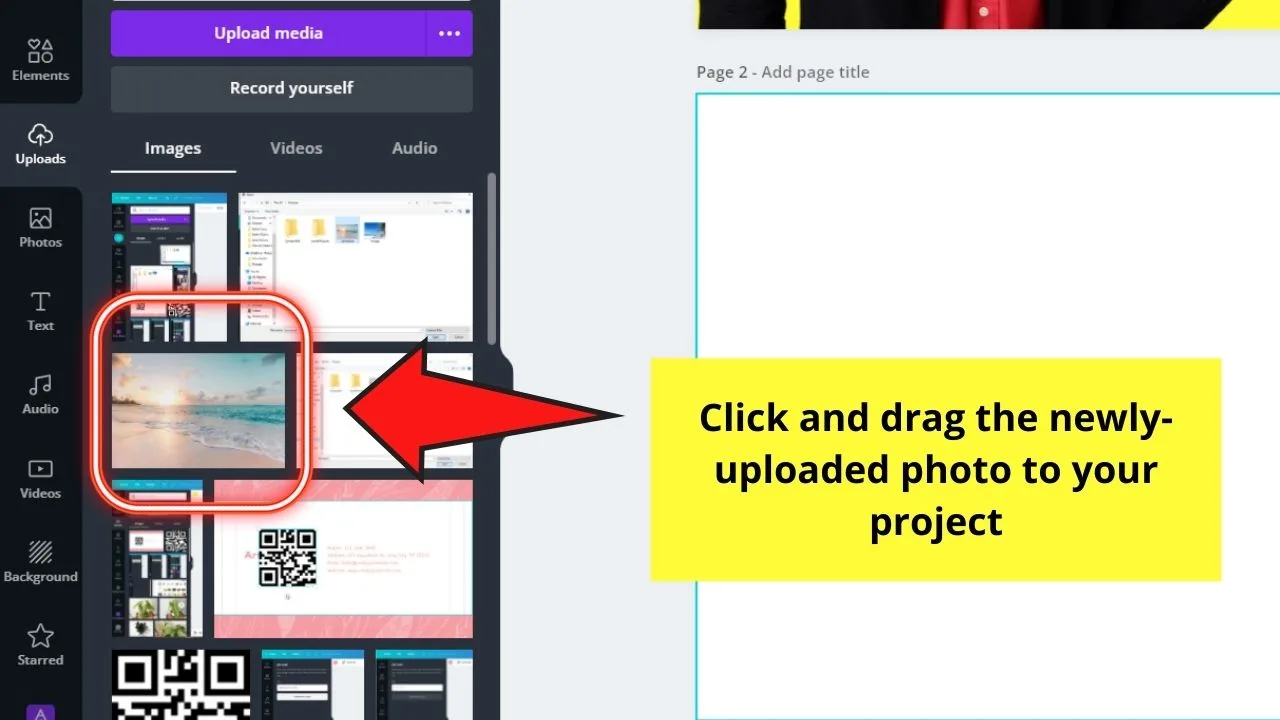
Step 3: Wait for Canva to finish uploading the photo you chose from your device.
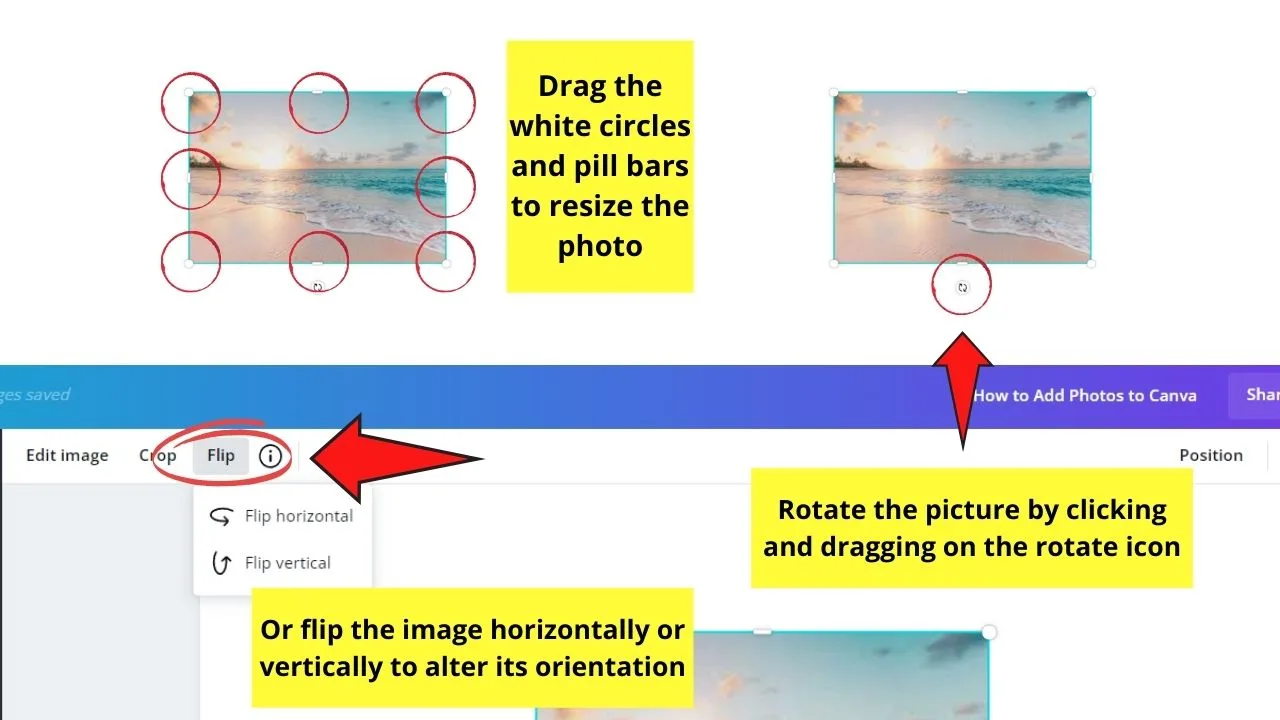
Once done, click and drag the said picture to the canvas. From there, you can drag the white circles and handles found on the image to resize it.


You can even rotate and mirror the said photo if it’s part of the desired effect for your design.

Step 4: Once you’re done adjusting the uploaded photo, tap anywhere on the canvas to save the recent changes you made.
Easy? Well, wait until you learn of the second way you can add photos to Canva — which we’ll learn below.
Adding Photos to Your Canva Project Through Canva’s Photo Gallery
Step 1: After creating a new design or opening an existing one from the All Designs menu, head over to the left-side panel menu.

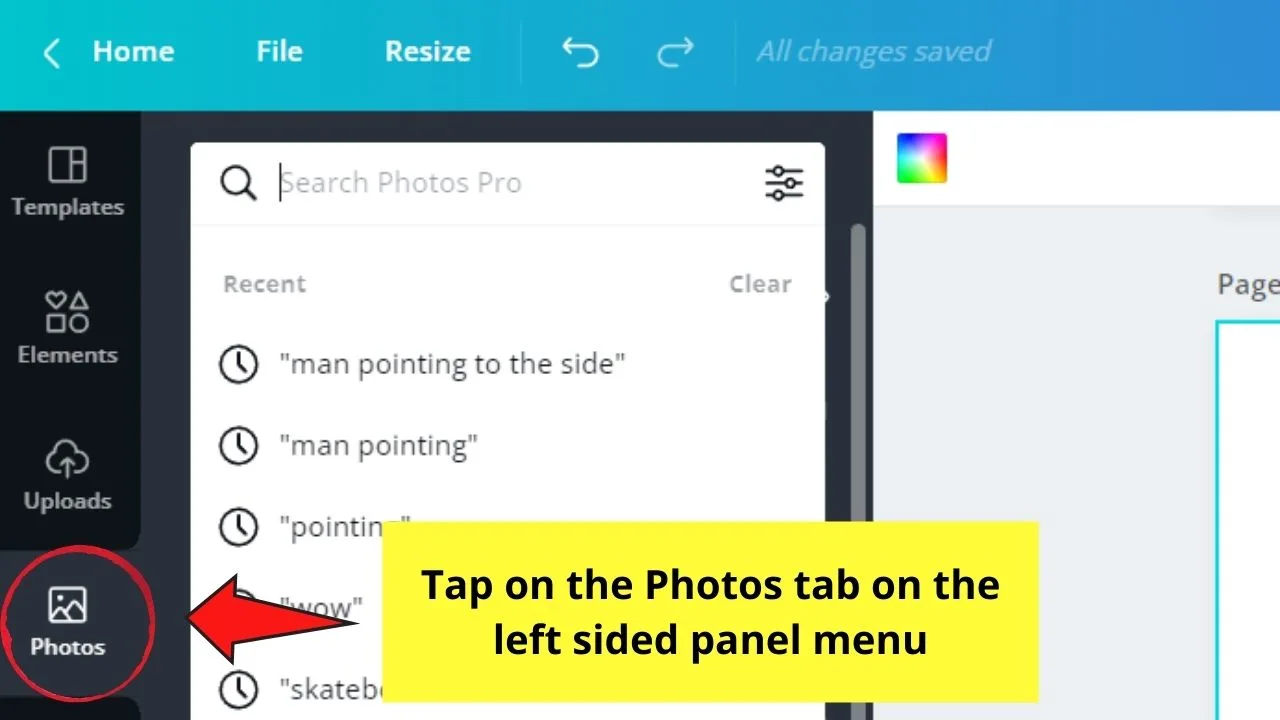
Keep scrolling until you reach the Photos tab. Tap it.
Step 2: In the succeeding panel that appears, you’ll then see the various images available in the Photos gallery.
You can opt to continue scrolling down to find that particular photo you’re looking for.

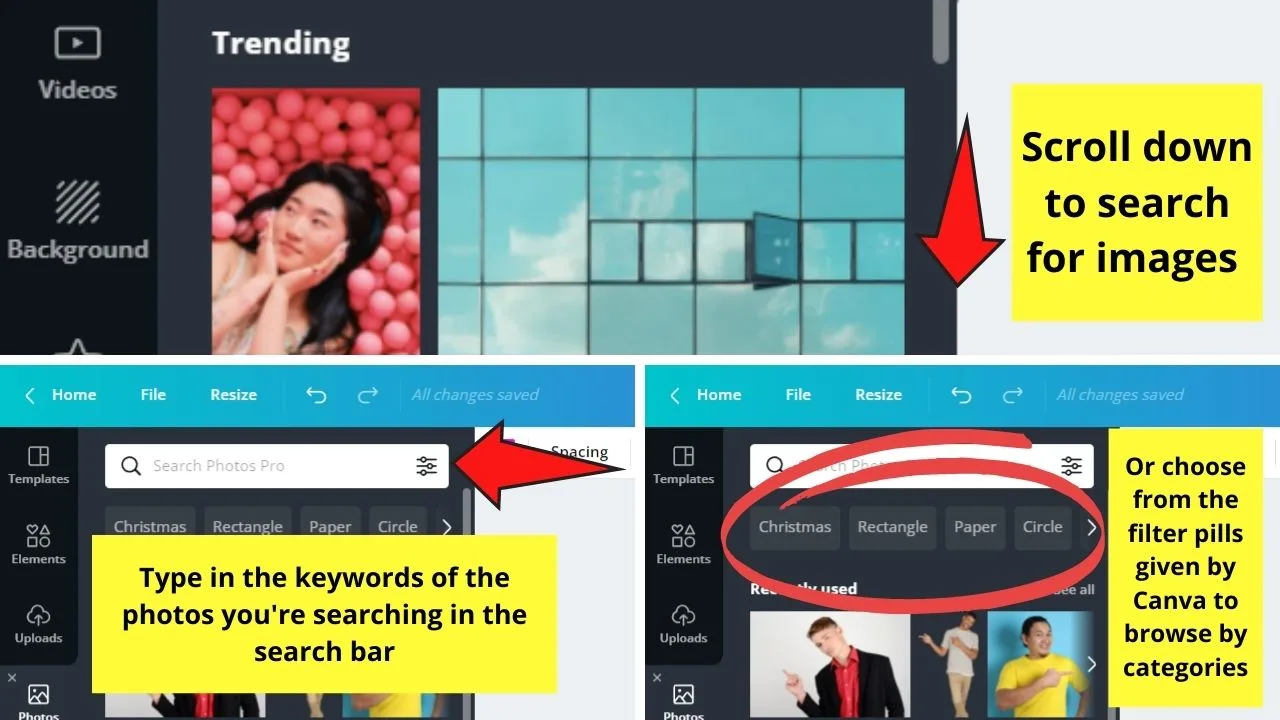
But, if you want to make the process breezier, there are 2 ways to narrow your search results:
- Type the keyword/s in the search bar found at the upper part of the Photos gallery, or
- Click on the filter pills below the search bar to sift through the pictures available based on categories.
While there are a lot of photos for you to choose from, be keen enough to check if such an image is a free or Premium one.
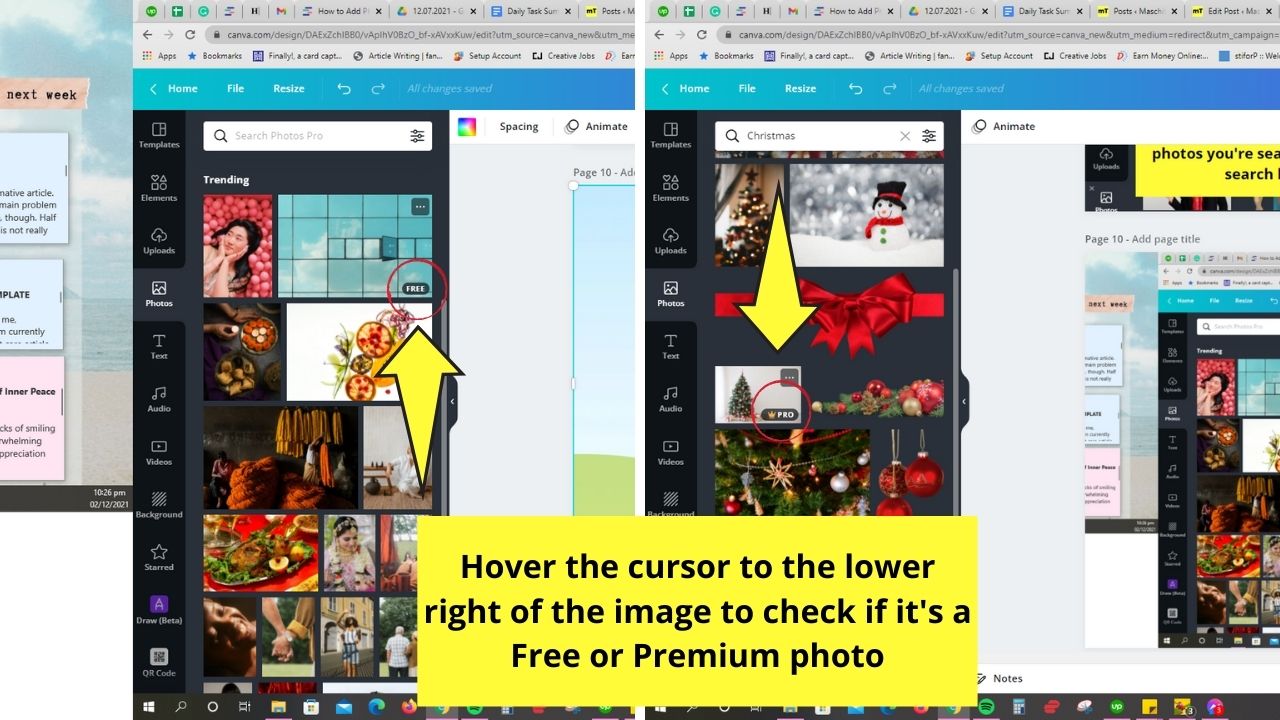
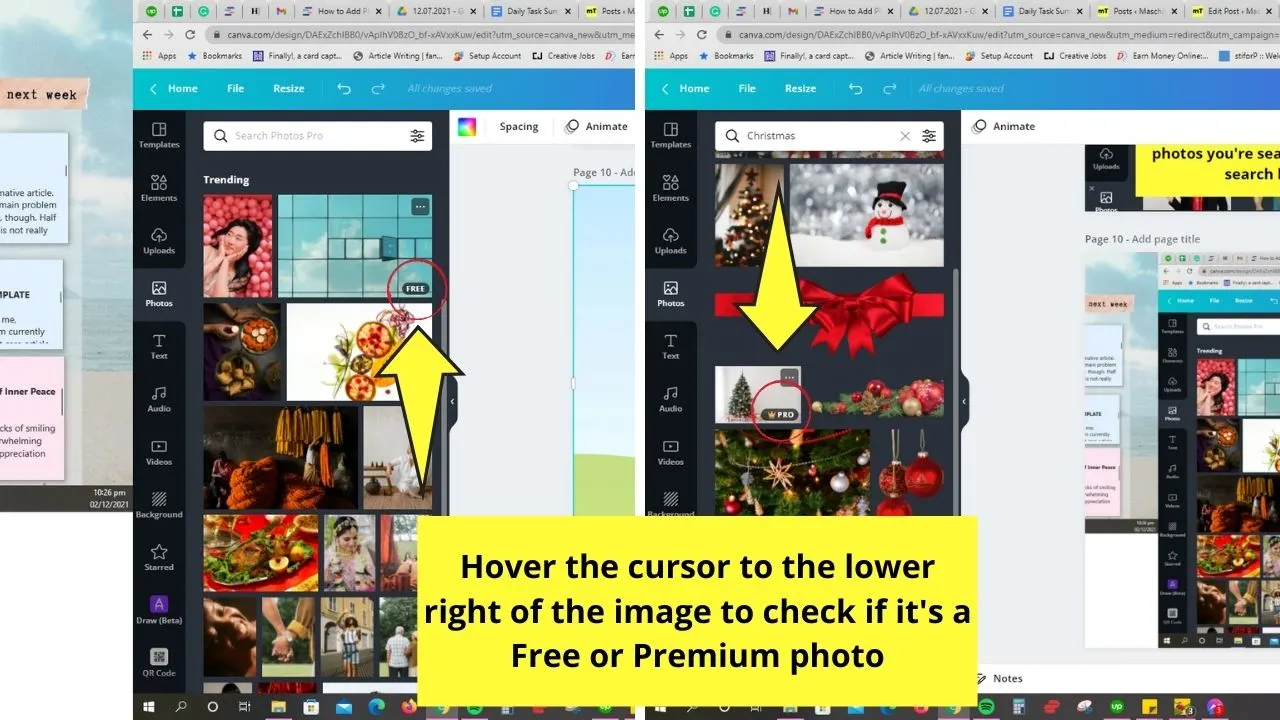
If you happen to fancy an image with the crown symbol on its lower right, it’s a Premium photo. You can only use it if you’re a Canva Pro, Enterprise, Education, or Nonprofits user.
Otherwise, you can only take advantage of the free images (those without crown icons) for your design.
Step 3: Once you’ve selected the photo/s, click and drag them to the canvas so you can do all the adjustments needed as mentioned in Step 3 of the previous section.

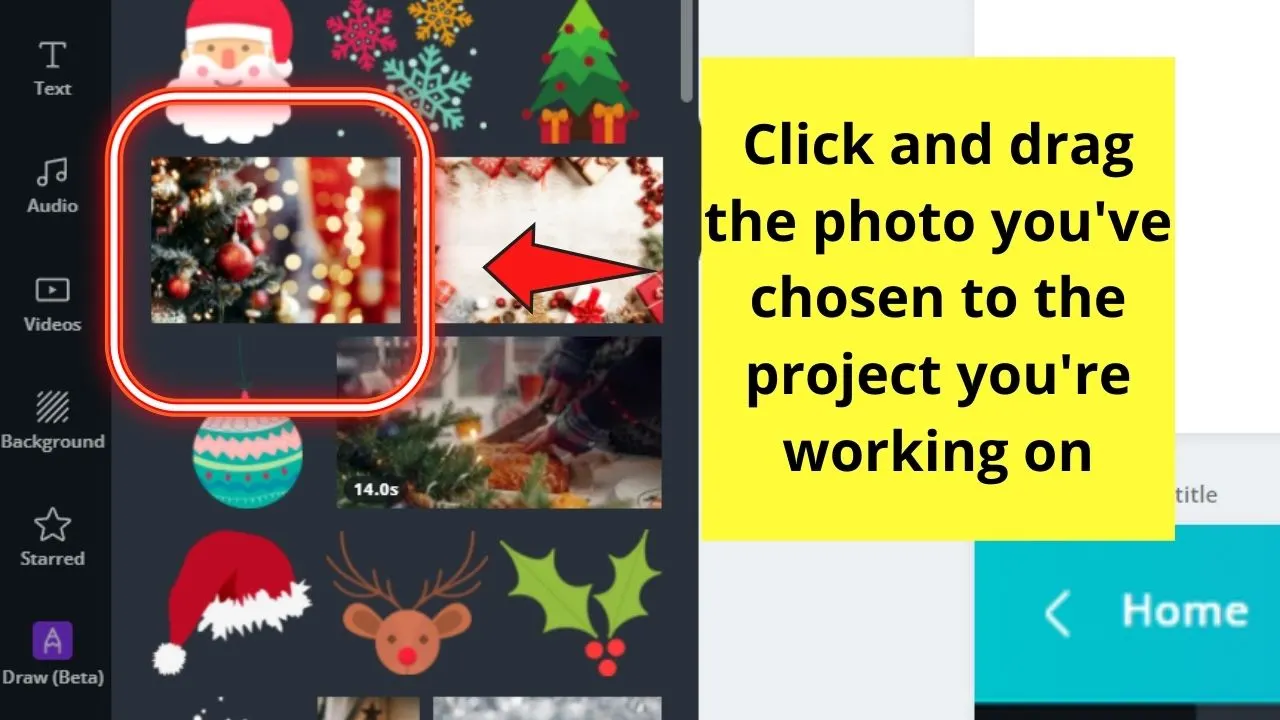
You can even add those pictures on a Canva frame or grid you chose earlier to make your design livelier.
Step 4: Now, if you’re planning to use that particular image as the background of your design, right-click on it and tap the Set as Image Background option.
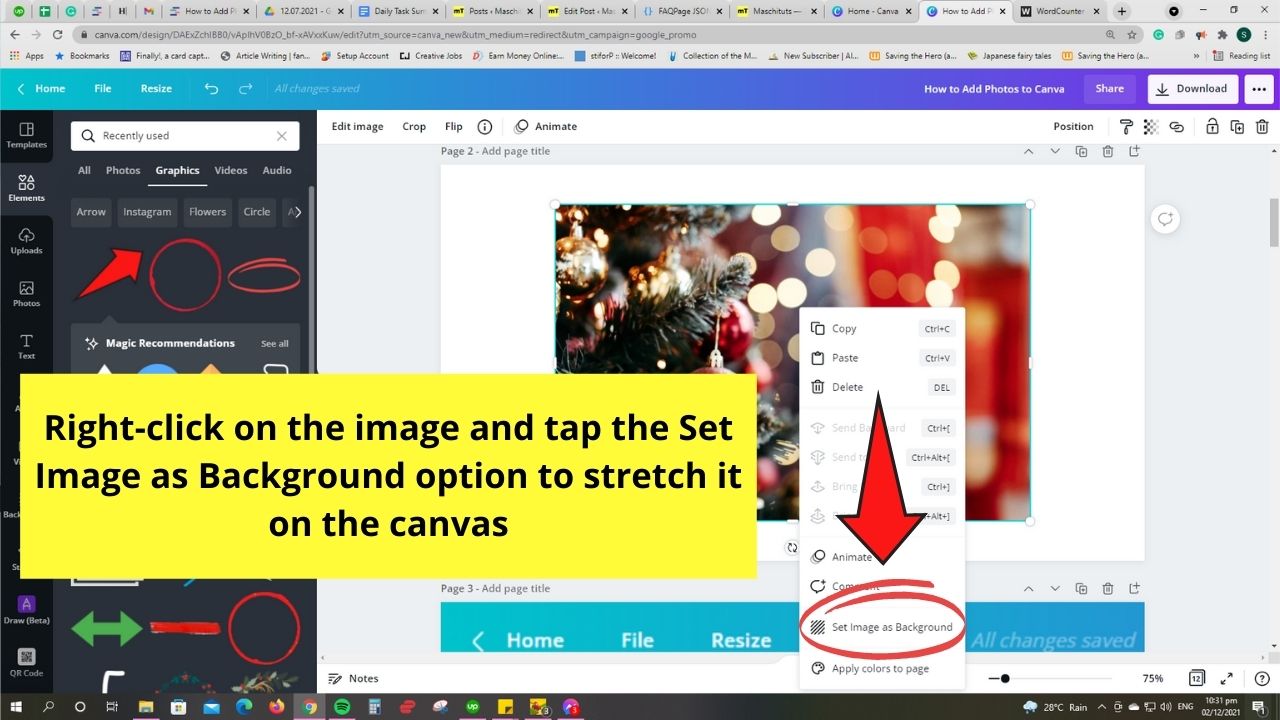

Canva will then automatically resize the photo to the canvas’ size.
If, however, you want to adjust the crop position of the image, just double-tap on it to make the grid box appear.
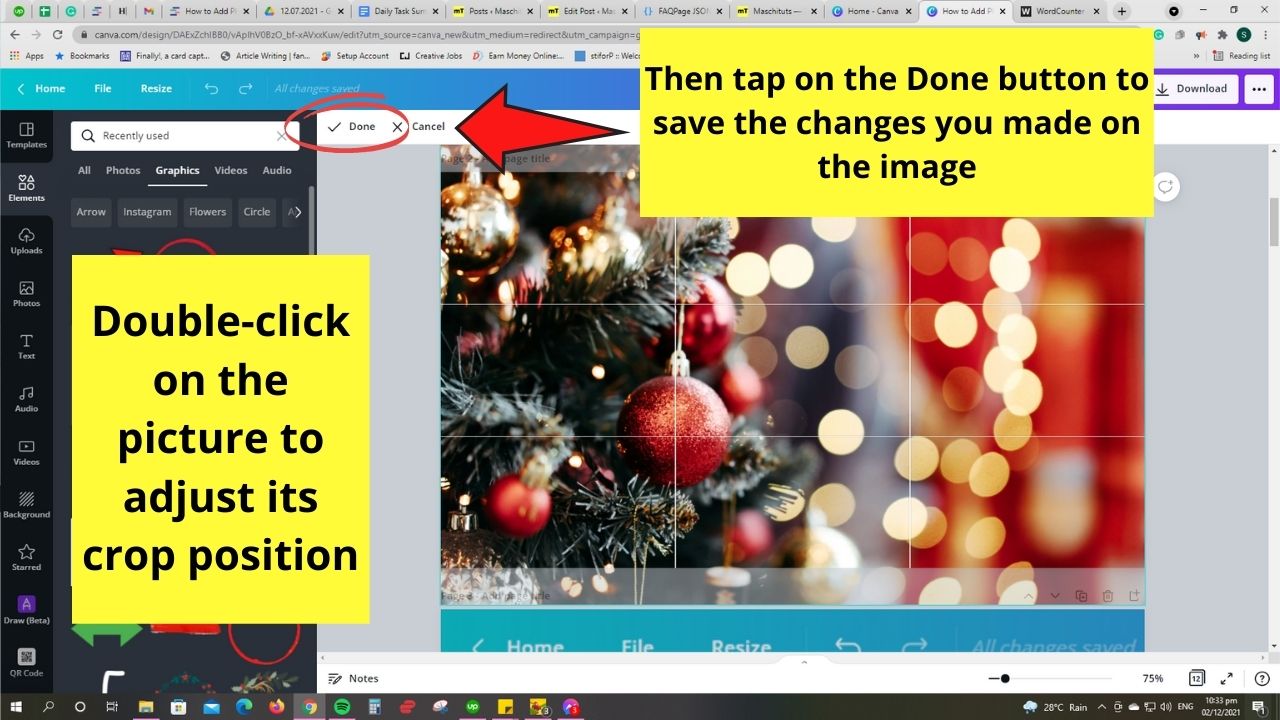

Drag the image sideways until you’re satisfied with the part of the picture featured on the canvas. Click the Done button so you’ll save the changes you’ve made.
Very simple, right? Follow through the steps above, and you’ll never go astray with adding photos to Canva.
So, what’re you waiting for over there? Start designing in Canva with images now!
How to Add Photos to Canva on Canva Mobile
After opening up a project in Canva, swipe to the left in the bottom toolbar until you see the “Photos” tab to add a photo to your project. Tap on it.
Then simply choose one of the photos from Canva’s stock photo library by tapping on it.
This will automatically add the photo to your Canva design.
If you would like to upload your own photos to Canva on Canva mobile, then switch to the “Uploads” tab that can also be found in the bottom toolbar.
Then tab on “Upload Files,” locate the file on your mobile device, and upload it. Once the photo is uploaded, tap on it again to add it to your design.
How to Add a Photo to a Canva Presentation
Adding a photo to a Canva presentation works exactly the same as adding a photo to a “regular” Canva project. Here’s how you do it:
- Select “Photos” in the left-side toolbar
- Click on a photo to add it to your design
If you would like to add a photo to a new page of your presentation, you can add a new page by pressing on the “+” symbol below your presentation and then do the steps as outlined above.
To add your own images and photos to your presentation, click on “Uploads” in the toolbar on the left, then click on “Upload Files” and locate the photo on your computer and upload it.
After it is uploaded, simply click on it again to add it to your presentation.
However, there is even an easier way to add your own images to a Canva presentation. Instead of going to the “Uploads” folder, you can directly drag & drop your image from your desktop straight into the project. Try it out. It works like a charm.
Frequently Asked Questions about How to Add Photos to Canva
Can I still use Premium photos for my designs even if I’m a Free account user?
You still can use Premium images on your Canva designs even if you haven’t upgraded to the Pro account yet. It’s just that you’ll need to pay for them first before you can download the entire design without a watermark splashed across it.
What should you do to add a picture to a grid or frame in Canva?
To add pictures to frames and grids in Canva, you’ll need to click and drag them towards the particular cell of that frame or grid. The photo will then assume the entire space in that grid or frame. Double-tap on the image to adjust its crop position.
Can you still detach an image you’ve already made as the background in Canva?
You can still detach a picture turned into a background. Right-click on that photo and choose the Detach image from Background option. The picture will then revert to its original size before you stretched it when you turned it into your background photo.
How do I replace my background image in Canva?
To replace the background photo, right-click on a different picture and choose the Replace Background option in the dropdown menu.


Hey guys! It’s me, Marcel, aka Maschi. On MaschiTuts, it’s all about tutorials! No matter the topic of the article, the goal always remains the same: Providing you guys with the most in-depth and helpful tutorials!

