Whoah! I need to create a slideshow that will showcase the landmarks we visited during our field trip.
Is it possible to create slideshows in Canva the same way I create text-on-click presentations?
Thankfully, creating slideshows in Canva is incredibly easy — you only need to learn where to tap the buttons first.
How to Create a Slideshow in Canva
To create a slideshow in Canva, you can use photo collages, slideshow templates, or grids. Whatever option you choose, edit them by changing photos and videos from the gallery or from your device, inserting audio clips, and adding text and animations before downloading them as a GIF or MP4 video.
Creating Slideshows in Canva — 3 Methods To Make Them
Canva is such a flexible graphic design tool as it allows its users to have more than one way of approaching a creative “problem.”
Even when you set the dimensions in Canva, there are 2 ways how you solve the dilemma.
Hence, let’s together discover the 3 ways with which we can come up with a stunning slideshow in Canva.
1st Method: Creating Slideshows in Canva Using Pre-made Slideshow Templates
Step 1: On Canva’s home page, head to the search bar and type “Slideshows.”
You’ll then see a dropdown menu listing the options closest to the word you encoded. Select the “Slideshow Videos” option.
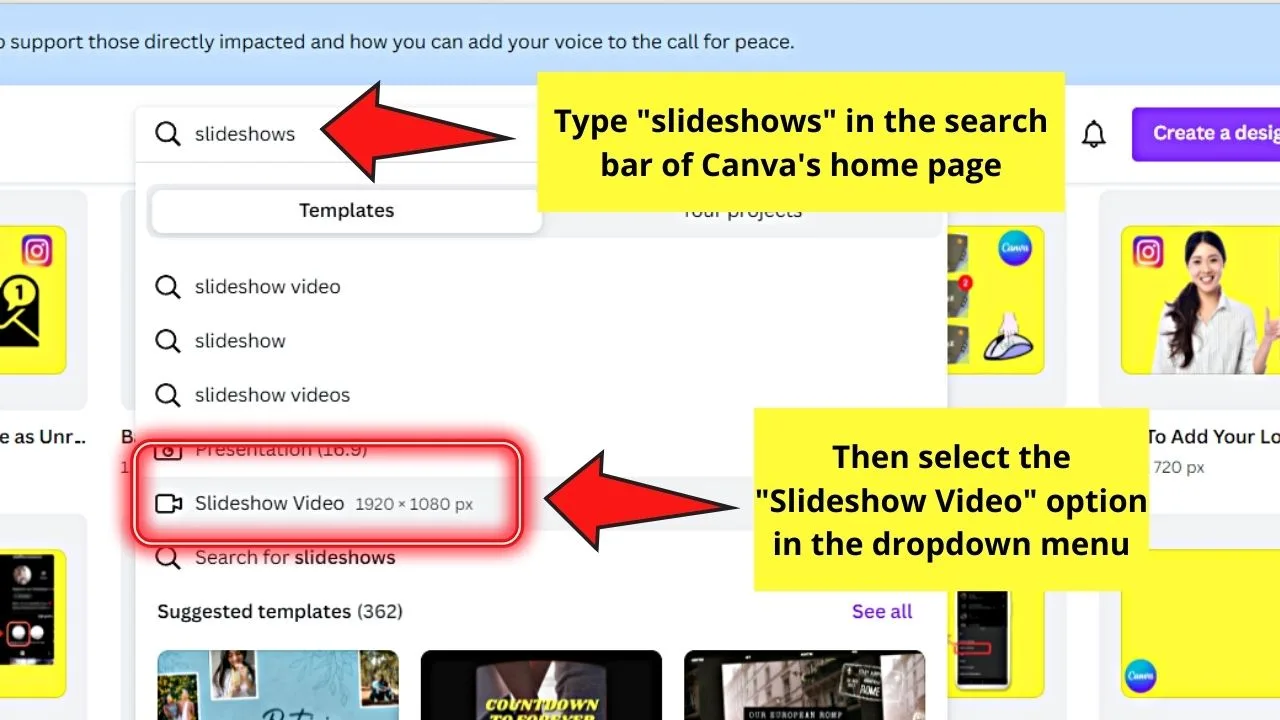
Step 2: You’ll then be redirected to the “Slideshow Videos” template page.
You can start from scratch by clicking the “Create a blank Slideshow video” or edit pre-made ones by selecting a template.

For sample purposes, let’s proceed with selecting a premade “Slideshow video” template.
Step 3: Once you’re on the editor page, begin customizing the slideshow template to your planned theme.
To start with the process, replace the photos used in the template.
Just choose the “Photos” tab on the left side panel to select images from Canva’s photo gallery.
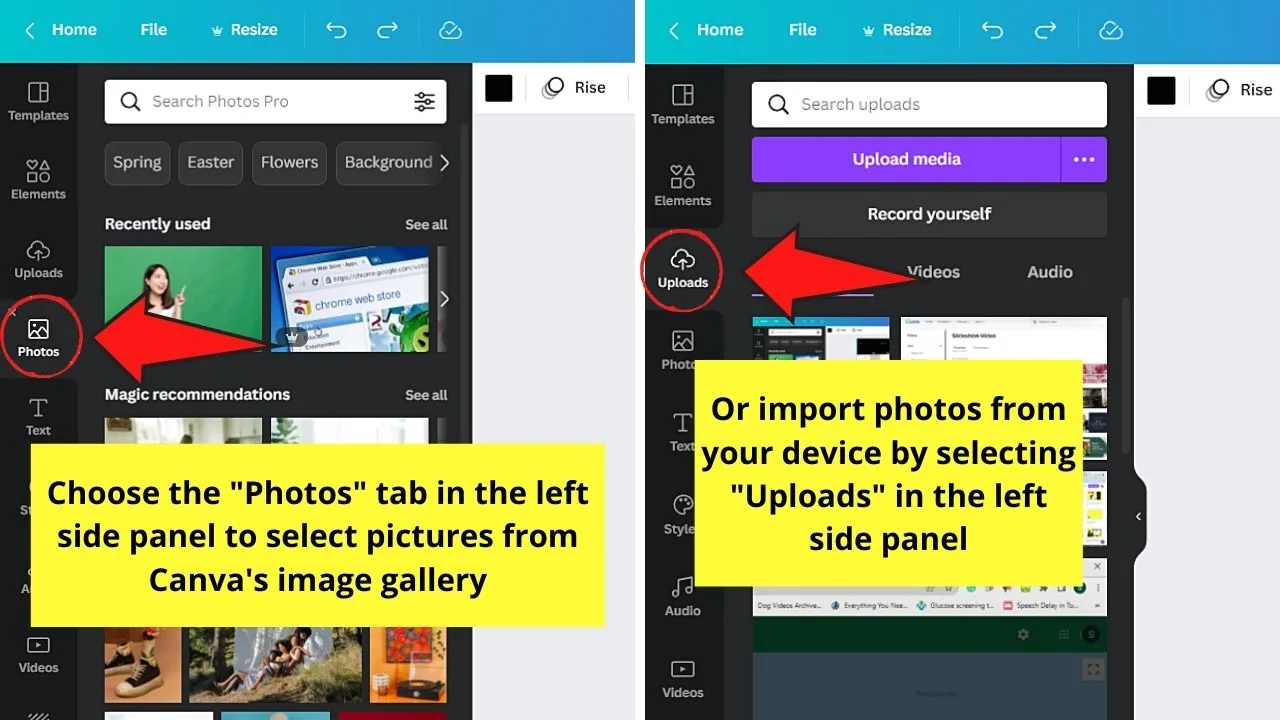
But, if you prefer to use your pictures, select the “Uploads” tab in the same left side panel and click “Upload media.”
Then, once the photos are uploaded, drag and drop them onto the template until they snap in place.
Continue doing this step until you replaced all the photos in the template.
Step 4: If you want to adjust the crop position of the images, double-click on one of them and drag them sideways.
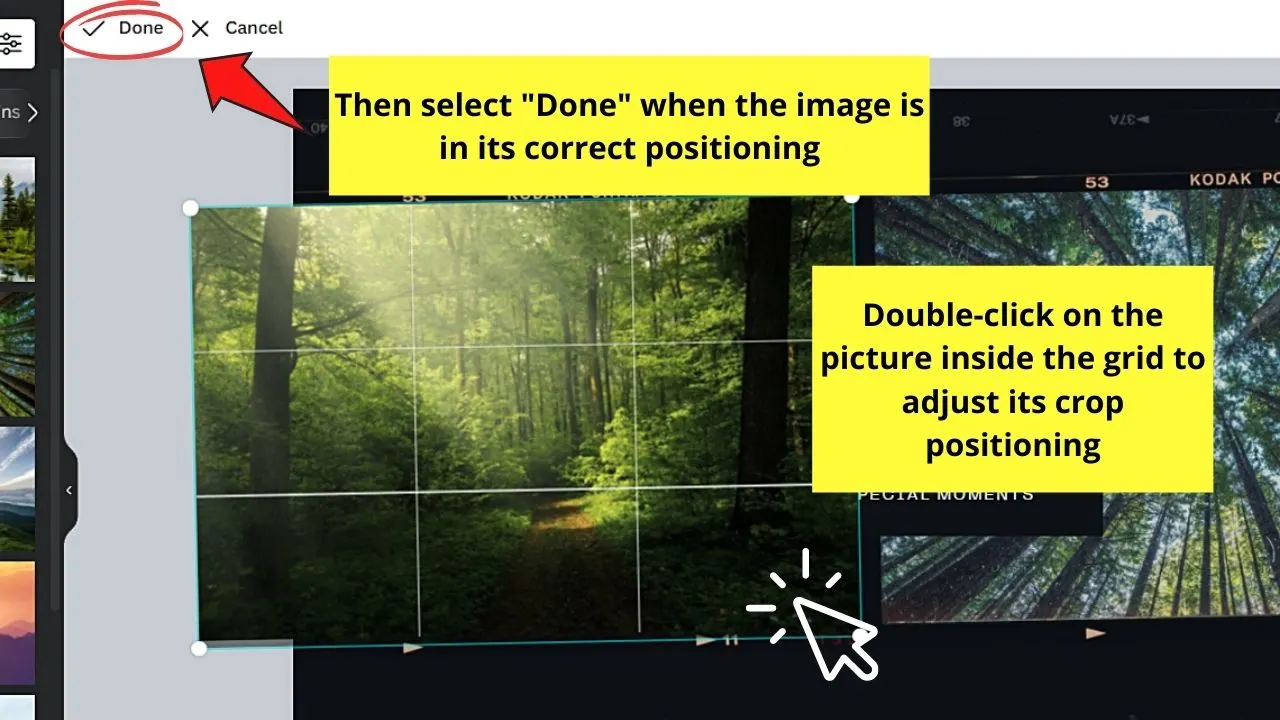
Then, click “Done” if you like how the photo’s positioned.
And, while you’re at it, you can further edit the photos by adding photo effects.
Just select an image, click “Edit image” and head to the “Edit image” gallery to choose the photo effect you’d like to apply.
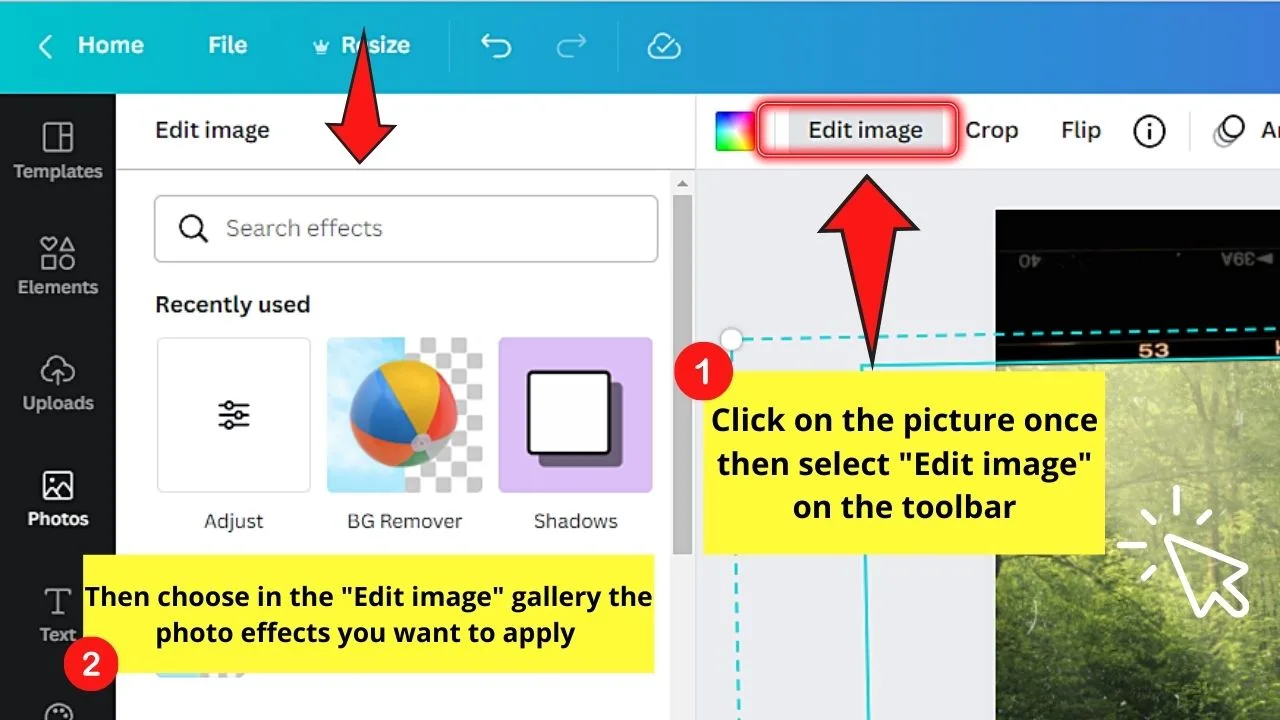
Step 5: After editing the photos, it’s time to add other design elements to your slideshow.
Go to the left side panel again, but this time, click “Elements.”
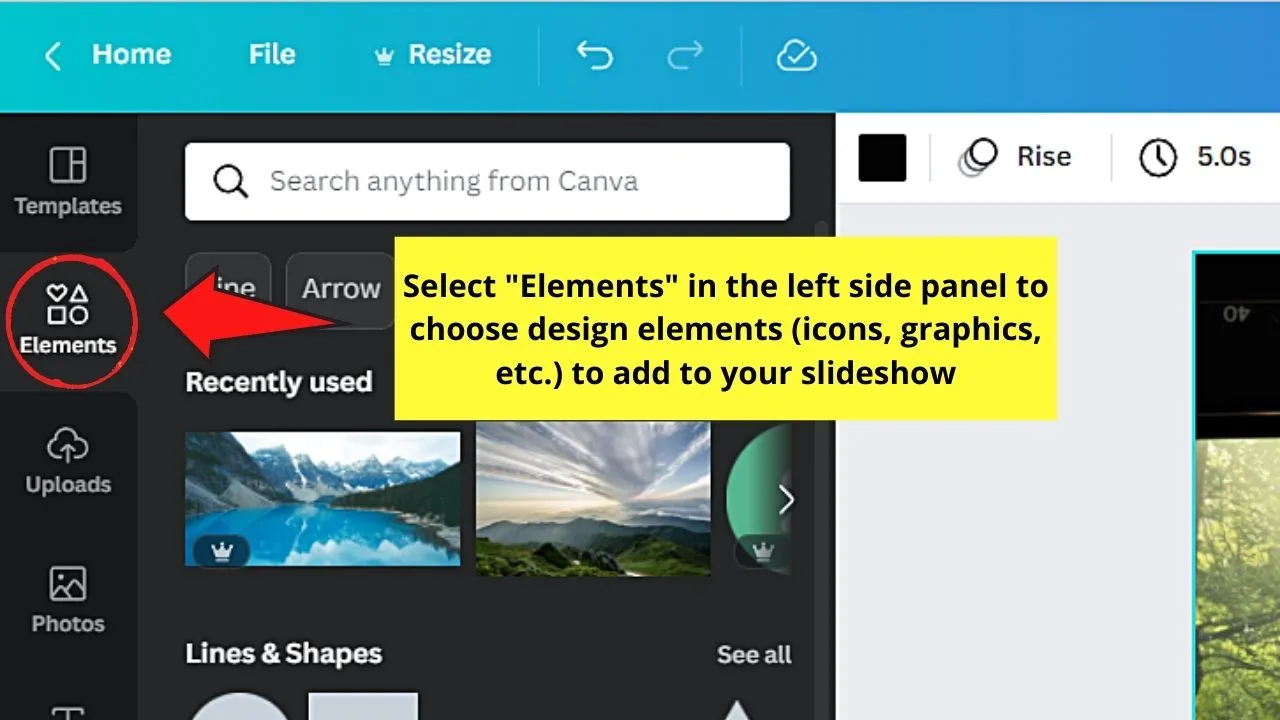
From there, you can add icons, stickers, or even charts and illustrations that suit your slideshow’s theme.
Step 6: After adding design elements, you can begin editing the text written on the slideshow template.
Just double-click on the text boxes for you to change the words written inside them.
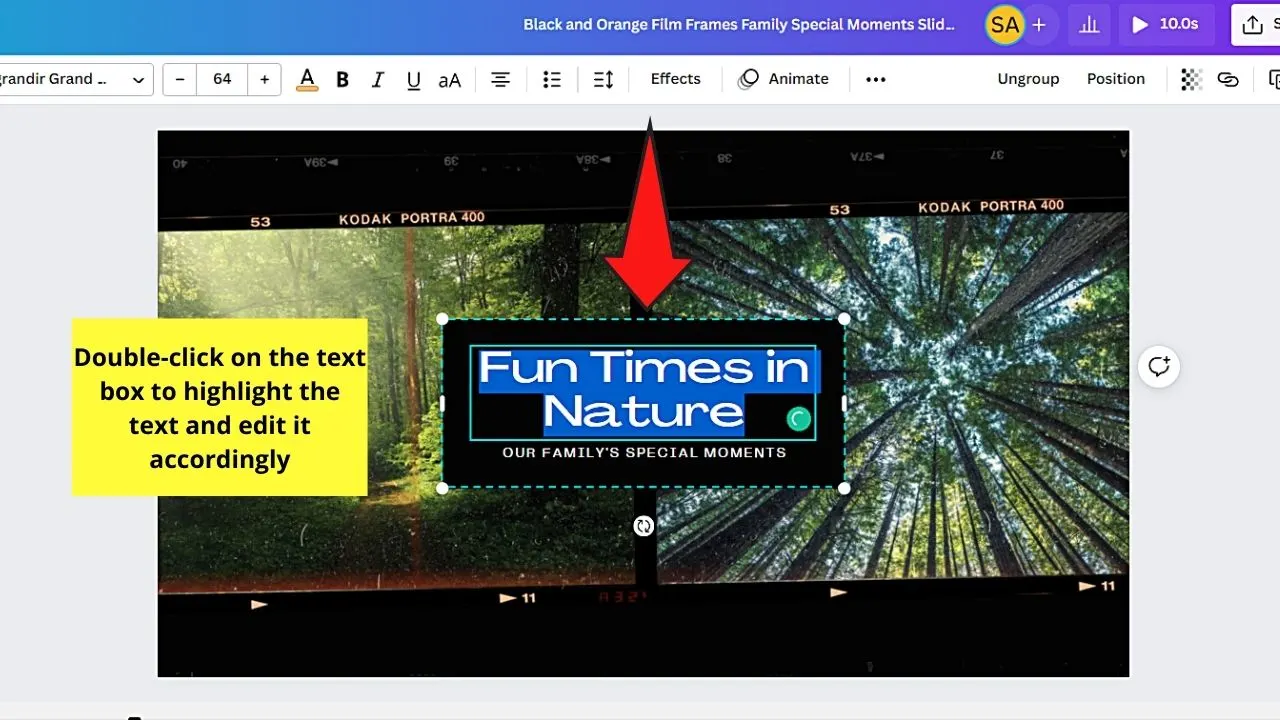
If you want to add more text boxes, press “T” on your keyboard and edit the text’s font style, size, color, and style accordingly in the editor toolbar.
Step 7: Now, if you want to further bring a fun element to your slideshow, add animations.
Simply click on the text, image, or element you want to add an animation before selecting the “Animate” button.
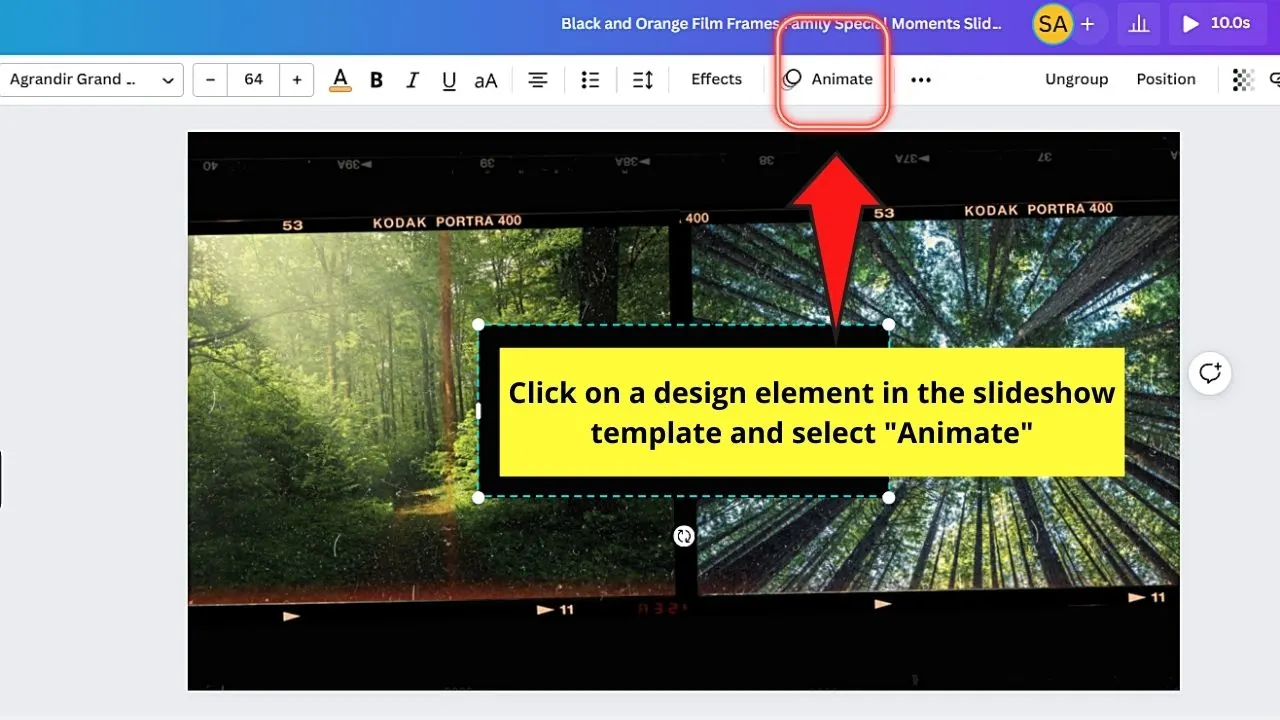
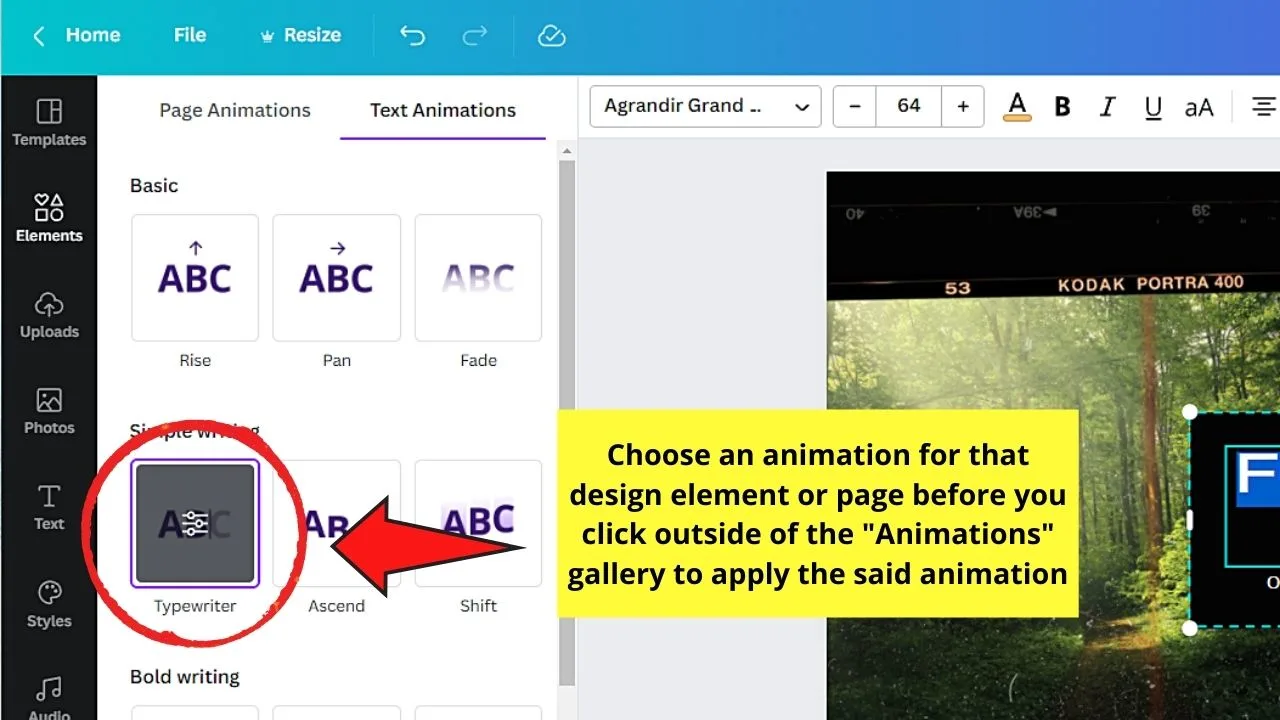
Then, in the “Animations” gallery, choose what page animation or text animation you want to use.
After which, click outside the “Animations” gallery to apply the animation you selected.
Step 8: Add music to your slideshow. To do so, head to the left side panel and click “Audio.”
You’ll then see a gallery of audio clips appear. Click on one to use for your slideshow.
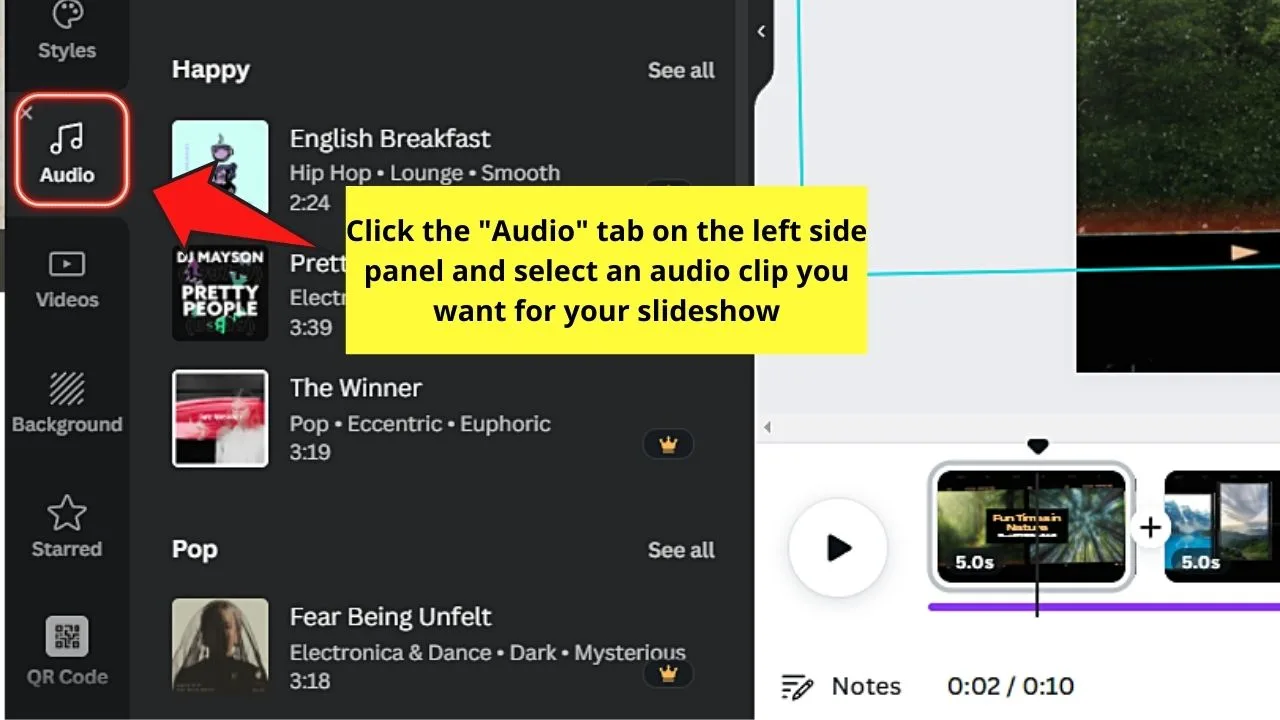
If you don’t like the current audio clip, just delete the said audio and choose another one from the gallery.
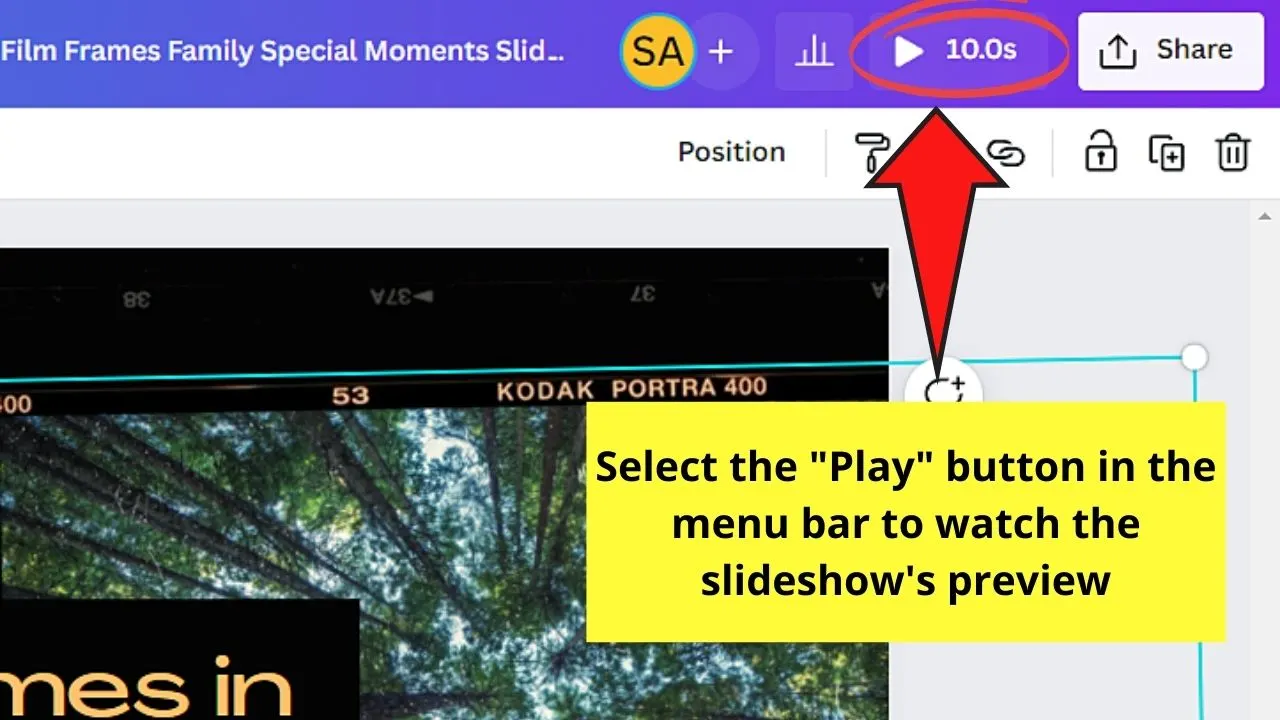
Step 9: If you’re good with how your slideshow looks, watch its preview by clicking the “Play” button in the menu bar.
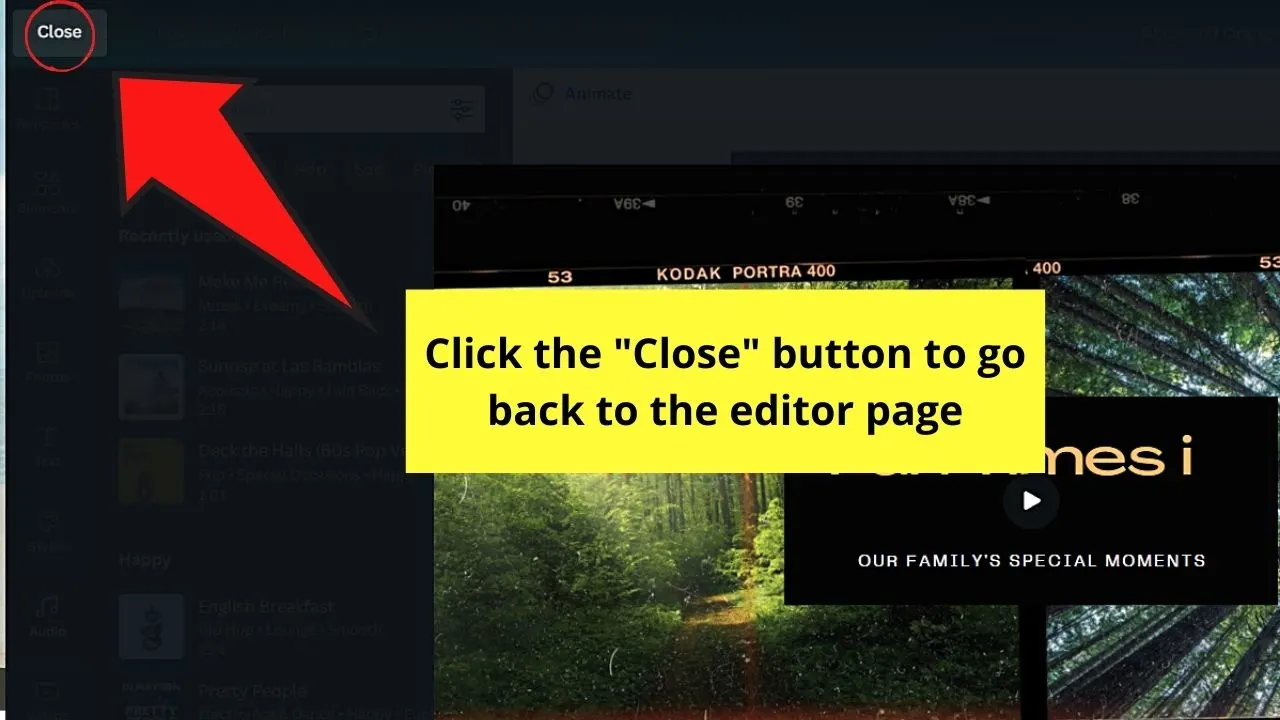
Step 10: Now, after viewing the slideshow’s preview and you want to edit the timing of each slide, click “Close” to go back to the editor page.
Then, select a page and click the “Edit Timing” button on the toolbar.
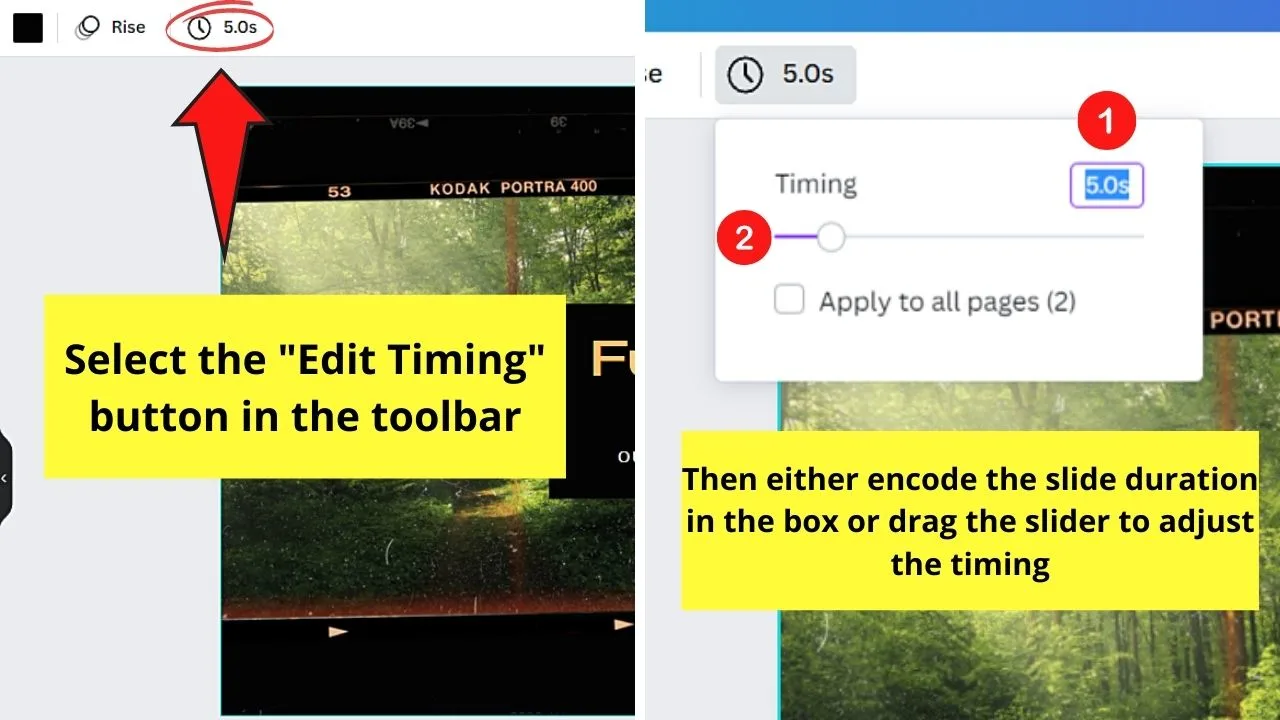
From there, encode the number of seconds or drag the slider to adjust the slide’s duration.
Step 11: Then, head back to preview to view the slideshow again.
If everything’s good, click the “Download” button in the “Preview” mode and choose the file type.
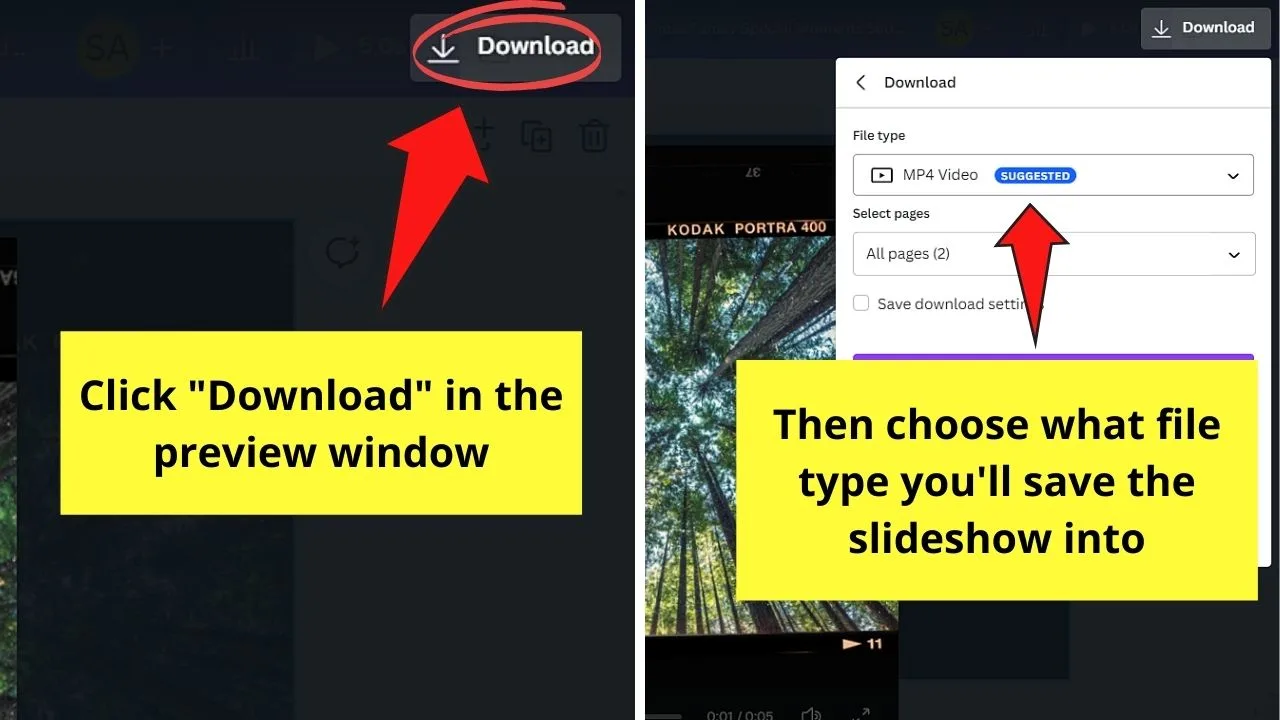
If you added an audio clip, it’s best to choose the “MP4 video format.”
If you don’t want music playing in the background, you can opt to select “GIF” or download it as a PowerPoint presentation instead.
You can even directly present the slideshow from Canva itself by clicking “Share” in the menu bar, then “All Options” before clicking “Present.”
And, just like that, you’ve created and presented a wonderful slideshow in Canva.
But, if none of the slideshow templates is the one you’re looking for, head to the second method below and use photo collage templates instead.
2nd Method: Creating Canva Slideshows with Photos Using Photo Collage Templates
Step 1: After logging into your Canva account, head to the “Create a Design” button and select “Photo Collage” from the choices available.
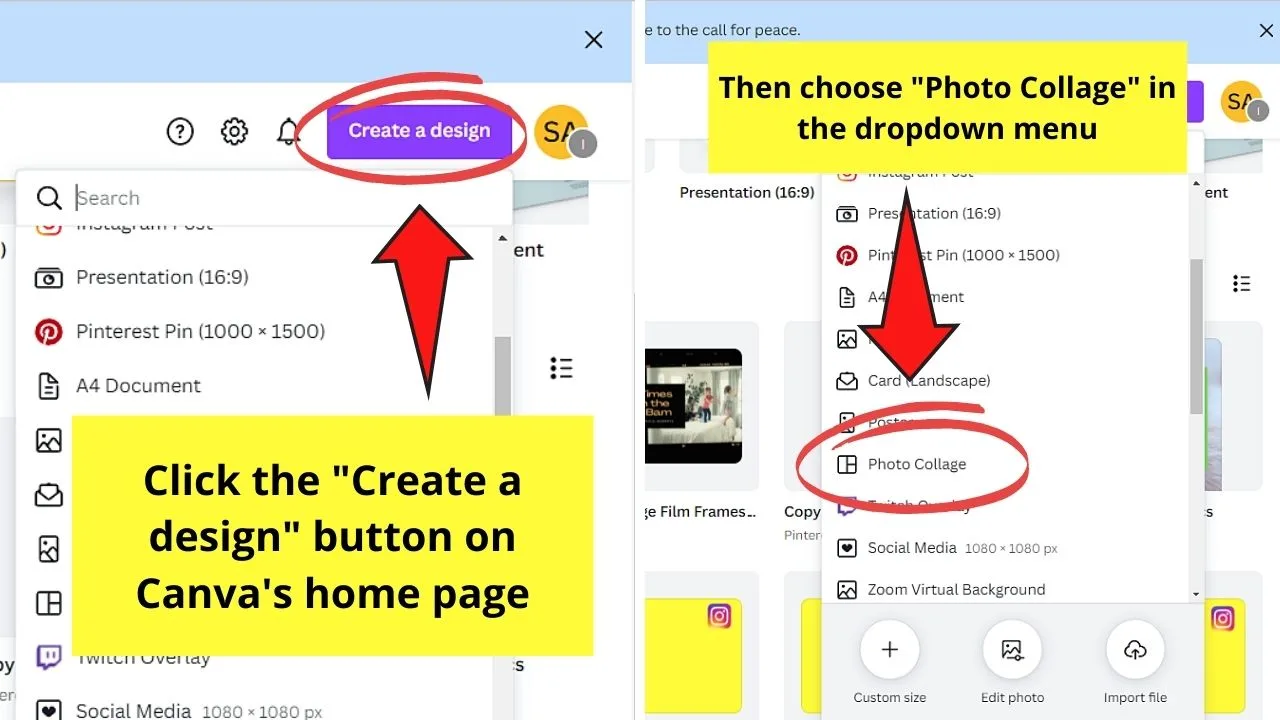
You’ll then be redirected to the editor page.
Step 2: Once you’re on the editor page, head to the left side panel and click the “Templates” tab.

This will open a gallery of photo collage templates that you can use for your slideshow.
Step 3: From the photo collage templates available, click on a template design that suits the theme you’re planning for your slideshow.
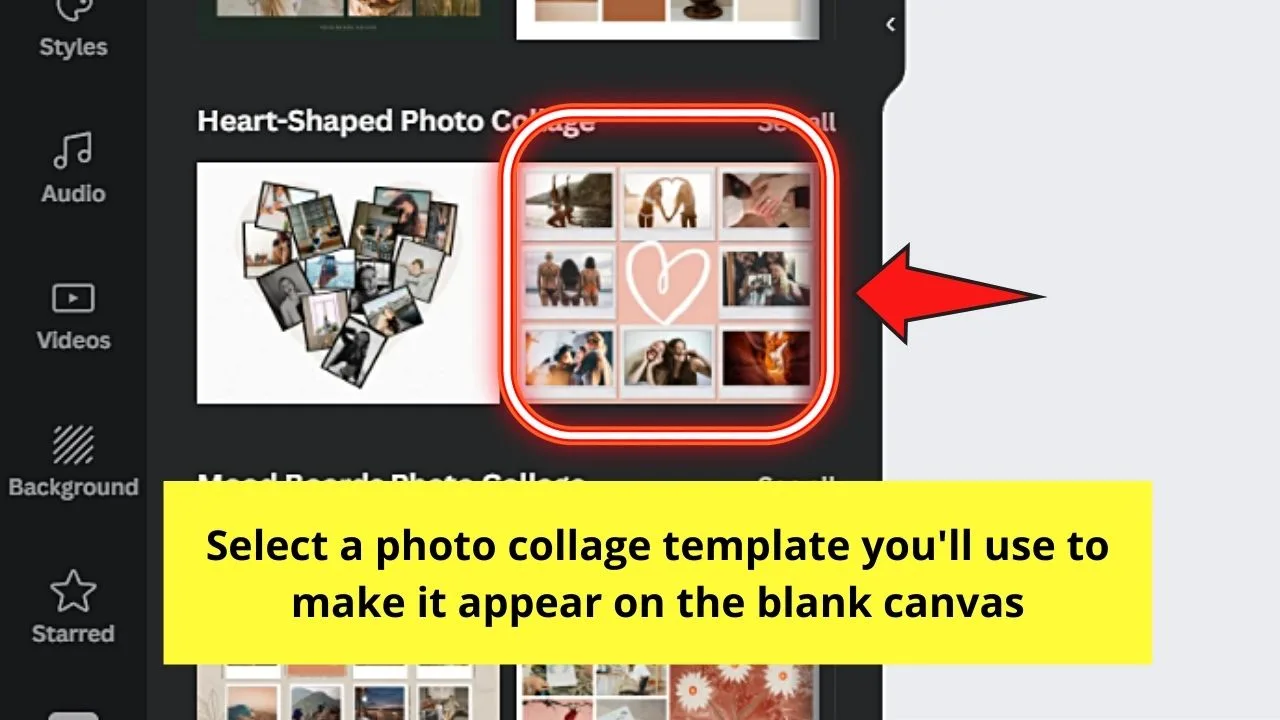
This move will automatically make the template appear on the blank canvas.
Step 4: Now, change the original photos inserted in the template.
You can do this either by inserting images from Canva’s photo gallery or by uploading your photos from your device through the “Uploads” tab.
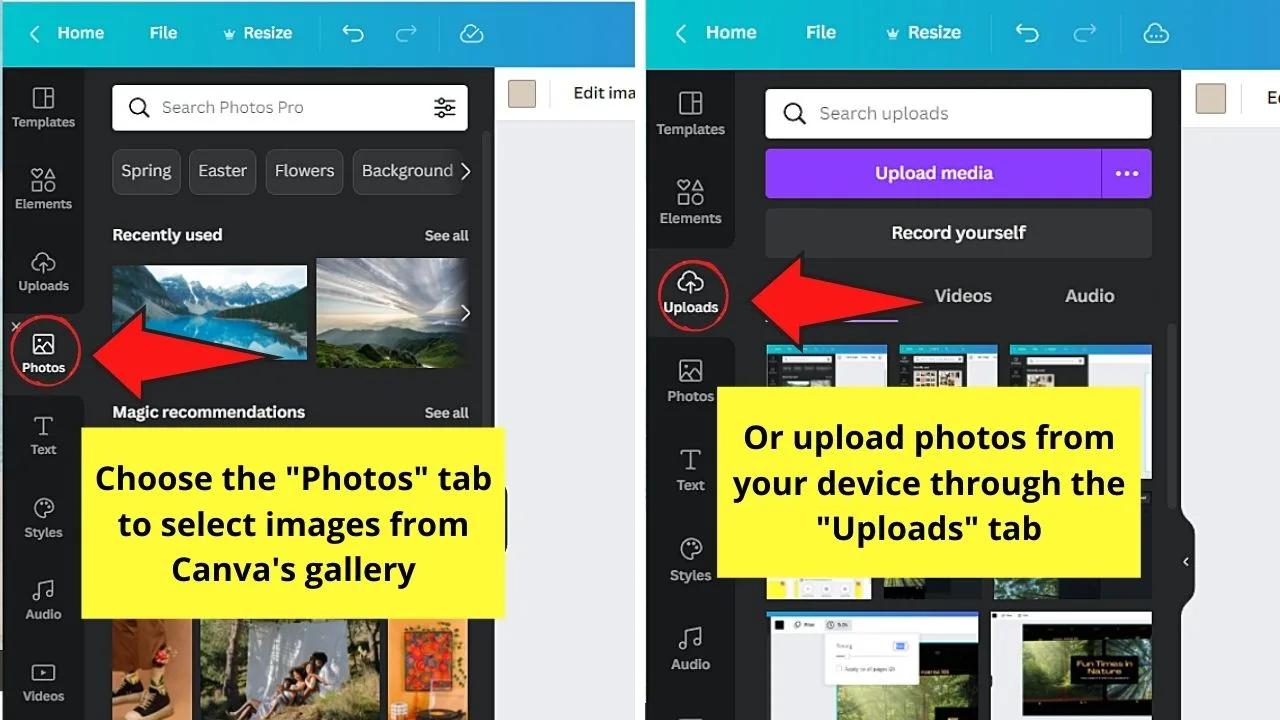
Whichever of the two methods you’ll use, click and drag the photos to the template until the images snap into place.
Repeat this step until all the frames in the collage template are filled with your desired images.
Step 5: If you don’t want to use the same color themes across the design elements in the photo collage you selected, change them.
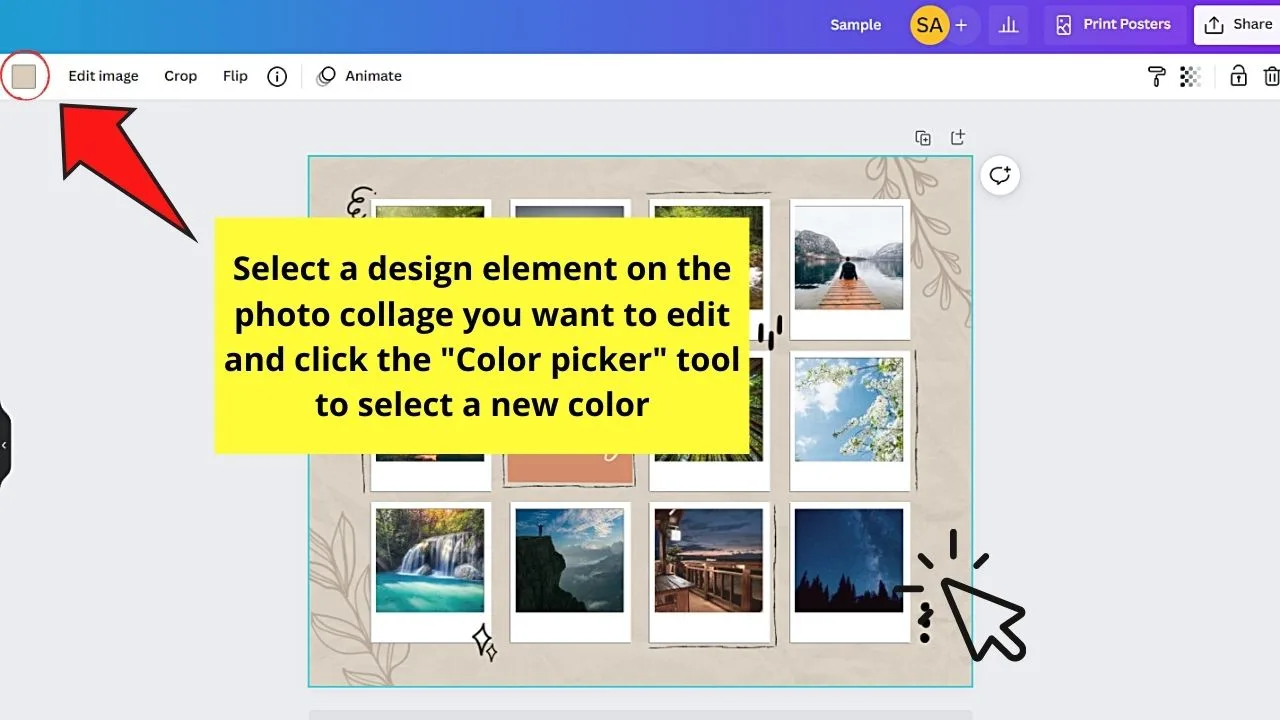
To do this step, click on a design element in the photo collage and select the color picker tool in the toolbar.
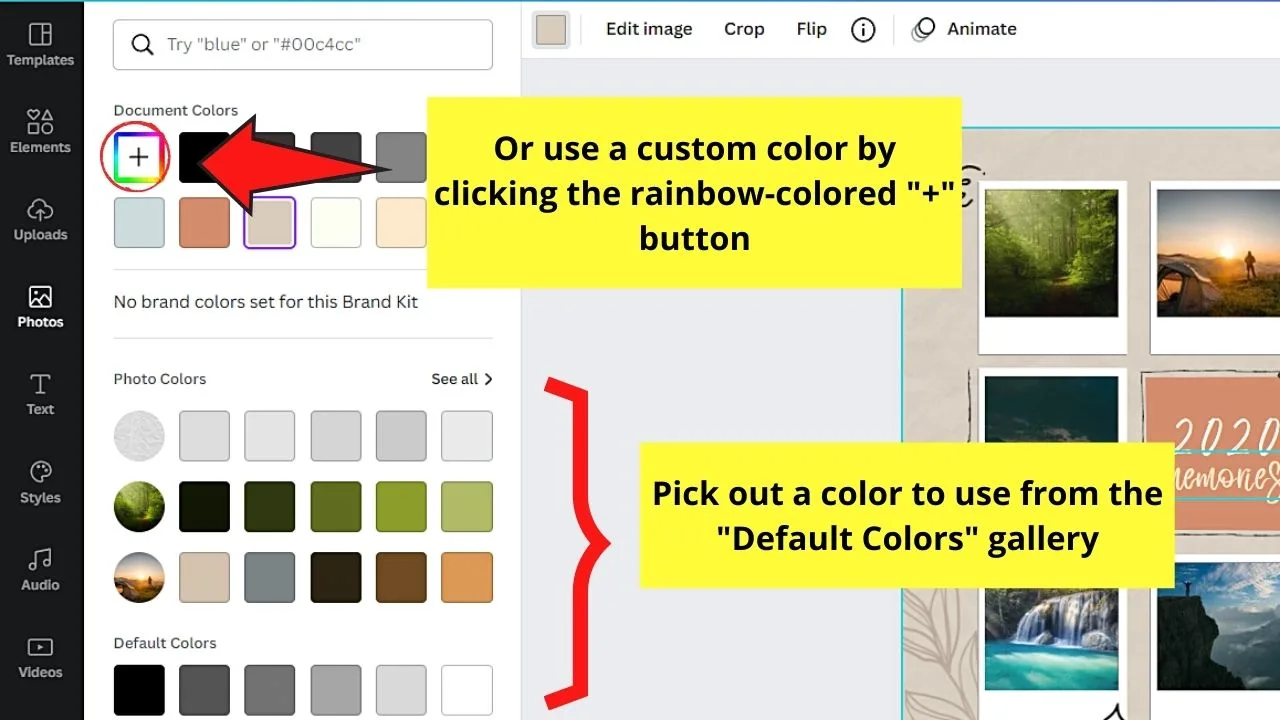
Then, in the left side panel menu that appears, click on a hue from the “Default colors” gallery or add a new one by selecting the rainbow-colored “+” button.
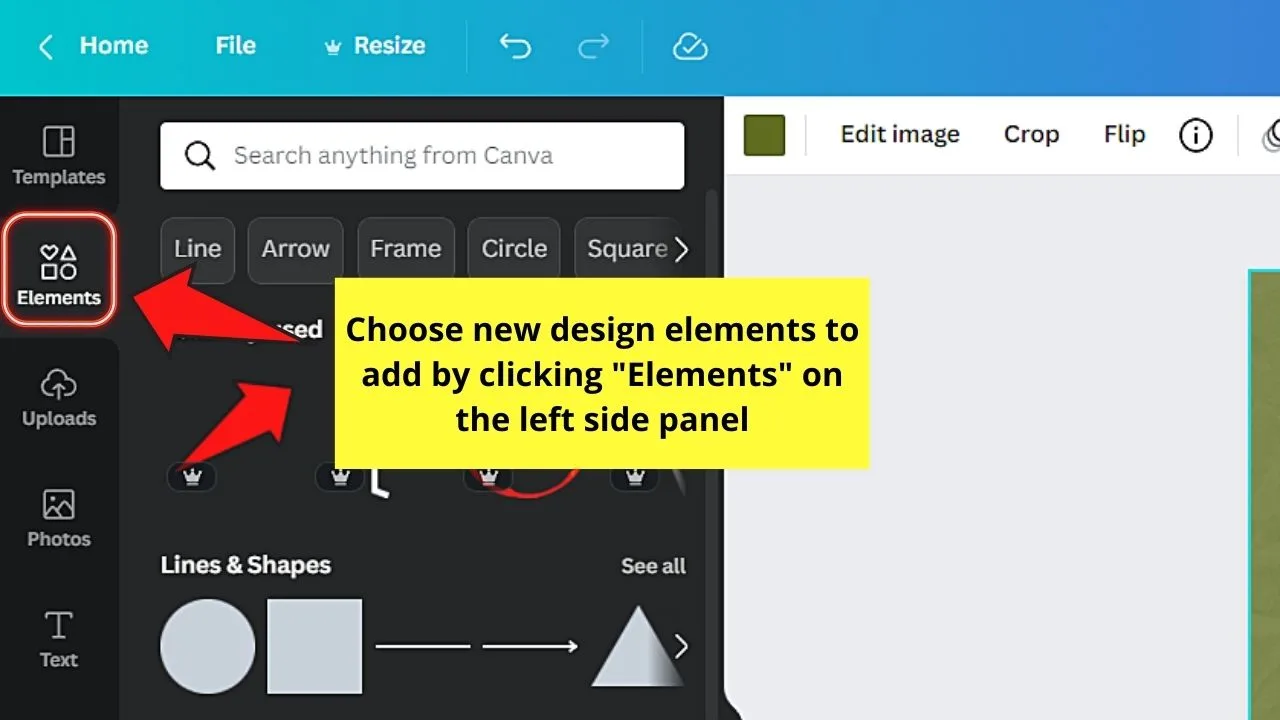
If you’re raring to add new design elements, click the “Elements” tab in the left side panel and select from the various elements available.
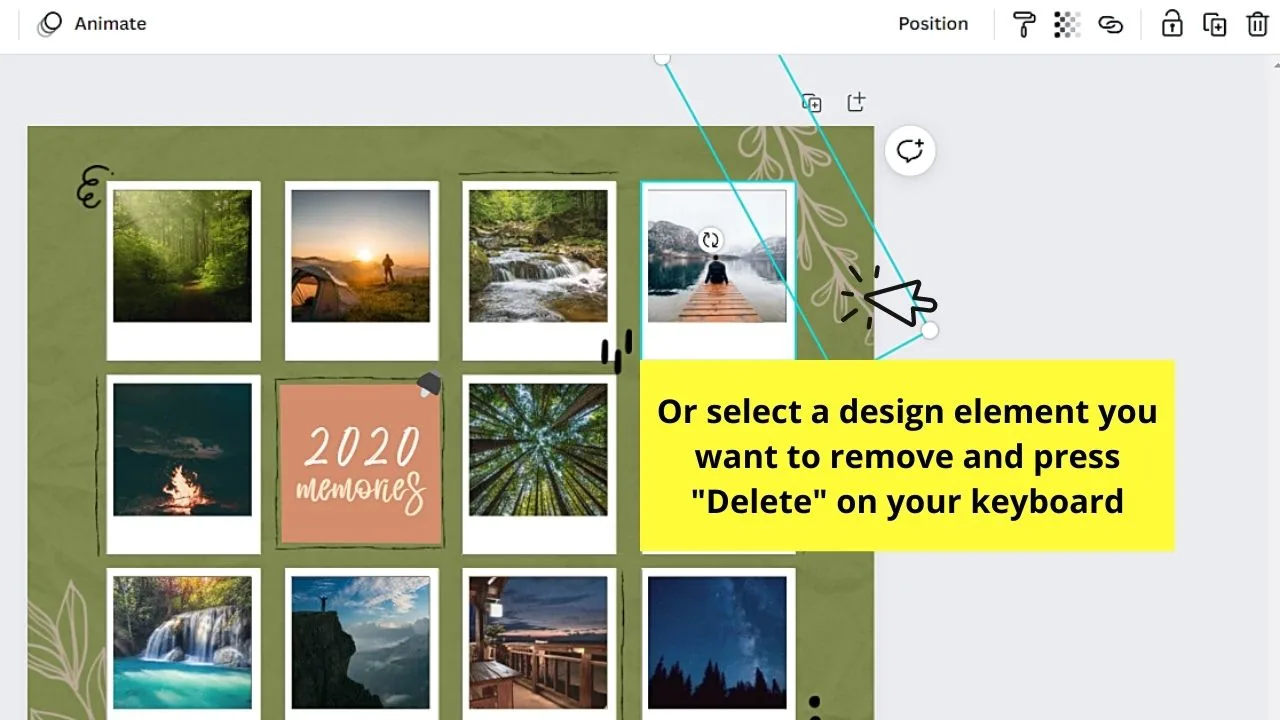
But, if you want to remove unwanted design elements, click that element and press “Delete.”
Step 6: After adding and removing design elements, add text to your slideshow.
Choose the “Text” button in the left side panel to add a heading, subheading, or body of the text.
You can also simply press “T” on your keyboard to automatically add a text box to the design.
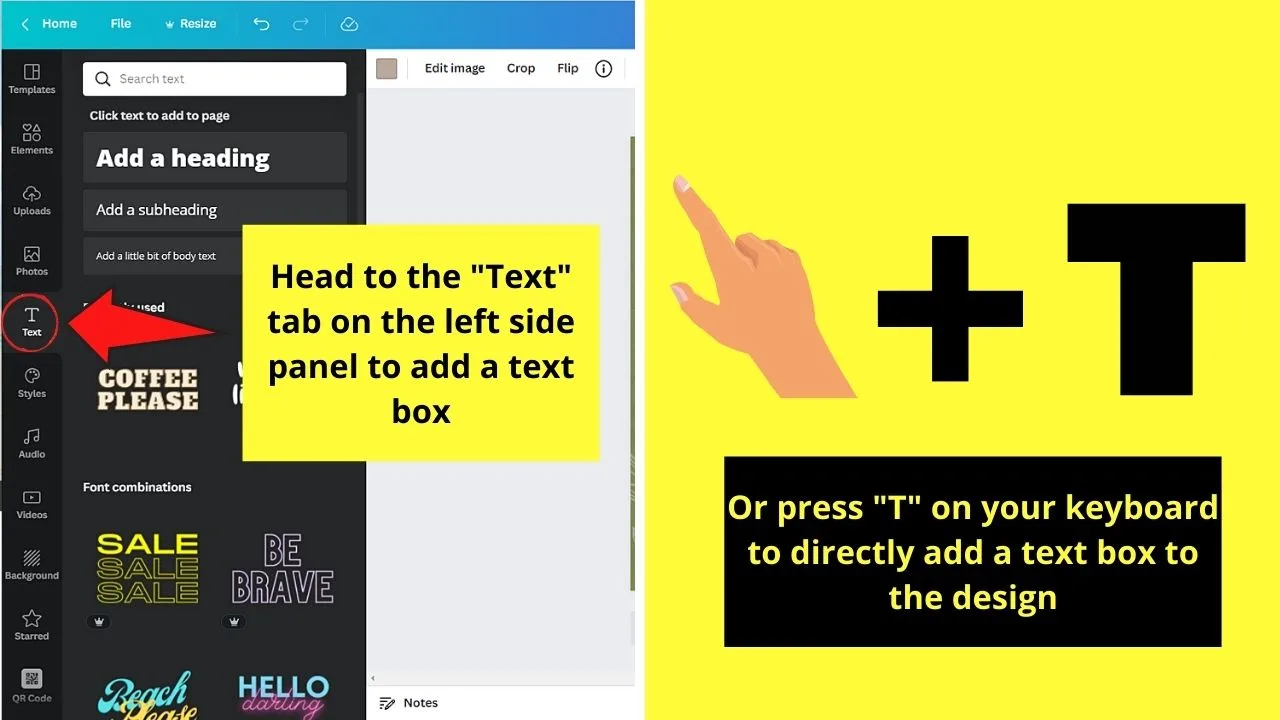
Then, edit the font’s style, effect, size, and color accordingly by selecting the corresponding buttons in the toolbar.
Step 7: Now, to further add a fun factor to your slideshow, add animations to your design elements.
To add those animations, click on the design element or text and select the “Animate” button from the toolbar.
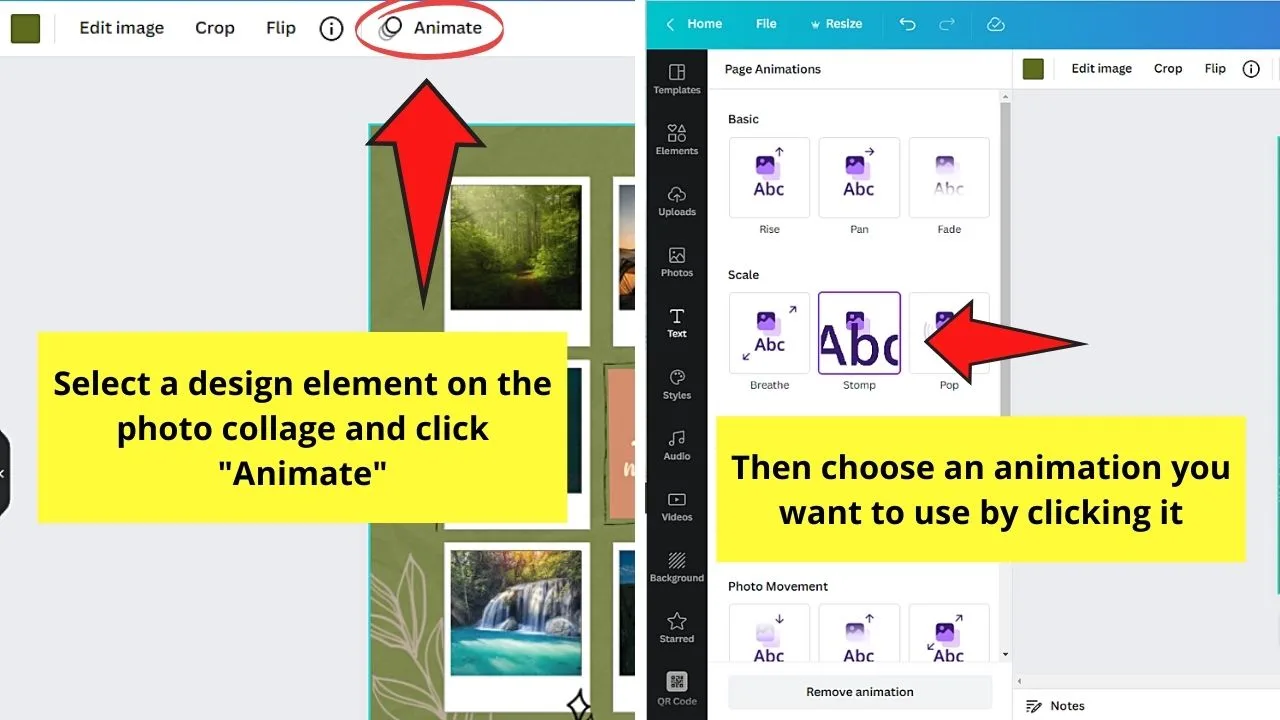
Then, in the left side panel, choose the page and text animation that you’d like to apply to that particular design element.
If you want to shorten the transition time between slides, click on a particular page or design element and click the “Timer” button to change it.

Step 8: After adding all the effects to your slideshow, you can add an audio clip.
Just head to the left side panel and click the “Audio” button to choose a music track you’ll use.
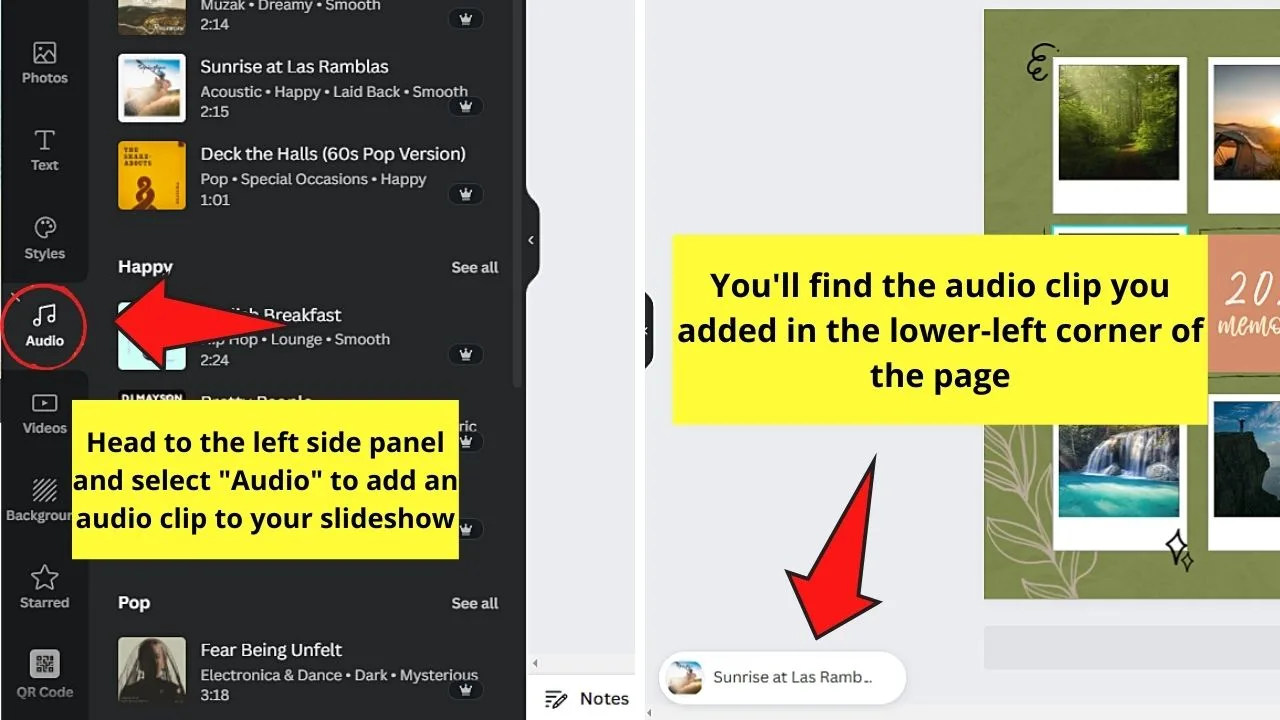
Then, preview the slideshow by clicking the “Play” button in the toolbar.
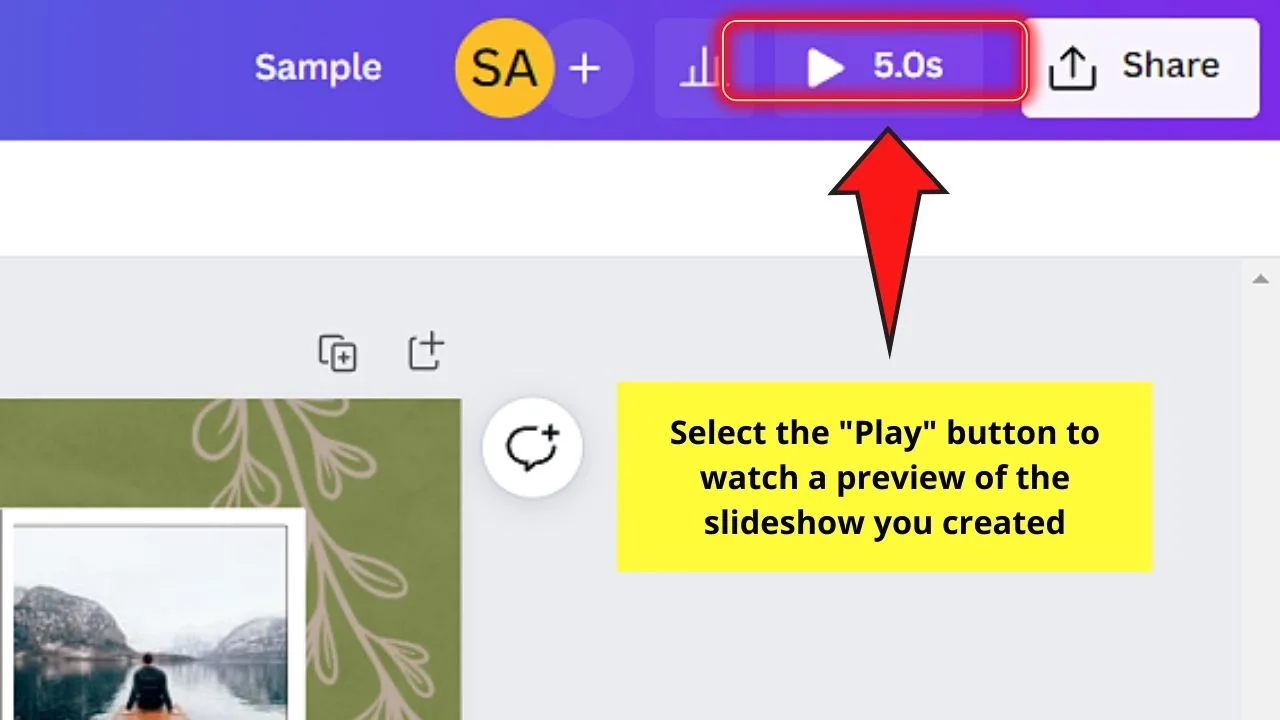
Step 9: If you’re good with how your slideshow plays, select the “Share” button in the menu bar before choosing the “Download” option.
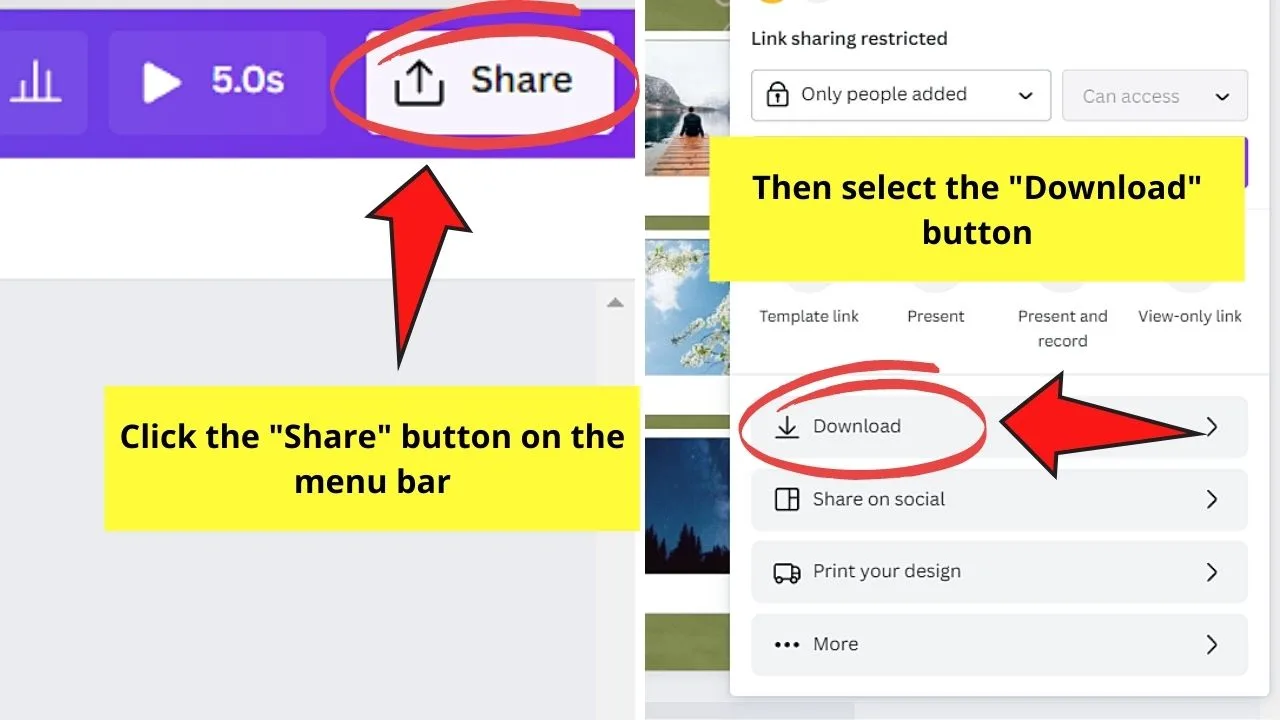
Step 10: On the “Download” page, select the file type you want to download the slideshow in.
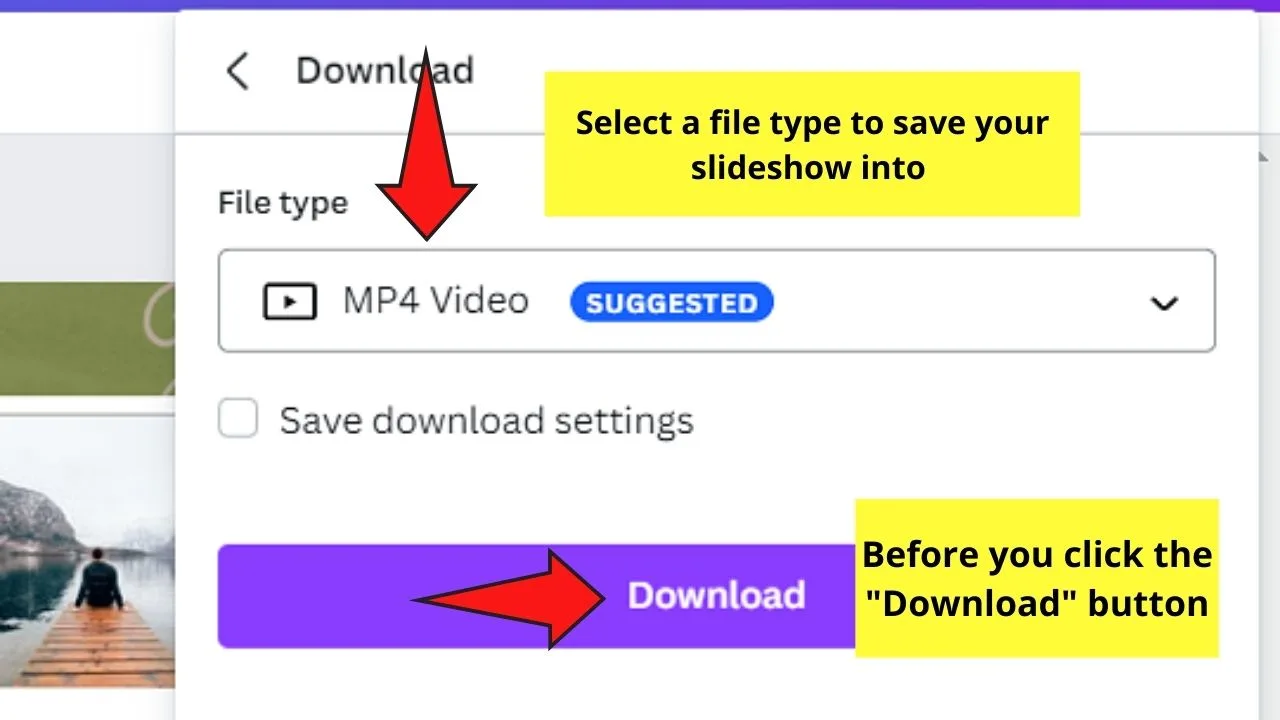
Since you want to keep the animations intact, choose either the GIF (without sound) or MP4 Video format (with sound).
Select “All Pages” before clicking “Download.”
But, if you want to have a more unique look to your slideshow, you can opt to start from scratch with the third method below.
3rd Method: Creating Slideshows Using Grids
Step 1: After opening a blank template in Canva, head to the left side panel of the editor page and choose the “Elements” tab.
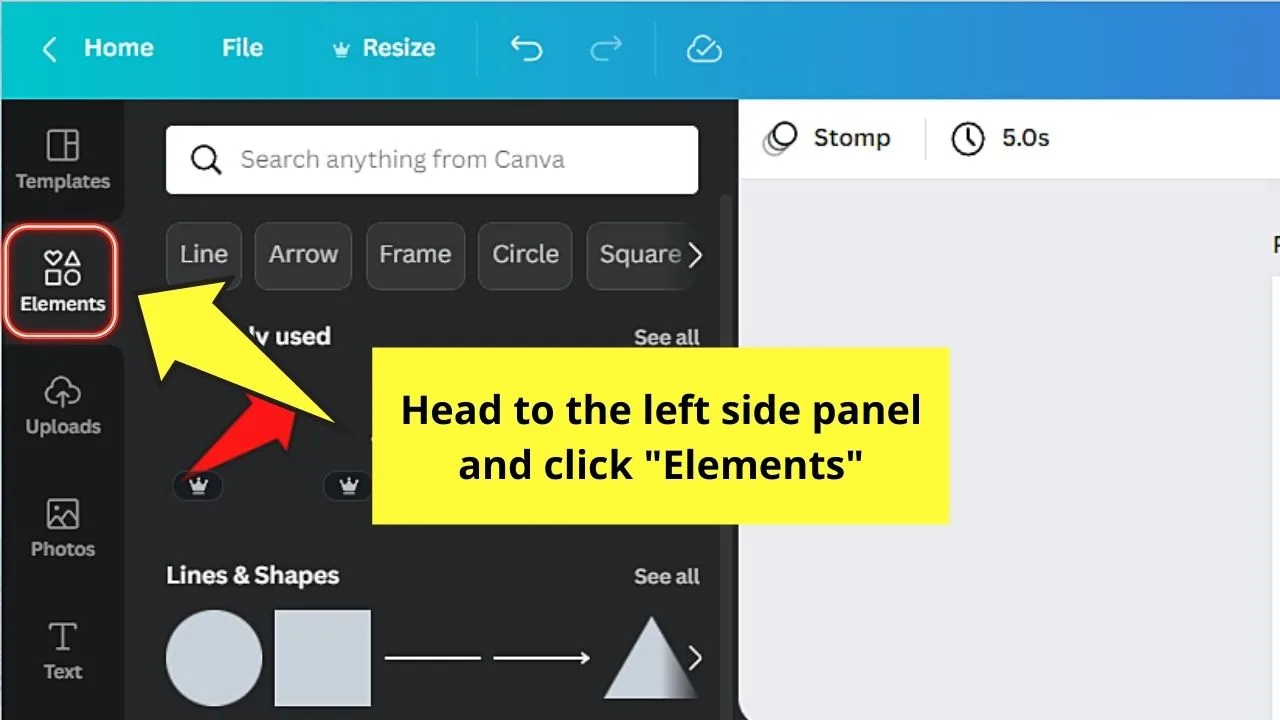
Step 2: In the “Elements” gallery, scroll down until you see “Grids.” Select the “See all” button to have a look at the grid layouts available.
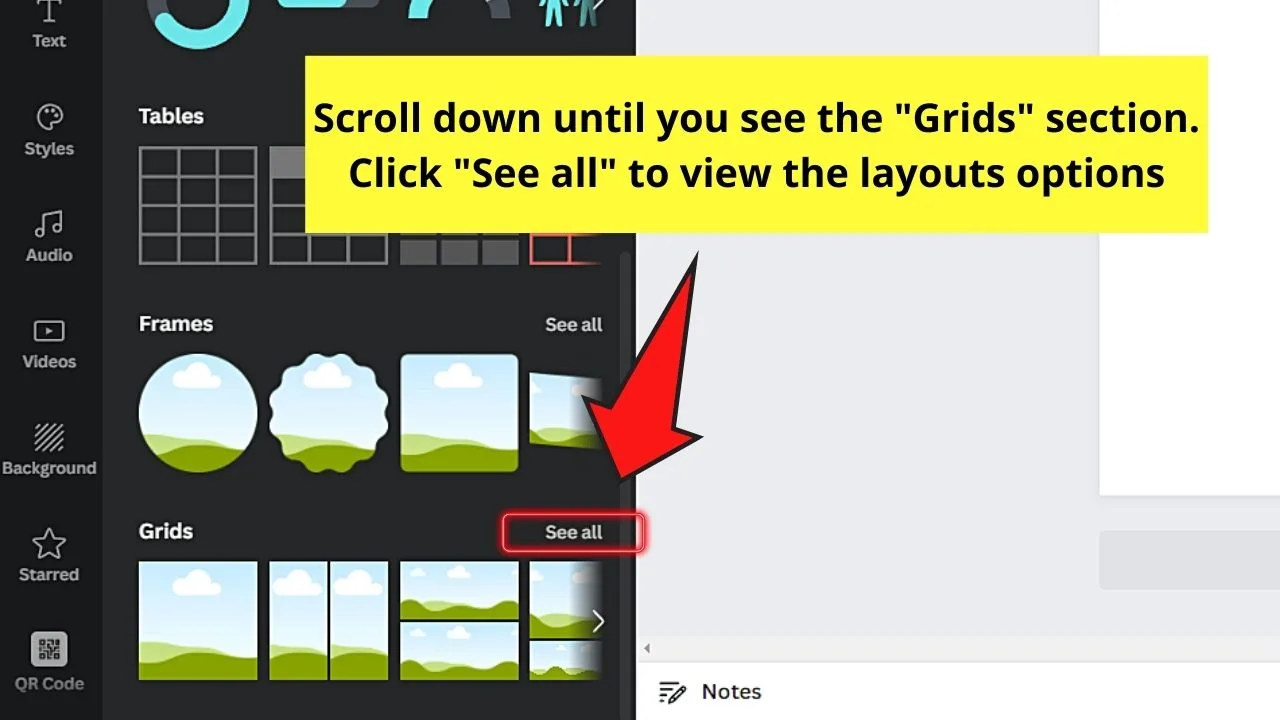
Continue scrolling down until you find the grid layout you want to use.
Once you find it, click it. This will automatically make the selected grid appear on the blank canvas.
If you want to combine certain grid layouts on a single page, you can do so by dragging the first grid diagonally to resize it.
Then, once you achieved the desired size for that grid, head back to the “Grids” gallery and choose another layout to use.
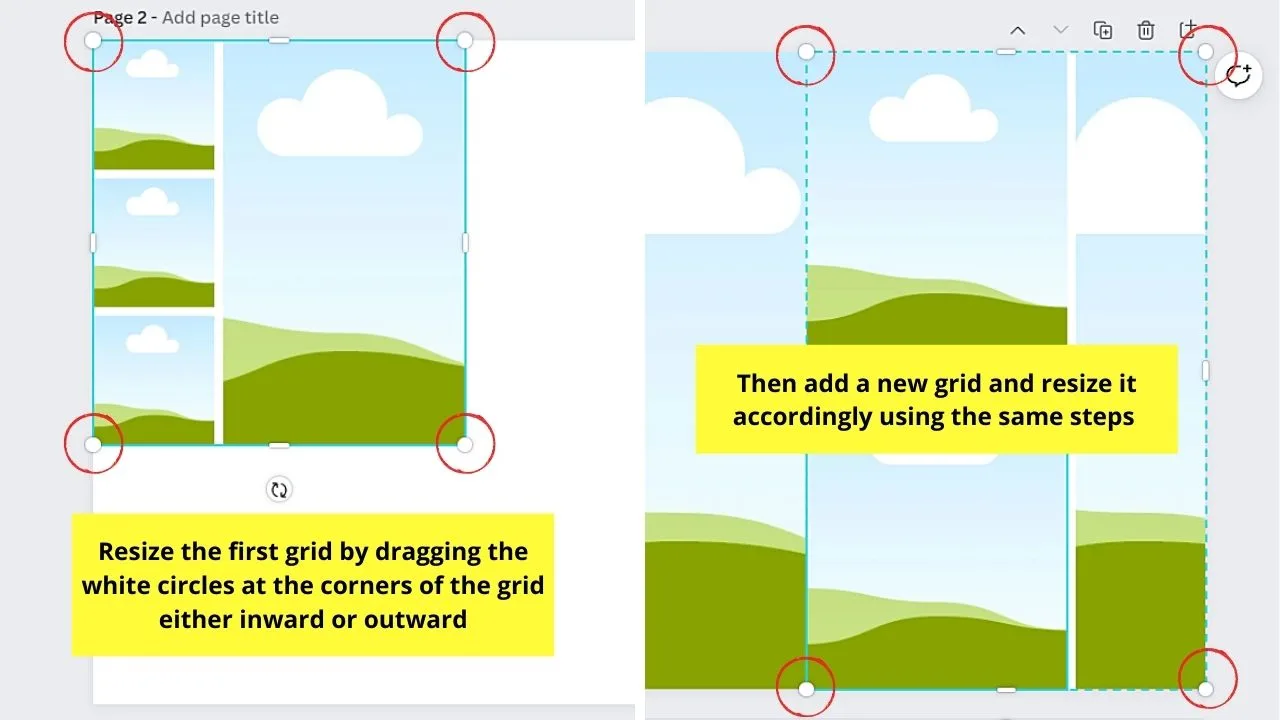
Repeat this process until every grid’s in the location where you want them.
Step 3: Now, add photos to the grids you inserted.
You can opt to add your photos from the device by clicking “Uploads” > “Upload media.”
You can also just use the images available in Canva’s photo gallery by selecting the “Photos” tab on the left side panel.
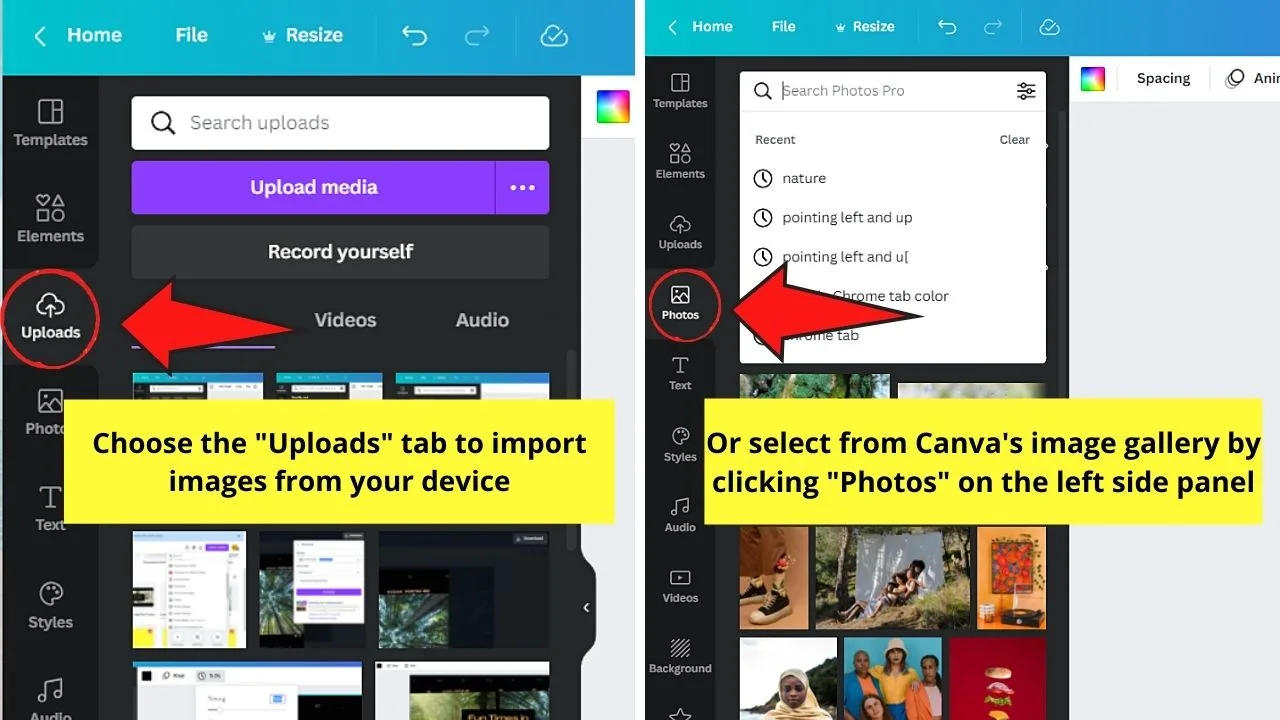
Whichever method you use, click and drag the photos to the grid until they snap into place.
Step 4: After inserting the photos into their respective grids, you can proceed with adding text to your slideshow.
Press “T” on your keyboard to add text boxes to the canvas, encode the text in them, and edit the font style, color, size, and effect accordingly from the toolbar.
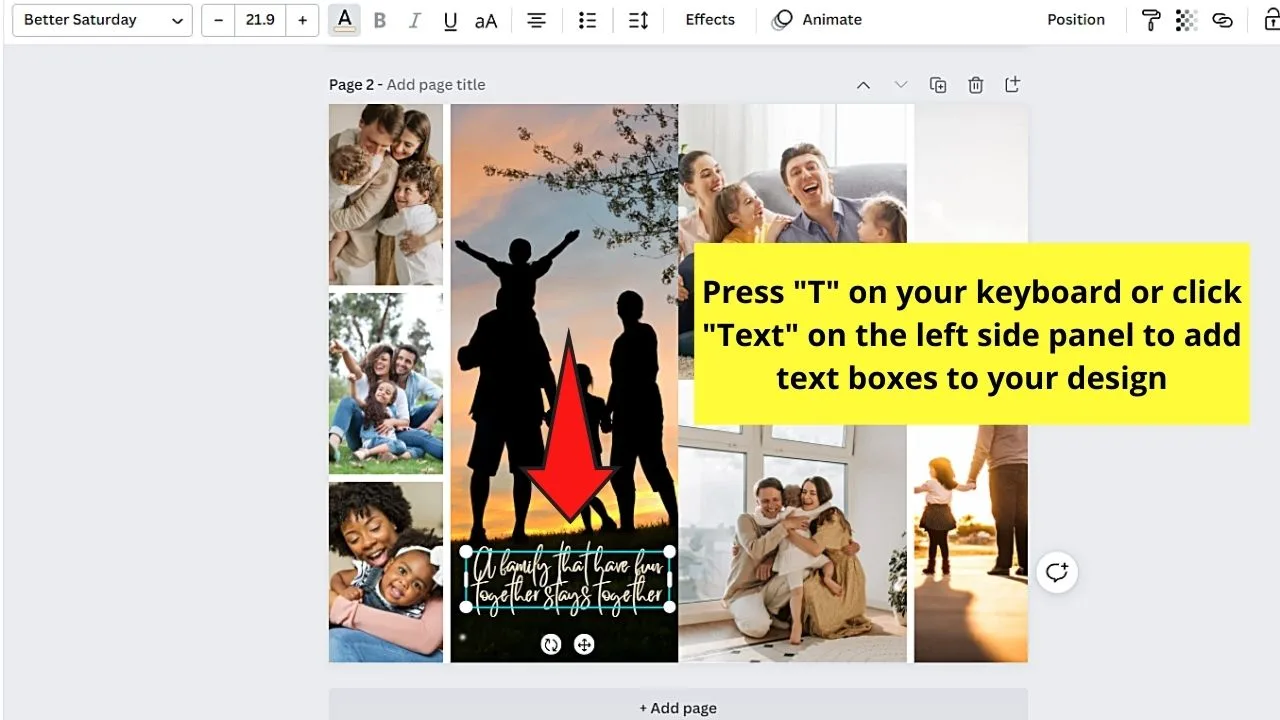
If you prefer to use font style combinations, click the “Text” tab and scroll to the “Font Combinations” section to select a font style you’ll use.
Step 5: Then, you can now add other design elements to your slideshow.
Click the “Elements” tab on the left side panel and choose stickers, icons, and other design elements available from the gallery.
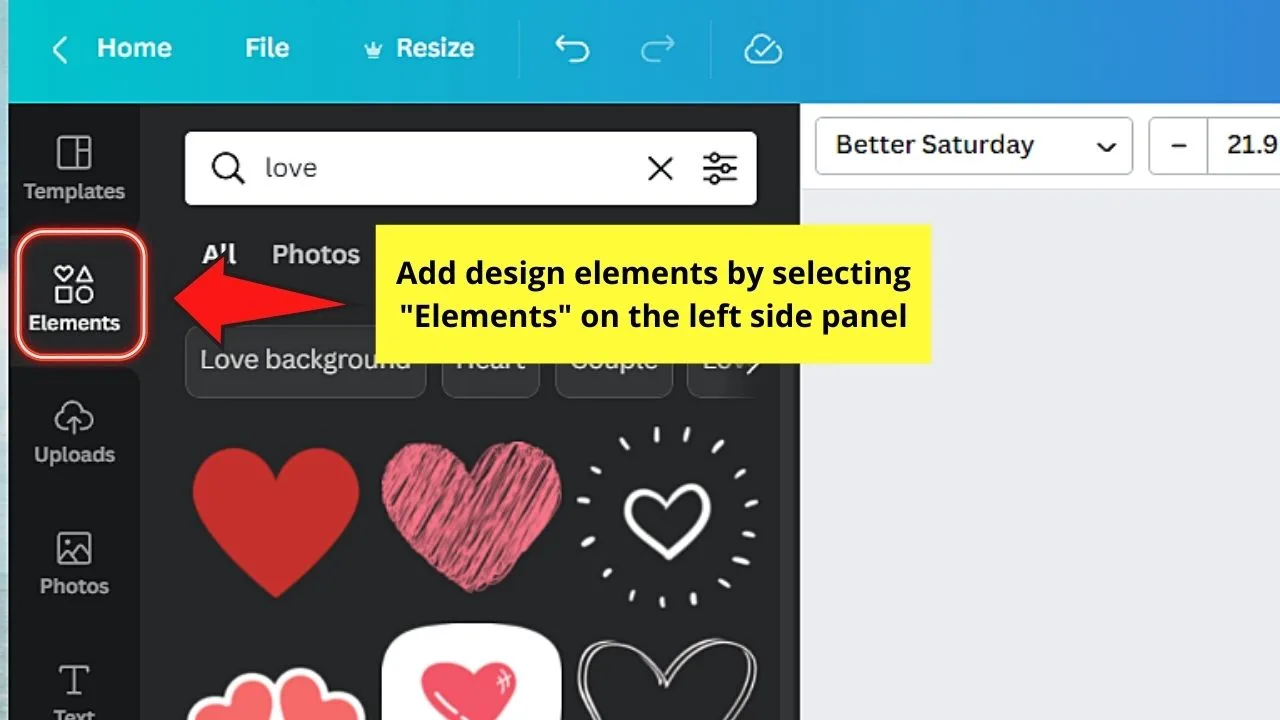
Click on one of them that you’ll use and resize accordingly.
Step 6: If you want to animate the elements on your slideshow, click on one of them and choose the “Animate” button in the toolbar.
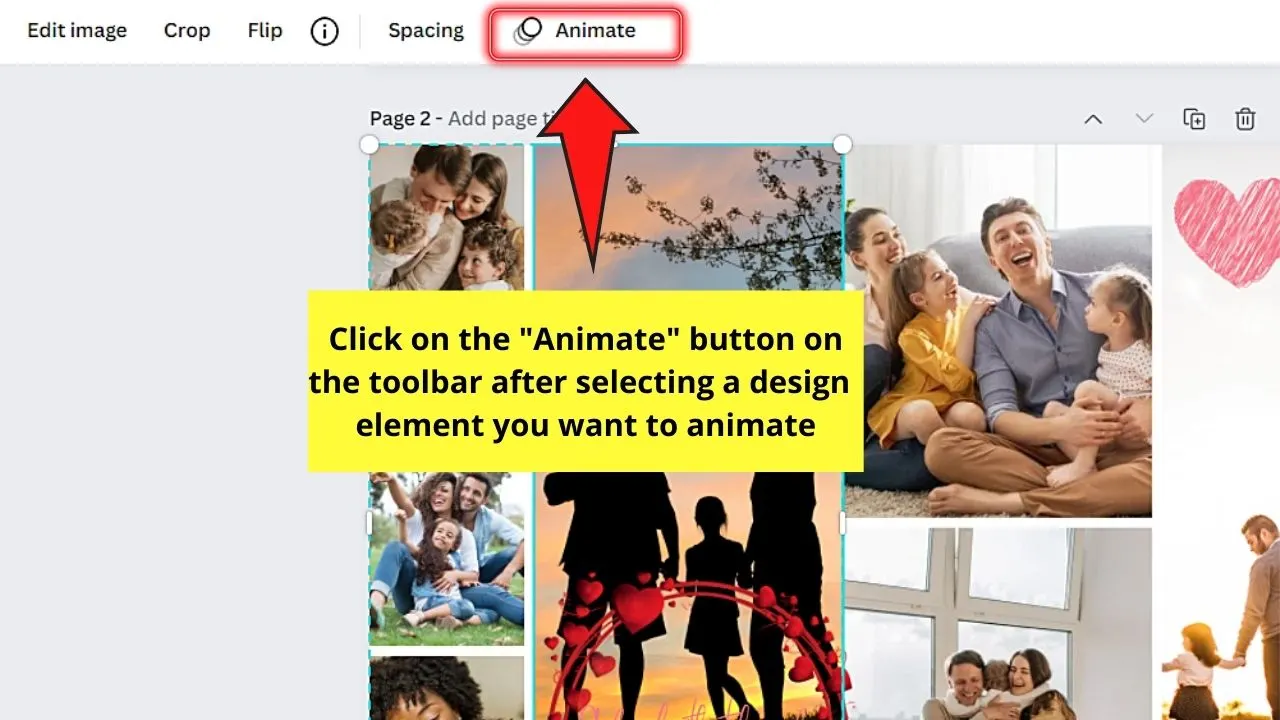
Then select the page, text, or photo animation you’d like to use.
Step 7: Now, add music to your slideshow by selecting an audio clip. Just head back to the left side panel again and click the “Audio” tab.
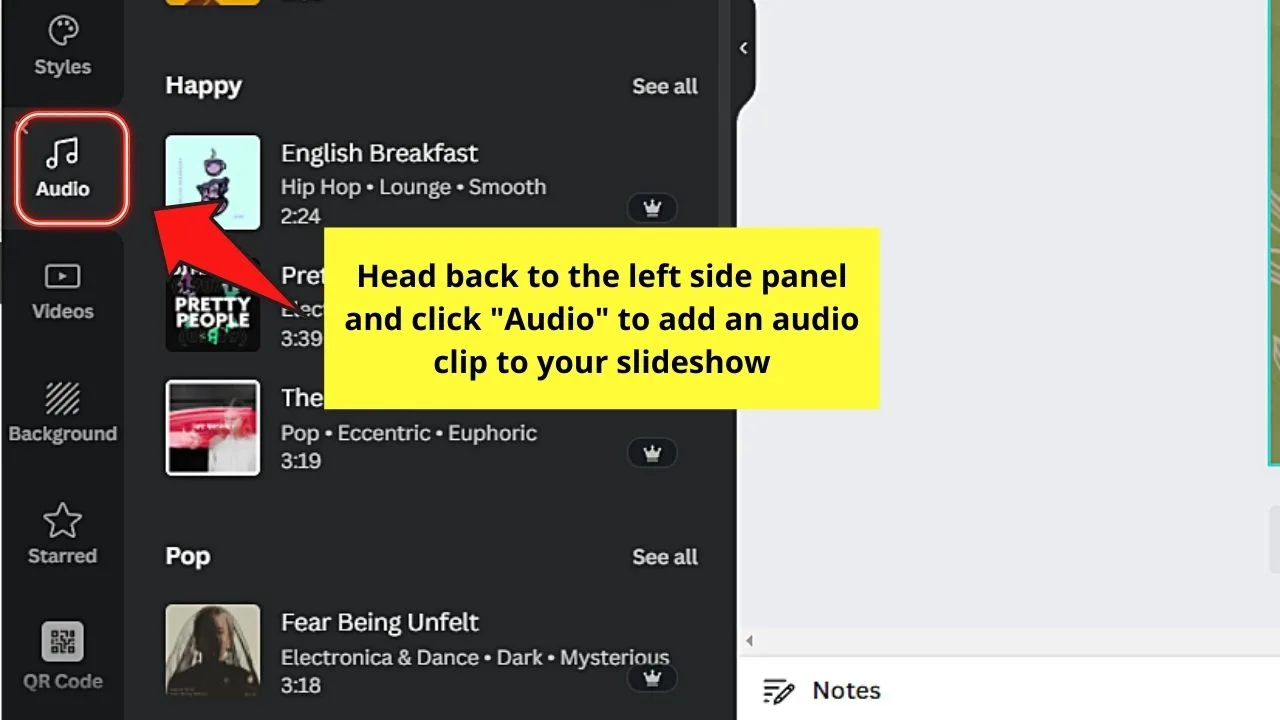
If you can’t find the “Audio” tab on the left side panel, click the “Elements” tab instead and scroll down until you find the “Audio” section.
Then, choose an audio clip you’ll use.
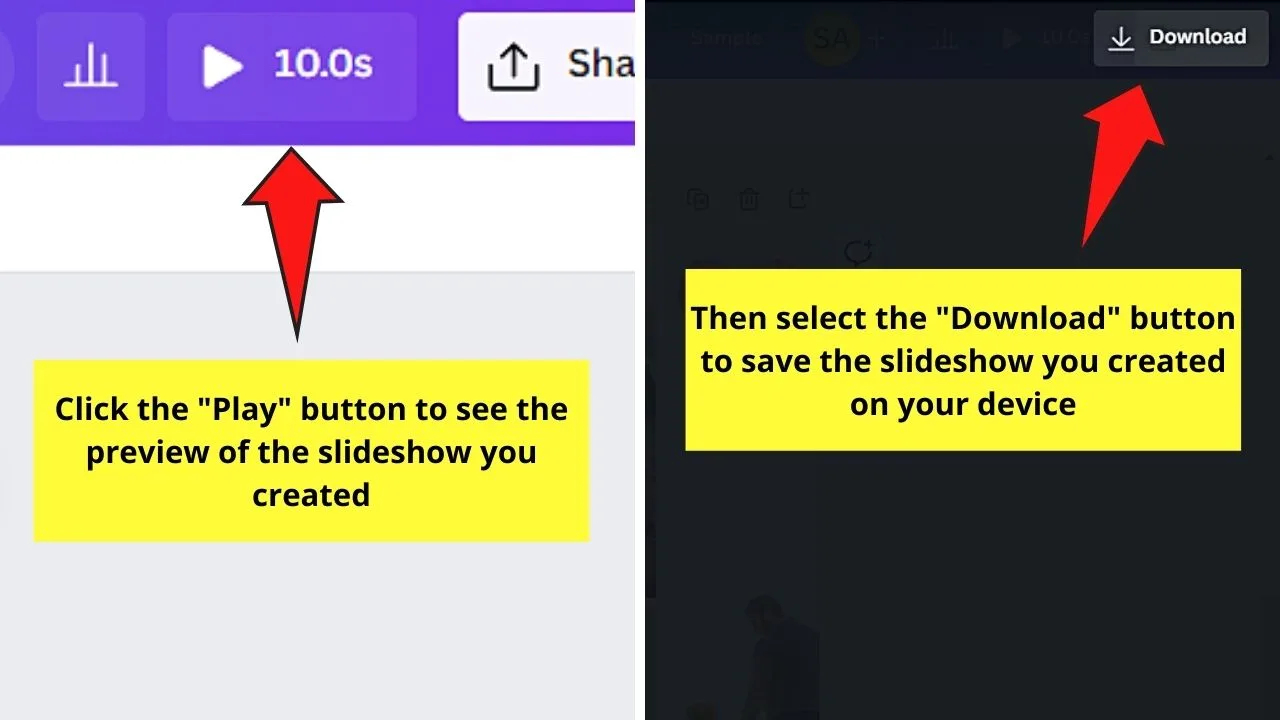
Step 8: To see how your slideshow goes, click the “Play” button on the menu bar to view it.
If everything’s on par with your expectations, choose the “Download” button in the preview window, select the file type before choosing “Download.”
And, those are the 3 ways with which you can create a slideshow in Canva.
Though there are slight variations in how you’ll start with the creation process, the steps are more or less the same for each method.
So, what’re you waiting for?
Apply the new learnings you gained from reading this article and create your very own slideshow now.
How to Make a Photo Slideshow in Canva with Music
Making a photo slideshow in Canva that is also featuring some music is a very easy feat. You can either use your own music by uploading it via Canva’s “Upload” tab or you can use a song from Canva’s vast music library.
If you would indeed like to use a music track from Canva, all you need to do is to click on “Audio” in the left sidebar and then just click on one of the numerous audio tracks there to add it to your project.
Some of the audio tracks are free to use for Canva Free users, while others can only be used as a Canva Pro member.
Once the audio track has been added to your project, you can find it just below your design. You can trim your music to make it fit your project.
One thing to keep in mind is that you can only use one single audio track if you are working on a “slideshow” project. If you would like to know how to trim your audio track, have a look at our audio editing in Canva article.
If you would like to add several audio tracks to your slideshow, you would actually need to make sure to create your slideshow as a video.
For video projects, Canva allows you to add several different music tracks (doesn’t matter whether you use Canva’s stock audio or upload your own music).
To create a video project, upon creation, you would simply click on “Create a new design” on Canva’s homepage (found in the upper-right corner of the screen) and then you click on “Video.”
Don’t be all too confused about the term “Video project.” In fact, even in a video project, you can still use still images for your pages instead of actual videos.
Also, more importantly, you can also use “Present” mode for video projects. So it generally makes a lot of sense to create your slideshows as video projects because it allows for more freedom and more flexibility.
As you are dealing with a video here after all, once you will hit play, the video will just play until the very end. But you can still adjust the length of each video page of course.
Frequently Asked Questions about How to Create a Slideshow in Canva
What makes a good slideshow?
A good slideshow uses a simple design that allows the viewers to focus on its content. You can add text, animations, and slide transition effects, but limit them as much as possible. Also, a good slideshow uses uniform font styles and sizes, background images, and color schemes.
How do you add more than one grid on a page in Canva?
To add more than a single grid in Canva, resize the first grid by dragging its corners inward (to make it smaller) or outward (to make it bigger). Then, head back to “Elements” > “Grids” to choose another grid layout. Then resize and position the second grid accordingly.
How can you replace the original images used in the slideshow or photo collage template used?
To replace images in a slideshow or a photo collage template, click on the photos and press “Delete.” Then, head to “Photos” or “Uploads” to choose a new picture and drag it to the layout. You can also directly click and drag the new image to the template to replace the picture in it.
Can you combine multiple songs in a Canva slideshow?
Unfortunately, Canva doesn’t allow combining songs or audio clips directly in the tool. If you want to use more than one song to be played throughout the slideshow, use a third-party audio editing tool first to combine them before uploading it to Canva as an audio file.

Hey guys! It’s me, Marcel, aka Maschi. On MaschiTuts, it’s all about tutorials! No matter the topic of the article, the goal always remains the same: Providing you guys with the most in-depth and helpful tutorials!


