Canva generally makes it really easy to align different elements.
However, when Canva designs get more complicated, using rulers is definitely advised.
Let’s have a look at how to make these useful rulers appear in Canva, shall we?
How to Show Rulers in Canva
To show rulers in Canva, head to “File” in the main menu and then hover over “View Settings” and make sure that the option “Show rulers and guides” is ticked there. You can also make the rulers appear on the editor page by using the shortcut Shift + R.
If you’re a new Canva user, you’ll probably notice the pink smart guides that pop up whenever you try to align certain elements of your design.
But, aside from those useful smart guides, Canva also incorporated rulers to assist its users further in creating professional-looking designs.
After all, properly and evenly spaced elements provide a professional feel to your design — regardless if you’re a newbie or a veteran.
But, for you to fully enjoy it, you have to make them appear on your editor page.
To use rulers in Canva, follow these steps:
Step 1: Click the “File” tab
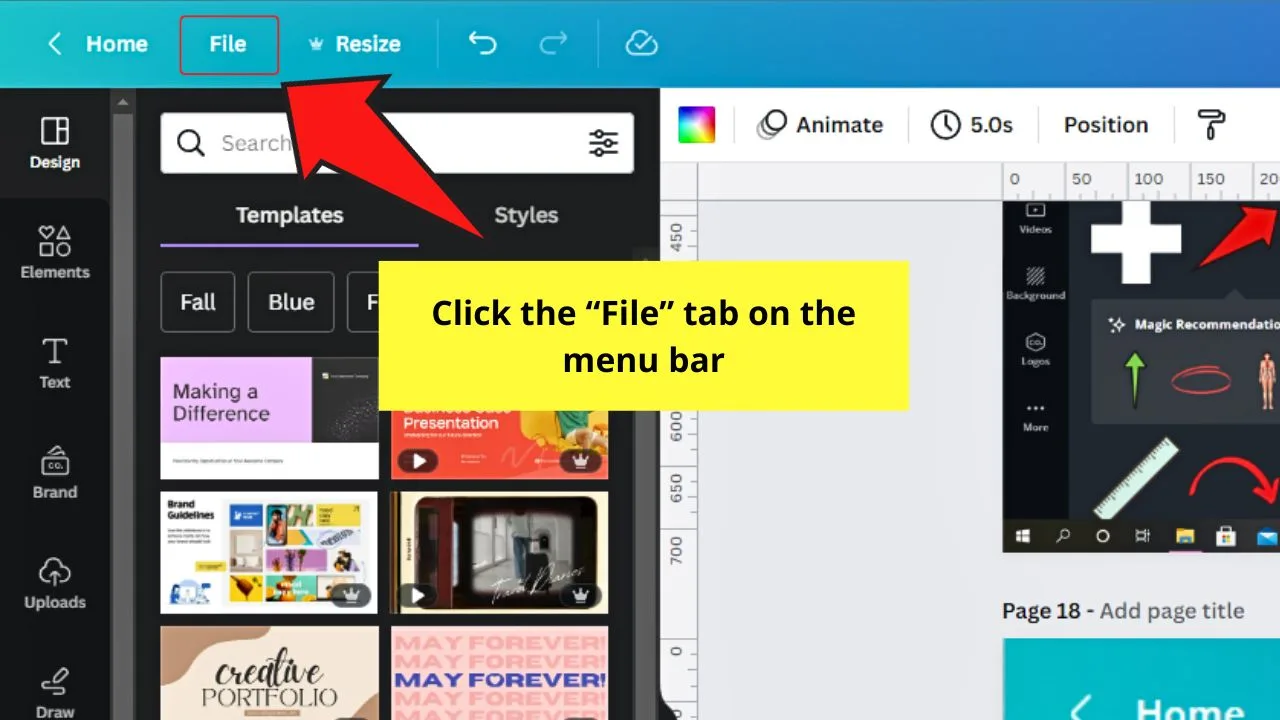
You’ll find this tab between “Home” and “Resize” on the menu bar.
Step 2: Click the “View Settings” option
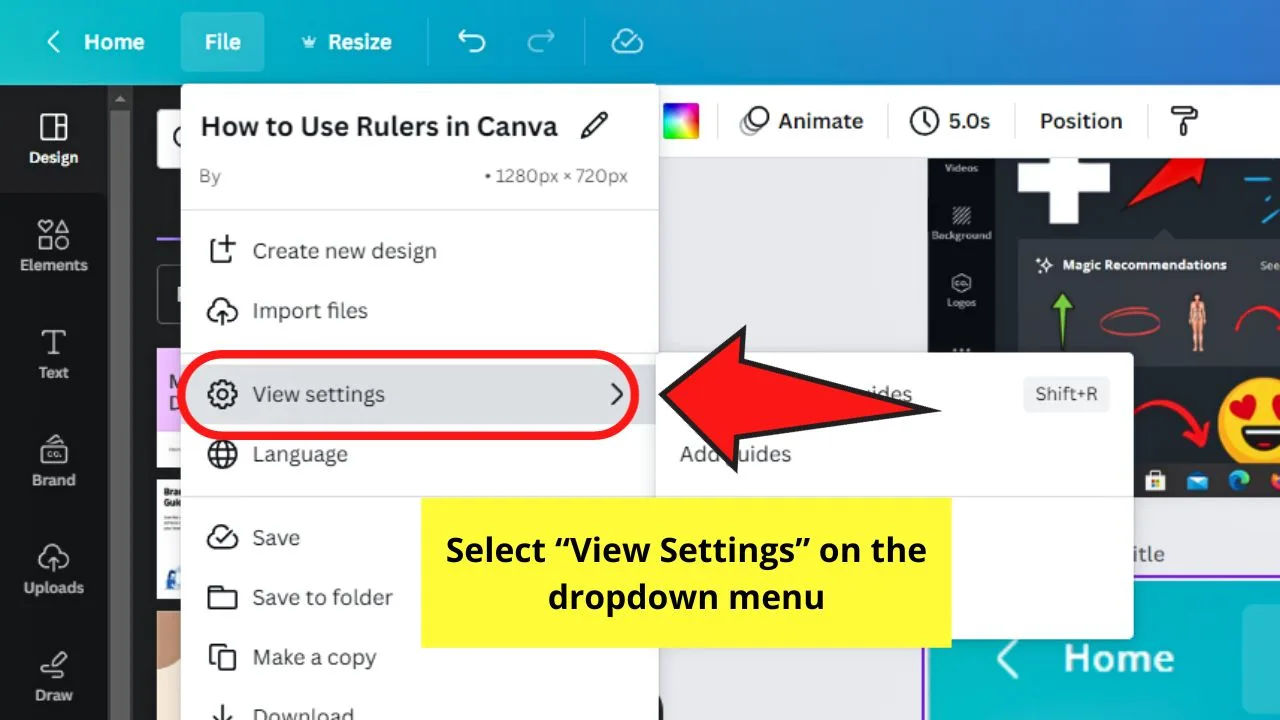
You will see this option between “Import files” and “Language.”
A submenu then opens to the right of “View Settings.”
Step 3: Select “Show rulers and guides” on the submenu
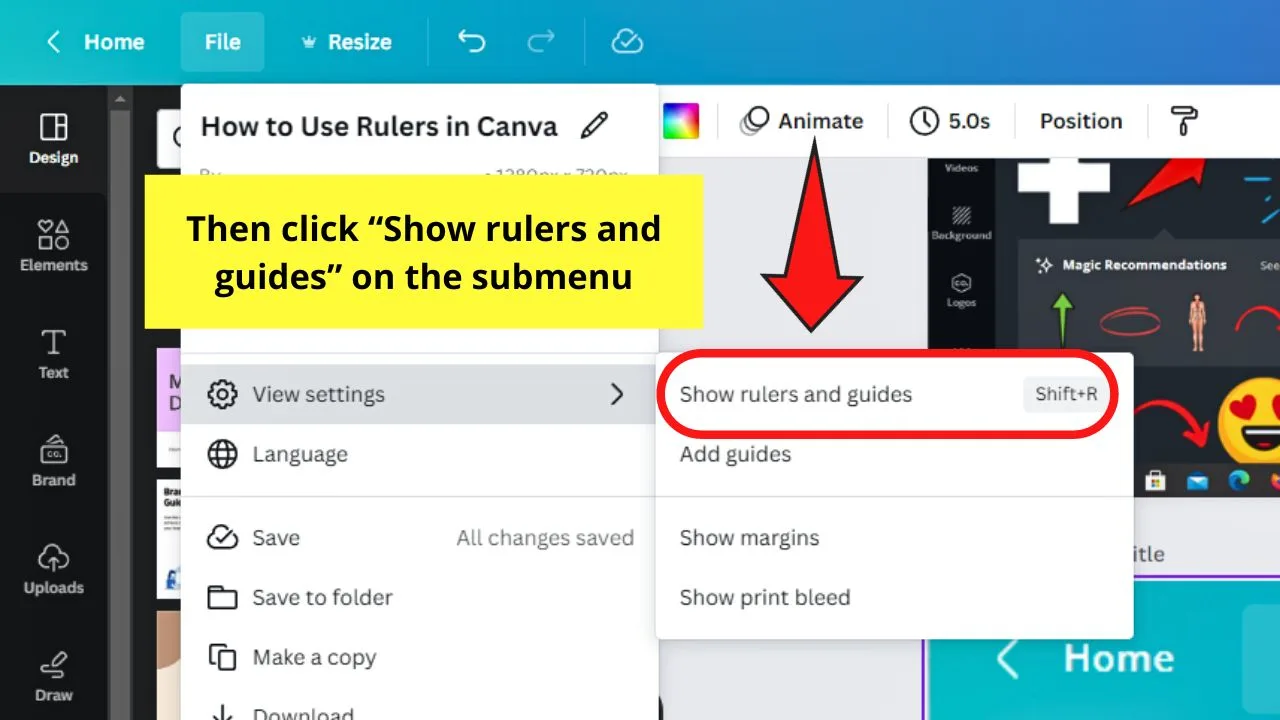
This will then make the rulers appear at the top and left side of your editor page.
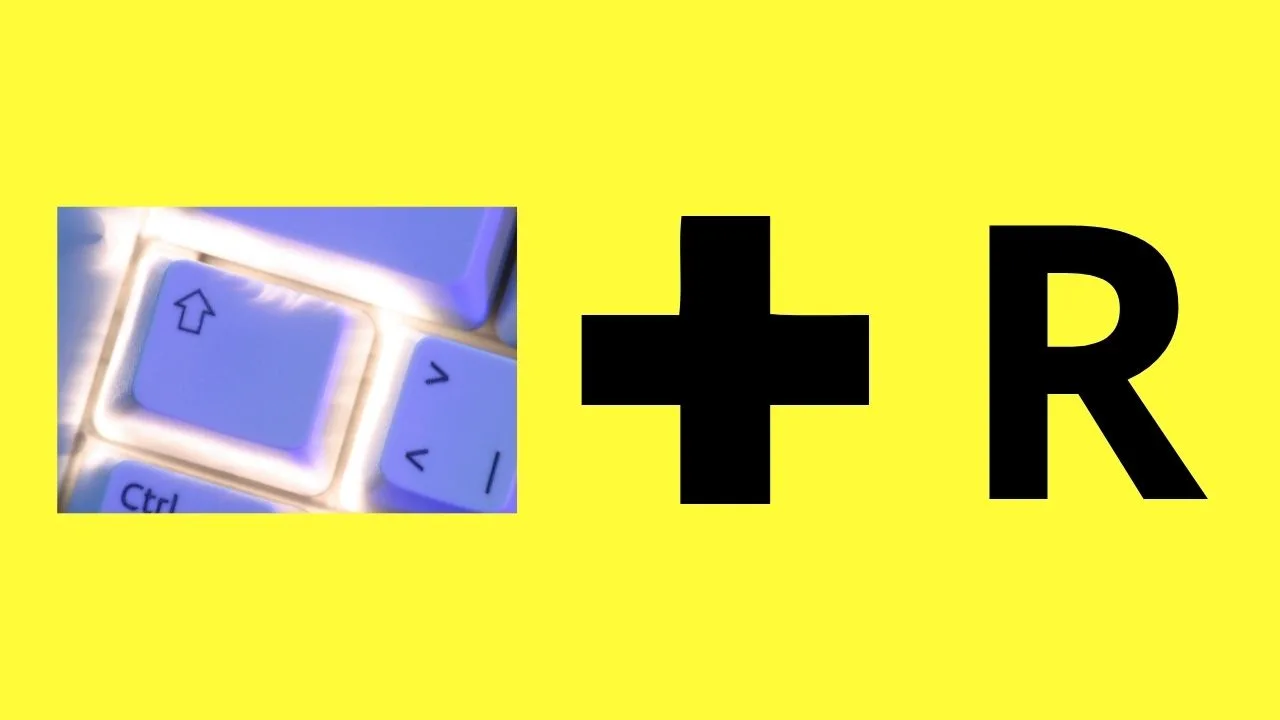
If you prefer using Canva keyboard shortcuts, then simply press “Shift” and “R” together to activate the rulers feature.
The dimensions or measurements that will appear on the ruler automatically match those of the measurements used for the document.
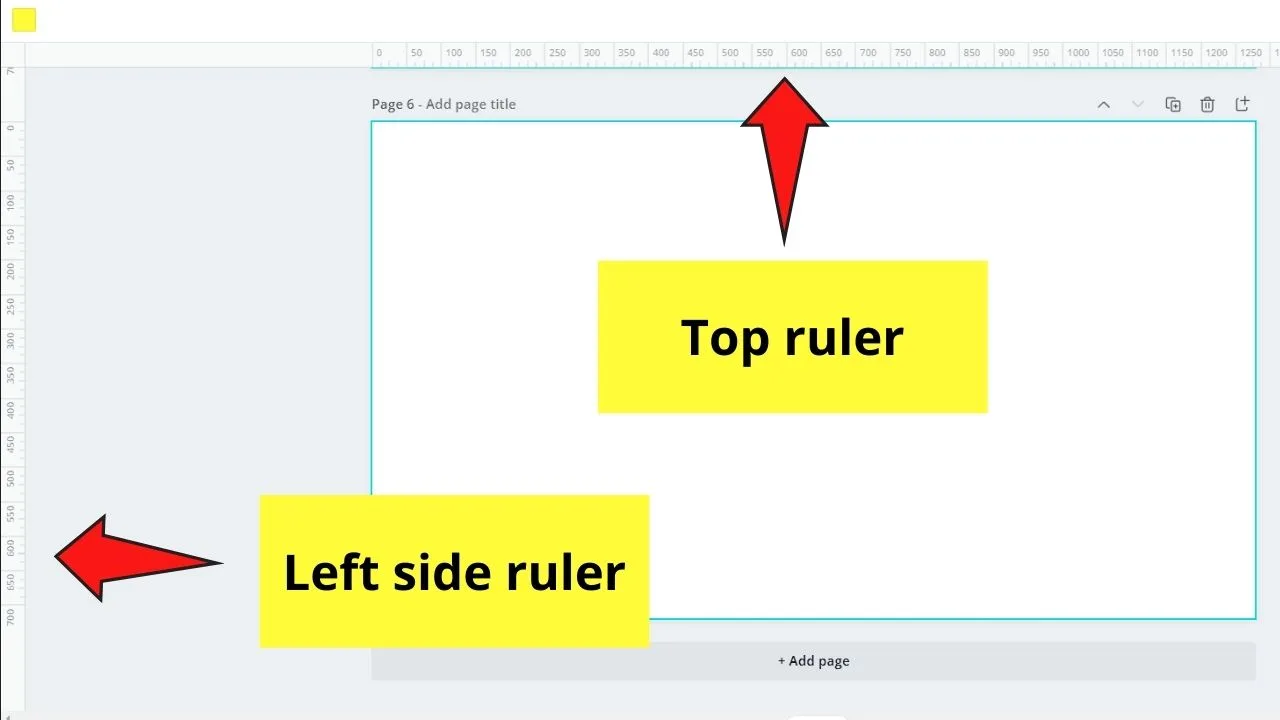
So, if your design uses the pixel dimension, the measurement on the ruler will also be in pixels.
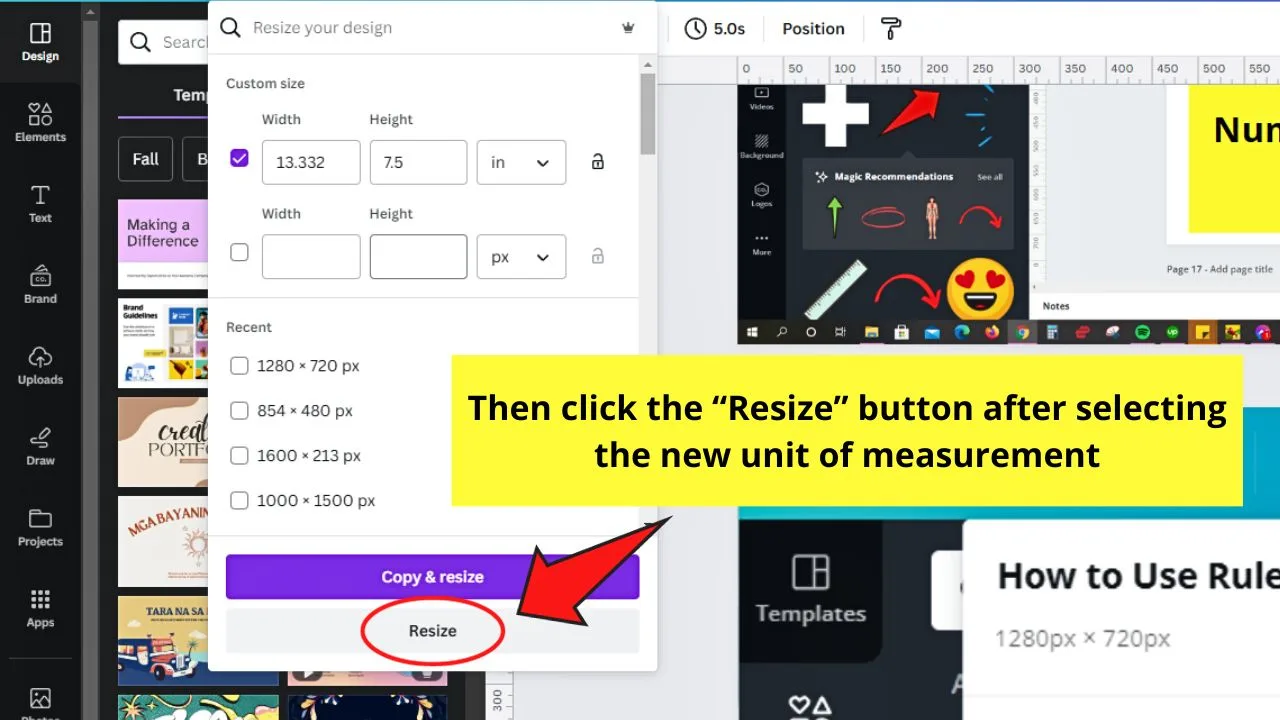
Step 4: Select the “Resize” tab if you want to change the dimensions used on the rulers
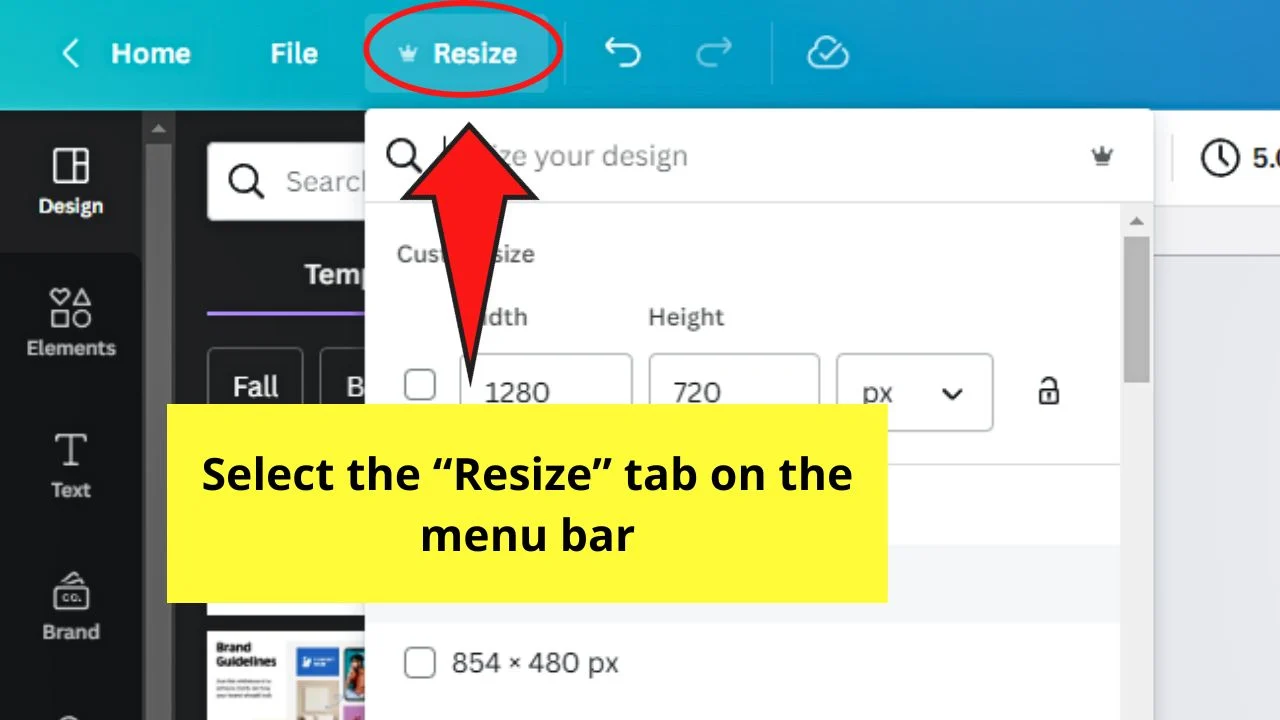
A dropdown menu then appears showing the design’s current size in the default unit of measurement used.
Step 5: Select the “Down” button of the “Dimensions” box
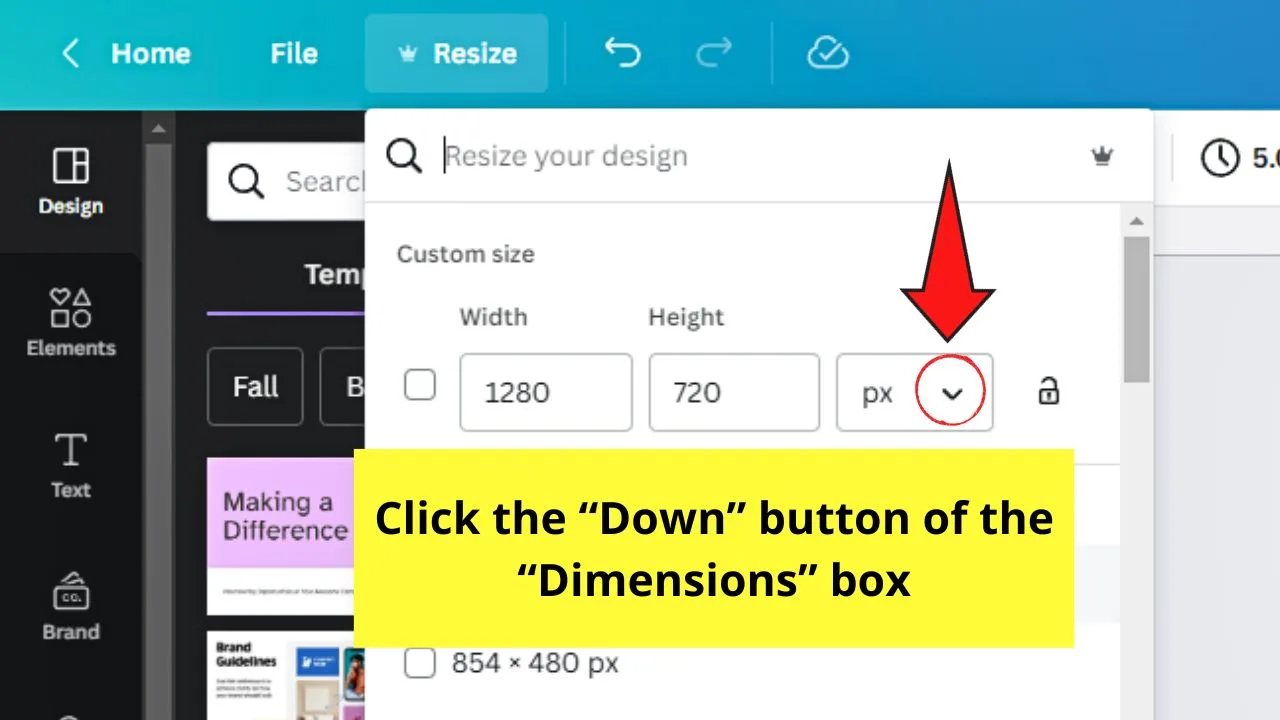
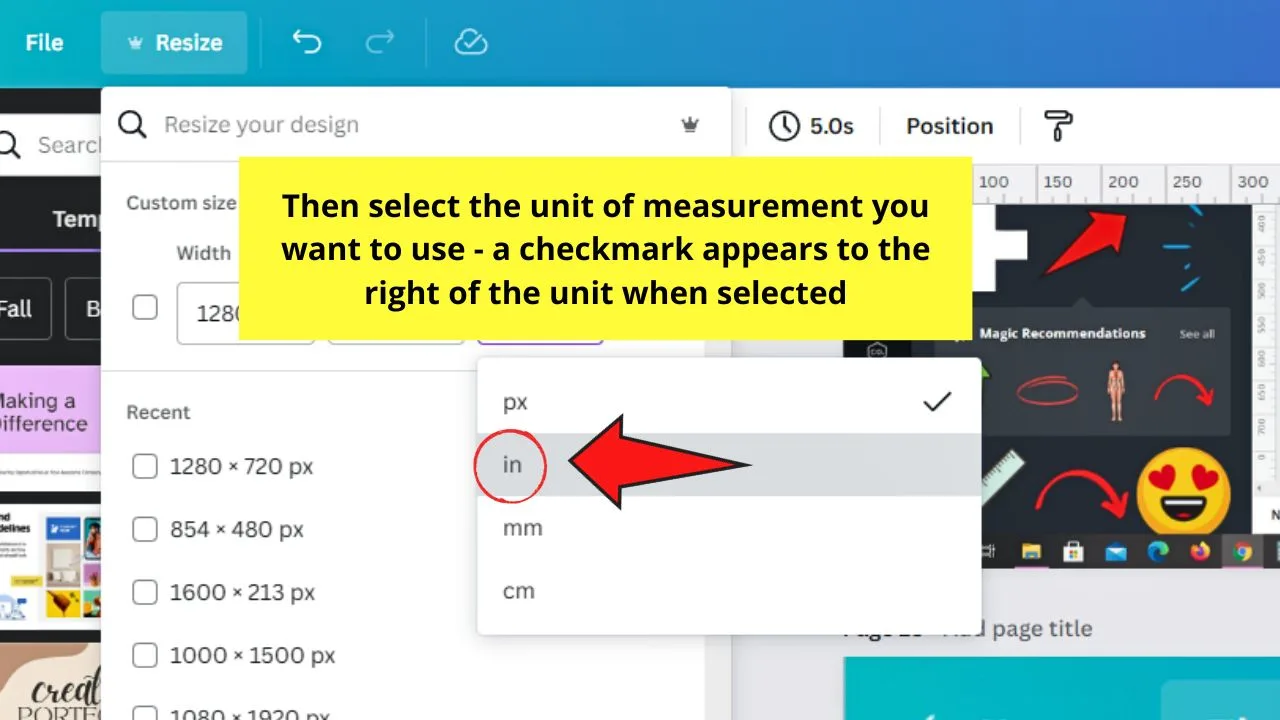
Then select the unit of measurement you prefer using.
You’ll know you have selected the unit of measurement as a checkmark appears on the right side of the unit.
Then select the “Resize” button at the end part of the same dropdown menu. This will automatically change the units shown on the ruler.
And there you have it! You’ve successfully shown the rulers on your project. But how exactly can you use those rulers in your design?
Don’t worry, as that’s what we’re about to talk about below.
How to Use Rulers in Canva
To use rulers in Canva, you can use the gray highlights of the rulers as the element’s placement guides. Another way is to add guides by clicking “File” > “View Settings” > “Add guides.” Then select how many guides to add before clicking “Add guides.” Then place the graphic elements accordingly.
Since you’ll find these rulers on a graphic design tool, then it’s self-explanatory that you’ll use it to align various design elements on the canvas.
But there are 2 ways for any designer to use rulers in Canva.
Use the Ruler’s Gray Highlights as Placement Guides to Use Rulers in Canva
Step 1: Click the “Photos” or “Elements” tab to add an element to your canvas
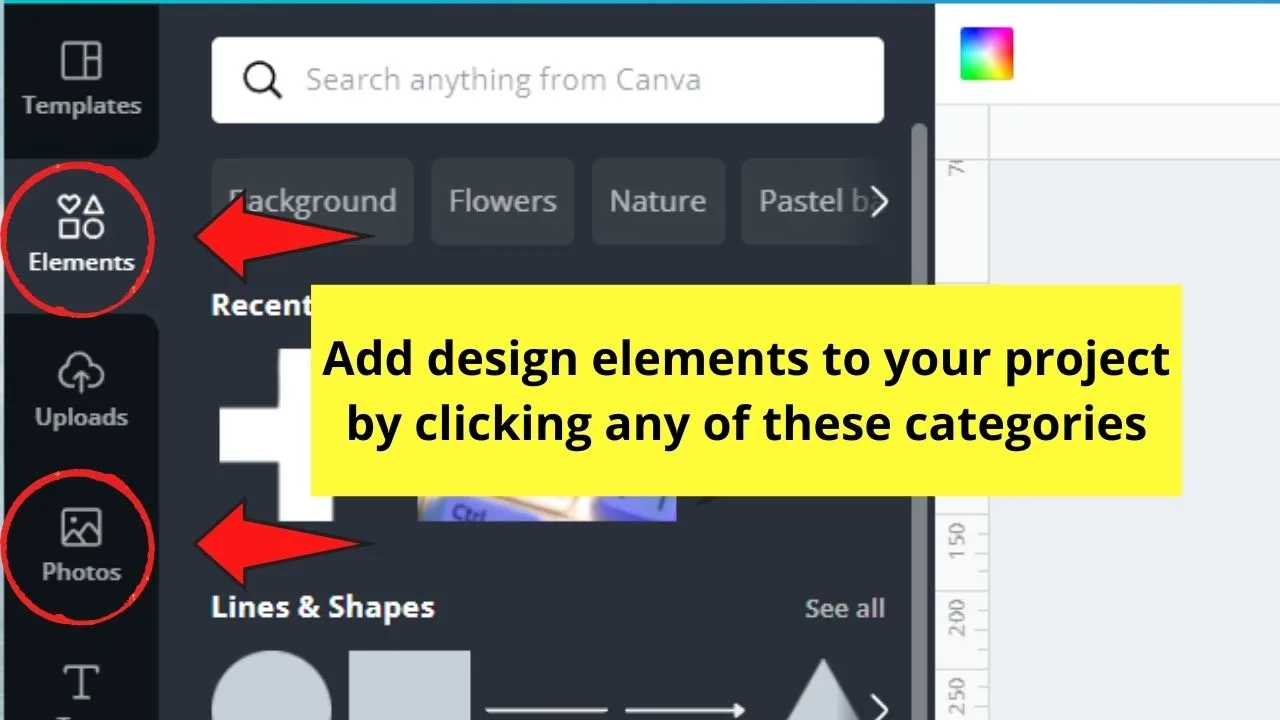
Step 2: Add text boxes to your project
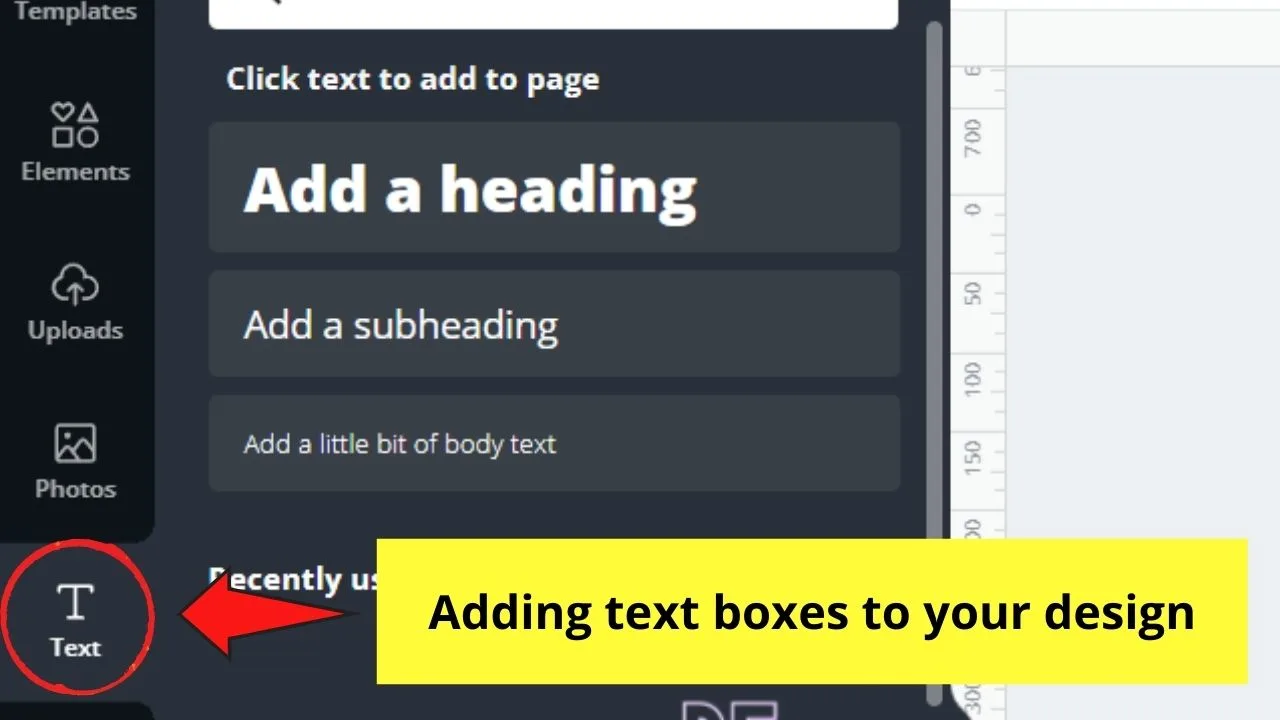
You can do this either by clicking on the “Text” tab or pressing the “T” button on your keyboard.
Step 3: Drag the design elements you’ve chosen to the canvas
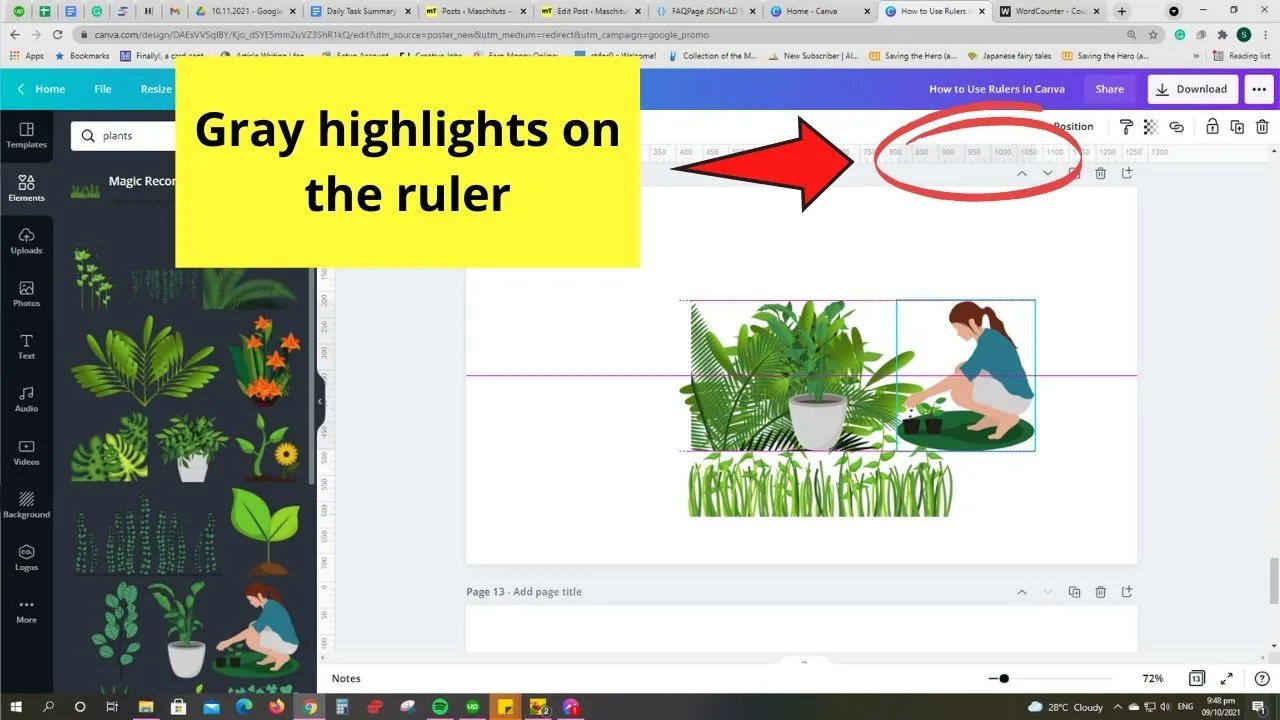
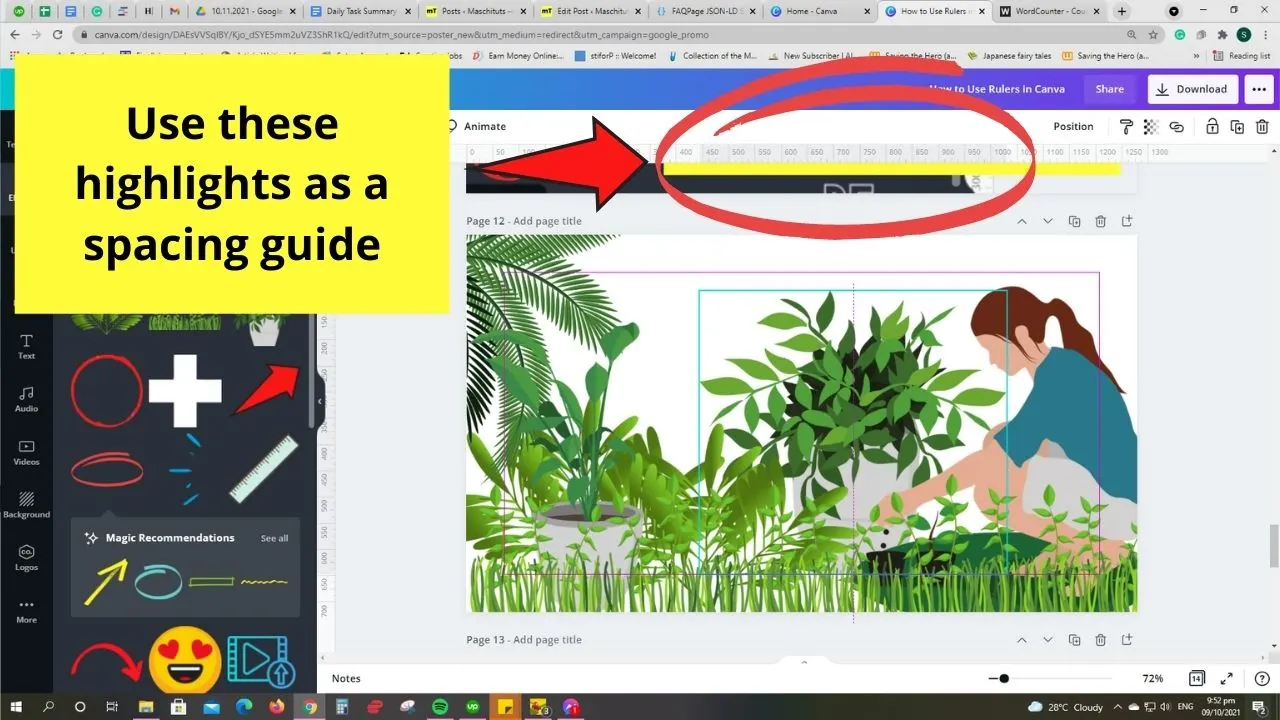
You’ll then notice the gray highlights that move along the ruler every time you drag the element on the canvas.
These gray indicators show you the element’s placement on the page in height and width.
Add more elements to your design while referring to the gray highlights on the ruler as your guide spacing them out evenly.
But if you prefer a more accurate way of spacing the elements on your design, activate the “Guides” feature.
How to Add Guides to Canva Design
There are two ways to add guides to your Canva design. One, you can do it manually.
The other and more recent method is to add the guides automatically using the “Guides” option.
Manual Placement of Guides to Canva Designs
Before you can activate the “Guides” feature, make sure you’ve turned on the “Rulers” feature first.
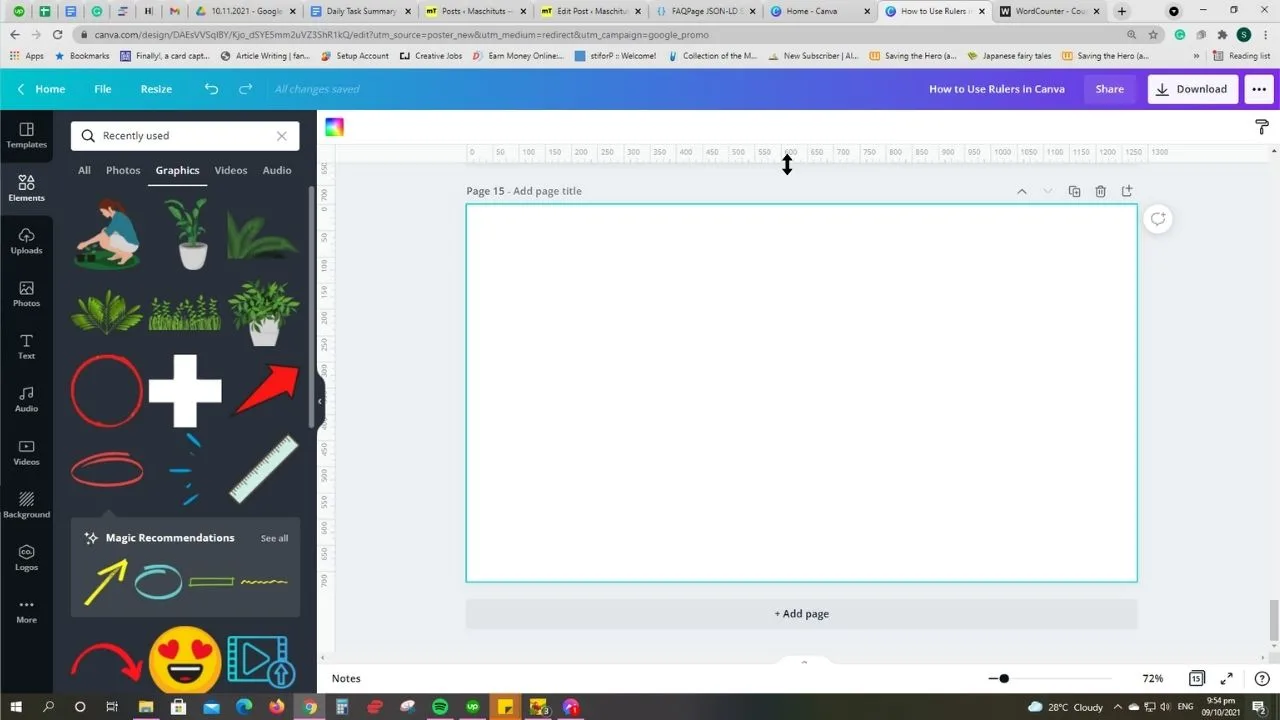
Step 1: Move the cursor towards the top or left side ruler until it turns into a two-way arrow icon
Step 2: Add horizontal and vertical guides
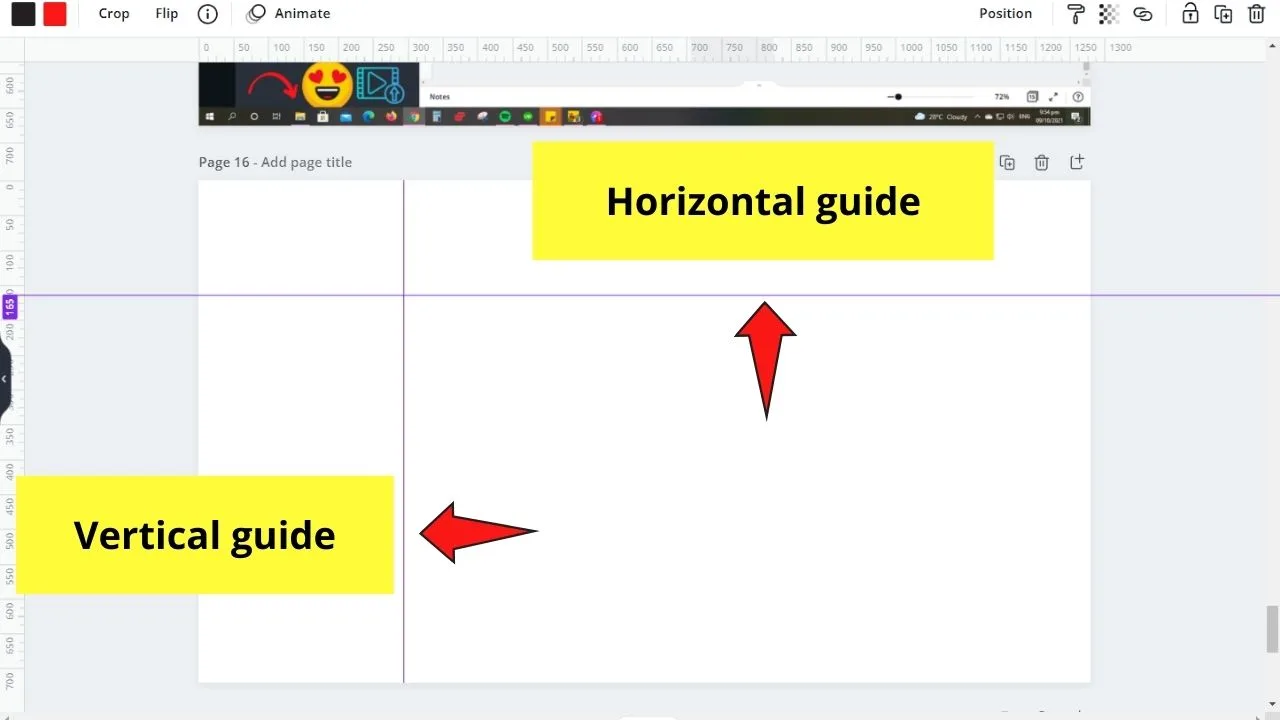
To create horizontal guides, click and drag down from the top ruler.
For vertical guides, click and drag towards the right from the side ruler. Do this until you position them to where you want them placed on the design.
Once the guides are in the position, let go of the mouse button to make them stay in place.
You’ll then see the changing numbers on the top part of the rulers. These serve to tell you the exact location of the guide on the page in real time.
Repeat steps 1 to 2 until you’ve added enough guides on the page.
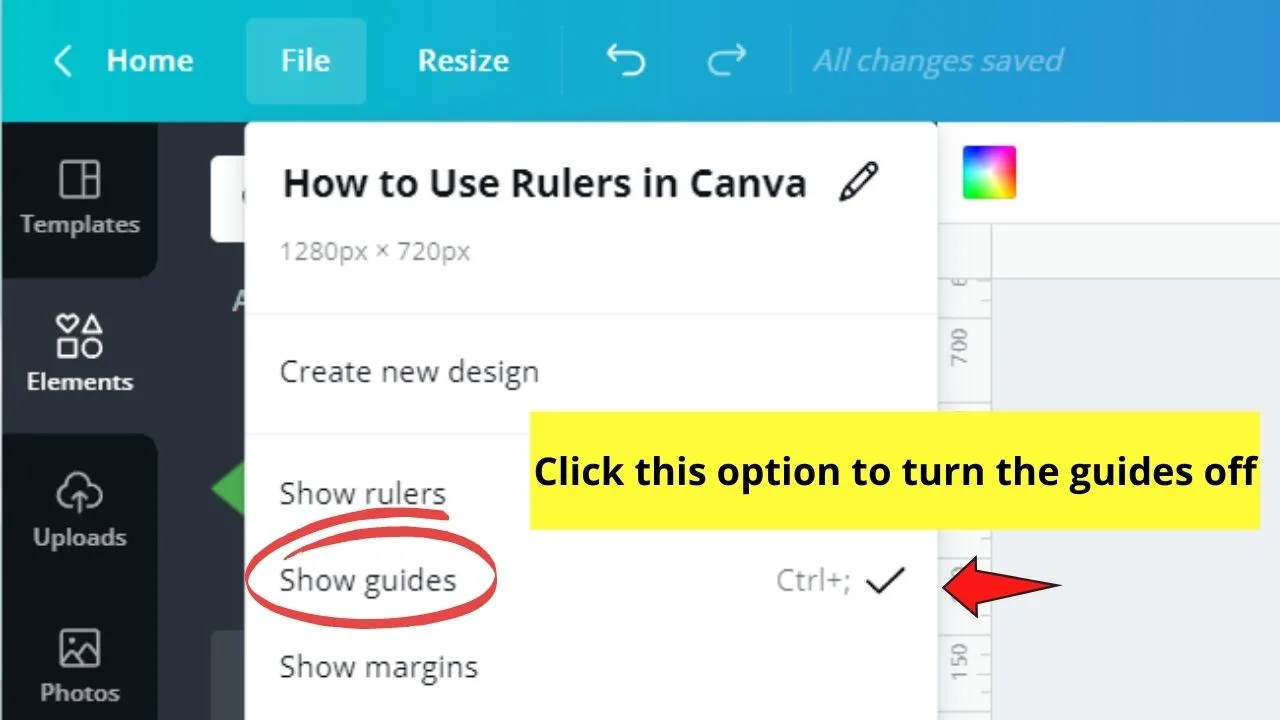
And, one cool thing about these guides is that once you make them appear again, they stay in the exact same place where you left them.
Plus, you’ll see them in the same position for every page of the design.
Automatic Placement of Guides to Canva Designs
With the latest updates in Canva, you can add guides with a few clicks. The only thing with these automatically added guides is that they are locked in place.
But you can unlock them by selecting the “Lock guides” option or pressing the “Ctrl/Cmd + Alt + ;” keyboard shortcut.
Follow these steps to add guides in the new way in Canva:
Step 1: Click the “File” tab
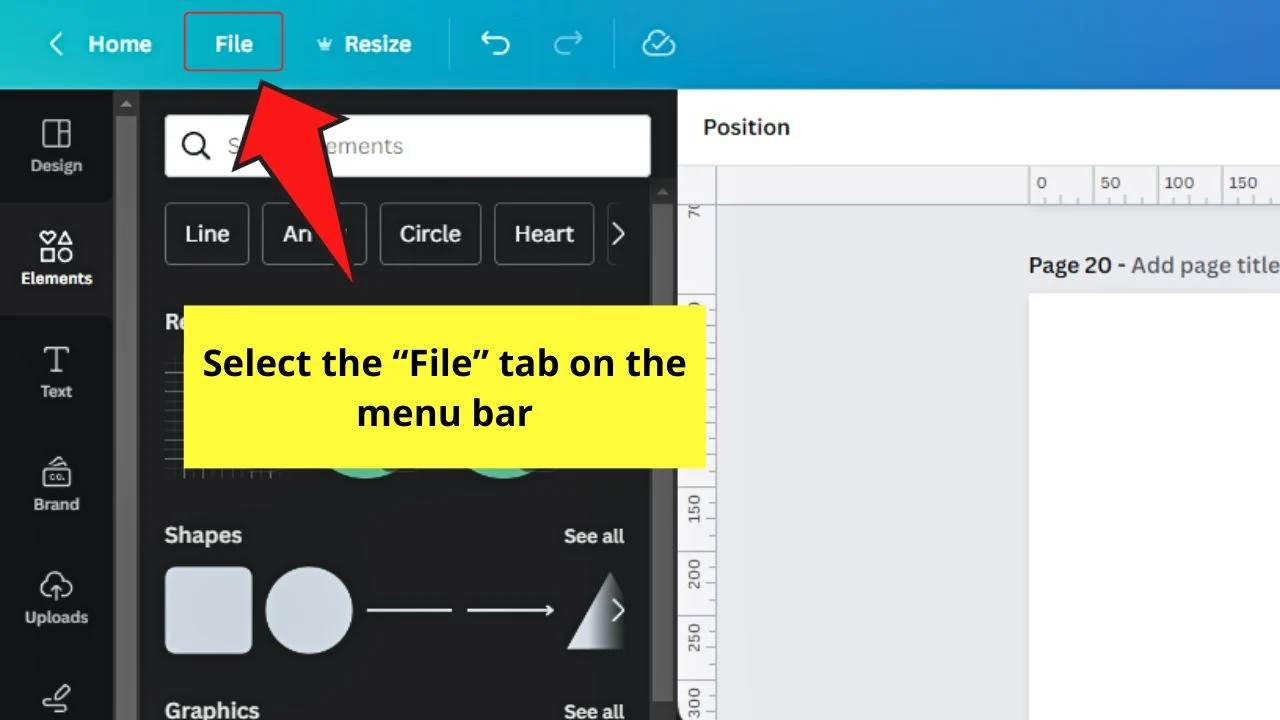
This option is between “Home” and “Resize” on the menu bar.
Step 2: Select “View Settings”
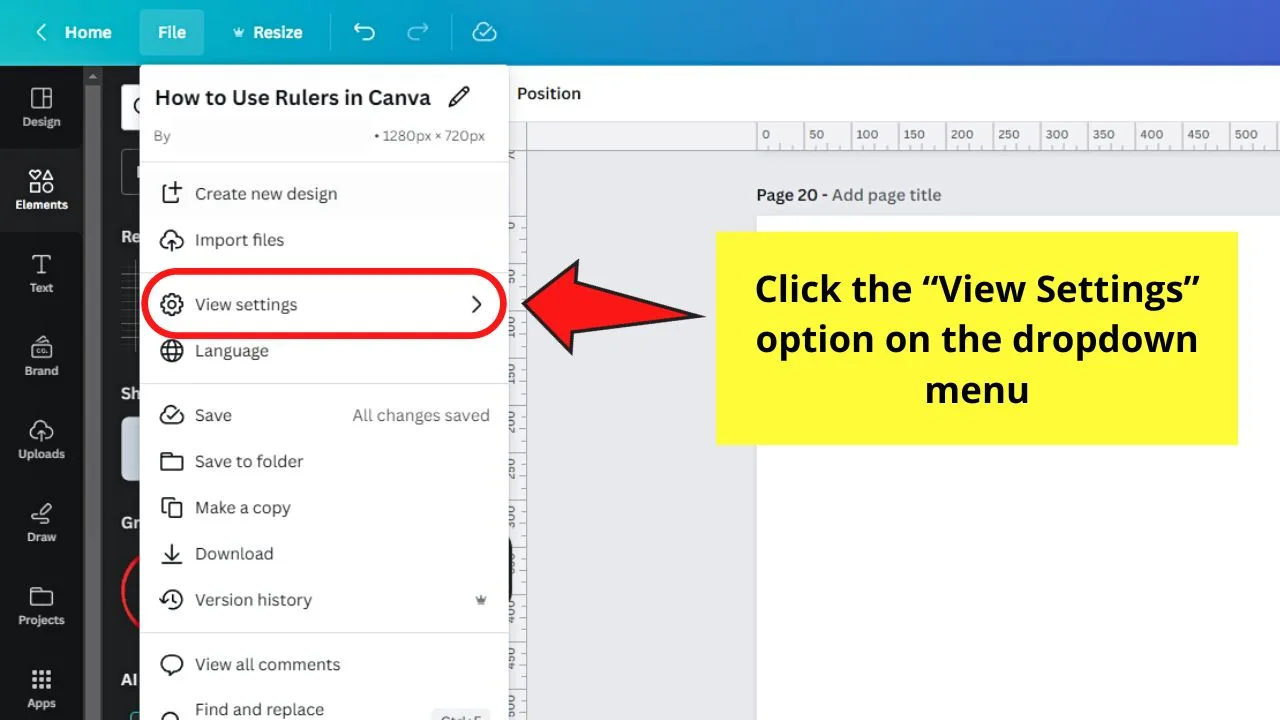
This is the third option on the dropdown menu between “Import files” and “Language.” A submenu then appears on its right side.
Step 3: Click “Add guides”
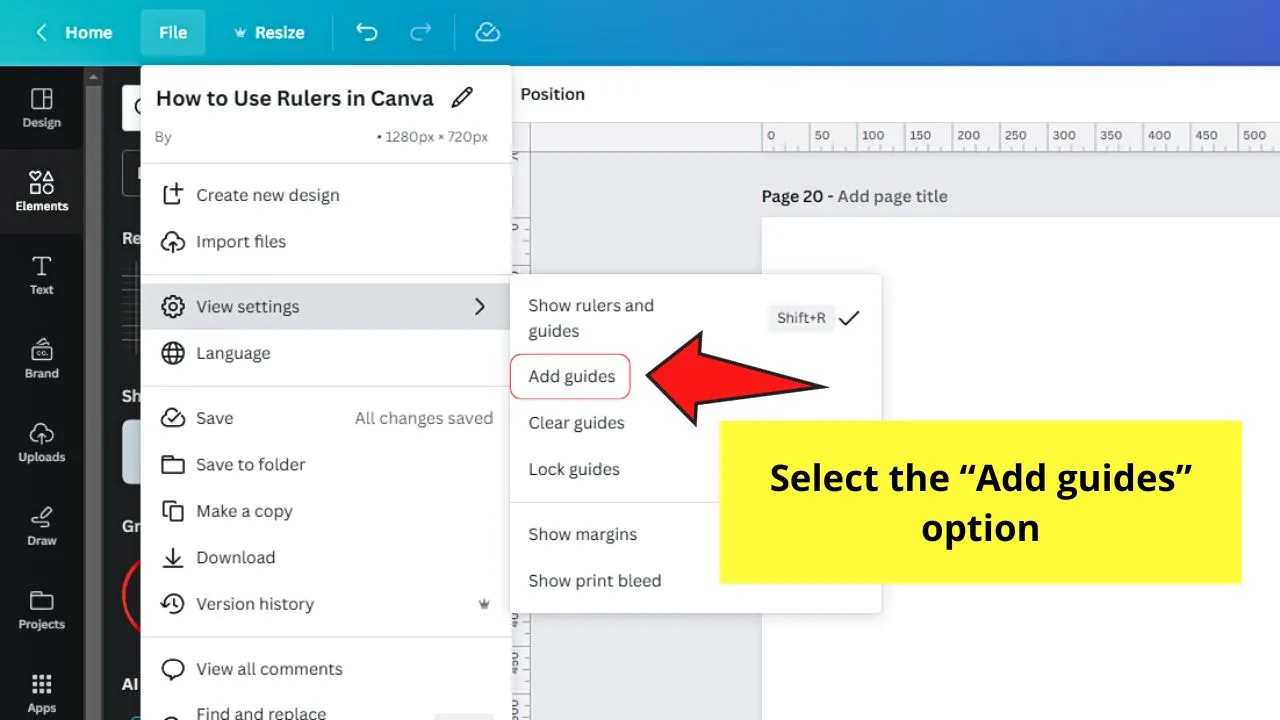
This is the second option on the submenu between “Show rulers and guides” and “Clear guides.”
The “Add Guides” menu then opens.
Step 4: Select how many guides you want to add
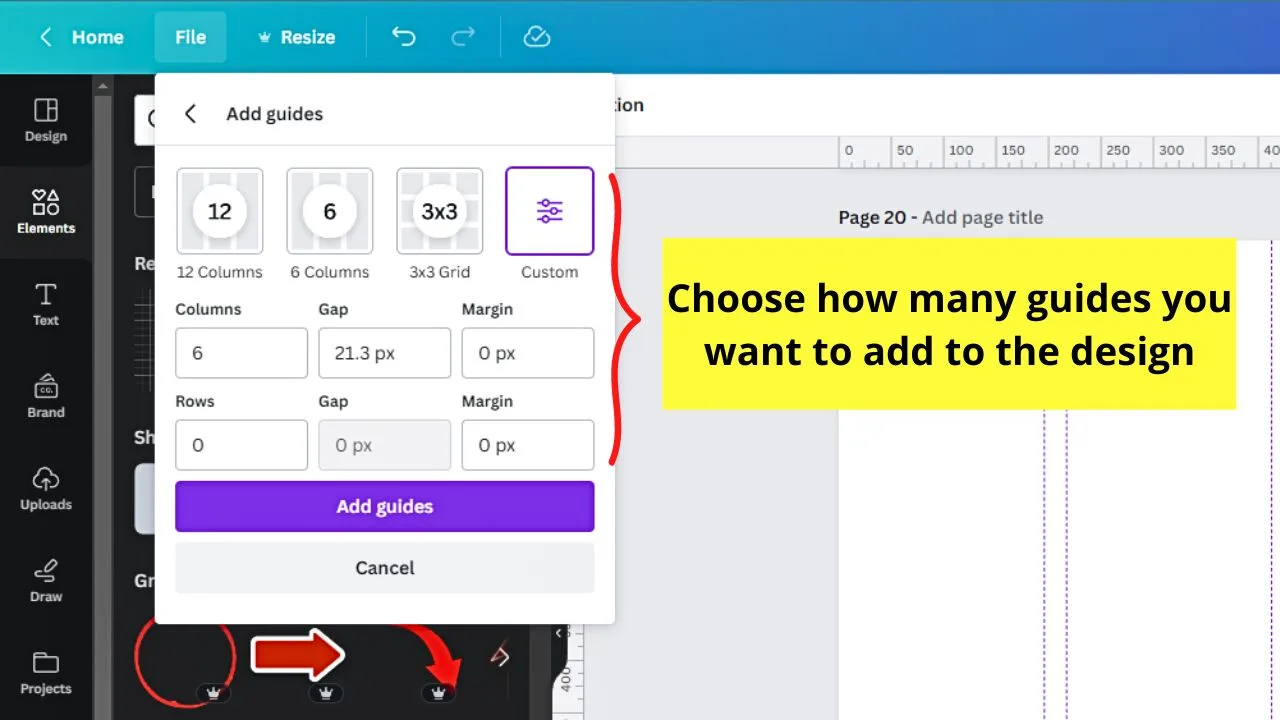
You can choose to add “12 columns,” “6 columns, a “3×3 Grid,” or a “Custom” number of guides.
If you choose “Custom,” you’ll have to type the number of columns and rows that will appear. You can even adjust the “Gap” and the “Margins” if need be.
Step 5: Select the “Add guides” button
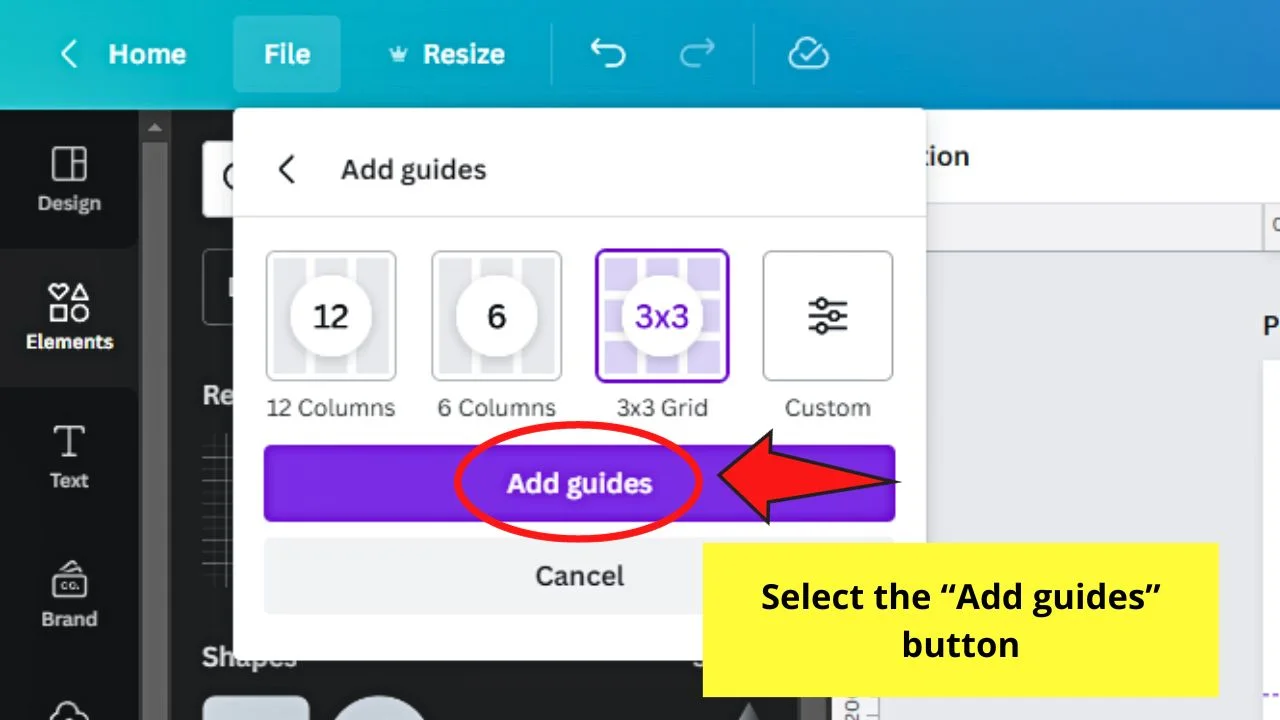
The selected number of guides you added then appears on the canvas, where you can add and arrange the design elements as you want.
You’ll then see a “Guides added and locked” notification at the top of the editor page. If you want to unlock the guides, you can select the “Unlock” button on the notification.
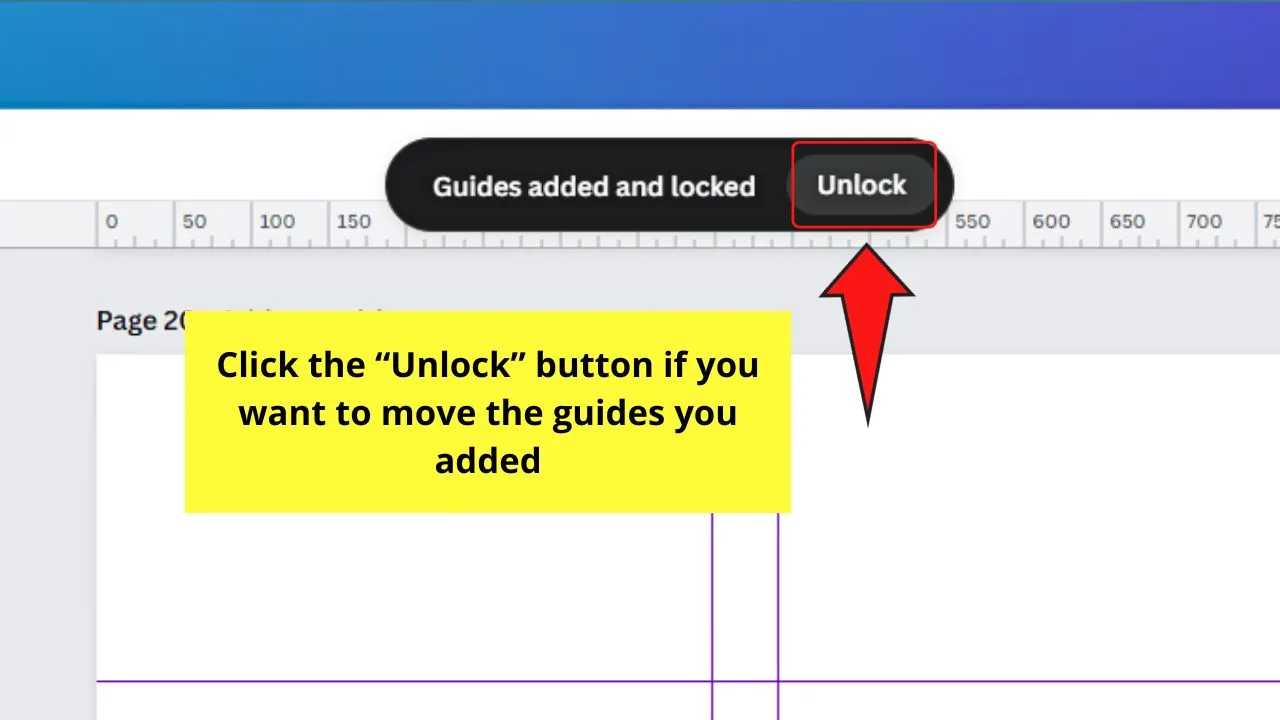
Otherwise, add a blank page, right-click on it, and then select “Guides.” Then click the “Unlock guides” option.
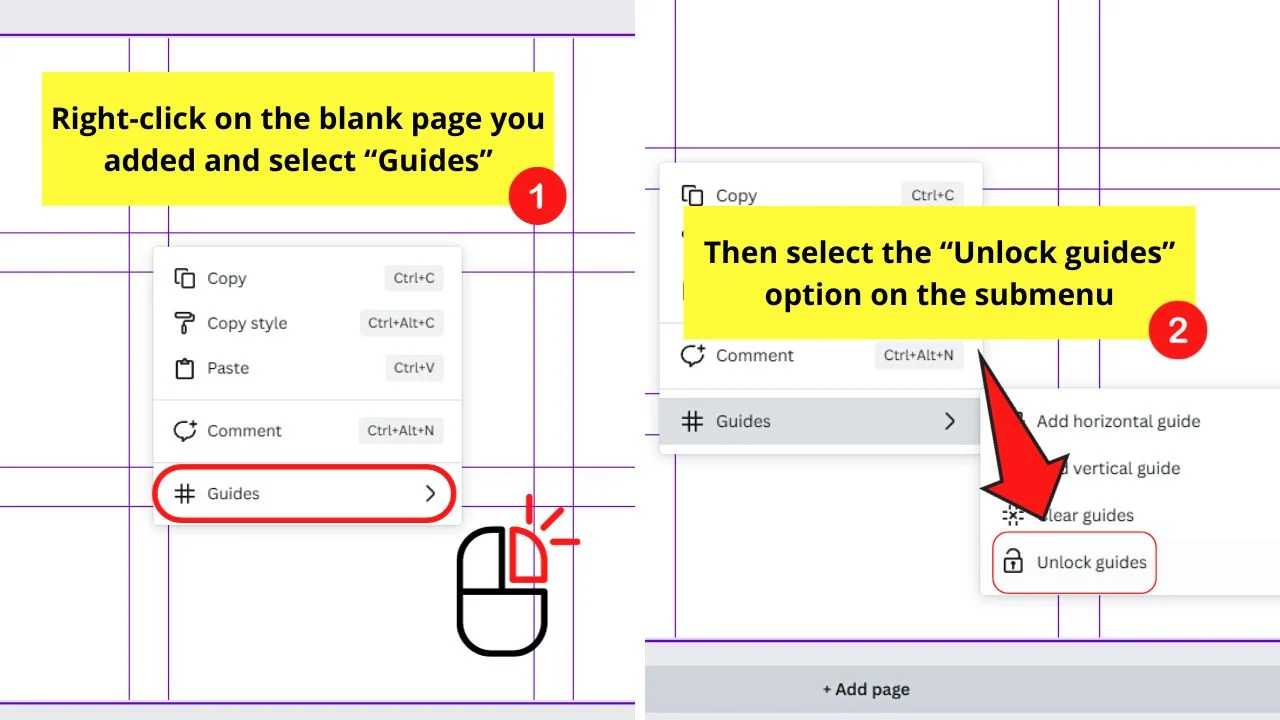
This way, you can rearrange the placement of the guides according to how you want them to appear.
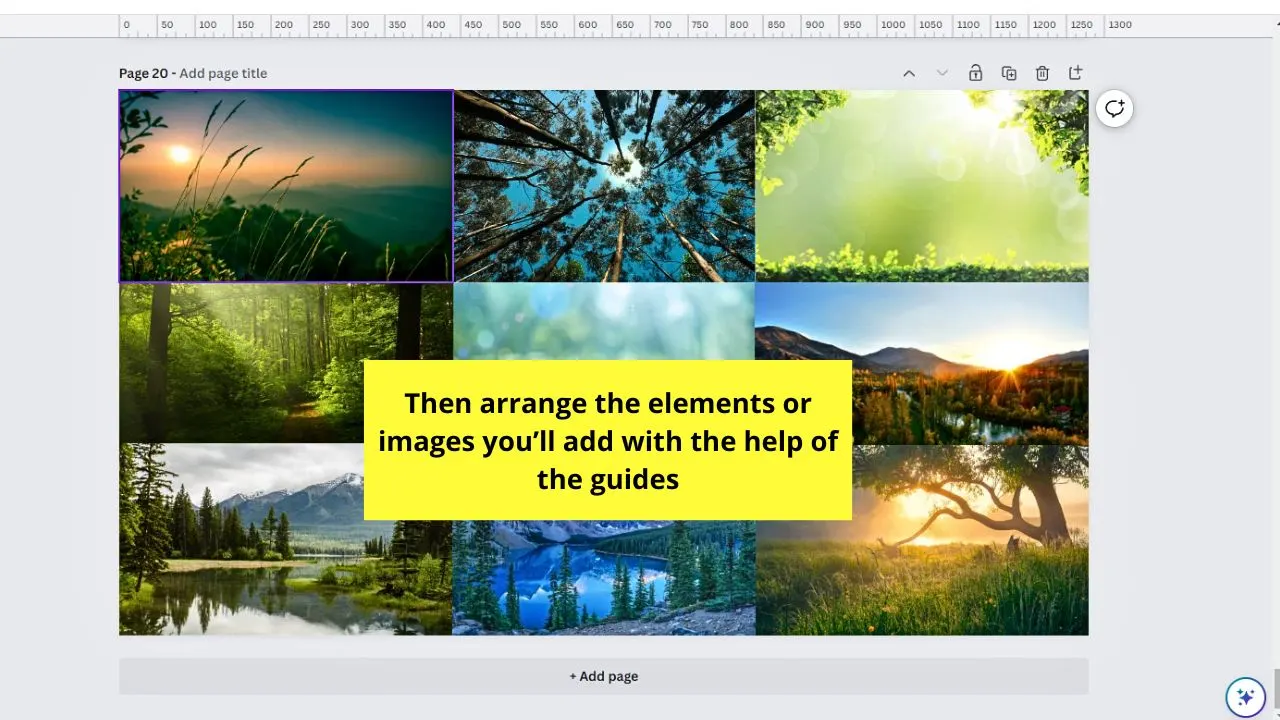
Then add and arrange the graphic elements with the help of the guides.
Step 6: Remove the guides permanently
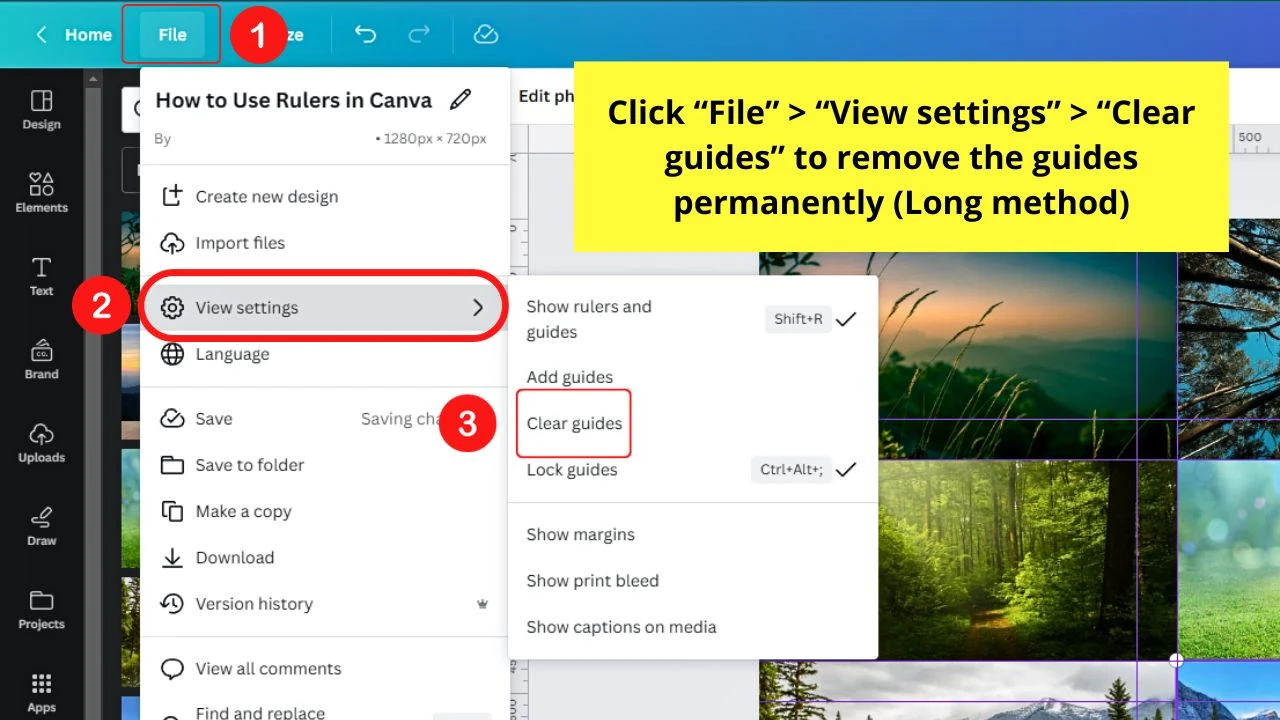
The long way to do this is to select “File” > “View Settings” > “Clear Guides,” which is best used if you have added design elements already.
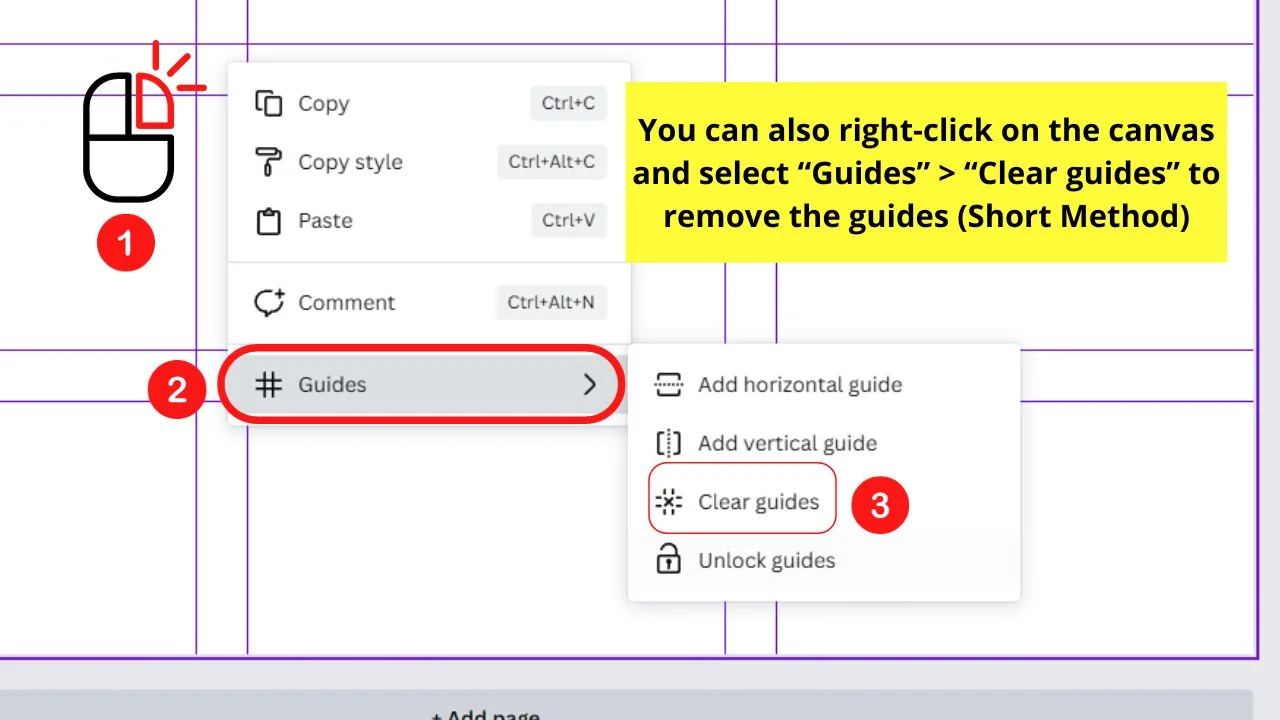
But if you prefer the shorter method, add a blank page and right-click anywhere on the canvas. Then select “Guides” > “Clear guides” on the dropdown menus that appear.
But, a word of caution though. Once you remove the guides from your design, you cannot undo them, even if you repeatedly click the “Undo” button on the menu bar.
So, are you now ready to turn Canva’s rulers into your newest designing best friends?
Frequently Asked Questions about How to Use Rulers in Canva
Can you use the rulers on Canva mobile?
While rulers on the Canva web version are nifty, you cannot enjoy them on the mobile version. We’ll have to wait for the Canva team to put such a tool on the Canva app. But, you can use the smart guides to properly space your elements on the app.
Are the rulers in Canva available to free users of the graphic tool?
While other Canva features are exclusive to Canva Pro users, rulers are available for the free Canva users as well.
Can you customize the guides’ location individually per page?
As of the moment, you cannot individually set the guide’s location differently per page. Where you positioned the guides on the previous page will be the same on the next page.
Is it possible to turn the rulers feature off without going through the File menu?
Since there’s a keyboard shortcut for activating rulers in Canva, use the same keyboard shortcut to make them disappear. Press the Shift and R together to de-activate the Canva rulers. Press both keys simultaneously to show the rulers again.

Hey guys! It’s me, Marcel, aka Maschi. On MaschiTuts, it’s all about tutorials! No matter the topic of the article, the goal always remains the same: Providing you guys with the most in-depth and helpful tutorials!


