

To ensure that updates appear on your WordPress website, clear the cache regularly.
Cached versions of the site can slow down and complicate the update process.
Manually clearing the cache can be a simpler solution than using a bulky plugin.
How to clear the cache in WordPress without a plugin
Clear the Google cache of outdated content
Advanced users: Clear the Cache with WP-CLI
WordPress caching explained
What is object caching?
Frequently asked questions related to clearing the cache in WordPress without a plugin
How to clear the cache in WordPress without a plugin
To clear the cache in WordPress without a plugin, follow these steps:
1. Clear your local cache
2. Perform server-side caching by deleting files contained in the “WP Contents > Cache” folder using File Manager or FTP
3. Purge the cache in your CDN account (if you use one). Alternatively, use SSH and a terminal emulator to run the WP-CLI command “$ wp cache flush”
Now, let us have a look at each of these steps in more detail and break them down into actionable “mini-steps.”
Step 1: Clear your local cache
The methods to clear your cache differ by browser, but the steps are similar.
To clear the local cache in Chrome, follow these steps:
- Click the three vertical dots in the top right of your browser
- Click on “Settings.”
- Click “Security and Privacy”
- Click either “Clear browser data” or “Cookies and other site data
The fastest method is to clear everything. If you would rather clear only the website cache for your WordPress website, use the “Cookies and other site data” option.
Click “See all cookies and site data,” then type your website name in the search field.
Click “Remove all shown,” which will clear the local cache for that single website.
![]()
![]()
Step 2: Perform server-side caching by deleting files contained in the “WP Contents > Cache” folder using File Manager or FTP
All WordPress hosting providers have different tools for different tasks. Check the support/knowledge base of your hosting provider to see what tools they offer, if any.
Not all have caching management. For example, SiteGround hosting provides a SuperCacher tool within the control panel. Flywheel hosting uses a feature called Smart Refresh.
Other hosting providers have specific plugins bundled into WordPress installations to handle the caching. Some offer nothing!
Each tends to publish “how-to” articles or videos in the support section of their website.
If no tools are provided, clearing the server cache can still be done by deleting the files manually, either in cPanel or using FTP.
You do need to be careful only to delete the contents within cache folders and not the cache folders in their entirety.
If you are uncomfortable editing files on a server, contact your web host. Most will handle server caching issues for you.


Clear the cache using File Manager in cPanel
To clear the cache using File Manager in cPanel, follow these steps:
- Log into your hosting account (yoursite.com:2083).
- Click “File Manager”
- Open the folder for your website
- Open the WP-Content Folder
- Open the “Cache” folder
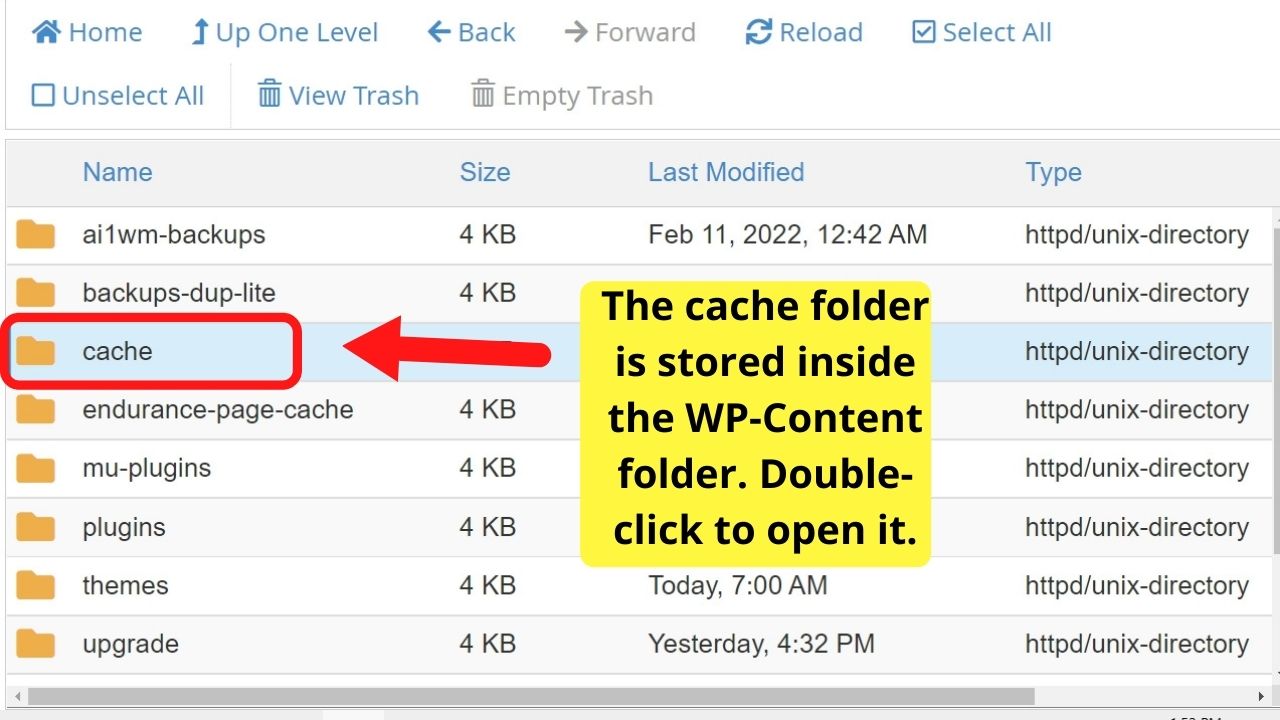

Then, open each folder and delete the contents stored inside them. Do not delete the folders.

Clearing WordPress cache with FTP
FTP stands for File Transfer Protocol, and it offers a faster way to clear your cache folders in WordPress.
Using an FTP client such as Filezilla, log into your hosting account. Your login details are ftp.yoursitename.com, then your cPanel login credentials, and the port number is 21.
Once logged into your site, the left side is your computer files, and the right is your hosting server’s files.
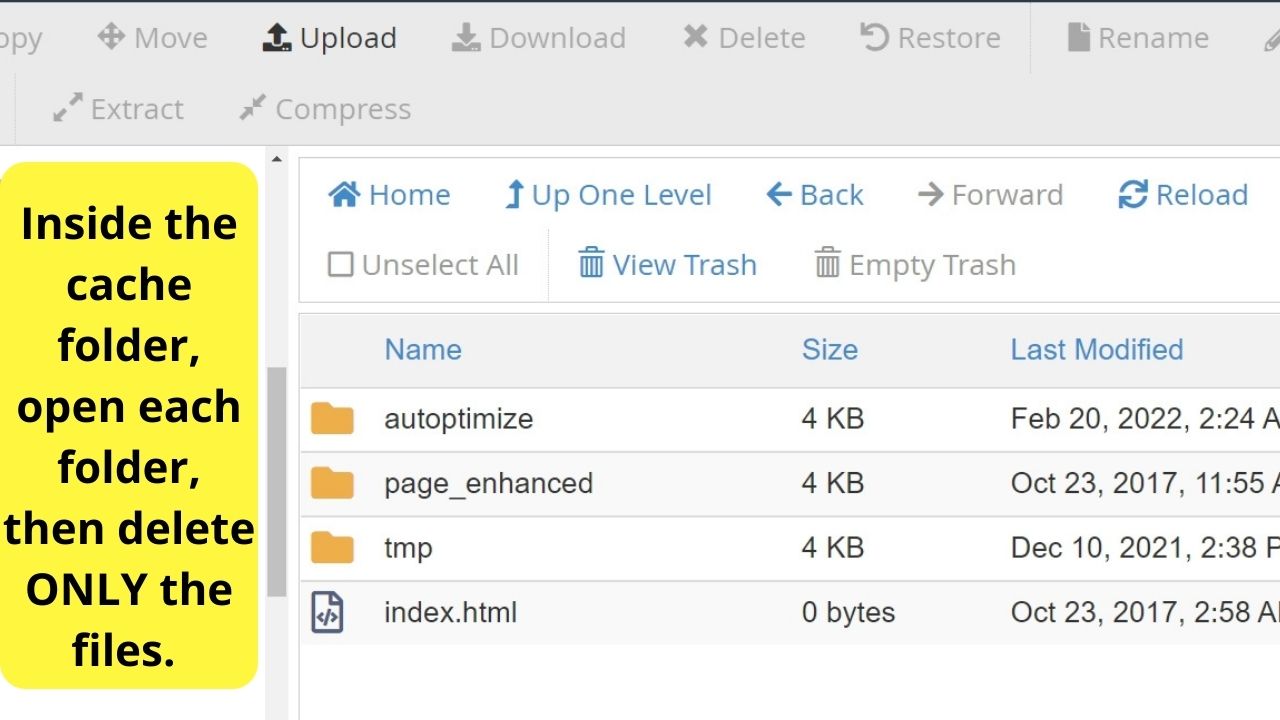
Select the root folder for your website, go to “WP content,” then “Cache,” then in the lower section, open the “tmp” folder and delete the files from within it.
![]()
![]()
As with cPanel > File Manager, do not delete any folders. Only remove the files contained inside the folders.
Check for other cache folders inside ANY plugin folder
The caching API is a core WordPress tool. Any plugin developer can use it; therefore, choosing not to install a specific WP cache plugin does not stop other plugins from storing cache copies.
Before logging out of cPanel or ending an FTP session, check your “plugins” folder for a Cache folder inside it. These are not limited to cache plugins.
Any plugin developer can use the Caching API for WordPress to help speed up load time.
As an example, the WP Enlighter plugin has a cache folder. To clear these, you need to go to WP Content > Plugins > Enlighter > Cache. Replace “enlighter” with any other plugin installed on WordPress.
Then delete the files in the tmp folder in there.

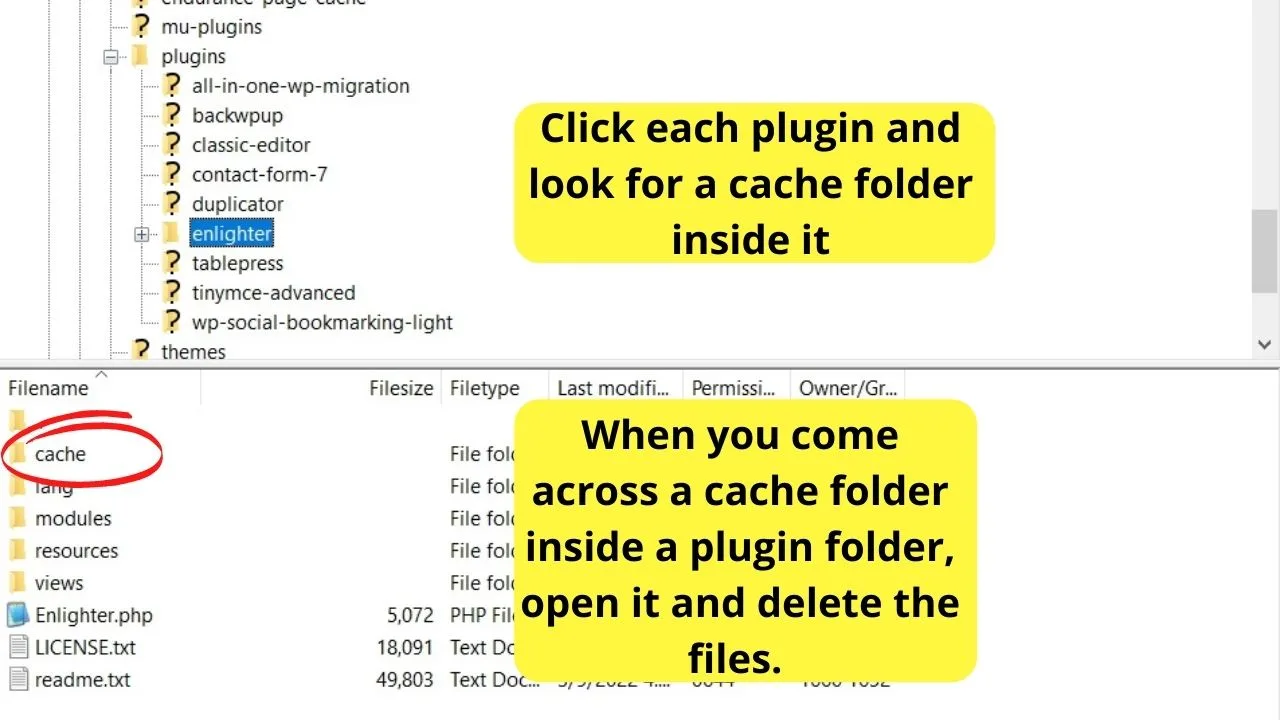
If you find a plugin is causing problems after deleting the contents inside the cache folder, go to your “plugins” folder and see if there is a cache folder for the plugin.
To delete the WordPress cache without a plugin, it is important to check for cache folders within all folders stored within wp-content.
When this throws a curveball, it is if you update a web page and clear the cache manually but forget to check the plugin folders. Another cache can make it look like a caching conflict.
The reality is that there can be additional cache folders stored elsewhere.
Step 3: Purge the cache in your CDN account (if you use one)
This step is only required if you have your WordPress site integrated with a Content Delivery Delivery Network (CDN).
The benefit of using CDNs is faster load time, regardless of where your visitors are loading your website from. The downside is that you need to purge more than one server.
This is because CDNs store cached copies of your static site files on multiple servers distributed around the globe.
Without a CDN, there is only a single cache on your hosting service.
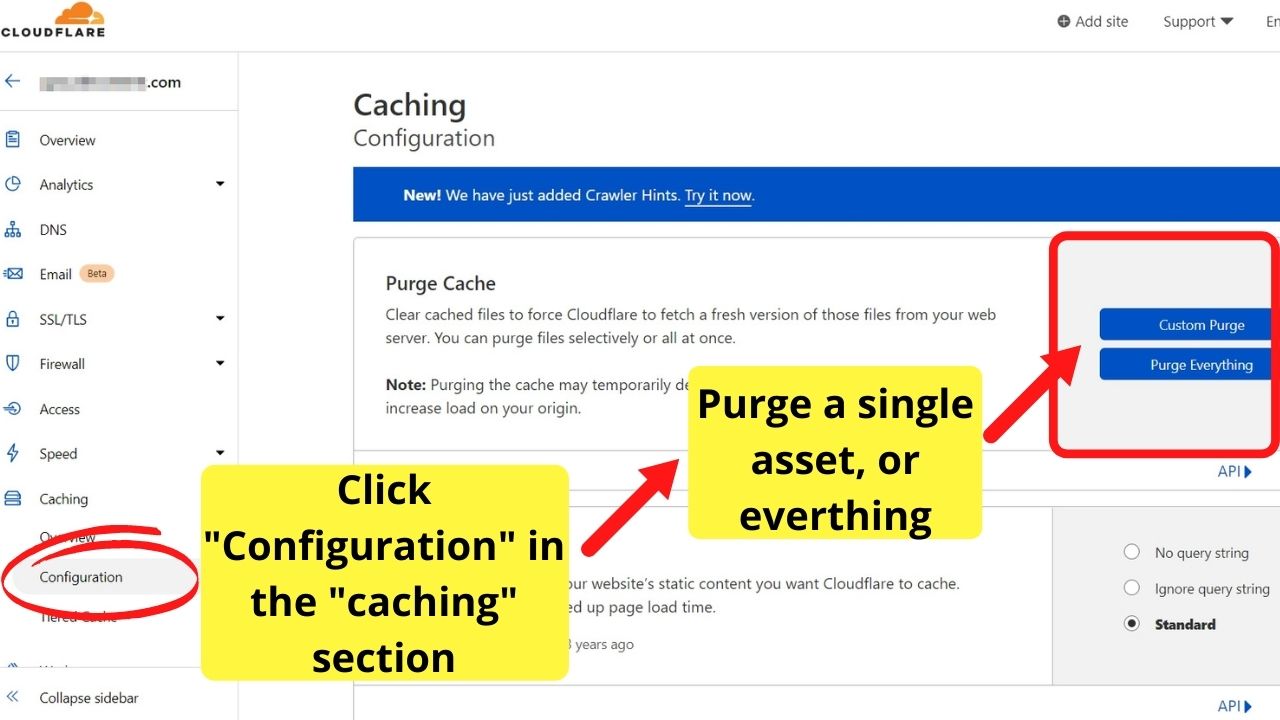
To purge the cache on multiple servers, CDN providers have a cache settings feature. Using Cloudflare as an example, they have two options. A custom purge, or purge all.
A custom purge is ideal for purging one page, or asset, such as an image. Purge all is site-wide to clear the cache of all static assets including CSS, images, and JavaScript.
To clear the cache in Cloudflare, follow these steps:
- Log into your Cloudflare account
- Click on the specific website you want to clear the cache for
- Select the “Caching” option
- Click on “Configuration”
- Choose either “Custom purge” or “Purge all,” depending on your cache-clearing needs.

Selecting a custom purge requires inputting the URL you want to clear the cache for.
For example, if you decide to add a different header per page on WordPress, the static header URL would need to have the cache purged using the URL path for the new header image to update in the cache.
You can input the URL path for the header image using a custom purge. This would purge the cache of the static image, updating it with the new header image.
Failing to do that and relying solely on clearing your host server cache would likely result in your CDN loading the previous static version.
Most CDNs issue a warning prompt alerting you that your site will temporarily run slower.
For most sites, the drop in page load time will be barely noticeable to users. Sites receiving thousands of daily hits will slow until the cache is built back up.
For established websites receiving thousands of hits daily, it would be better to use the custom purge only to clear a specific URL rather than delete the cache of your entire website.
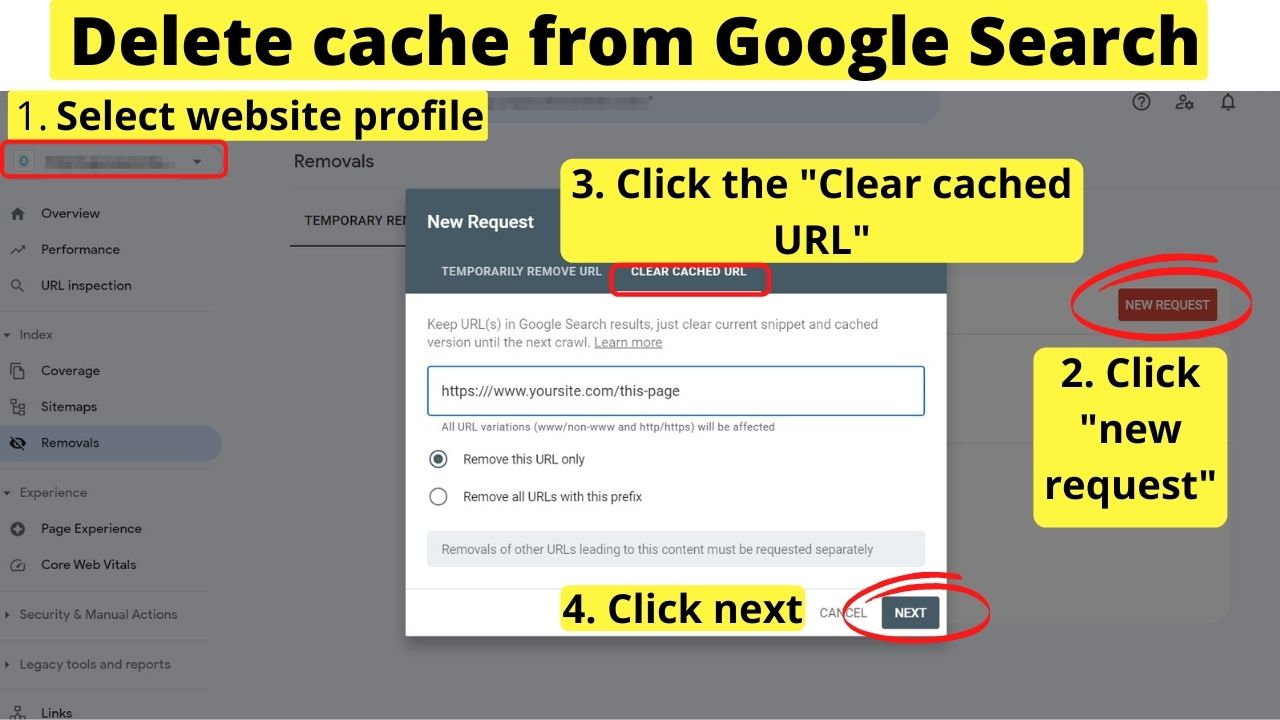
Clear the Google cache of outdated content
Unless a no-index tag is added to your metadata, Google will include a cached version of your web page.
When you update important information, you may want to instruct Google to update the cached version of that page. You can do that in the Google Search Console.
To clear the Google cache of outdated content, follow these steps:
- Log in to your Google Search Console account
- Select the website profile you want to work on
- On the left-hand side, click on “Removals”
- Locate and click the “New Request” button on the right
- In the “Clear Cached URL” tab, enter the URL of the page you want to clear from the cache
- Choose the option to “Remove this URL only”
- Click the “Next” button to proceed with the cache-clearing request

Once this is done, the page snippet will be cleared from the Google search results. Until the page is crawled again, the meta description will show a message: “No page description available.”
It generally takes up to 48 hours for the page to be recrawled, then the new information updated in Search, including an updated cache version.
Advanced users: Clear the Cache with WP-CLI
WP-CLI stands for WordPress Command Line Interface. It is most beneficial for developers who need to do a lot of maintenance.
For users managing multiple websites, familiarity with the WP-CLI commands can save time.
It should be noted that users should have moderate to advanced technical knowledge before running any commands.
You must enable SSH access on your web host’s server to use WP-CLI. Not all web hosting providers offer this.
The settings to manage Shell access are controlled in your hosting account, not within cPanel.
Your hosting provider will have details on enabling Shell access for your server.
If it is available, you must use a terminal emulator such as PuTTY for Windows or an alternative emulator for Mac.
Using your SSH access keys, you can start a remote session and then run the following command line:
$ wp cache flush
Press enter, and you’ll be shown a message: “Success: The cache was flushed.”
WordPress caching explained
How often have you experienced a glitch on any website, researched the solutions, and read the advice to “clear your browser cache?”
Browser caches are controlled by cookies placed on your browser.
This is a local cache; the cookies are stored in your computer’s browser history.
Clearing that (or the individual cookies for a website) clears the local cache for that website, but only on your browser.
The local cache for every browser is a storage area for static files. It’s how browsers can load websites faster the second time you visit the same web page.
Rather than downloading all the static files from a page, browsers use the local cache on your computer (or phone history) to prevent re-downloading the same static assets.
The technical term for clearing the browser cache is client-side caching.
This is because the user needs to clear the locally stored data themselves.
You can’t do that for your users, but you can clear the cache on the WordPress software server.
When you build a website on WordPress, caching is used at the server level.
By default, WordPress is coded to use Object Caching. So, even if you do not have a WP caching plugin installed, your website will use Object Cache.
Possibly more as plugins can be hardcoded to use the WordPress Caching API. Those that are will have an additional cache folder inside the WP plugin folder on your server.
Details for deleting those are covered later in this WordPress caching guide.
What is object caching?
The simplest way to understand Object Caching is to understand how pages are loaded.
WordPress stores all the data of a website built on it on a database. PHP scripts are used to load the content to communicate with the server.
The most used server query is
Get_post_meta()
Rather than running a PHP script for every unique website visitor, the first time the query is run, WP executes the script, renders the result on the web page, then the Object Cache automatically creates a copy of the results generated.
The Object Cache is the static result to show the next visitors.
By using the Object Cache, it reduces the number of queries being requested. Less database queries results in a faster page load time.
The downside to that is WordPress is also dynamic.
The generated results from the first query can be different later, such as if your visitors are leaving comments or you have a WooCommerce store that shows the number of items in stock.
When the query results change, server-side caching needs to be done to be sure visitors are shown the fresh results and not the static results from before the changes were made.
To clear the WordPress cache, you must clear both client- and server-side caching.
Client-side caching is your browser cache. Server-side caching is your hosting server running the WordPress software.
Frequently asked questions related to clearing the cache in WordPress without a plugin
Do I need to use a caching plugin for WordPress?
Caching plugins use the WP Caching API to make maintenance easier. The large file size of plugins can outweigh the speed performance benefit. Object caching is enabled in WordPress by default and can be managed on the server without caching plugins.
Can WordPress cache be disabled?
To disable caching in WordPress, open the theme folder in File Manager or FTP, then edit the wp-config.php file for your theme. Add “define (‘WP_CACHE’, false);” This is a time saver when developing your site so you can see changes in real-time. Remember to remove the code to re-enable caching.


Hey guys! It’s me, Marcel, aka Maschi. On MaschiTuts, it’s all about tutorials! No matter the topic of the article, the goal always remains the same: Providing you guys with the most in-depth and helpful tutorials!

