Wow! You are done creating your design in Adobe Illustrator, and you suddenly realize you have been working on the wrong size; or, maybe, you just need some adaptations to make it fit on different devices.
Now, for those who don’t know: You don’t really have to worry about size in Illustrator, cause your design should be in all vectors, which means, you can resize your artwork as many times as you need!
That doesn’t mean you don’t need to be specific though, you still need to figure out a way to be precise when you print it or export it in any format you need!
The first thing to know is that the “canvas” in Illustrator is actually known as “Artboard”. And guess what: you can have multiple artboards on the same document!
To change the size of those individually, you have to do it inside of the document itself.
And here’s a step-to-step guide to explain to you the best way to do this.
How To Change The Canvas Size in Illustrator
The Canvas size can be changed when you create a new document. It can also be adjusted later on by selecting “Document Setup” inside “File” and then “Edit Artboards”. Another way to adjust the canvas size is to use the Artboard tool (keyboard shortcut = Shift + O).
How To Change The Canvas Size in Illustrator in 5 Simple Steps
The best part of the artboard tool is that as always on all of the Adobe products, you have more than one way to do everything.
You can set the size by going through the main menu options, using the artboard panel, or even do it manually with the artboard tool, if you already learned the appropriate shortcuts to make it.
And, btw, It’s really important that you learn all the important keyboard shortcuts if you are planning to work in Illustrator on a daily basis.
This will definitely improve your workflow and help you optimize the time, focusing on what really matters.
To help you do that, here’s a guide with the easiest way to do this:
Step 1:
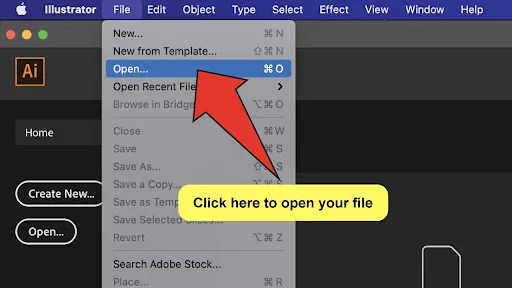
Open your Illustrator file. First, open the document by clicking on it, or once in Illustrator, you can go to “File” on the top menu, and then “Open” and choose the file you want to open. You need to have the document open to be able to change the size.
Step 2:
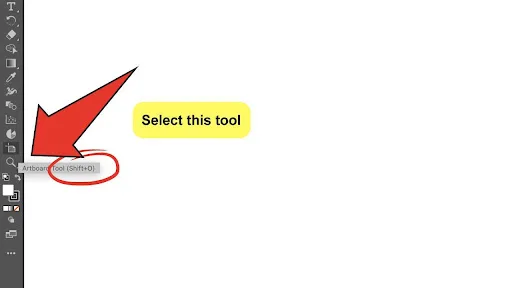
Find the artboard tool. This tool is located on the toolbar on the left, and you can also find it by pressing the keyboard shortcut “Shift+O” to reach the same result.
Each time you mouse over a tool on the toolbar, you can discover the shortcut, then use it. Make it a habit.
Step 3:
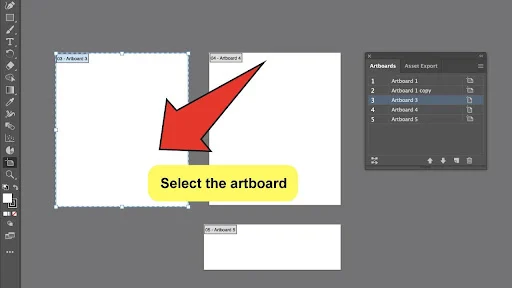
Select the artboard (or artboards) you need to resize.
Once you actívate the artboard tool: This will highlight your artboards, and you will be able to see their size values at the top of the Illustrator window. Now you can click on the artboard you need to resize.
Step 4:
Change the artboard’s width. Adjust the value in the “Width” text box.
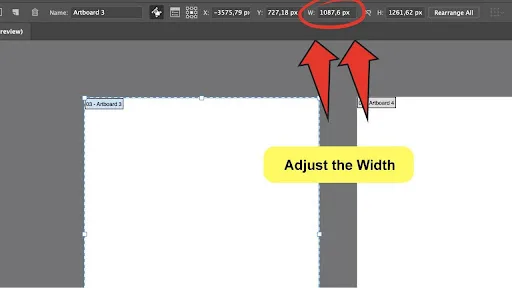
Step 5:
Change the artboard’s height. Adjust the value in the “Height” text box.
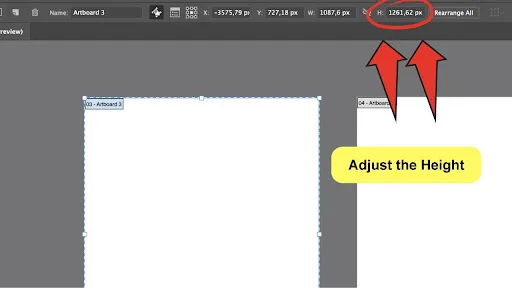
And, there you go! You’ve already changed the size!
Now, if you are in a hurry, and you want to reach the same result, but faster, you can do it by pressing the “Enter” key, once you’ve already entered the “Artboard Tool”, and you are standing on the artboard that you want to adjust.
This will lead you to a new pop-up window with the “Artboard Options”, which can also allow you to change the size, the unit, and will give you a list of commonly used presets that are ready to use!
What’s the biggest size an artboard can have?
In general, the maximum size of the artboard in Illustrator corresponds to the size of the canvas, which is 226 in. x 226 in. This means the maximum size of the Illustrator artboard is approximately 16290 x 16290 pixels square.
Can I get Illustrator to automatically clip the artboard to the vectorized object’s size?
Yes, you absolutely can! And this is probably the easiest and fastest way to make it happen without going through windows and menus.
You can simply select all the objects you want to include inside of the artboard to be, and then group them.
Once you have selected the group, go to activate the artboard tool, which you can do by using the previously mentioned shortcut “Shift+O”, click on the selected group with the tool, and you’re done!
The artboard will be created matching the size of the selected group.
If you don’t remember the shortcut, or you just don’t like it, you can also do the same from the menu: Once you selected the group, go to “Artboards” option, inside of “Objects” on the main menu, and click on “Fit to Selected Art”.
Is there a way to use preset sizes for artboards in Illustrator?
Sure there is! And you can find them first thing when you create a new document on the “Document Setup” window, which you can also find inside of “File”, on the main top menu.
The third way to find them is on “Artboard Options” which you can find pressing the “Enter” key once you stepped on any artboard while using the “Artboard Tool”.
You can find all sorts of presets available that can adjust to any of your needs when creating a new design. And if you need to change the sizes of the previously created artboard, you also can!

Hey guys! It’s me, Marcel, aka Maschi. On MaschiTuts, it’s all about tutorials! No matter the topic of the article, the goal always remains the same: Providing you guys with the most in-depth and helpful tutorials!
