Ever wonder what those white words below a YouTube video are? Most of us would probably think they’re subtitles.
While subtitles are also found at the bottom part of a video screen, technically, those words are what you call closed captions.
Unlike subtitles that serve as a translation of a language, closed captions serve as the dialogue’s transcription.
And, if you’re a content creator, you’ll notice that with every video you upload, YouTube automatically adds a closed caption file to it whenever it’s possible.
But, as the captions generated are low enough in terms of quality, it doesn’t affect SEO as well as comprehension.
Hence, you can opt to delete those auto-generated caption files and add their newer, more accurate versions.
So, let’s find out how to add those closed captions in the text below.
How to Add Closed Captions to Your YouTube Videos
First, choose “subtitles” from the left sidebar. Search for the video you uploaded, and when you see the English (automatic) language listed, click “Duplicate and Edit.” Click “Assign Timings” to split the text into sections and do a grammar check. Adjust the text’s positioning, then hit the publish button.
But, the process of adding closed captions depends on whether you have a script ready or whether the footage’s published or not yet.
That said, let us now dig deeper and review each case in much more detail.
Adding Closed Captions to YouTube Videos: The How-tos to Remember
As mentioned earlier, adding closed captions has a significant impact on your videos’ ranking and the audience you’re able to reach.
But, for you to do that, you’ll need to learn exactly how to add those coveted closed captions.
How to Get to Youtube’s Captions Editor Page
When Uploading a New YouTube Video
Step 1: Input all the descriptions and other necessary details of your video in the Details section. Make sure in the Language and captions certification category, you selected English.
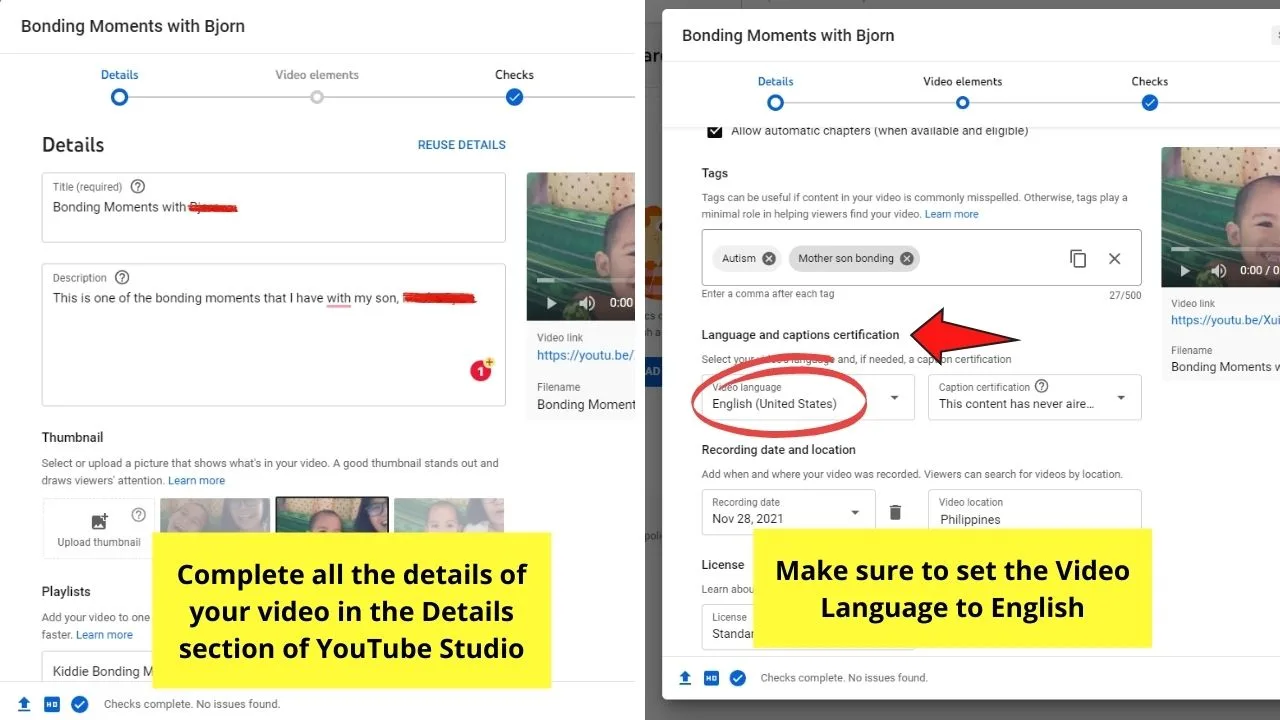
After filling up the Details section, head to the Video Elements section.
Step 2: On the Video Elements section, click the Add button in the Add Subtitles option.
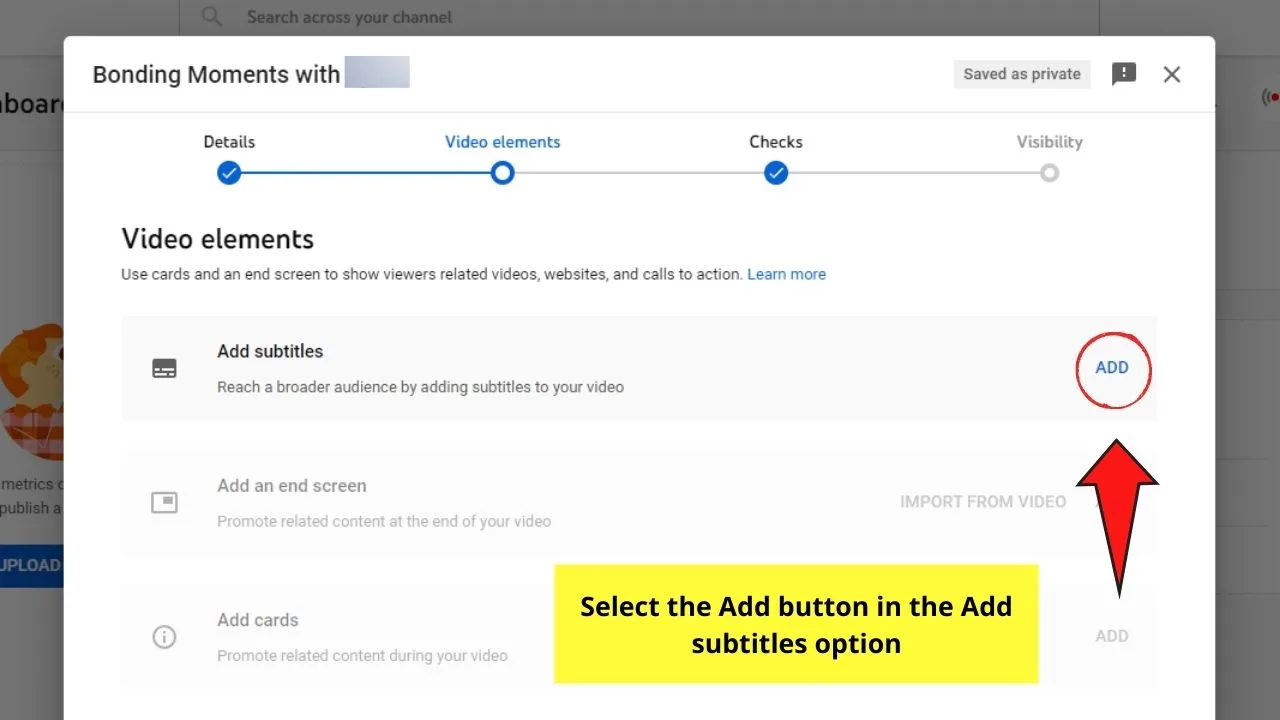
You will then find yourself directed to the Captions editor page.
When Adding Closed Captions to a Published YouTube Video
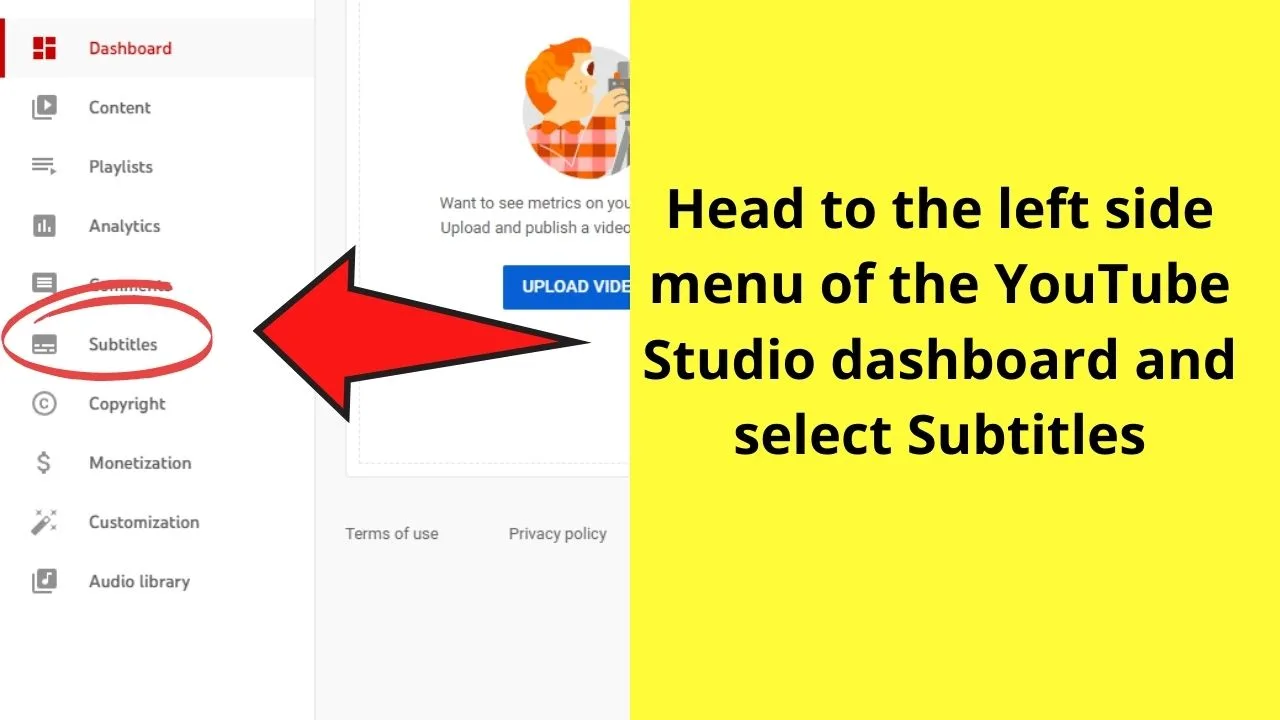
Step 1: On your YouTube Creator account home page, head to the Subtitles tab on the left side of the screen.
Step 2: Select the video you want to add closed captions and head to the Languages column. Click the v icon.
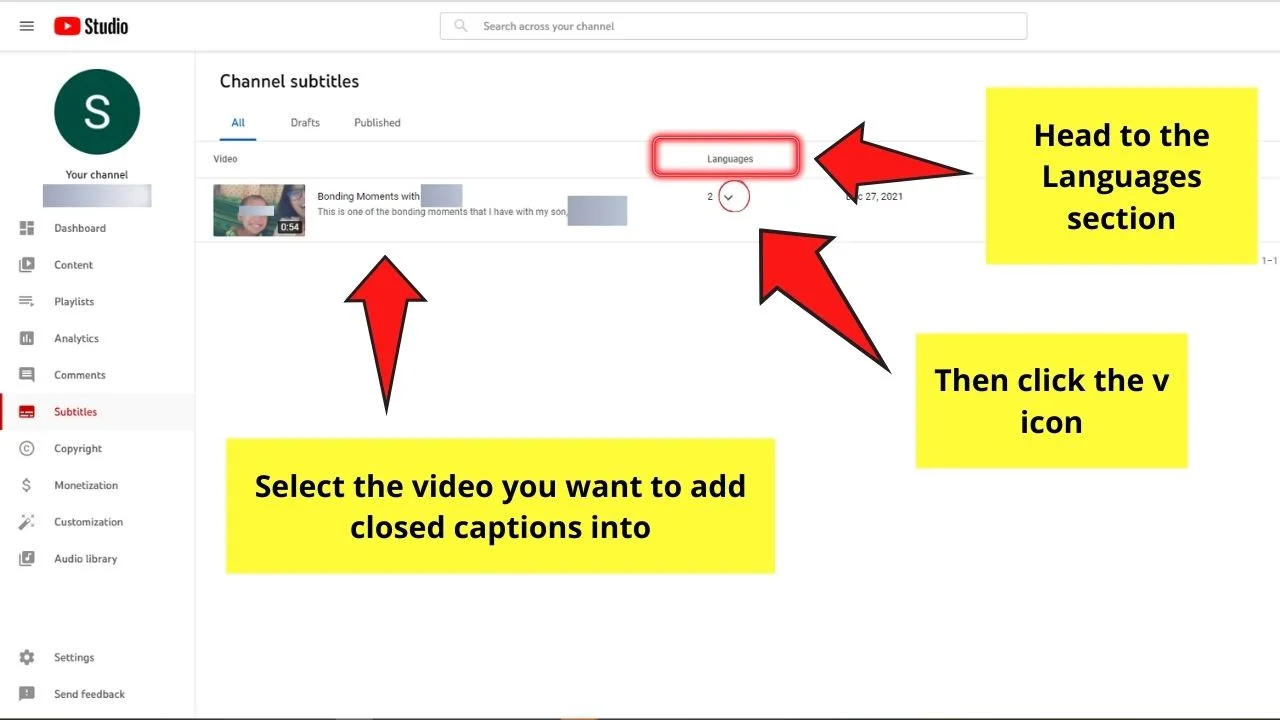
Step 3: Once you see the name of the language with the words automatic written beside it in the dropdown menu, select the Duplicate and Edit button.
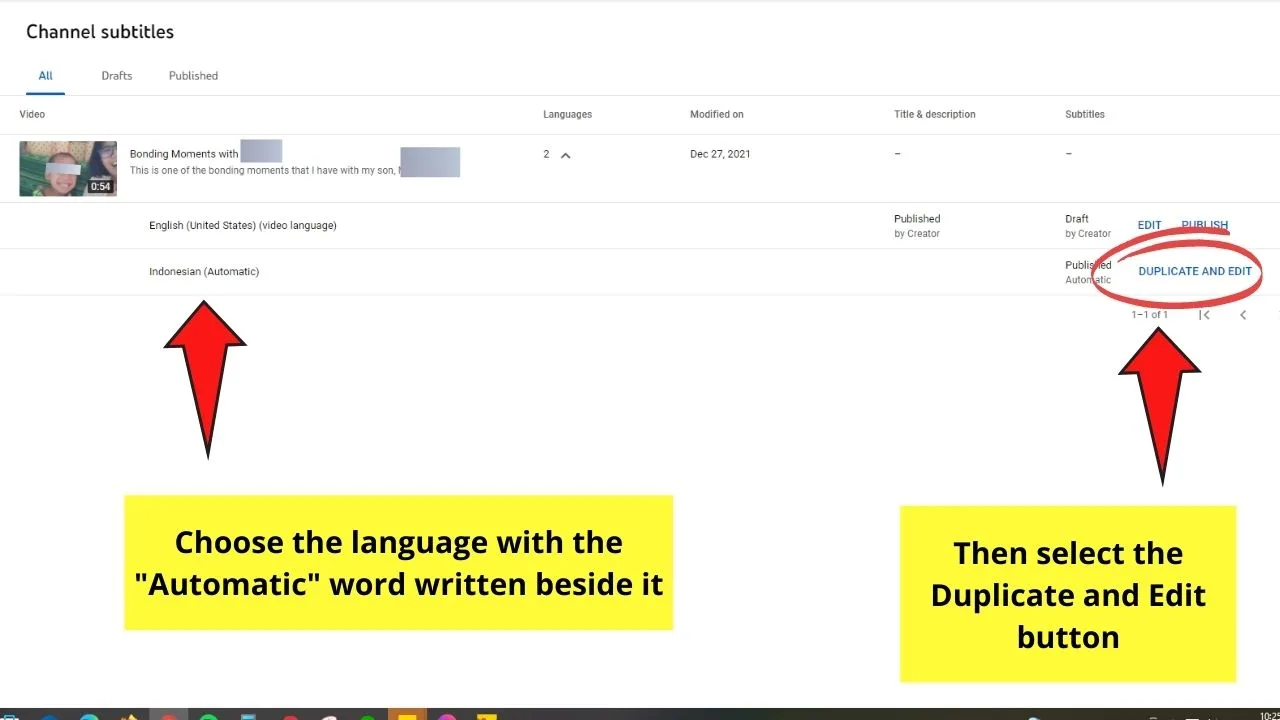
This step will automatically lead you to the Captions Editor page.
What to Do in the Captions Editor Page
Step 1: On the Content section of your YouTube studio, select a video you’d like to add captions into by clicking on it once.
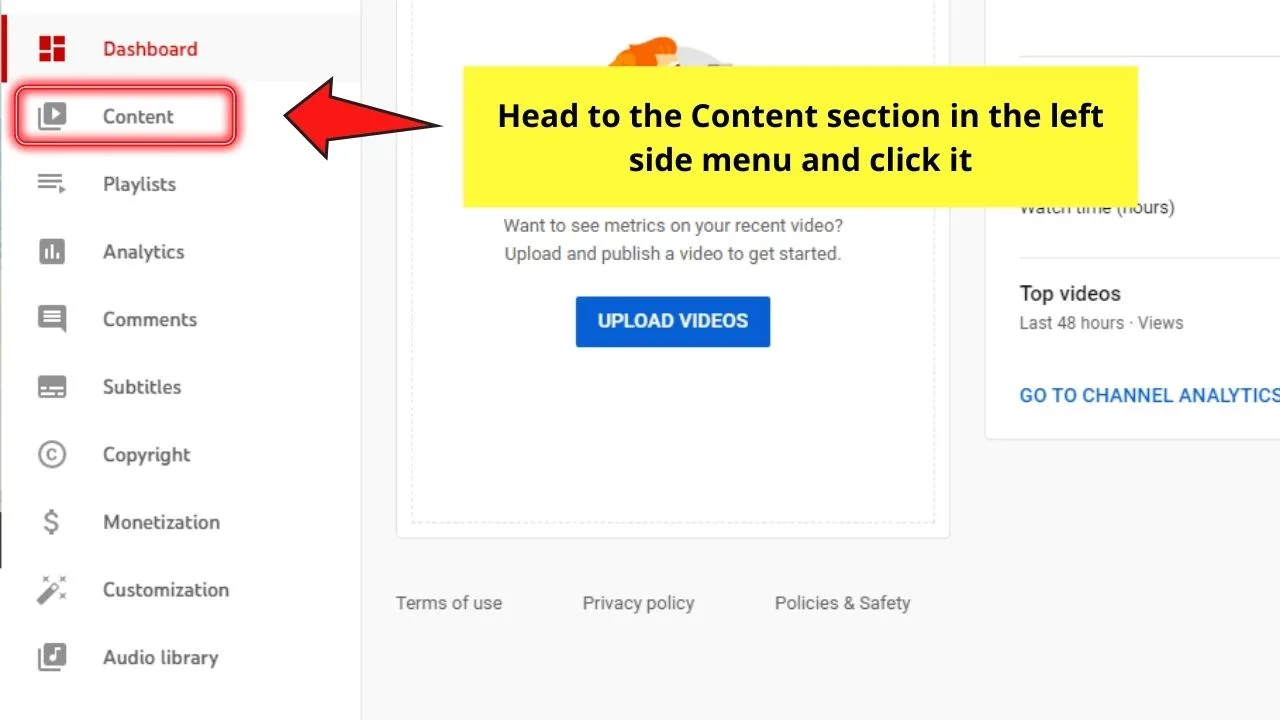
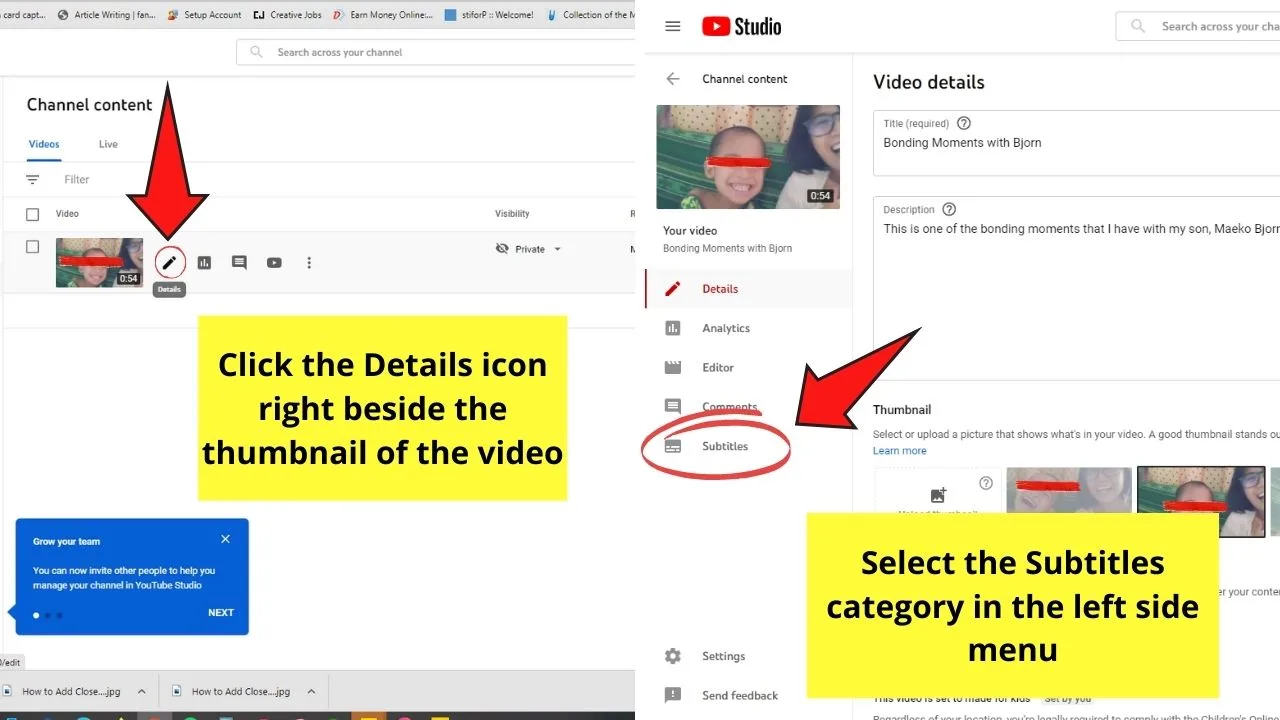
This will then lead you to that video’s Details page.
Step 2: On the Details page, head to the Subtitles category and click it.
Step 3: If that particular video already has pre-populated captions added, click the Duplicate and Edit button.
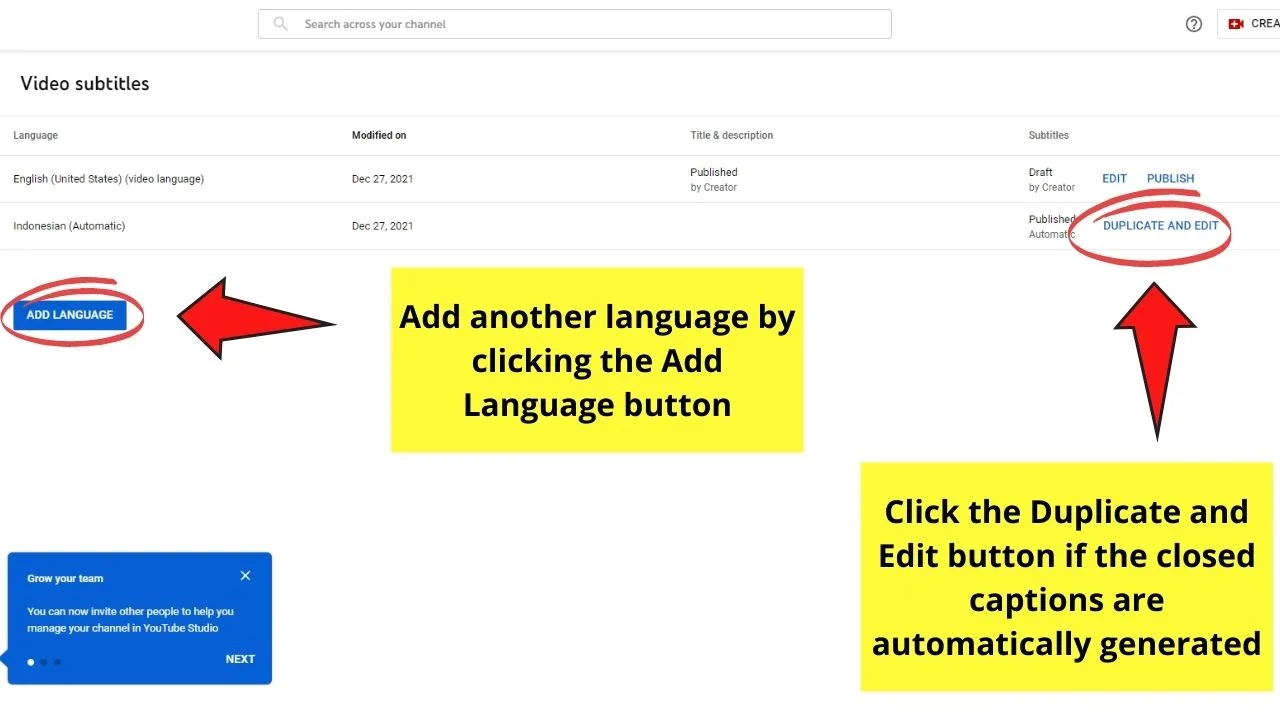
If, however, that footage doesn’t have any automatic captions added, then select the Add button instead.
You can also add a specific language other than your native one, simply click the Add Language button in the Subtitles category.
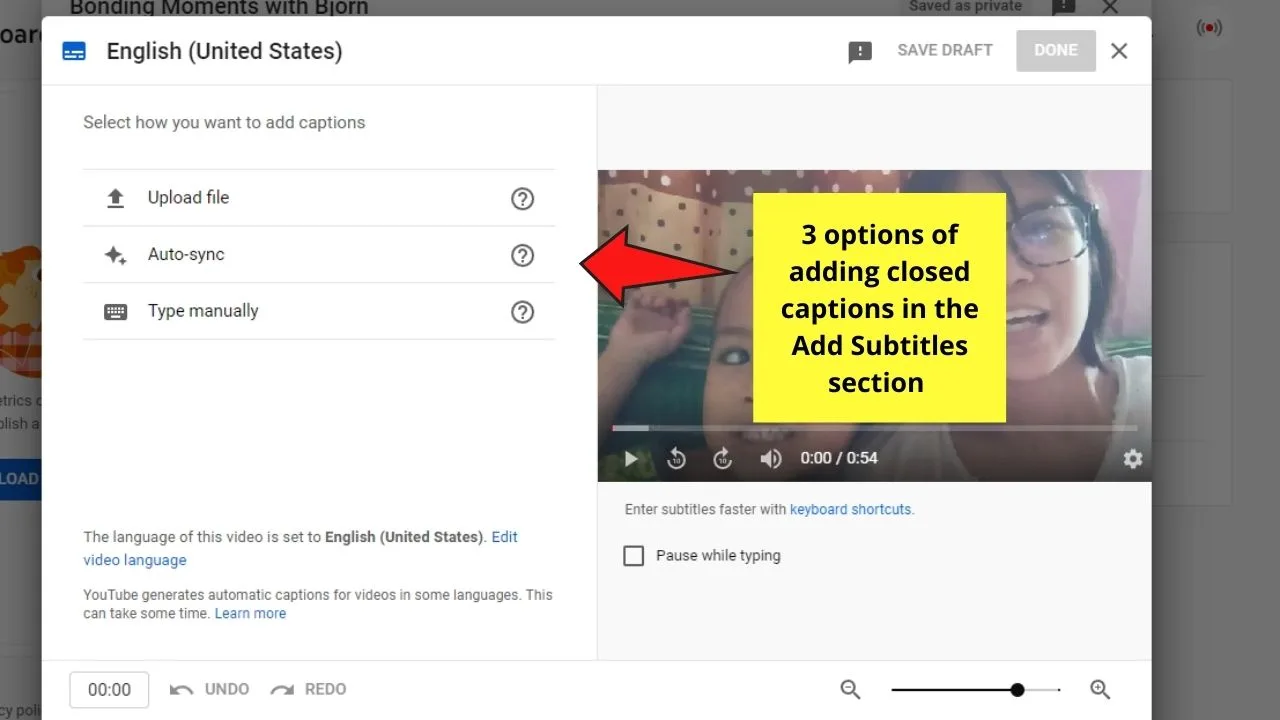
Once you’re on the Captions Editor page, you’ll notice that there are 3 options on how you can add closed captions to your video.
Uploading a Transcript
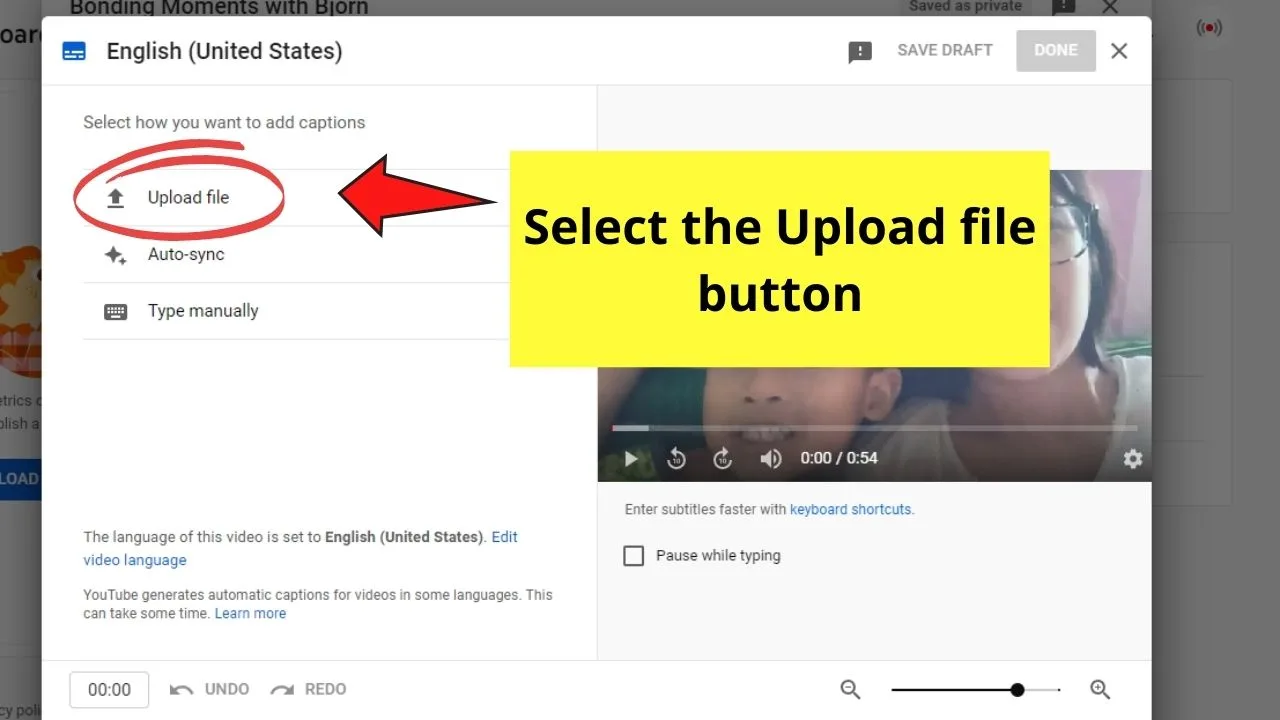
Step 1: On the Captions Editor page, select the Upload file option.
Step 2: Choose what subtitle file type you want to import into the editor page: With timing or without timing.
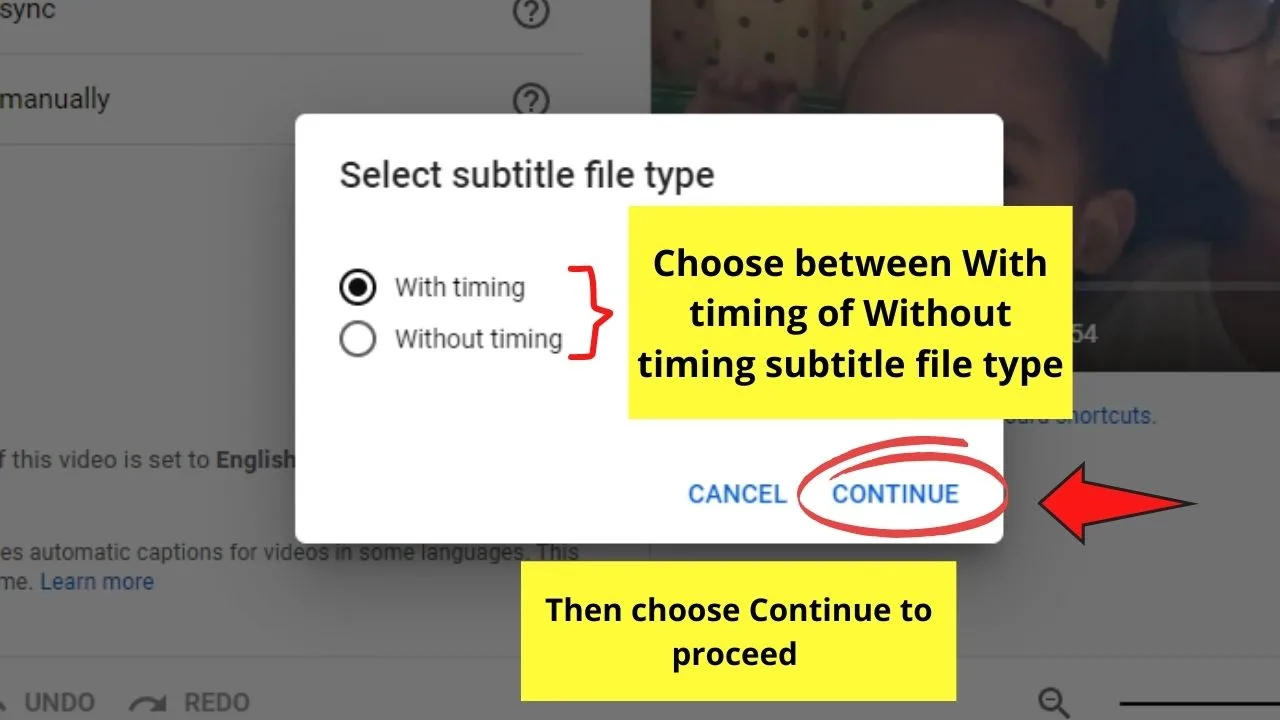
After choosing the subtitle file type, click the Continue button.
Step 3: This will then populate the editor page with the text from the transcript file you uploaded.
Pasting and Syncing Video Transcript into the Editor Tool
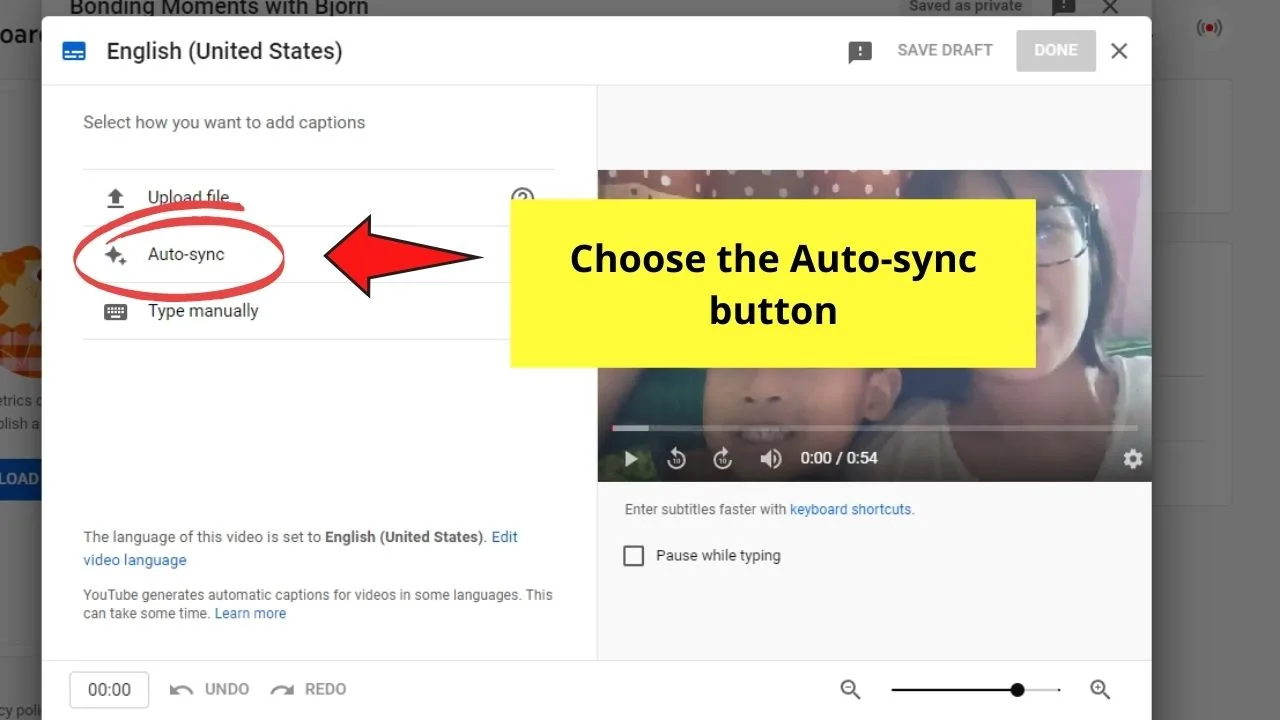
Step 1: On the Captions Editor page, select the Autosync option.
Step 2: Copy the video transcript from the document file where you saved it and paste it on the edit transcript box.
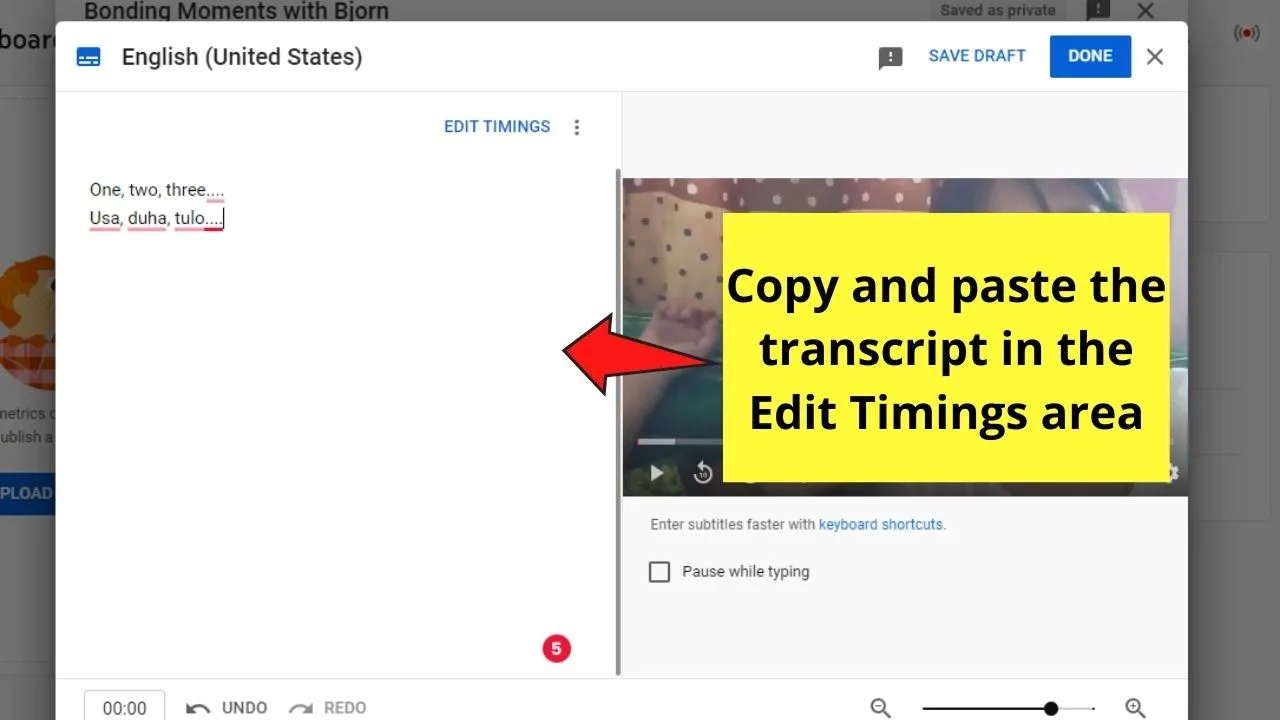
Since it’s the auto-sync option, YouTube will automatically set the subtitle timings.
Step 3: Head to the upper right corner of the edit transcript box and click the Add Timings button.
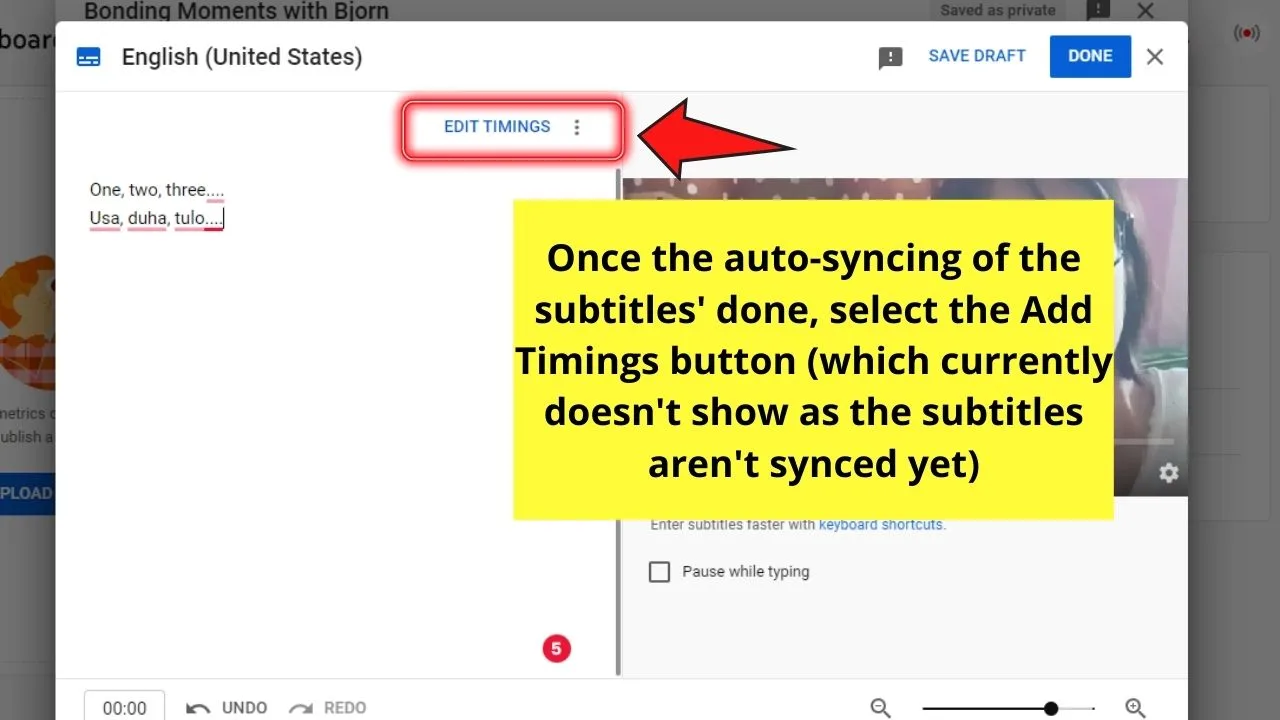
This step will set the caption timings automatically without any intervention from you.
Step 4: You can now go ahead and proofread your captions before fully publishing the video.
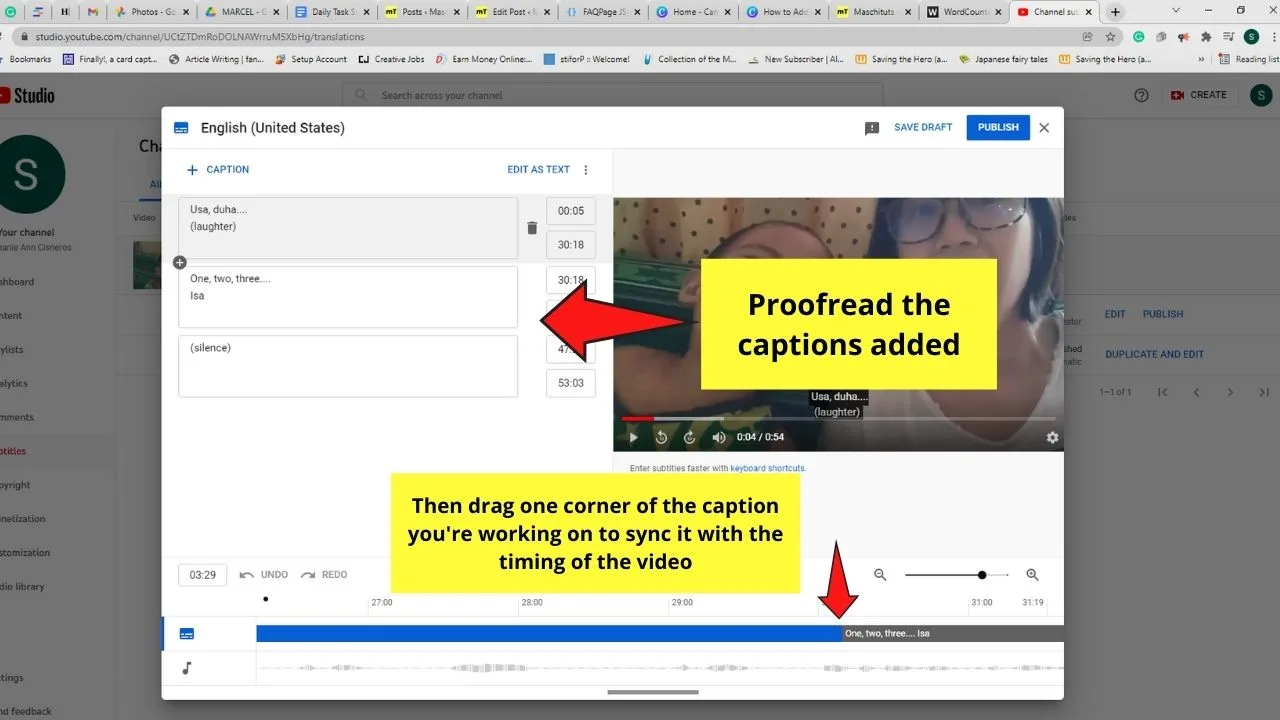
If you find some missing text, insert a new caption by dragging the previous caption’s end part to the correct position on the timeline.
Step 5: On the left side of the editor page, click the + icon after the previous caption block to add another caption line.
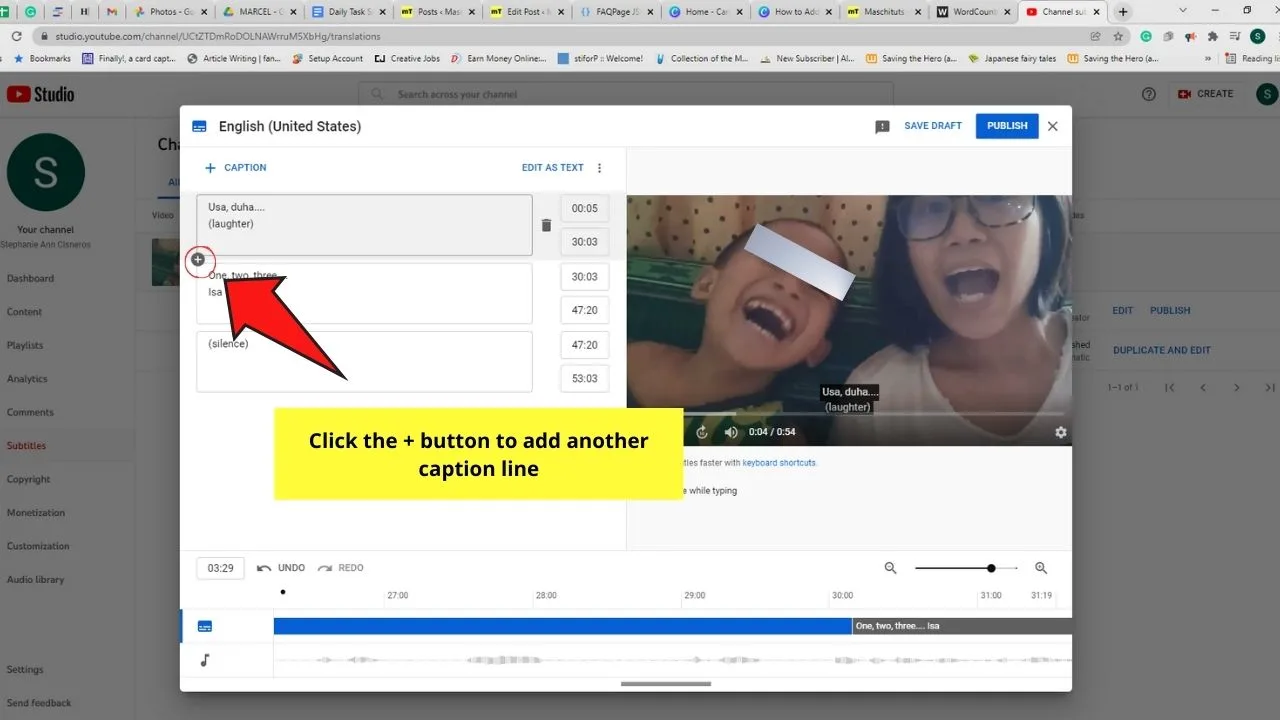
Then, encode the new caption inside the box. You will then see the new caption added to the blue subtitle section on the timeline.
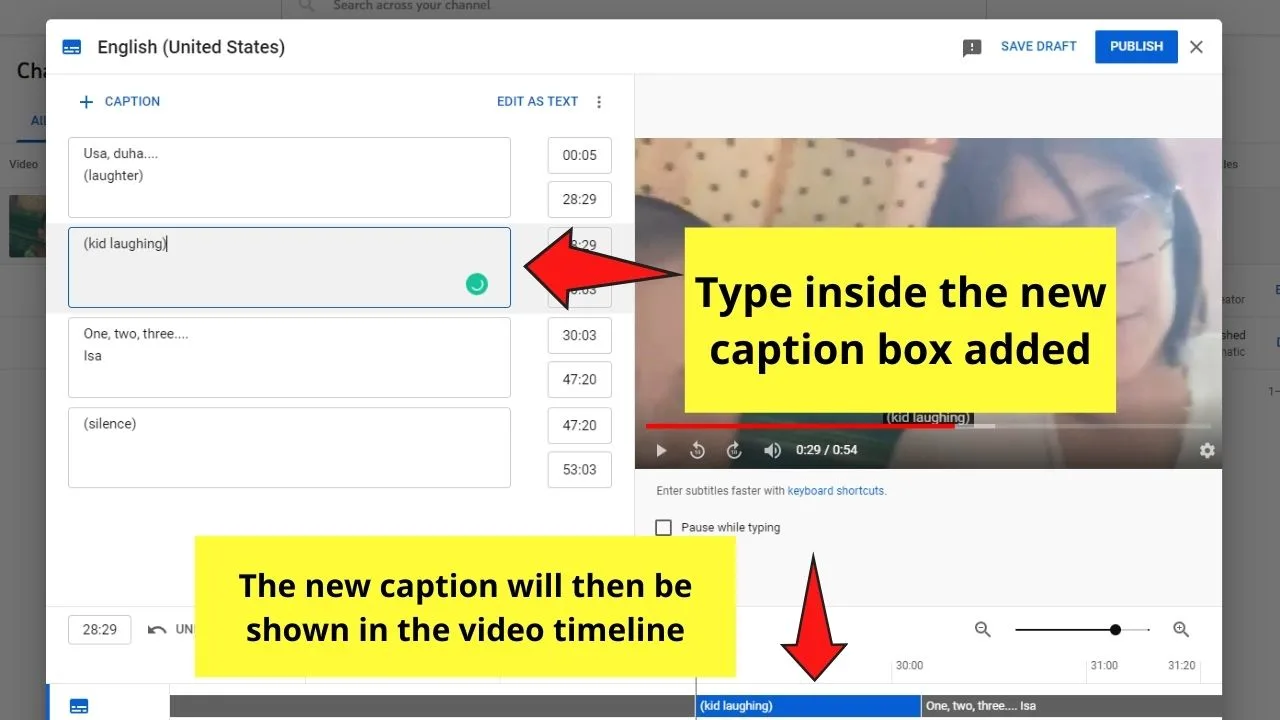
If there’s a need to resize the subtitle, go ahead and drag the caption accordingly.
Step 6: If you want to remove a caption, hover your cursor over the trash icon and click it.
This move will automatically delete that caption.
Manual Typing of Closed Captions
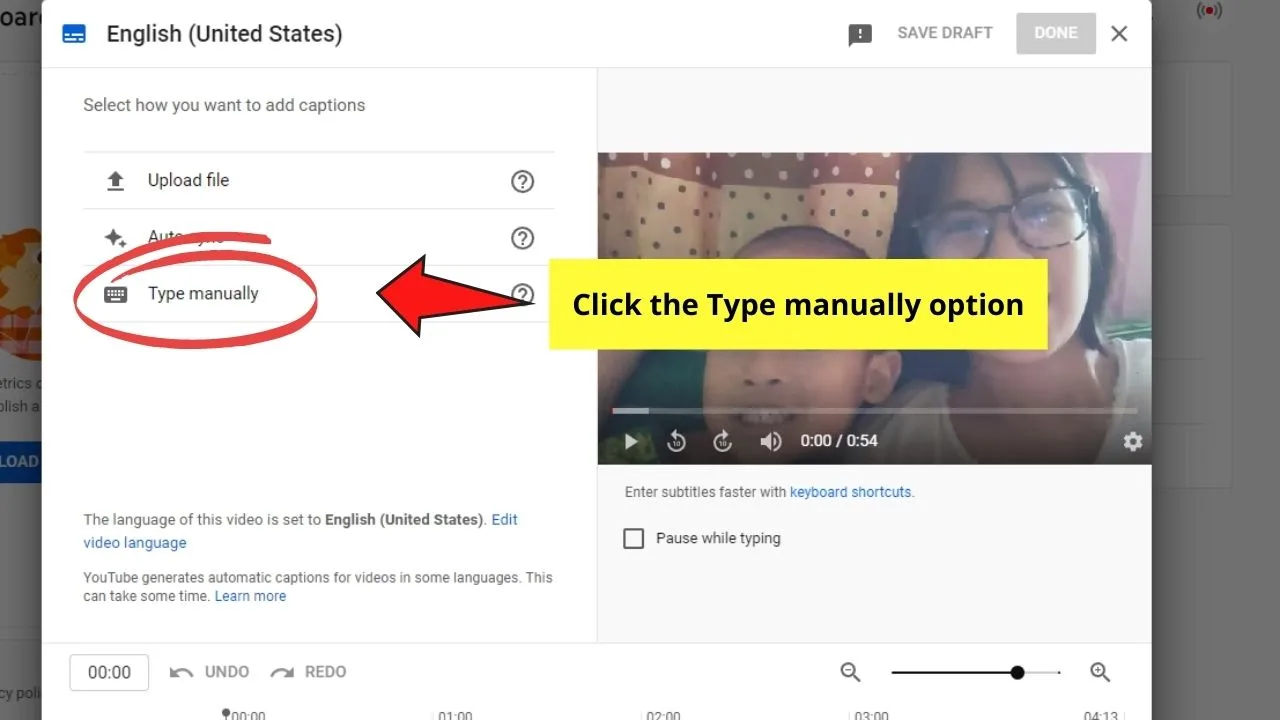
Step 1: On the Captions Editor page, select the Type manually option.
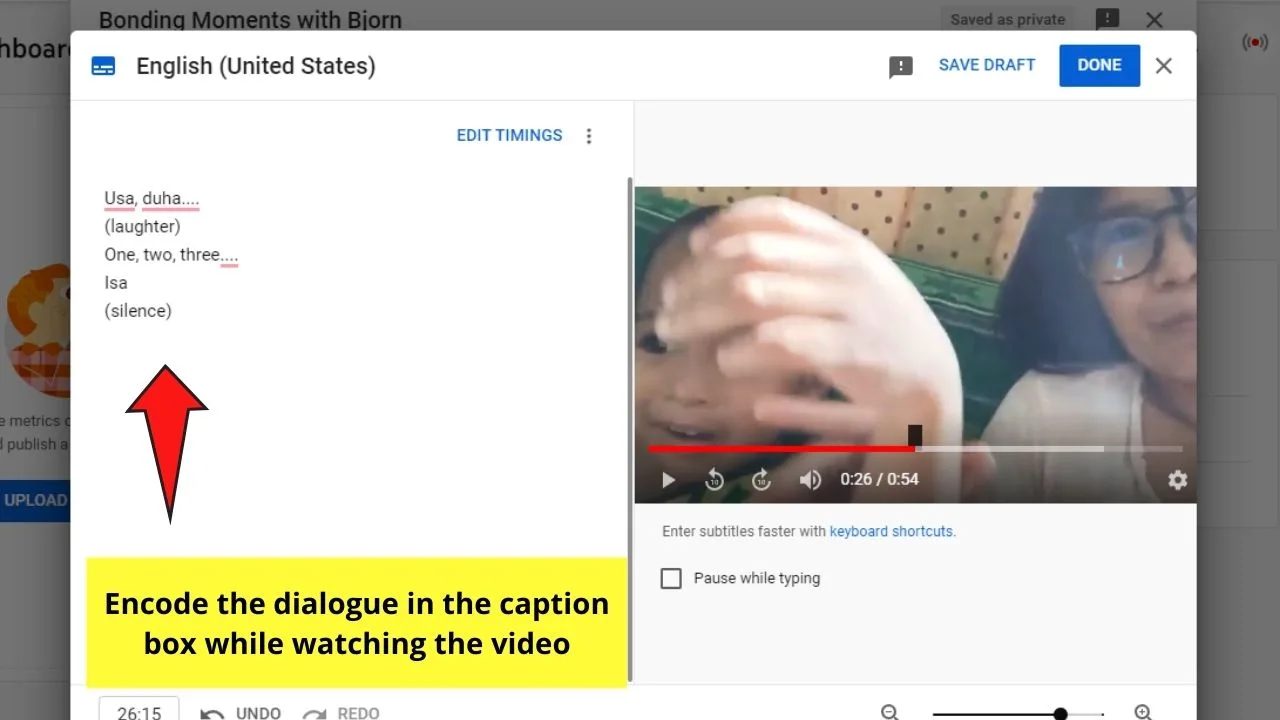
Step 2: Begin typing the captions while you’re watching the video.
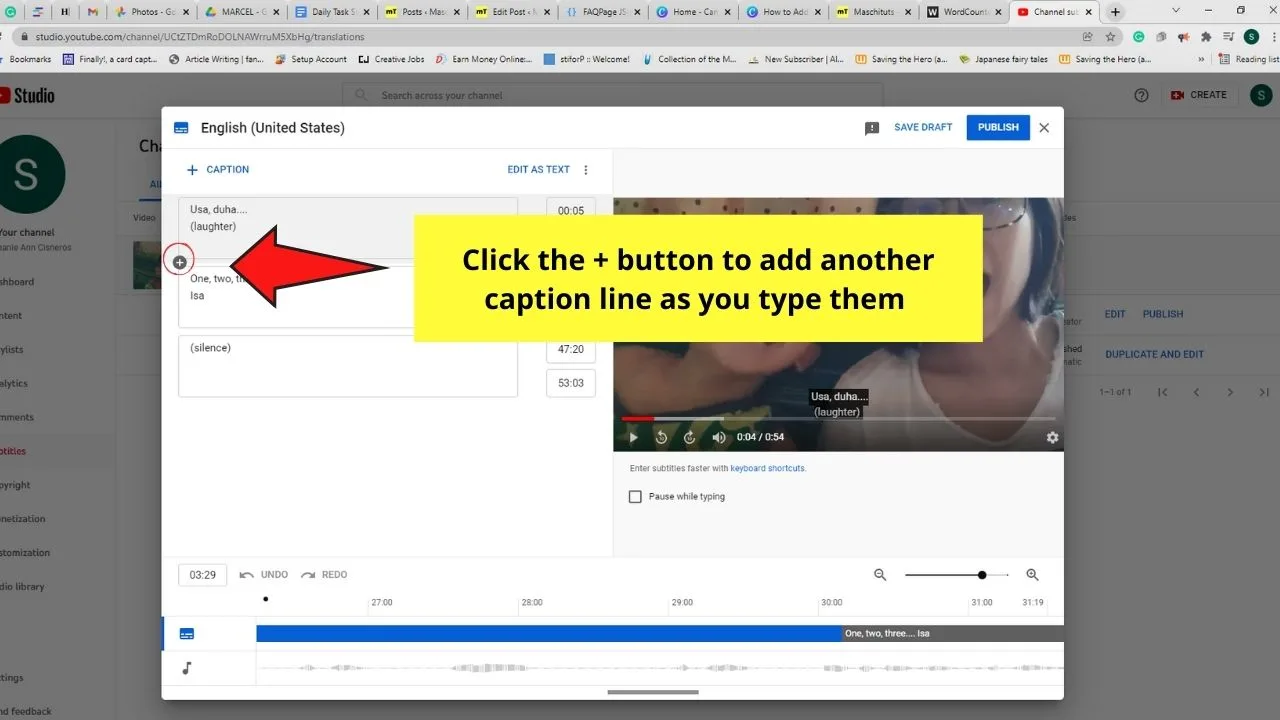
Click the + Caption button to add another caption line. You can also hover your cursor on the lower left of the caption box and click the Add caption line icon (looks like a +).
Step 3: Manually set the timings of the captions by heading to the rightmost of the caption line.
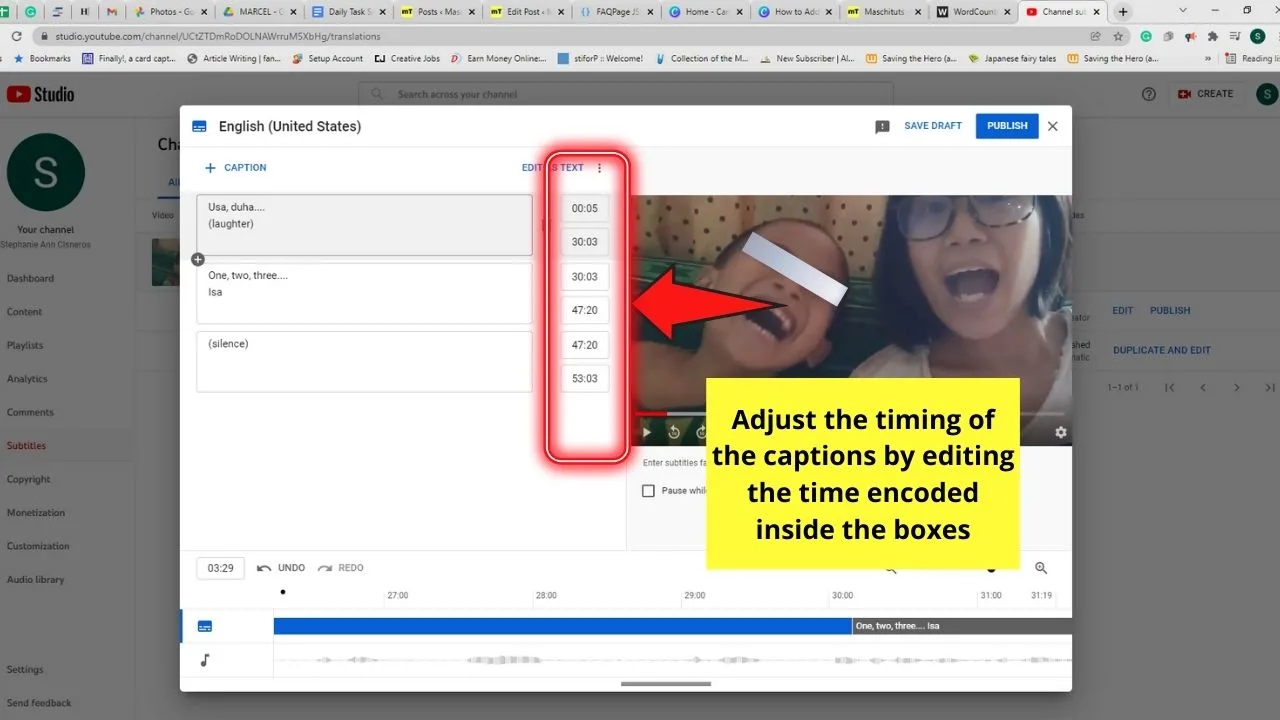
Step 4: Delete the caption line by hovering your cursor over the trash icon found between the caption box and the timings section.
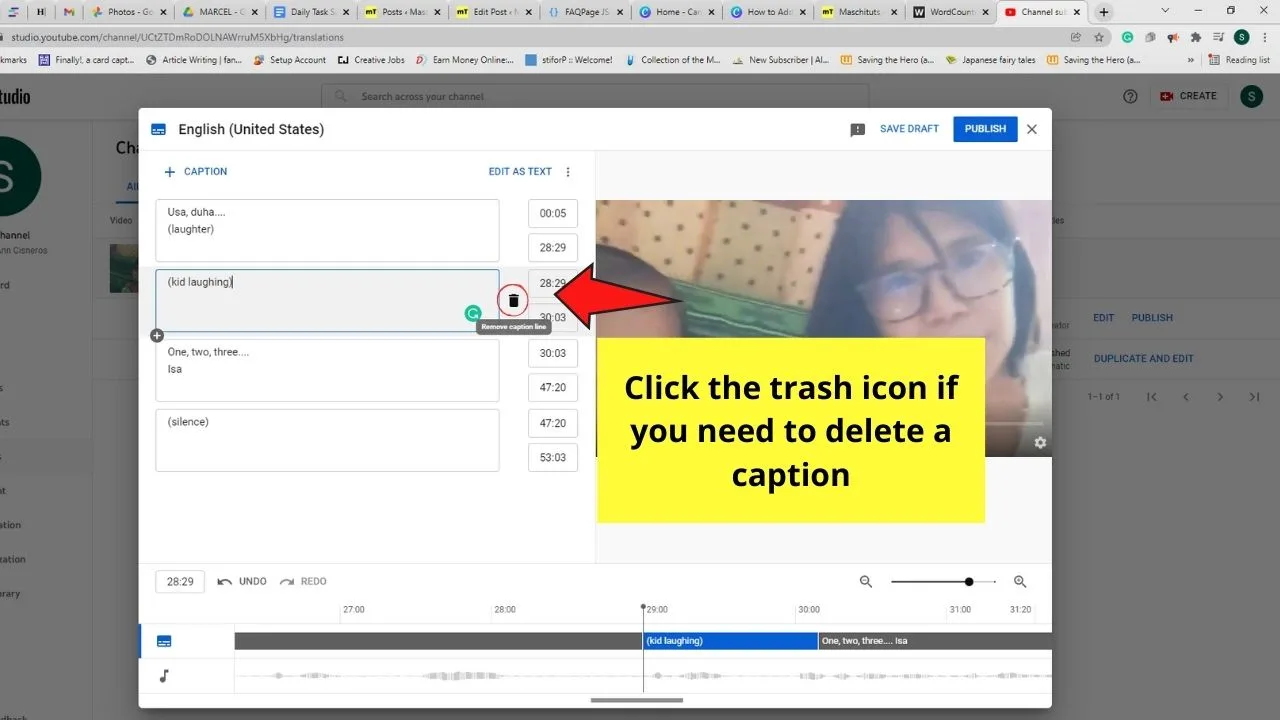
Repeat the same actions until you finish captioning your YouTube video.
If you want to save time during the captioning step, master the keyboard shortcuts.
Among these keyboard shortcuts, the Shift + Space key combination is the most useful as it allows you to pause and resume your video while you’re typing out the captions.
Step 5: Sync your captions with the video by clicking and dragging them across the timeline to move their positions.
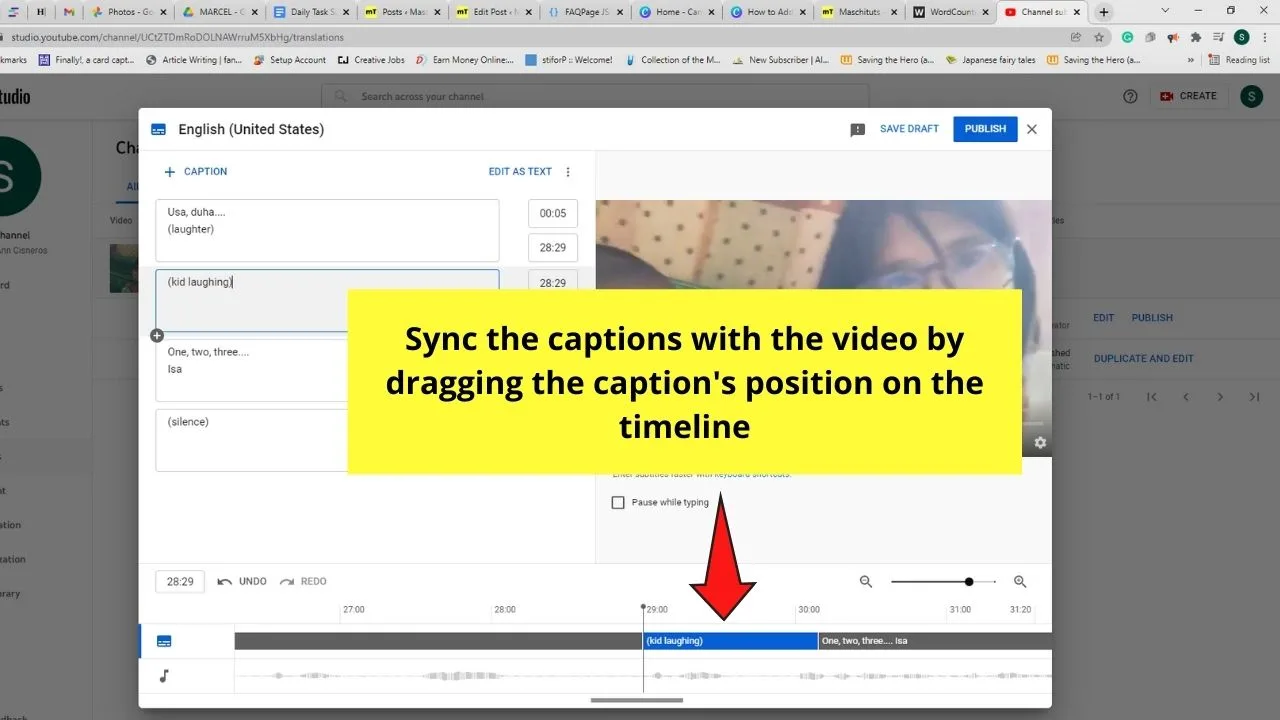
You can also lengthen or shorten a caption’s duration by dragging a caption’s end to the desired position.
Zoom in and out of the timeline for you to have better control over your captioning process.
And, once you’ve successfully added the closed captions, head to the blue Publish button and click it.
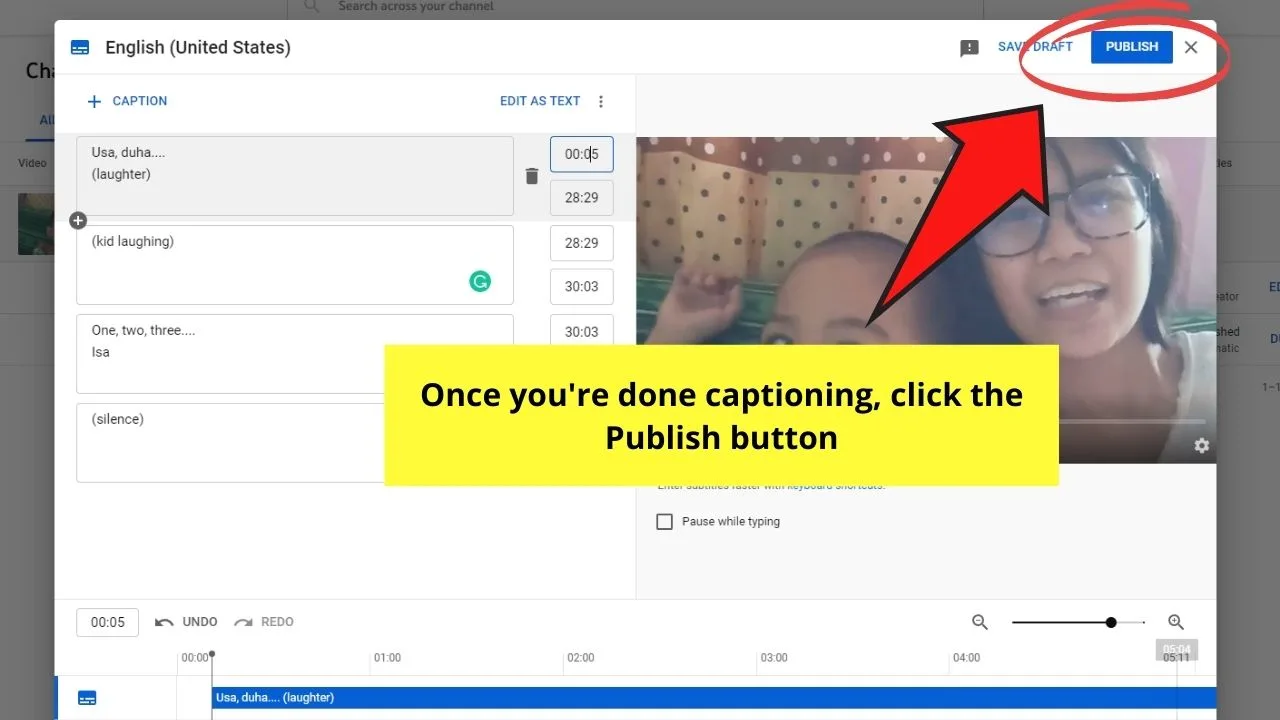
And, just like that, you’ve successfully added closed captions to your video.
Master any of the techniques mentioned, and you’re on the road to becoming a captioning expert.
How to Activate the Automatic Closed Captions Feature on your YouTube Videos
Now, you may be a captioning expert already, but you don’t know what button to click when you want to activate the automatic captions feature of the YouTube video you’re watching.
For most people, it isn’t a problem. But, as the location of the button’s not immediately at eye level, some may find it troublesome to locate.
So, here’s how you can activate the automatically-generated closed captions while you’re watching videos on YouTube:
Step 1: On the lower right side of the YouTube video you’re watching, click the white CC button.
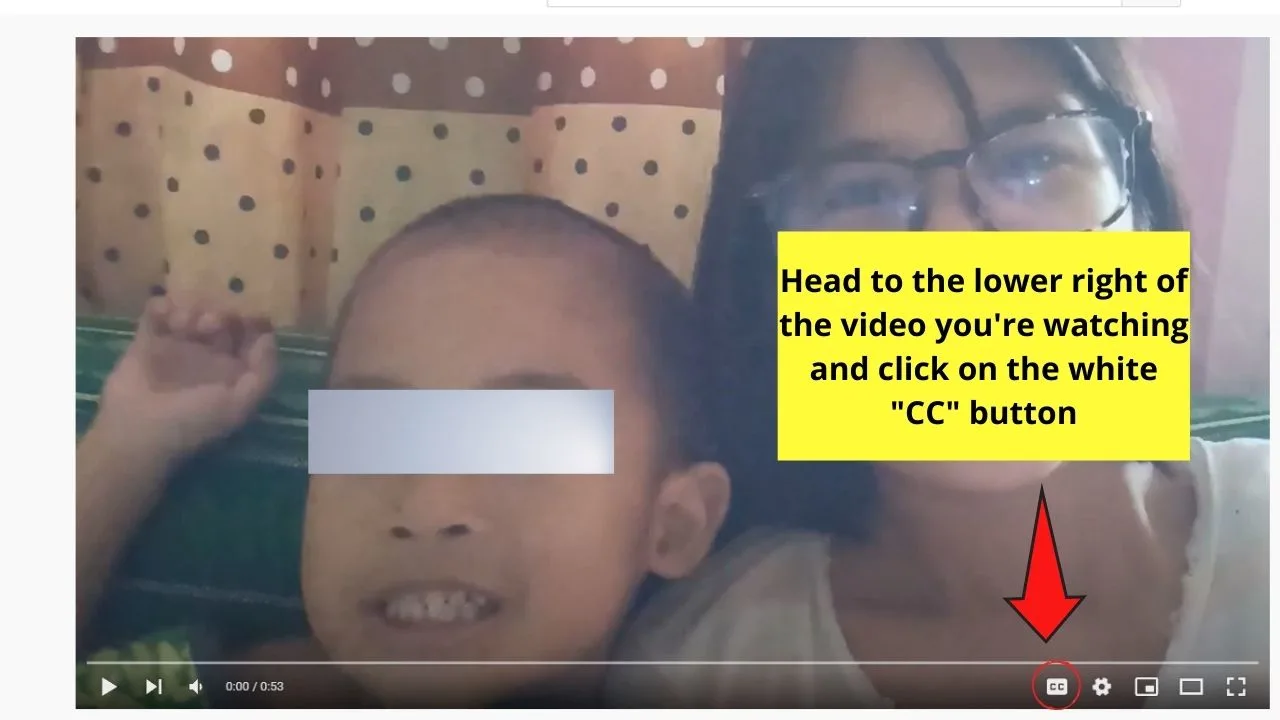
Once you click it, you’ll notice that YouTube flashes the captions it generated automatically based on the video.
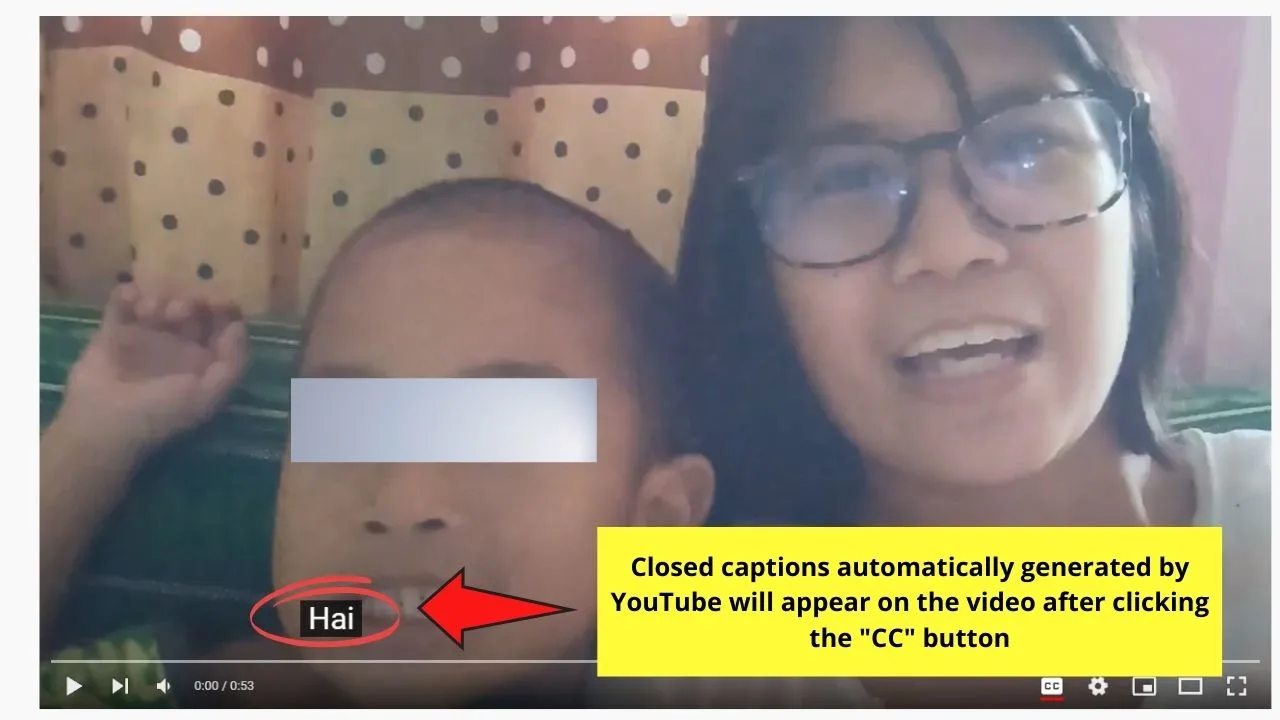
Step 2: If you’re good with the language used on the auto-generated captions, then you don’t have to do anything other than continue watching the footage.
But, if the auto-captions generated are in a language you don’t understand (for instance, not in English), you can still change it.
Just click the Settings button (the one that looks like a gear icon) next to the CC button.
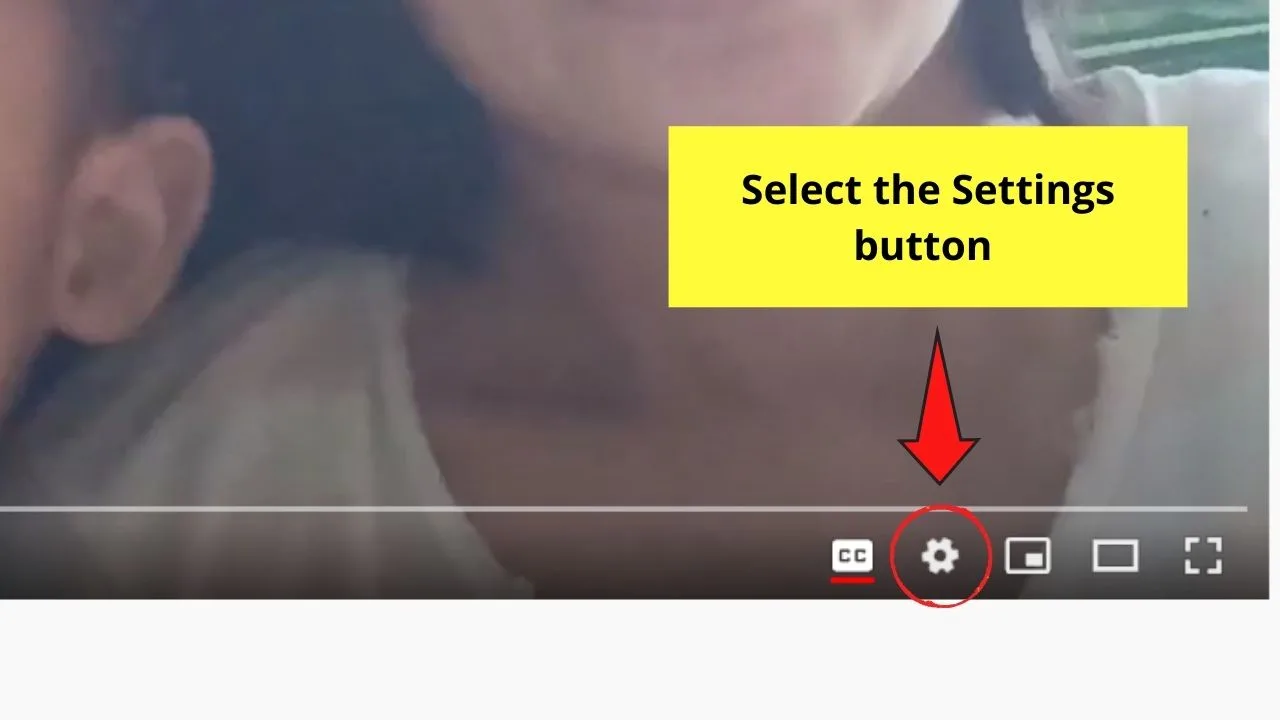
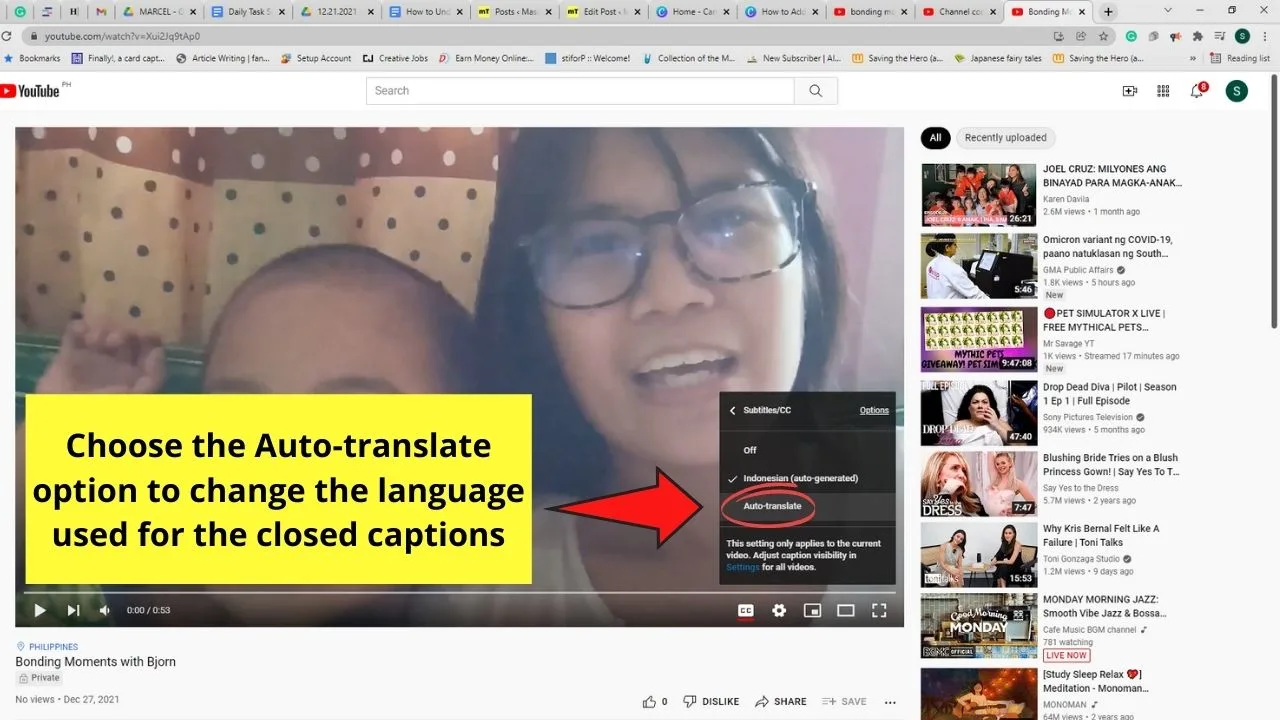
Step 3: On the Settings menu, click the > button on the right side of the Subtitles/CC option.
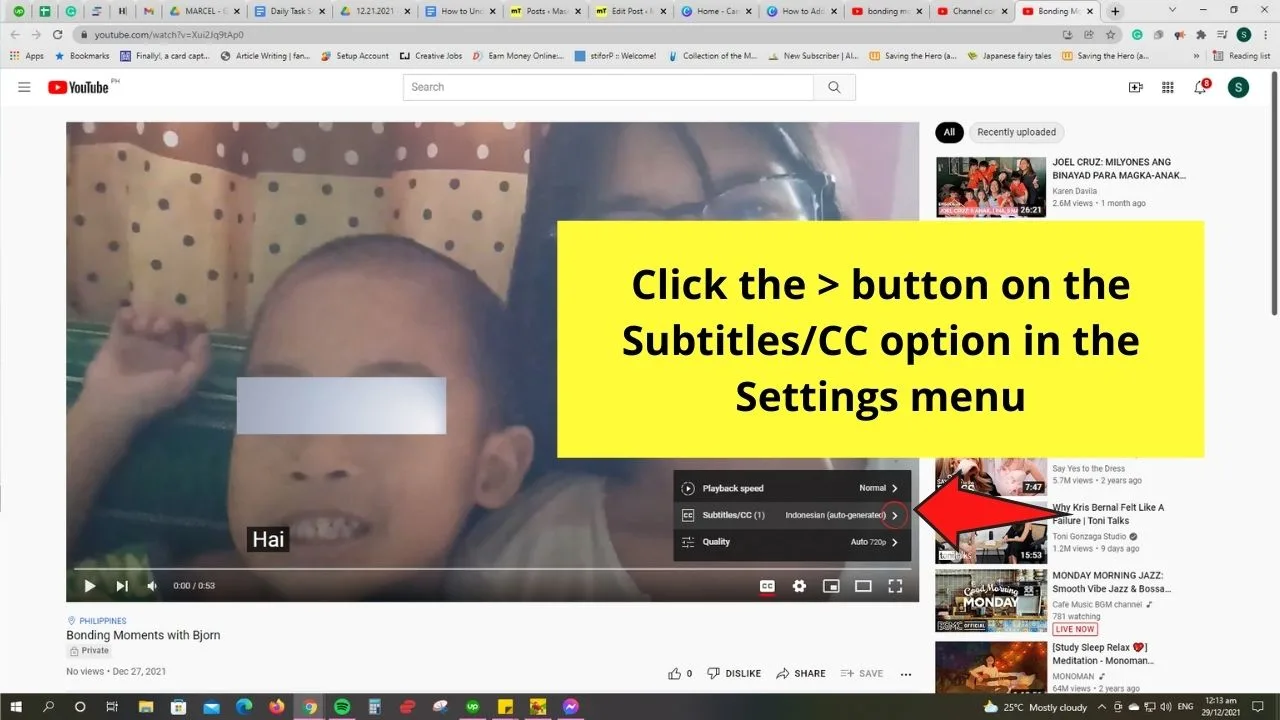
Then, select the Auto-translate option in the succeeding menu that appears.
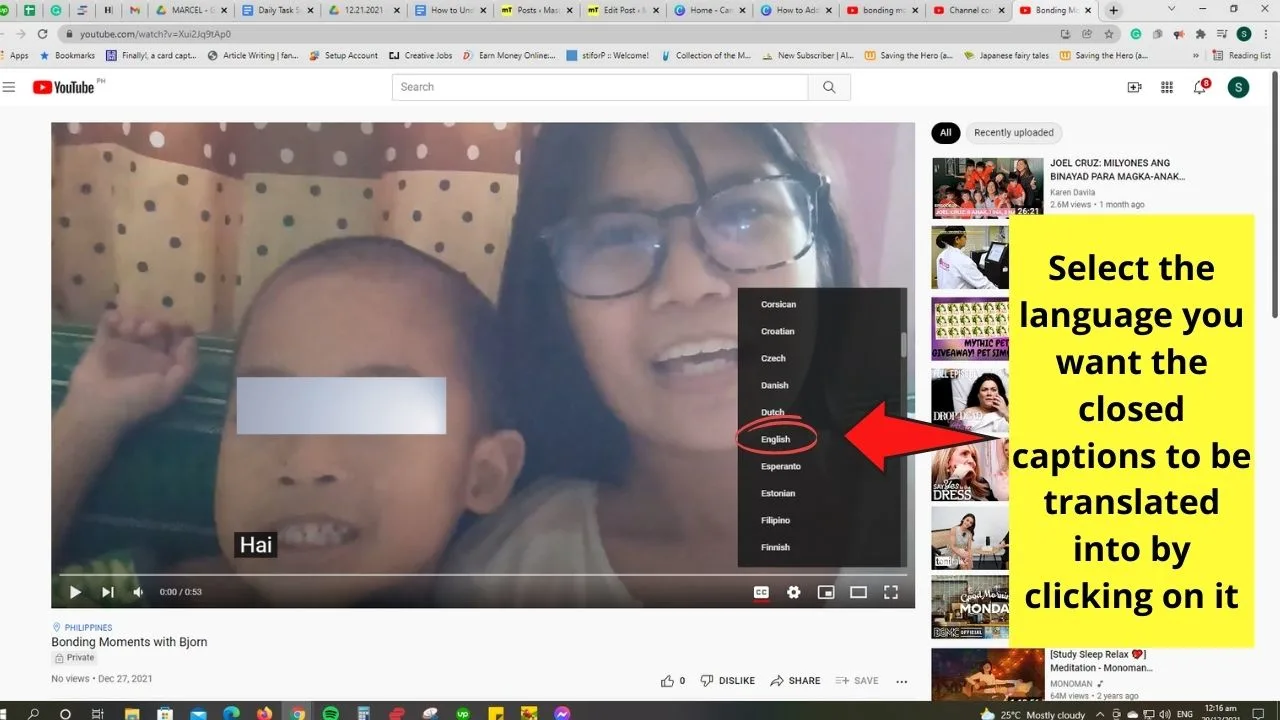
You will then see a dropdown menu listing the various languages available for the closed captions. Continue scrolling until you find the language you want the closed captions to be translated in.
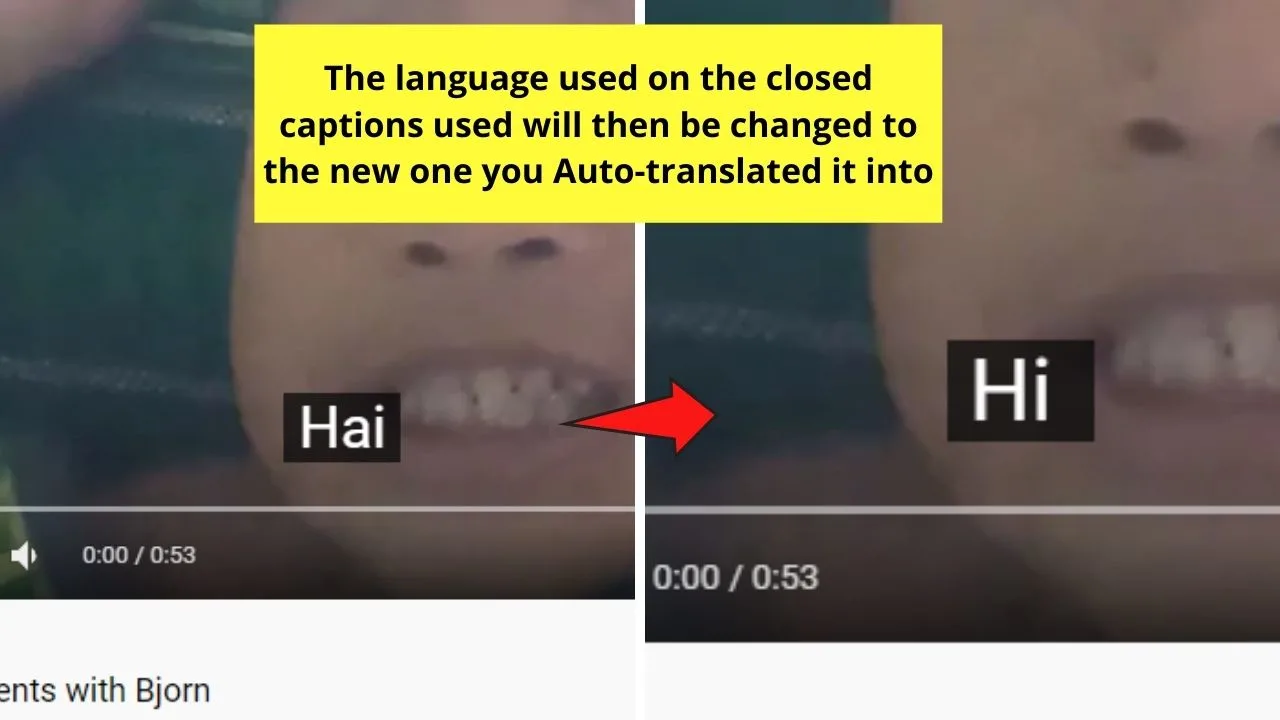
And, just like that, you’ve already activated the automatic closed captions feature of YouTube videos.
Frequently Asked Questions about How to Add Closed Captions to Your YouTube Videos
Can you edit your saved captions on a video that’s already live on your YouTube channel?
Though you’ve already published the video, you can still edit the captions you added. Just click the Edit button for you to be redirected back to the Captions Editor page.
How can you add closed captions automatically to your footage on YouTube?
In previous versions of the YouTube studio, there’s an Auto-Caption button that allows content creators to simply click it and post the video. But, with the latest version, such a feature’s removed.
Do I need to pay a fee to be able to add captions to my YouTube videos?
In adding closed captions to your YouTube videos, you don’t need to pay any fees as they’re completely free. The only time you’ll have to pay is if you decide to avail of professional services to do the captioning part for you.
Are the automatic closed captions accurate?
As long as the person in the video speaks clearly, the automatic closed captions generated are pretty much accurate. But, you still need to proofread them for you to spot potential spelling and grammatical errors.

Hey guys! It’s me, Marcel, aka Maschi. On MaschiTuts, it’s all about tutorials! No matter the topic of the article, the goal always remains the same: Providing you guys with the most in-depth and helpful tutorials!


