
In today’s article, we will have a look at how to export artboards from Adobe Photoshop. There are a couple of ways to get this done and you can export artboards in many different formats.
Let’s dive right into it.
How to Export Artboards in Photoshop using the “Export As…” Option
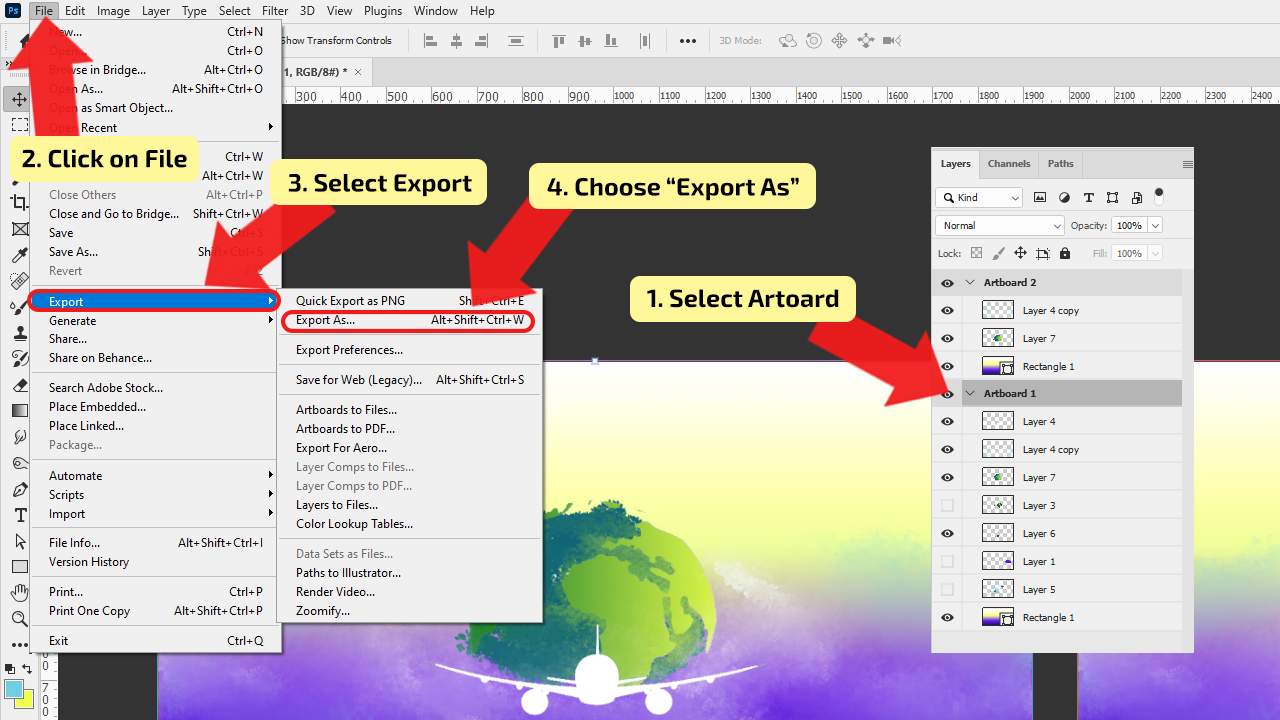
Select the Artboard in the “Layers” panel (Window>Layers), then go to “File” in the main menu and select “Export”, then choose “Export As…”. In the new window, choose the format in which the artboard should be exported and adjust the settings and finally click on “Export.”
Step 1:
Select your artboard. You are able to export one or multiple artboards at once. After artboards are finished and ready for export, in the “Layers” panel, select the artboard which you want to export. Open the menu, by using right-click. Choose the “Export As…” option and the window will pop up. The second way to open the “Export As…” window is by clicking on “File” in the main menu, then in the drop-down menu, choose the “Export”, in the fly-out menu select the “Export As…”. If you prefer using shortcuts, then use Alt + Shift + Control (CTRL) + W (Windows) or Option + Shift + Command (⌘) + W (MAC).
Step 2:
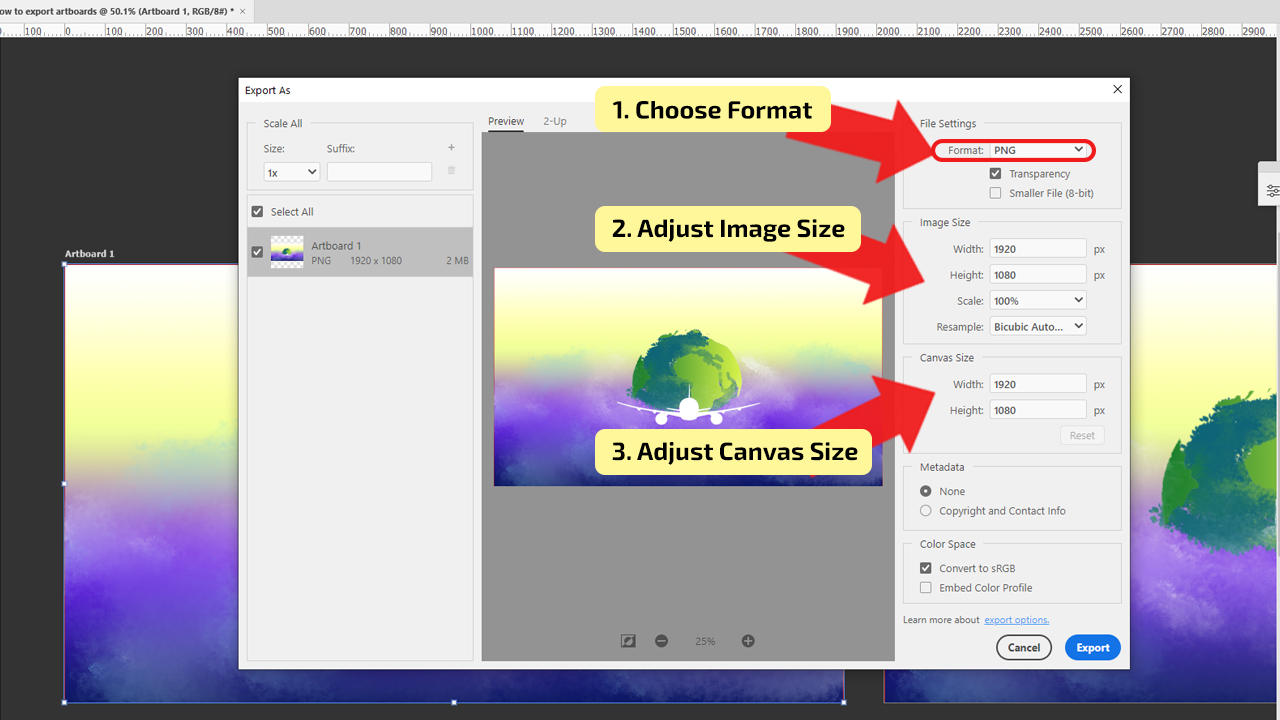
Export your artboard. After opening the “Export As…” window, it is time for adjusting the settings. First, start with choosing the format for your export. In the format drop-down list, you can choose from the following: JPG, PNG, GIF, or SVG. For example, set the format of your artboard to PNG. Then, if you want to change the size of the image or canvas, adjust it in the sections below the “Format” settings.
Step 3:
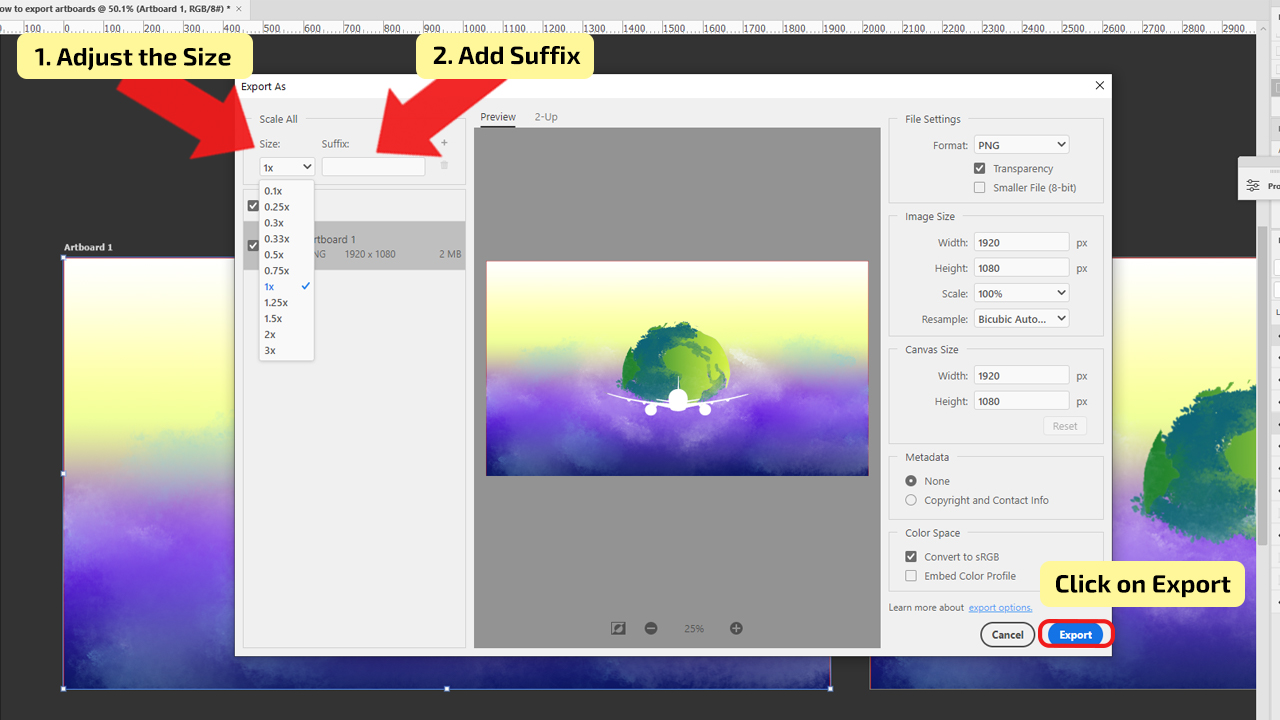
Export your artboard in different sizes. Before you press the “Export” button, check the options on the left side of the window. In this section, you can scale the image for 0.5x, 1.25x, 2x, etc. Choose the scale you prefer, add a suffix so that you can easily manage the exported files and then simply export it.
How to Export Artboards in Photoshop using the “Artboards to Files” Option
Select the Artboard, go to “File” and click on the “Export”, in the menu choose “Artboards as Files”. In the new window, select the folder for storing a file, adjust the following settings and then choose “File Type” in which the artboard will be exported, then press the “Run” button to finish.
Step 1:
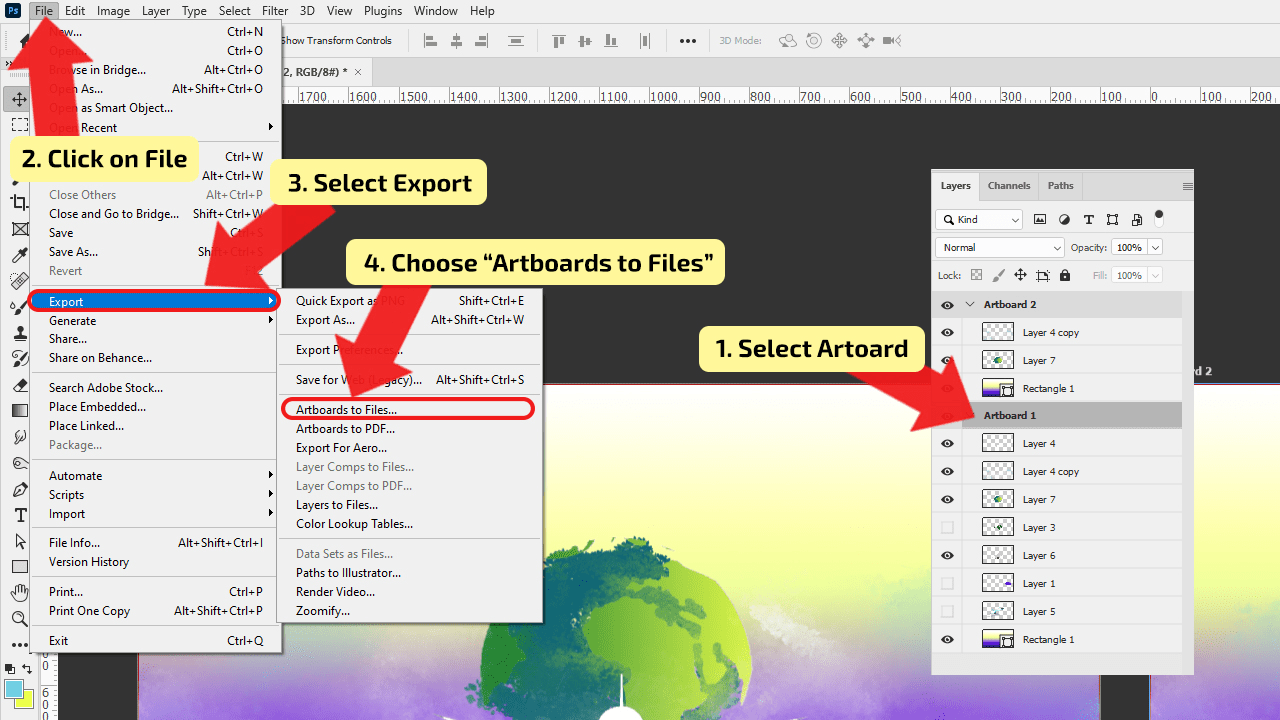
Select your artboard. Select one or more artboards in the “Layers” panel. To select multiply artboards, hold Control (CTRL) (Windows) or Command (⌘) (MAC) while selecting artboards. To open the window to save artboards as a file, go to the main menu and click on “File”. In the drop-down menu, choose “Export” and then select “Artboards as Files” and the new window will pop up.


Step 2:
Adjust the settings. In the pop-up menu, first, choose the desired destination for your file. Next is adding the “File Name Prefix”. This prefix will be added to your exported file. If you are going to print the exported files, for example, business cards or flyers, in the next section select “Include Overlapping Areas”. On the other hand, if you are going to use these artboards for web purposes only, select the second option “Artboard Content Only”. After you decided if you should include or exclude overlapping areas, you should select “Export Selected Artboards” if you want to export only those, if not leave it unchecked, also, you can choose to “Include Background in Export”. In the “File Type” drop-down menu, select one of the following options BMP, JPEG, PDF, PSD, Targa, TIFF, PNG-8, or PNG-24. Then click on the “RUN” button and Photoshop will export your artboard(s).


How to Export Artboards in Photoshop using the “Artboards to PDF” Option
Select the Artboard, go to “File” and click on the “Export”, in the fly-out menu choose “Artboards to PDF”. In the new window, select the folder for storing the file, adjust the following settings, after you are done with the adjustment, press the “Run” button to finish.
Step 1:
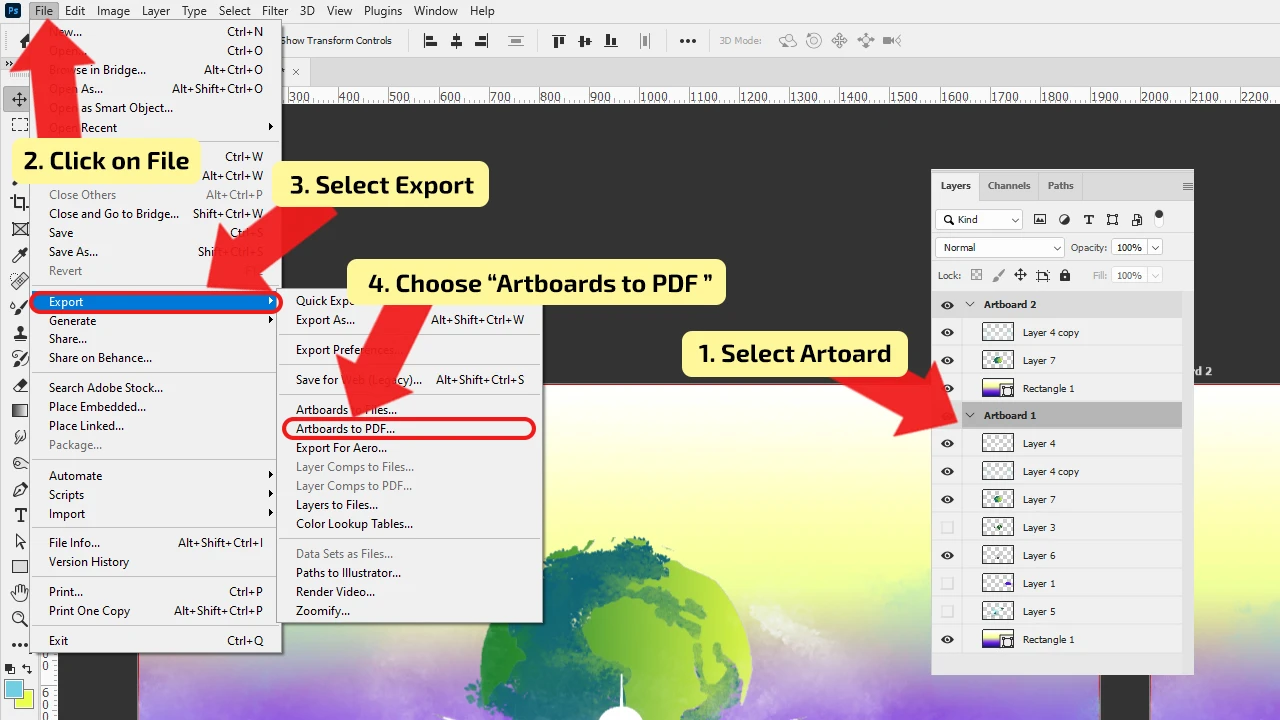
Select your artboard. Select one or more artboards in the “Layers” panel as explained in previous steps. To open the window to save artboards as PDF, go to the main menu and click on the “File”. In the drop-down menu, choose “Export” and select the “Artboards to PDF” and the new window will pop up.

Step 2:
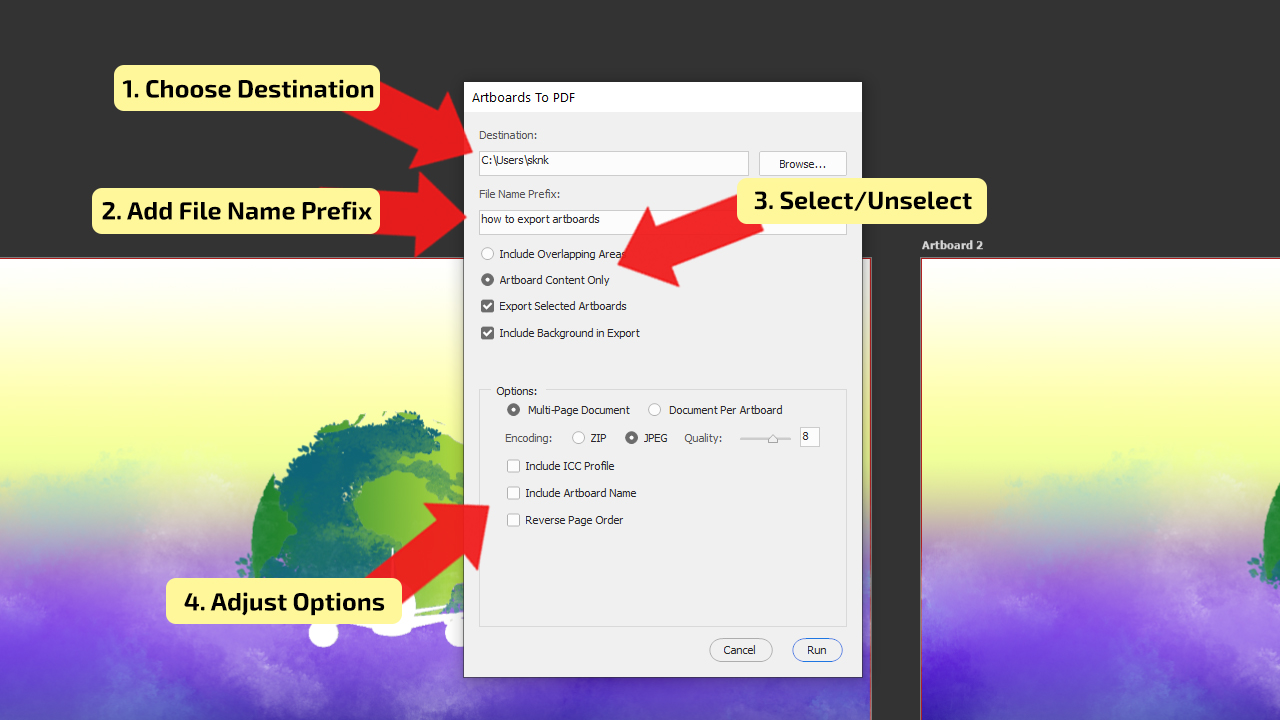
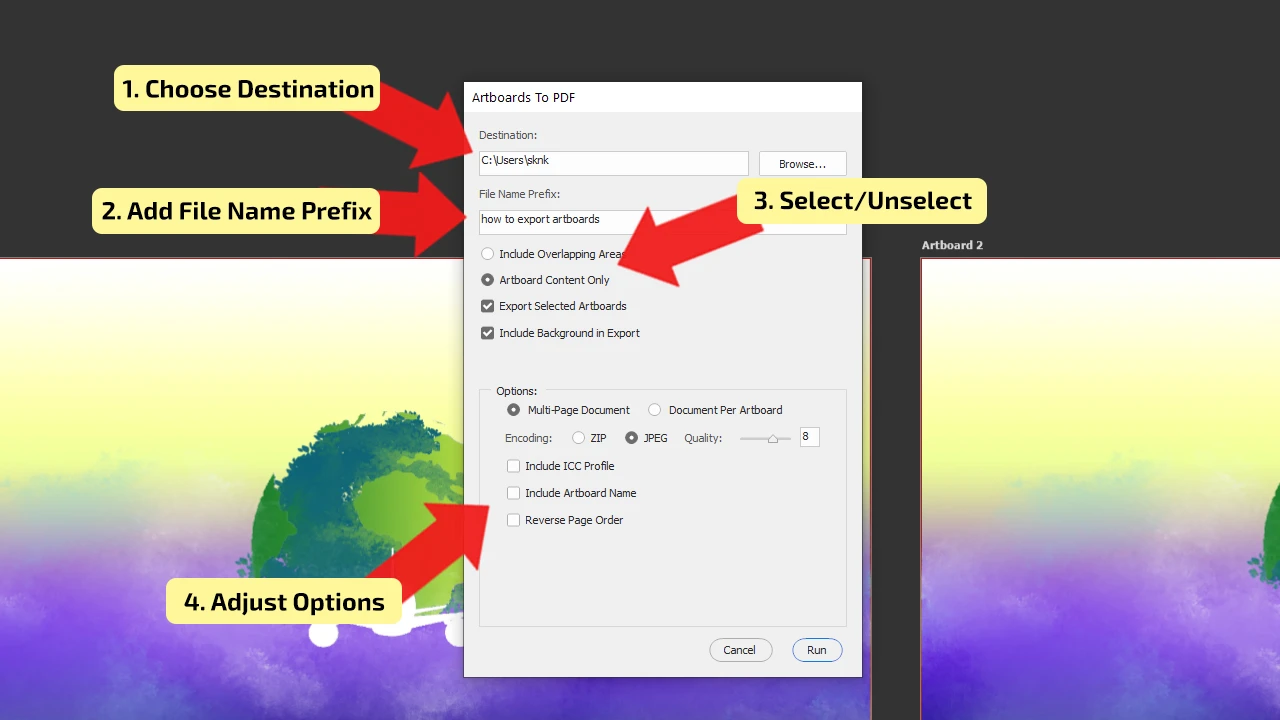
Adjust the settings. The menu is almost the same as “Exporting Artboards As Files”, except you can’t choose the “File Type” because you already chose the file type by using this option for export. Then, choose where the file should be exported to and add the “File Name Prefix”. Choose between “Include Overlapping Areas”, and “Artboard Content Only”. Select “Export Selected Artboards” if you want to export only those, if not leave it unchecked. Then select “Include Background in Export” if you want to export the background of your artboard as well. Also, adjust settings in the “Options” section. Then click on the “RUN” button and Photoshop will export your artboard as a PDF file.


Hey guys! It’s me, Marcel, aka Maschi. On MaschiTuts, it’s all about tutorials! No matter the topic of the article, the goal always remains the same: Providing you guys with the most in-depth and helpful tutorials!

