Whether you’re trying to import an entire website to WordPress, demo content from theme imports, or import a huge XML database, you can experience numerous issues.
Most of them are to do with your server configuration, rather than anything WordPress does that prevents things from happening.
Import settings for WordPress are controlled at the server level. Not your WP dashboard.
Find the settings below that you need to configure to get imports operating smoothly.
WordPress failed to import data
Server misconfigurations or exceeding limitations set by hosting providers cause WP imports to fail. In most cases, a file upload size increase (applied to either the php.ini file, .htaccess file, or the wp-config.php file) will solve this issue.
PHP configurations explained
WordPress imports are reliant on your hosting plan having sufficient memory and time settings for imports to successfully complete.
Depending on the size of the data being imported, it can exceed the limitations set by your hosting provider.
To use an example of a common import problem, it’s importing demo content from theme providers. Some have libraries of demo websites. Not just media files.
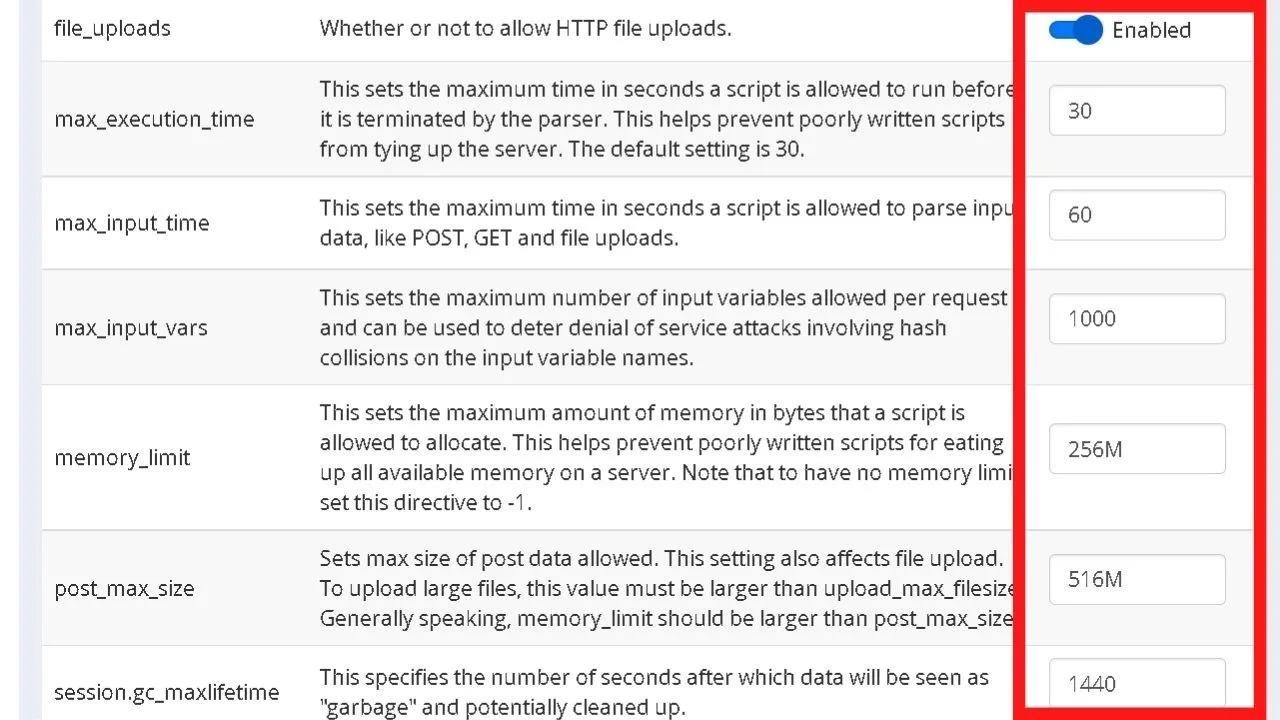
The theme provider may require you to configure the server to have a “max_execution_time” of 600 seconds (5-minutes) to prevent timeouts.
Memory limits can be restricted on hosting plans, too. Some hosts may have a file size limit of 128MB, but a demo content import requires 256MB size limitation, in which case, you’d need to contact your host for a temporary increase.
Not every web hosting provider will allow this. Some have execution times maxed at 300 seconds. Any higher, you’ll get a 502 Bad Gateway error message.
As an FYI, any 500 errors (500, 501, 502, 503 etc.) are server errors. They mean the request reached the server, but something in the configuration settings prevented it from completing.
That will happen if your import time takes longer than the max execution time set in your wp-config.php file.
Importing Demo Content Failed
A number of theme installs have demo sites you can import at the click of a button giving you a web design ready to edit to make your own.
Some of the demo content may require third-party plugins.
As an example, it’s likely that any e-commerce web template will need the WooCommerce plugin installed and activated before importing.
If the plugins aren’t installed, the demo content will still import the data (because it’s included in the files being imported) but without the required plugins activated, you’ll get “failed to import” error messages.
Whichever theme you’re using, look for the required plugins to use, even if they are listed as optional.
Optional doesn’t exclude the files from the bundle. It just means the content will still be imported but it won’t work without the plugins.
There is a possibility you’re seeing “failed to import” messages for content you’ve no use for anyway.
Here’s an example of the Neve theme site imports showing the plugins that need installed
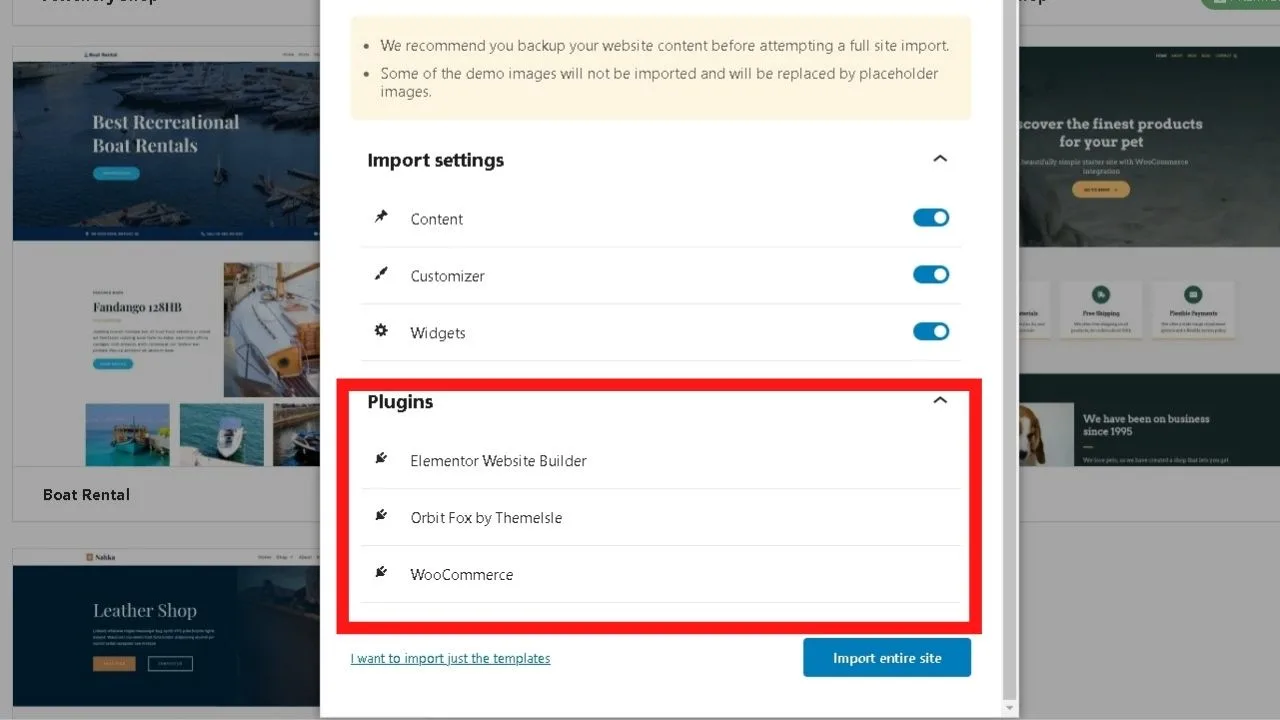
The importer in this case handles the plugin install, but if your directory permissions weren’t set to 0755, it’d prevent plugins being installed, in which case you will get a failed to import error message because the permissions don’t allow the script to write to the WP database.
Go to cPanel > File Manager > WP Content. Right click to change file permissions and set them to 0755.
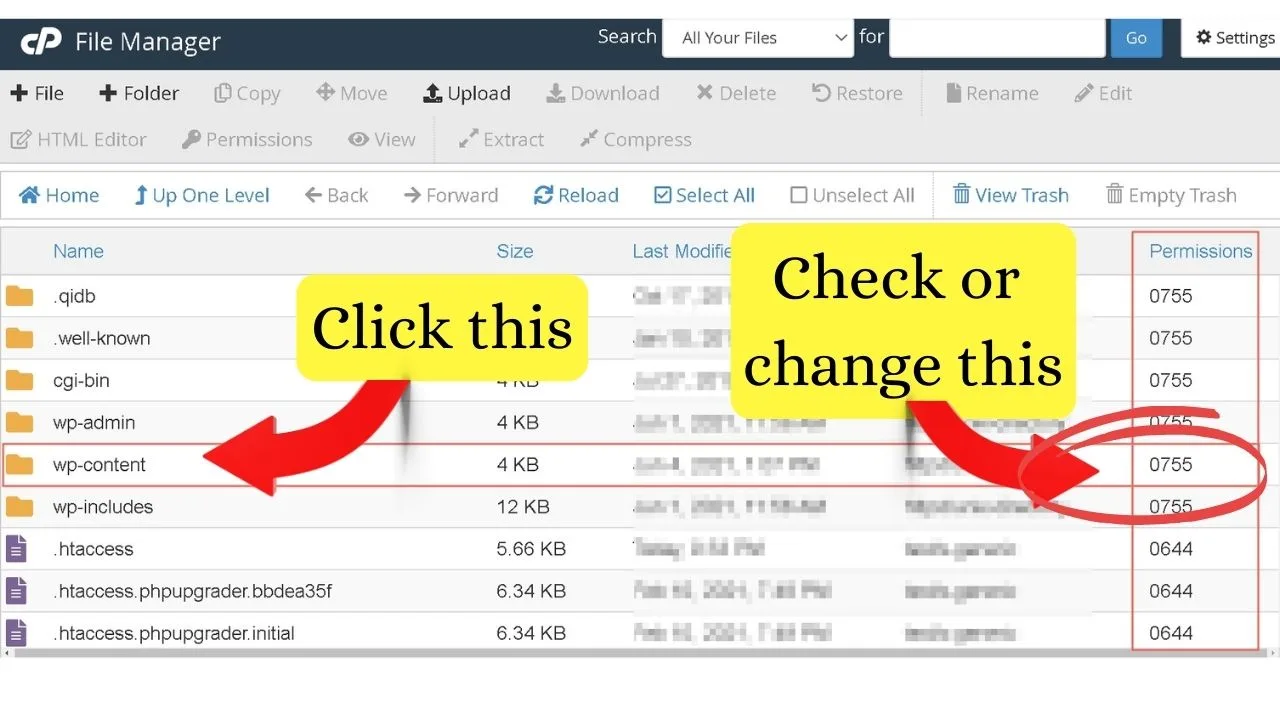
WordPress Failed to Import Media Errors
Media errors are almost always related to your file permissions or the maximum file size being exceeded.
File size limitations are set by your host. These can vary from as low as 4MB up to (generally) 128MB or higher.
Since the WordPress 5.2 core update, a new feature was added to the tools section for “site health”. This shows your server setup here without you having to inspect code in cPanel.
Go to the Tools menu (left sidebar) > Site Health > click info.
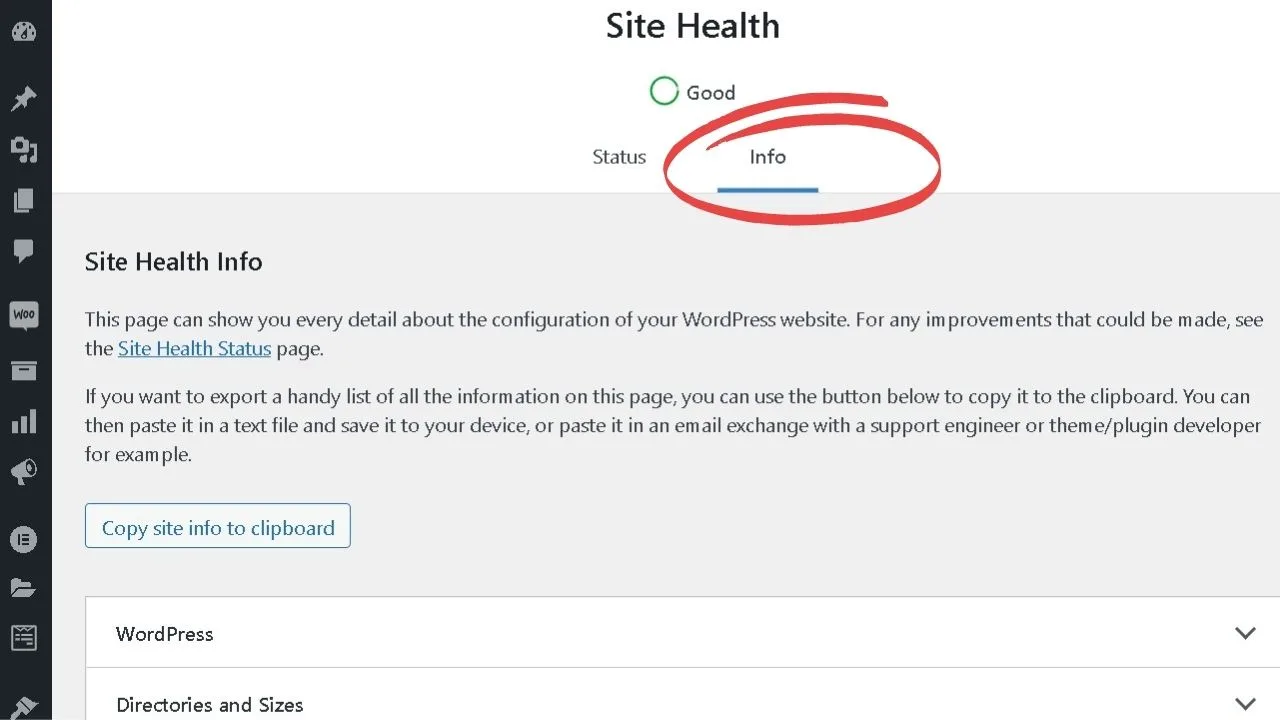
Scroll down to the section for “media handling” click to open the dropdown tab and you’ll see the “max size” and “times” for all your media files.
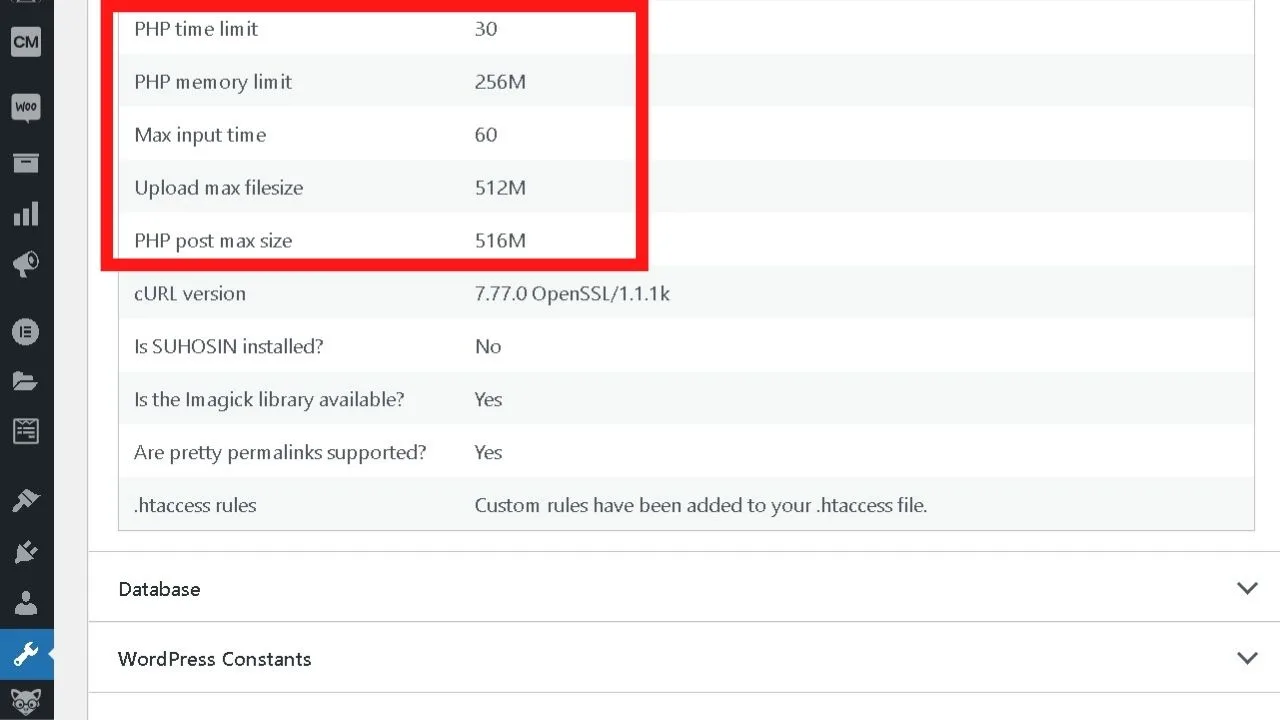
These apply to post type imports too when images are attached to them, since imports add the media to the library then attach them in the database.
If you’re importing image-heavy posts and pages, such as portfolios, the total file sizes can exceed those set by your host. When that happens, it will not import. Not fully anyway. You might get a partial import of text minus the image files.
How to increase the maximum file size you can upload
You can increase your file size uploads in cPanel, provided your host allows it. To increase file sizes, you can edit the php.ini files, the .htaccess file, or your sites wp-config.php file.
If you are not very tech-savvy, it is usually also sufficient to reach out to the support team and they can usually get this done for you because this is a very common request.
It often happens that after installing WordPress people will get this error once they are trying to upload a custom theme, for instance.
N0w, if you do have access to your hosting’s cpanel (or simply over FTP), here’s how to solve this issue:
The php.ini file
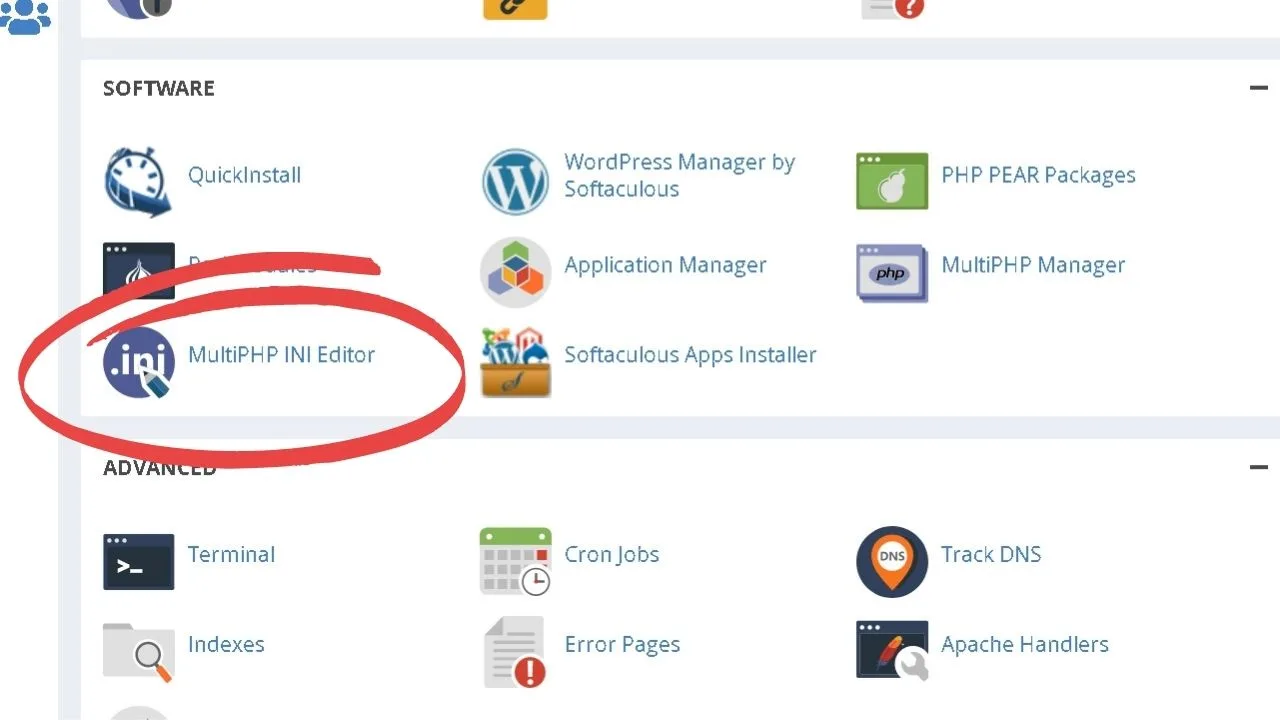
To use this method, log into cPanel, go the “software” section and click on “MultiPHP INI Editor”.
Select the site you want to increase the file size limits on, scroll down the page and you can change the values.
The .htaccess file
The software approach above changes this file for you. Edit this file if you don’t have access to the MultiPHP INI Editor software.
The .htaccess will be in the root directory of your website in cPanel’s file manager. Click to download, save a copy of the original and paste the following code into the bottom.
php_value upload_max_filesize = ##M
php_value post_max_size = ##M
php_value memory_limit = ##
Php_value file_uploads = On
Change the # to the numbers you want to change it to, such as increasing from 16MB to 64MB or however high you need (or the max limit your host allows).
Once imported, if you don’t need the higher limits going forward, remove these settings.
Add the code to your wp-config.php file
In the WP-config.php file, located in the same directory as your .htaccess file, the same rules can be set using a different code format.
@ini_set( ‘upload_max_size’ , ‘##M’ );
@ini_set( ‘post_max_size’ , ‘##M’ );
@ini_set( ‘memory_limit’ , ‘##M’ );
@ini_set ( ‘file_uploads’ , ‘On’ );
Once those settings are changed, you should be able to go back and import all the media files, WordPress plugins, and even entire demo website imports without issue.

Hey guys! It’s me, Marcel, aka Maschi. On MaschiTuts, it’s all about tutorials! No matter the topic of the article, the goal always remains the same: Providing you guys with the most in-depth and helpful tutorials!


