Managing a YouTube channel is an incredible challenge every content creator has to go through every single day.
Aside from uploading quality and unique YouTube videos, you’ll have to ensure that the channel art is eye-catching.
Add the fact that whatever graphic design you place on your channel’s optimized for both mobile and web viewers.
So, if you’re having trouble in this department, then let’s discover how to make it look better with YouTube channel art.
How to Create YouTube Channel Art in Canva
YouTube channel art, aka the Youtube Banner, is the image you see splashed on the top part of the YT channel page. Canva offers several suitable templates in their gallery that you can tweak. You also can start from a blank template to do your very own Youtube Channel Art banner in Canva.
But, YouTube channel art isn’t merely all about the banner.
You can also design your YouTube thumbnails, video introductions, and subscribe button right here in Canva.
So, if you’re ready to find out how to do each of them in this graphic design tool, better read on.
YouTube channel art refers to the various design factors that you can add to your YouTube channel to invite viewers to have a look at your content.
Though the term’s most commonly linked to YouTube banners or header images, there’s so much more you can do in Canva.
Creating YouTube Banners in Canva
Technically speaking, YouTube banners are like the cover photos that you find on your Facebook account.
Like Facebook cover photos that tell people what kind of person the account holder is, YouTube banners also tell the audience what your channel’s about.
To begin with, let’s take a look at how YouTube banners are created.
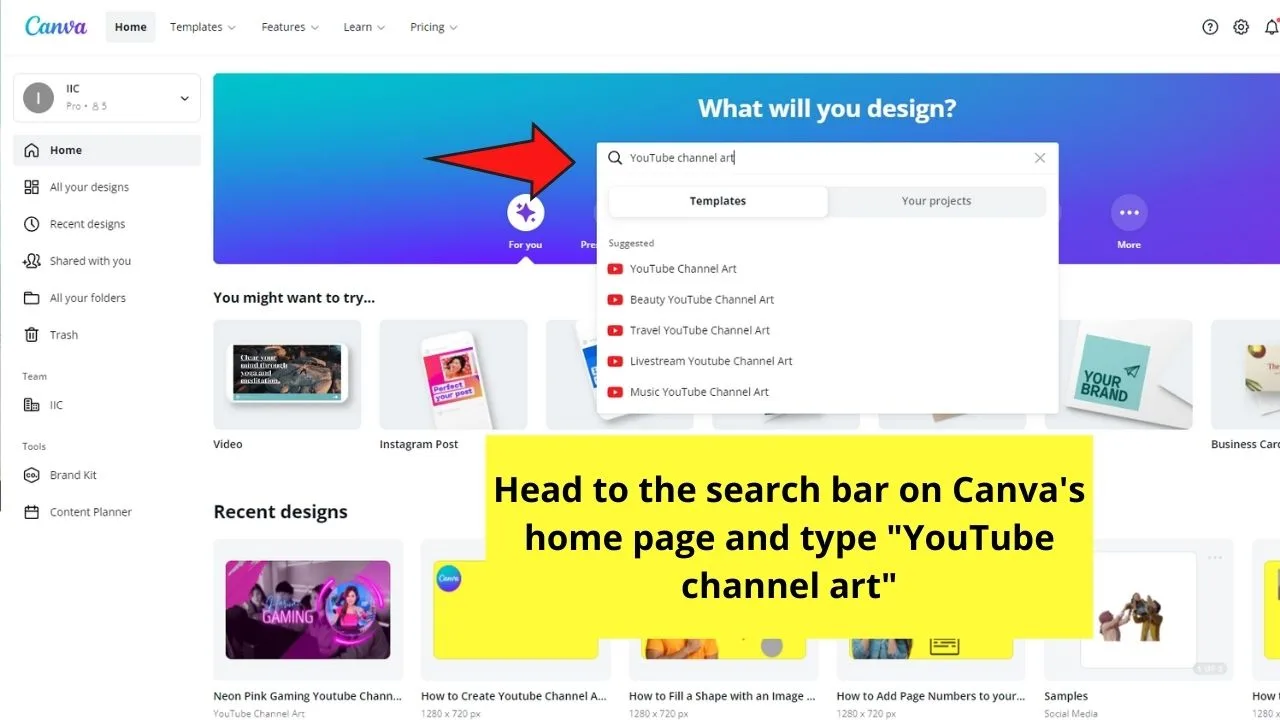
Step 1: On Canva’s home page, head to the search bar and encode in the box “YouTube Channel Art.”
Step 2: Scroll down the various Youtube channel art templates available and select one that’s compatible with what your channel is about.
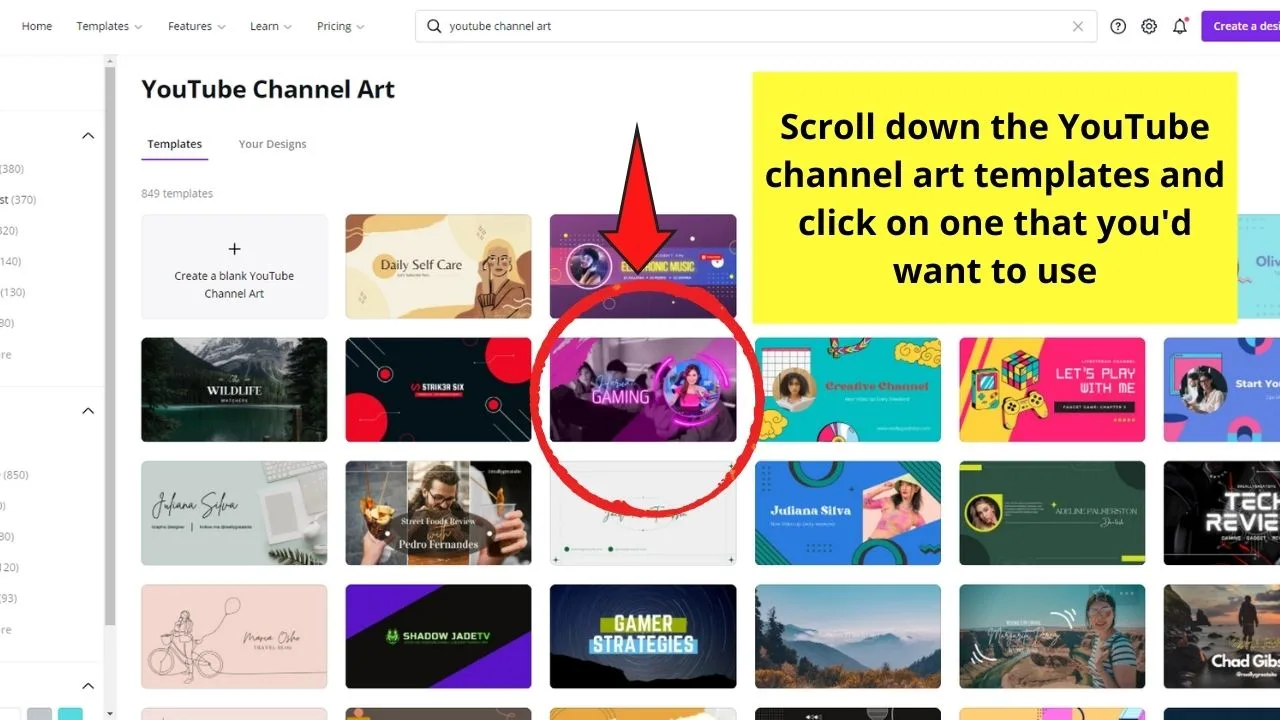
Click on the said template so you’ll be redirected to the editor page.
Step 3: You can now begin editing the YouTube channel art template to make it your own.
Start with changing the text components of the template. Double-click on the text box to highlight the text inside.
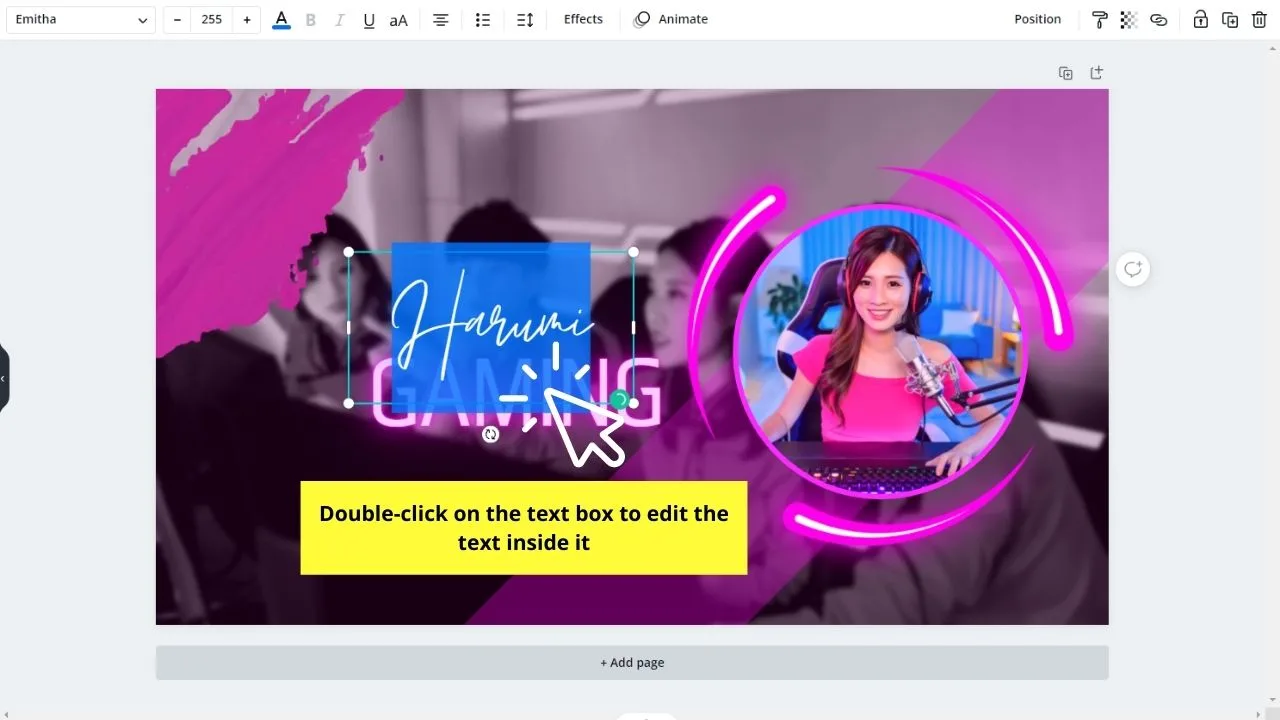
Change the title to your YouTube channel’s name. You can also edit out the part of the banner that indicates your new video release schedule.
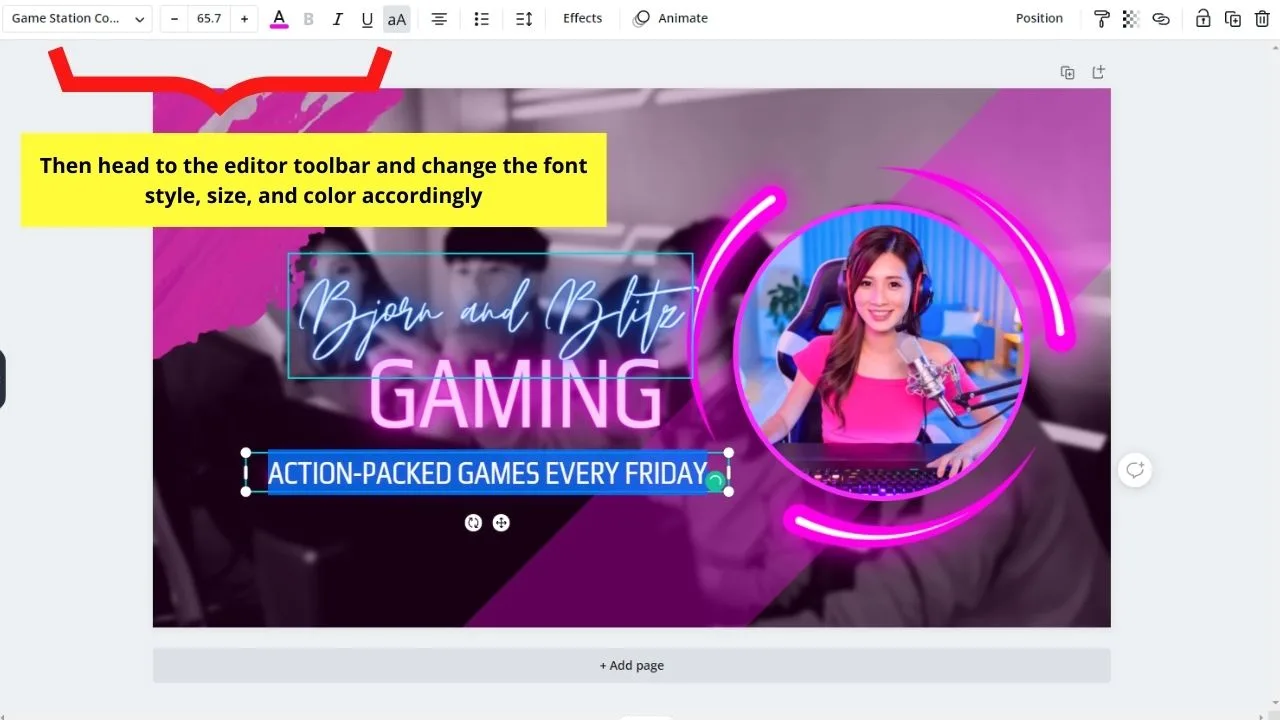
After which, you can head to the editor toolbar to change the font style, size, and color accordingly. Whatever you choose, just make sure the text’s entirely legible to your audience.
Step 4: Once you’re satisfied with how your text components look, add an image that graphically describes what your channel’s about.
You can choose to upload a logo that you designed in Canva by clicking on the Upload tab on the left side panel.
Step 5: If you prefer to use another graphic element instead of adding your logo, then head to the Elements tab instead.
But, first, remove the element originally used on the template by selecting it before pressing Delete on the keyboard.
After which, click the Elements tab on the left side panel and browse through the various graphics available.
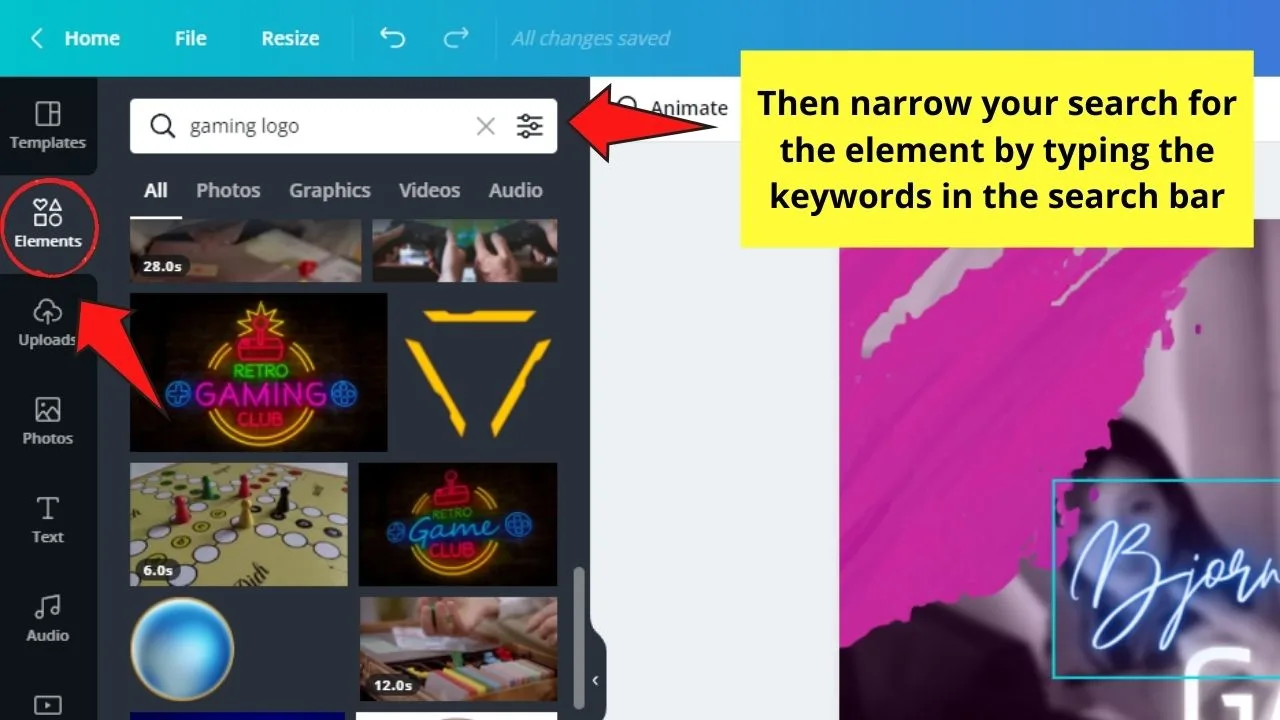
You can narrow the search by typing out the description of the element you’re looking for.
Scroll down until you find the element you’re looking for. Then, click and drag the said element to your project.
Then, resize and adjust its positioning accordingly.
Step 6: Review how your YouTube banner looks. Use the guidelines and rulers in Canva if you want to check on the alignment of your elements.
Once you’re satisfied with how everything’s positioned, head to the Download button, select the file type and export the image to your device.
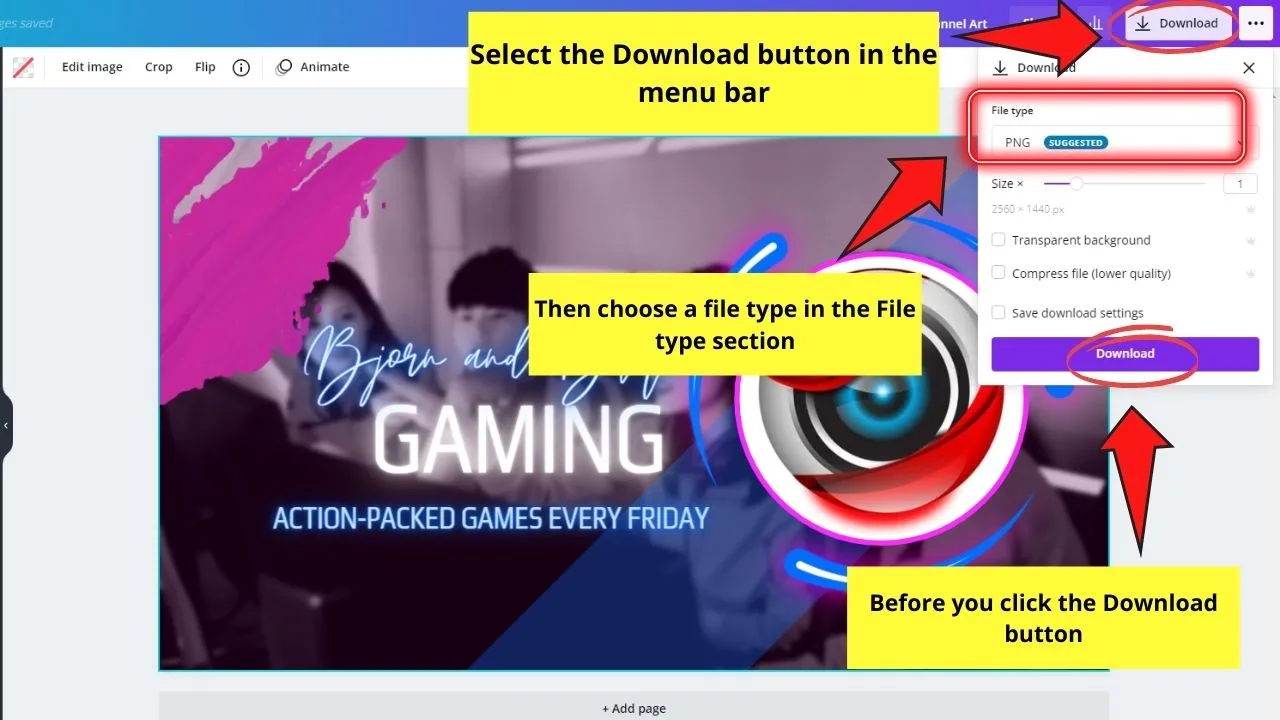
If, however, you prefer to create YouTube banners from scratch, head to the next section below.
Using Blank Templates to Design YouTube Banners
Step 1: On Canva’s home page, go to the search bar and encode “YouTube Channel Art.”
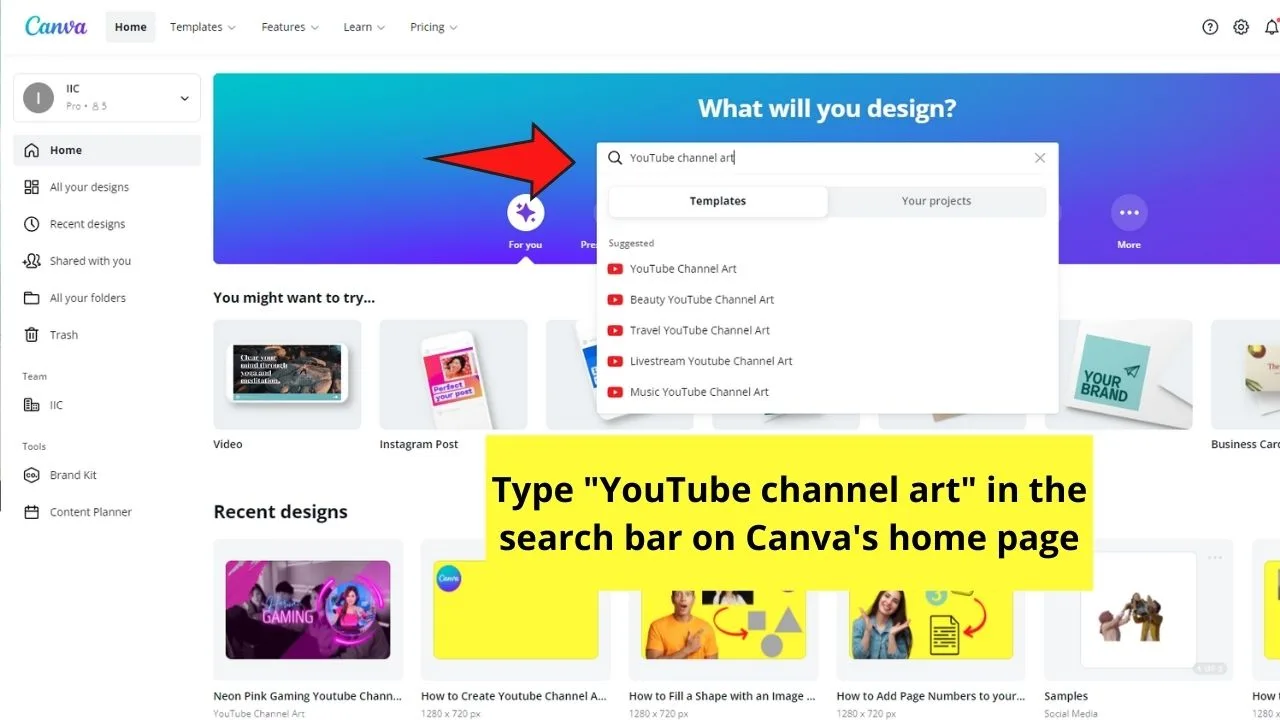
You’ll then see a dropdown menu showing you the design choices available. Select the YouTube Channel Art option.
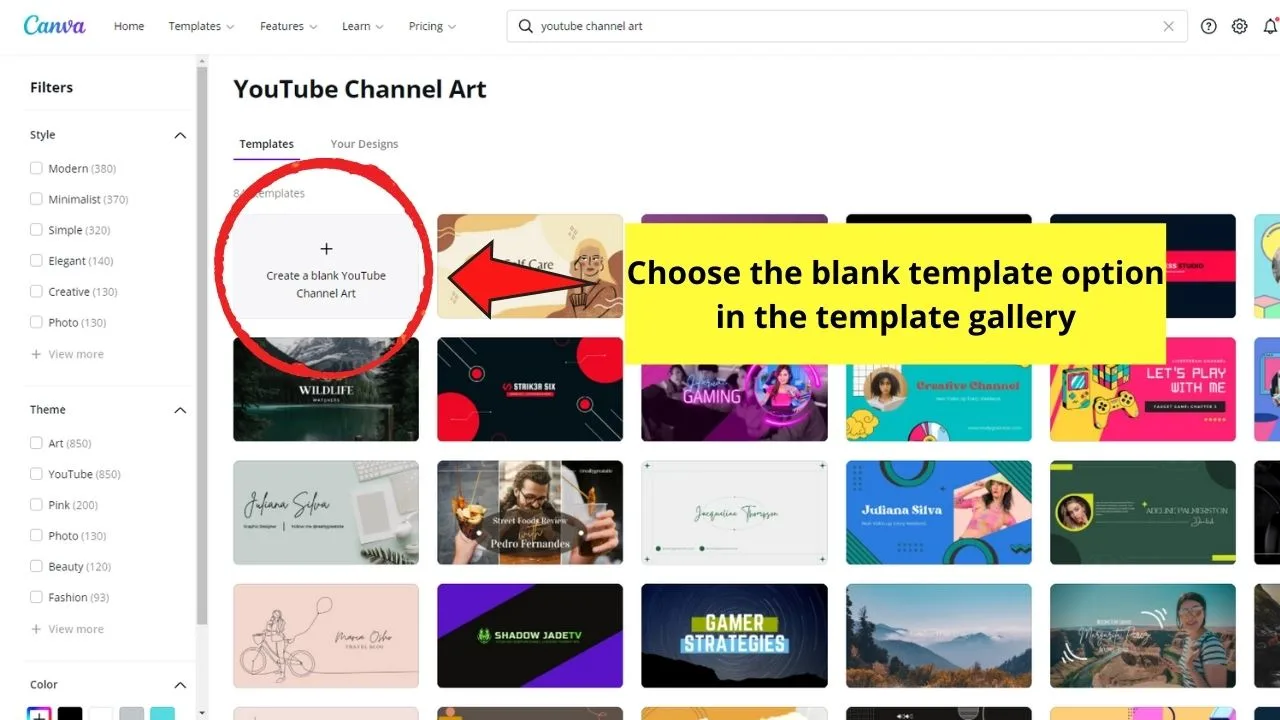
This move will then lead you to a template gallery. Select the Create a blank YouTube channel art option where the document’s automatically set at 2560 x 1440 px size.
Step 2: Once you’re on the editor page, start by changing the background of the canvas.
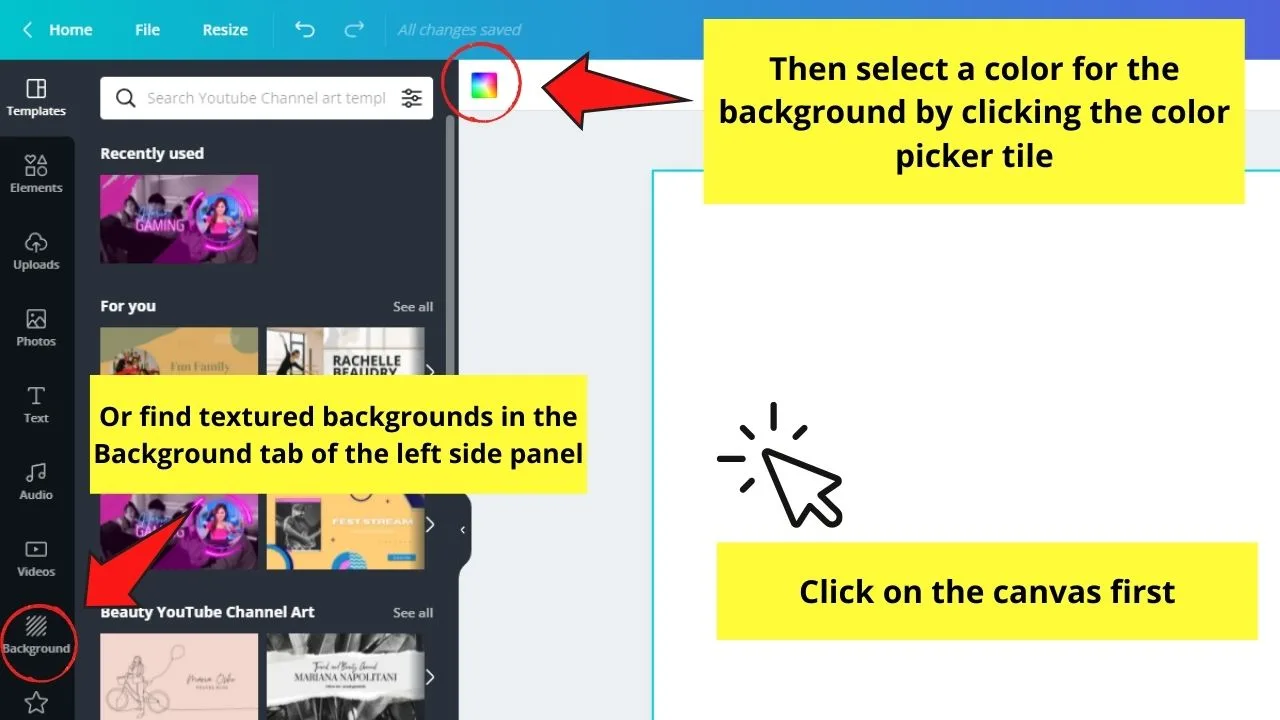
After you click on the canvas, you can head to the color picker tile and select from the various default colors available.
You can even opt to find background images by heading to the Background tab on the left side panel.
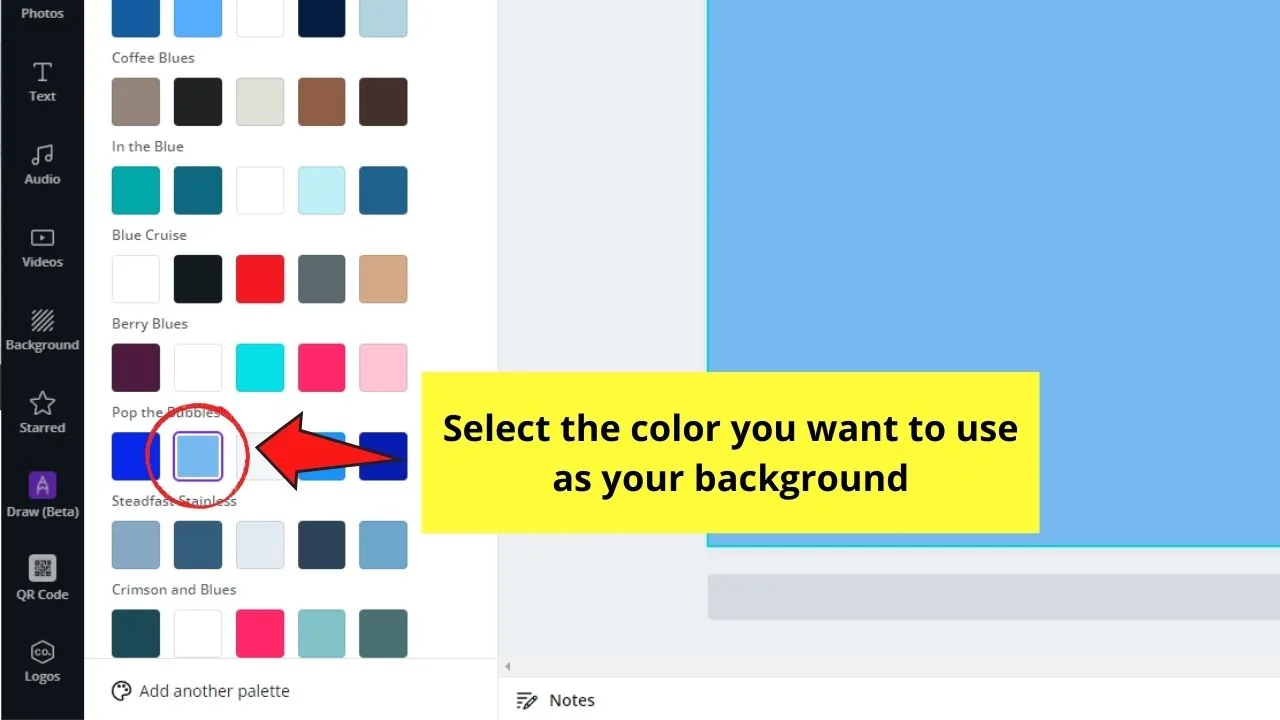
Whatever option you pick, just make sure to click on the color or design thumbnail to make it occupy the entirety of the canvas.
Step 3: Next, add text to your YouTube banner design. The easiest way to do so is by hitting the T key on your keyboard to automatically add text boxes to the canvas.
If you don’t want to start from scratch with editing the text’s font style, size, and color, then head to the Text tab on the left side panel.
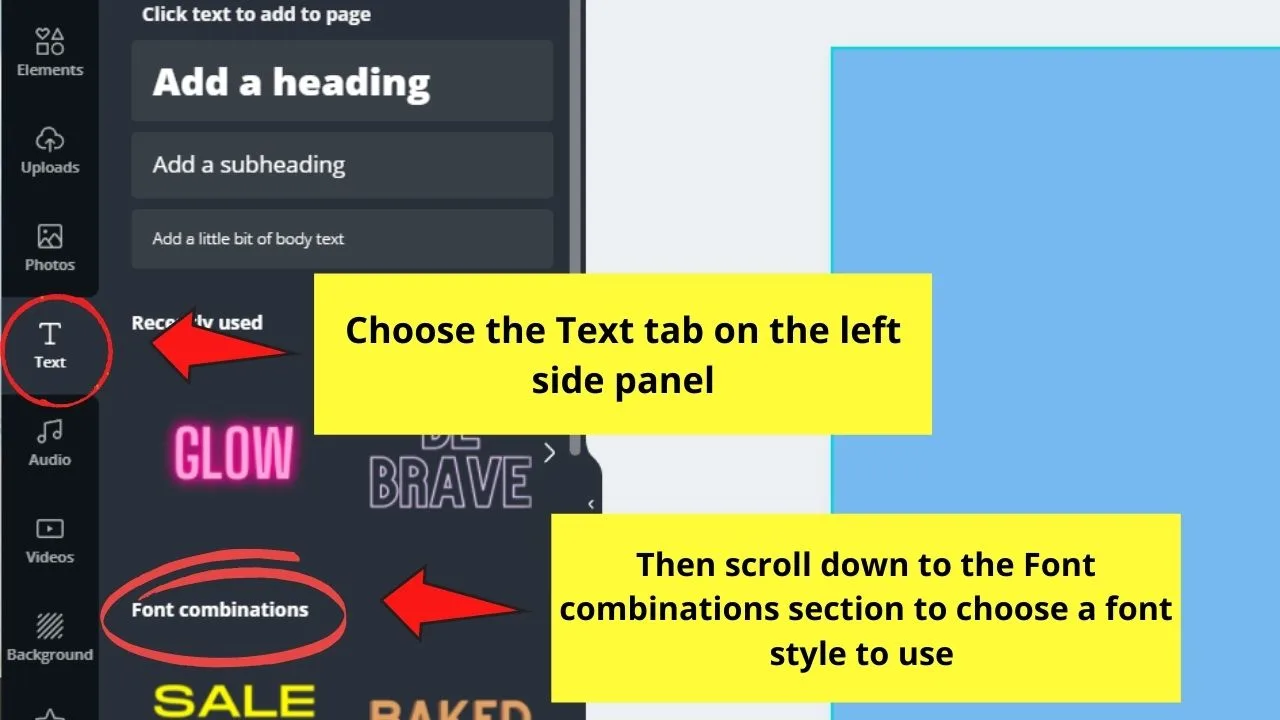
Then, scroll down and choose what font combination you want to use.
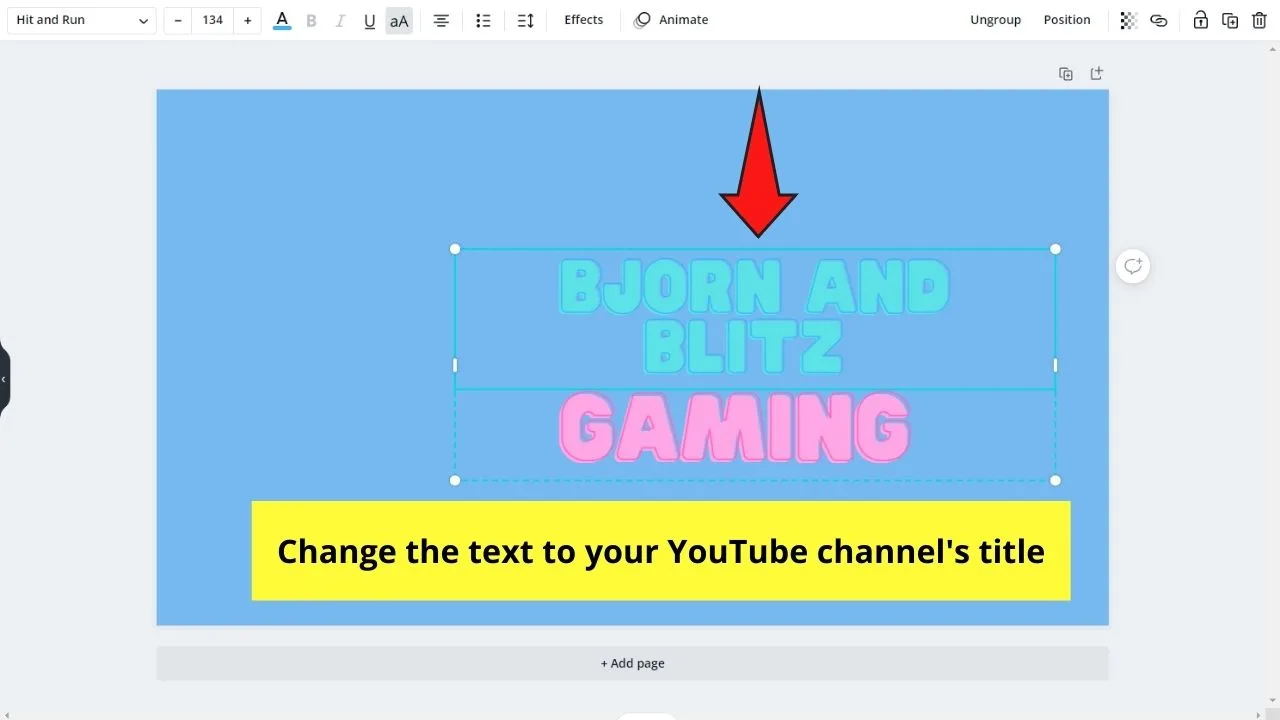
Then, resize the Canva text box by dragging the white circles or pill bar handles surrounding it. After which, edit the text in the text box.
Step 4: Add a graphic element to your YouTube banner. To do this, head to the Elements tab.
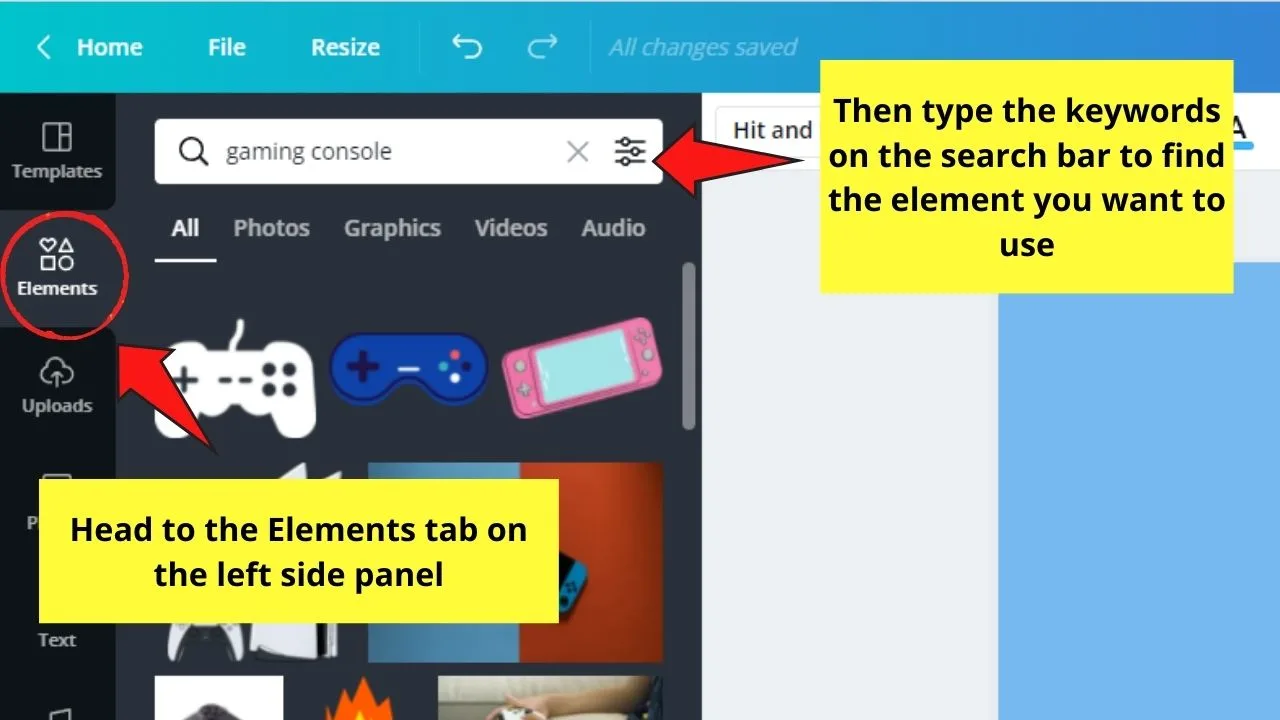
Then, on the search bar, encode the descriptive keywords that will narrow down your search of the said element.
Once you find that particular element, click and resize it accordingly.
Step 5: Review how your design looks. Make sure everything’s aligned and centered on the canvas.
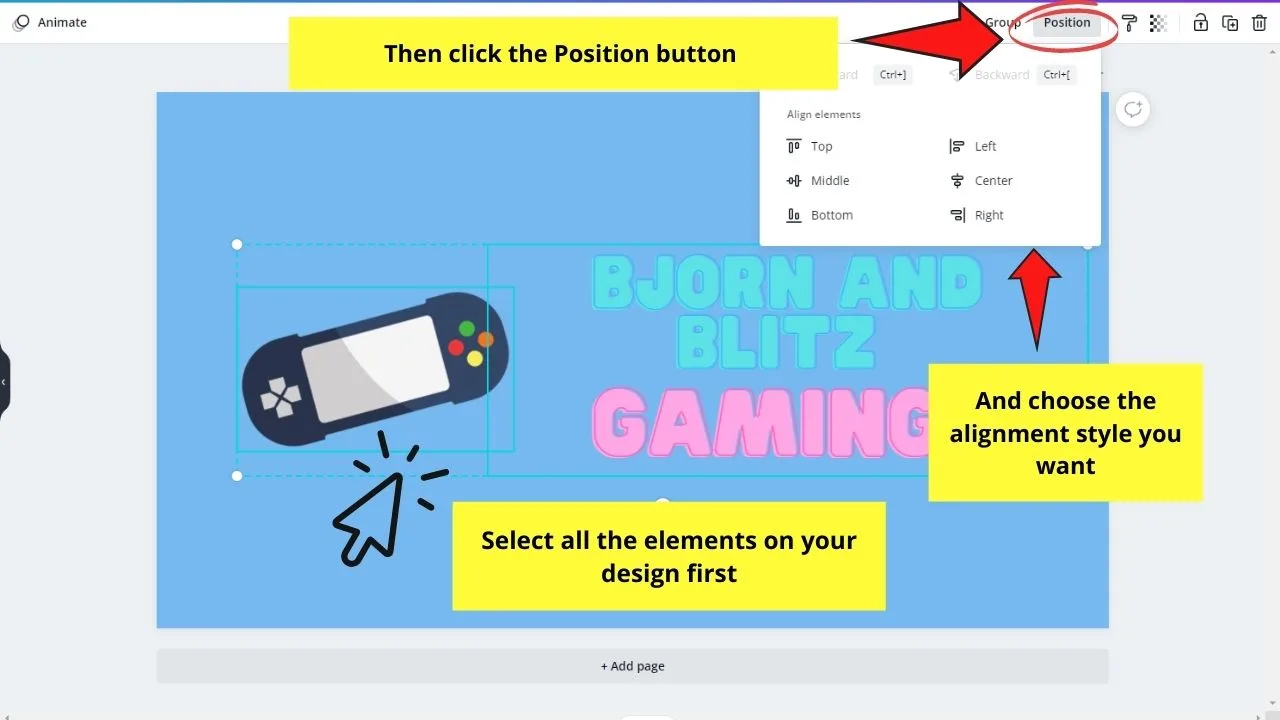
You can even select all the elements on your design, click the Position button, and choose the Tidy up option to polish their alignment further (if it’s available).
After which, export your design to your device by selecting the Download button on the menu bar.
Making Fun Animated YouTube Video Intros in Canva
YouTube video intros are the short clips that are played right before the YouTube video’s main content.
In short, these 5-12-second videos introduce to the audience what that YouTube channel’s about.
To create one for your upcoming videos, here’s how you create them.
Step 1: On Canva’s home page, head to the Create a Design button and search for a video template.
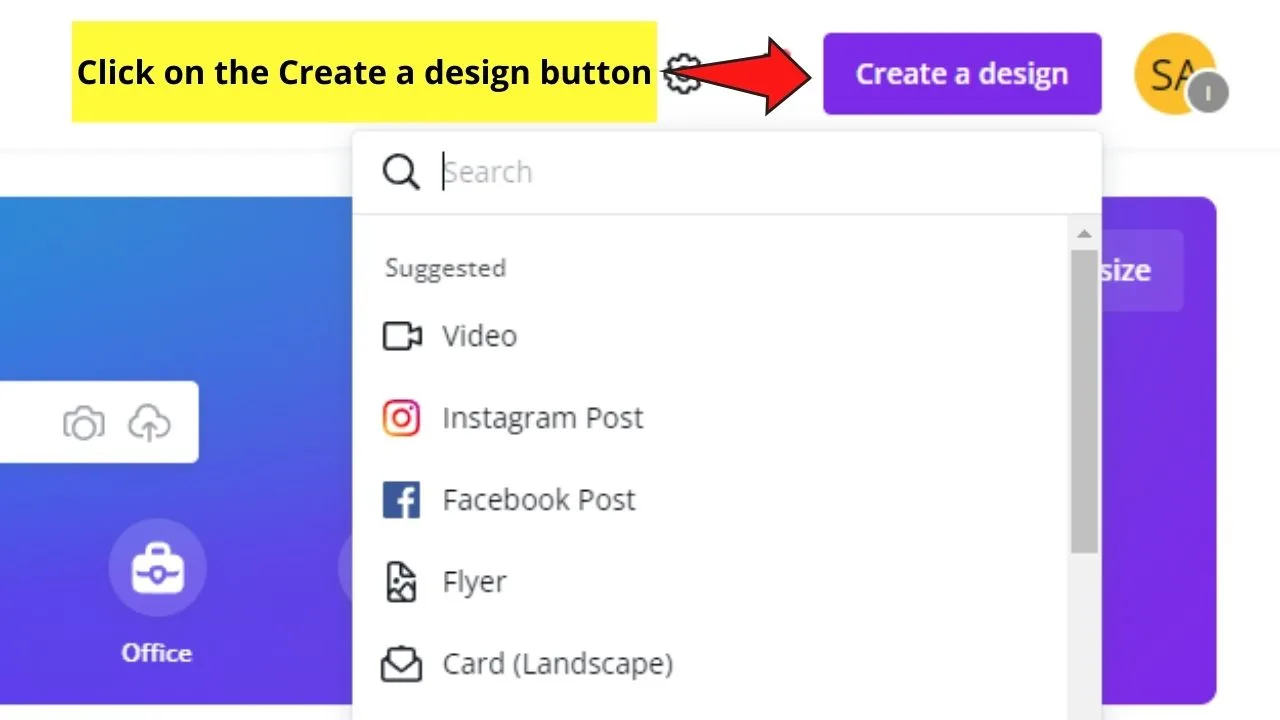
You’ll then see a dropdown menu of video templates to choose from. Select the plain video template that has a 1920 x 1080 px dimension size.
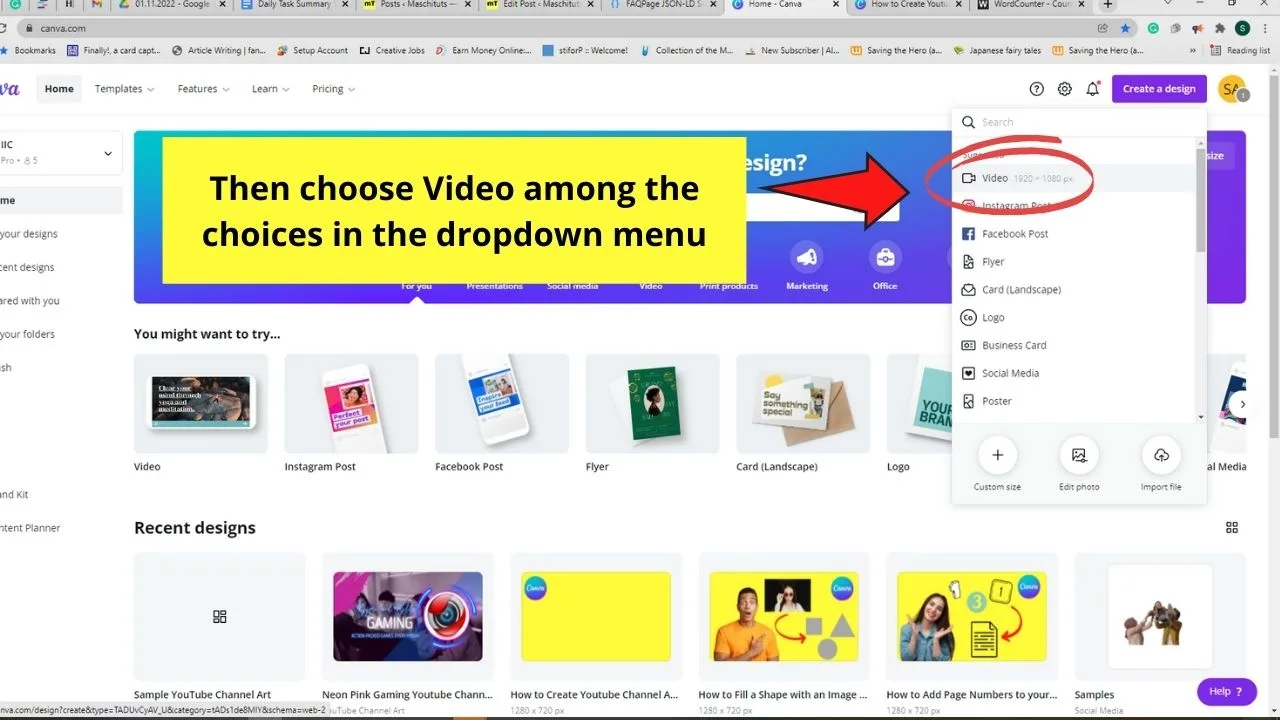
Step 2: Once you’re on the editor page, you can begin by changing the background of the canvas.
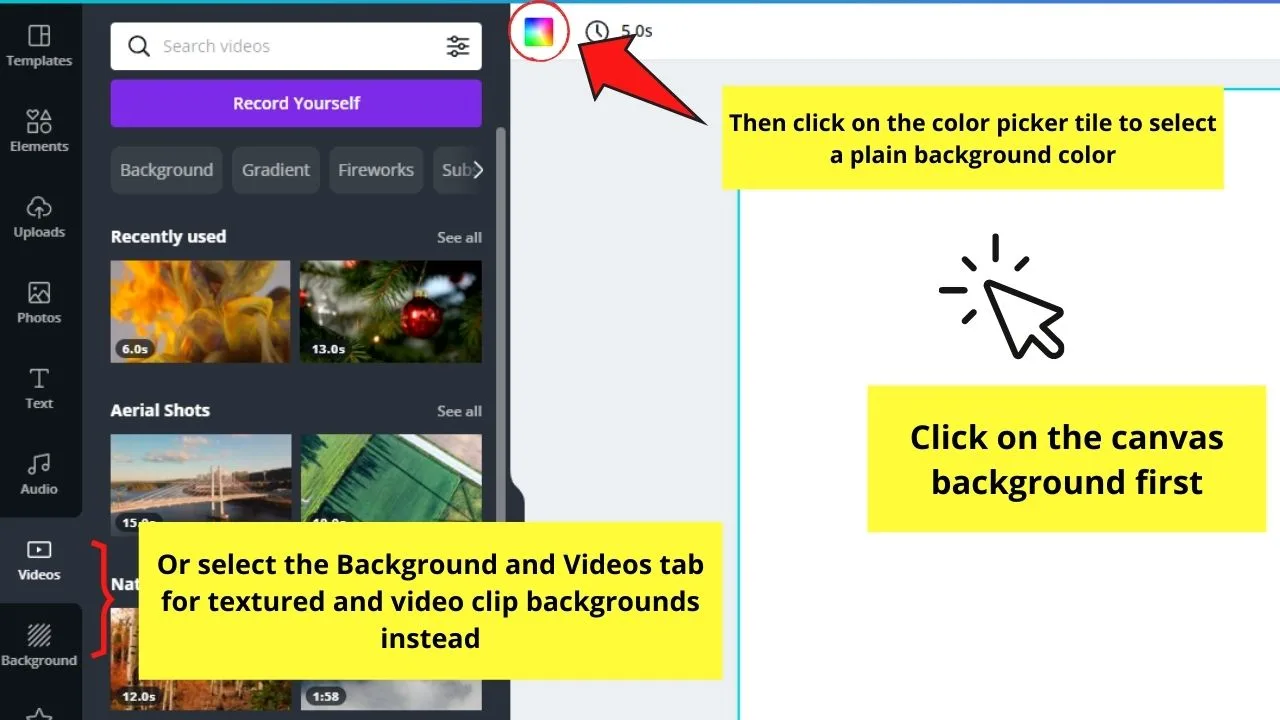
Here, you have 3 options with regards to the background. You can opt to use a plain colored background, a textured background, or a video clip for some added effect.
Whatever option you choose, click on the canvas and select the color picker tile or the Backgrounds tab on the left side panel. Clicking the Videos tab is also another option you have.
From there, select from the hues available in the gallery or the background images and videos. Click and drag them to your project to make them occupy the space.
Step 3: After changing the background of your canvas, it’s time to add some elements.
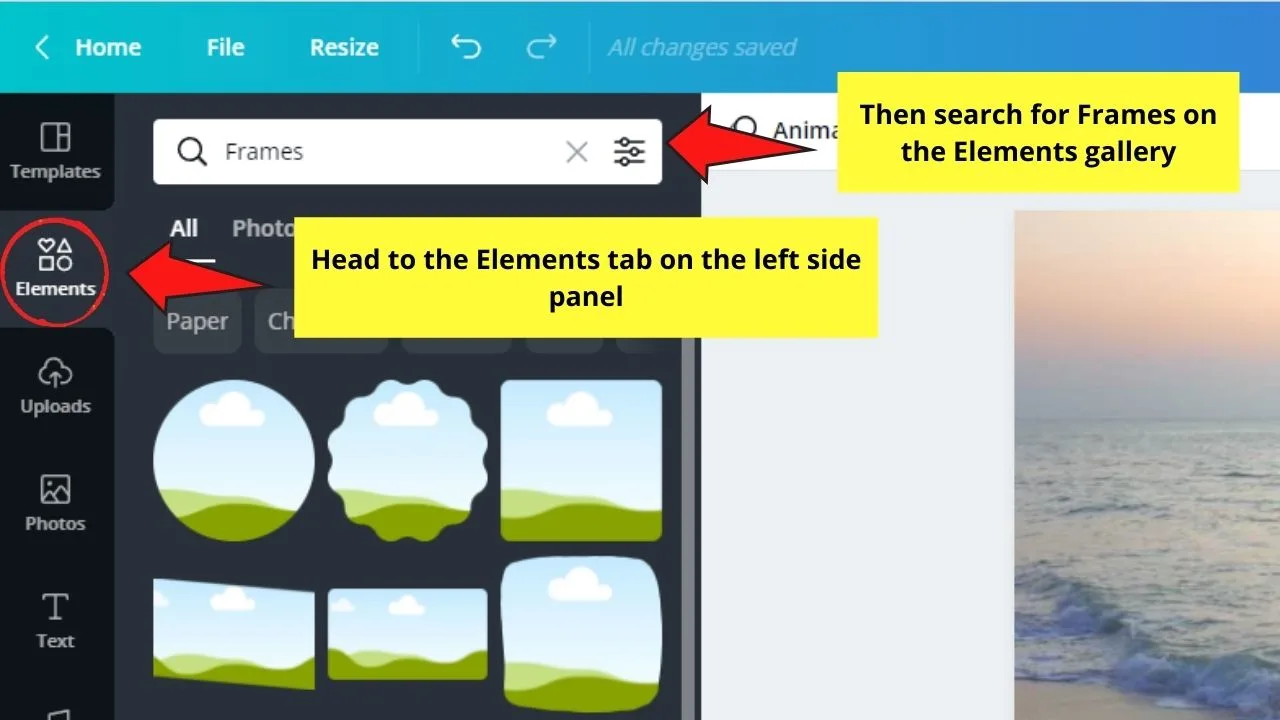
One fun way to incorporate a picture is to insert them into a frame. To do so, you need to select the Elements tab on the left side panel.
Then, head to the Frames section, scroll down, and choose what frame you’ll use for your design.
Click and drag the frame you chose and position it accordingly on the canvas.
But, do note though that this step’s optional. If you prefer to use your company logo instead, then there’s no need to add a frame to your design.
Step 4: Insert an image into the frame you added. If you have a photo from your device, head to the Uploads tab and click the Upload media button to begin importing the picture.
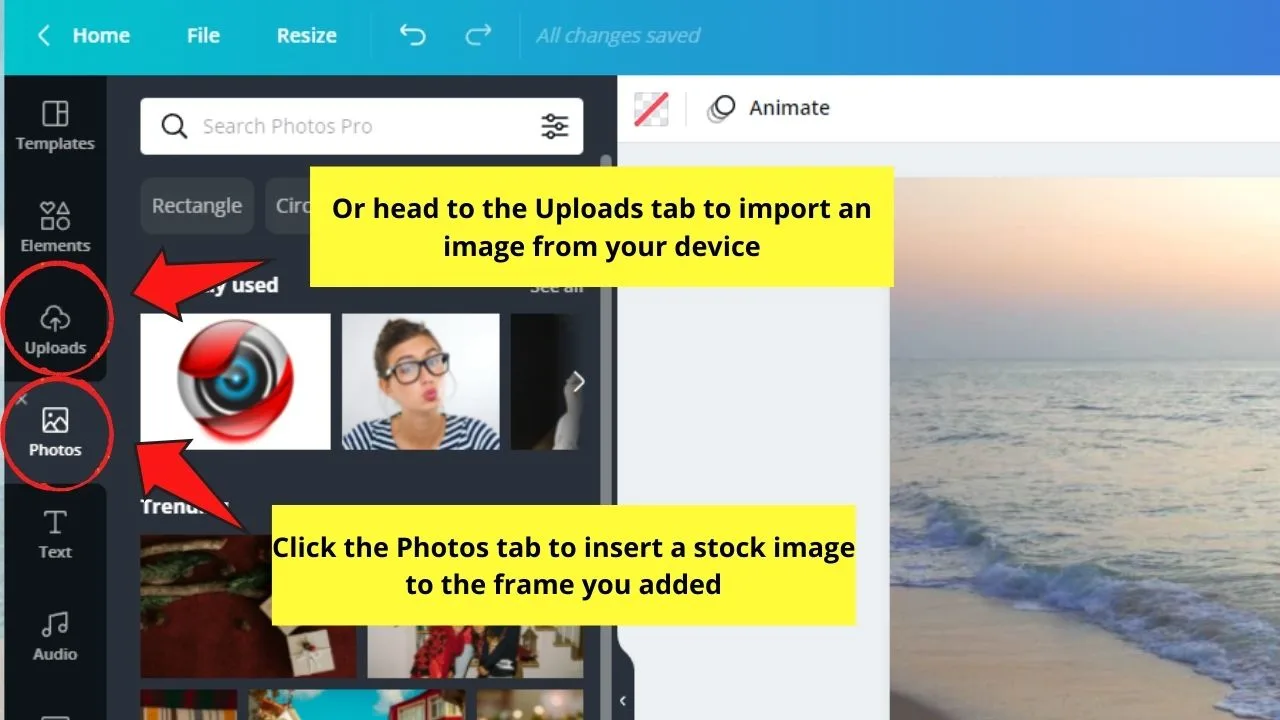
Once the photo’s successfully uploaded, click and drag it to the frame until you see the image occupying the space.
If you don’t like the crop positioning of the picture inside the frame, double-click and drag the image sideways or enlarge it.
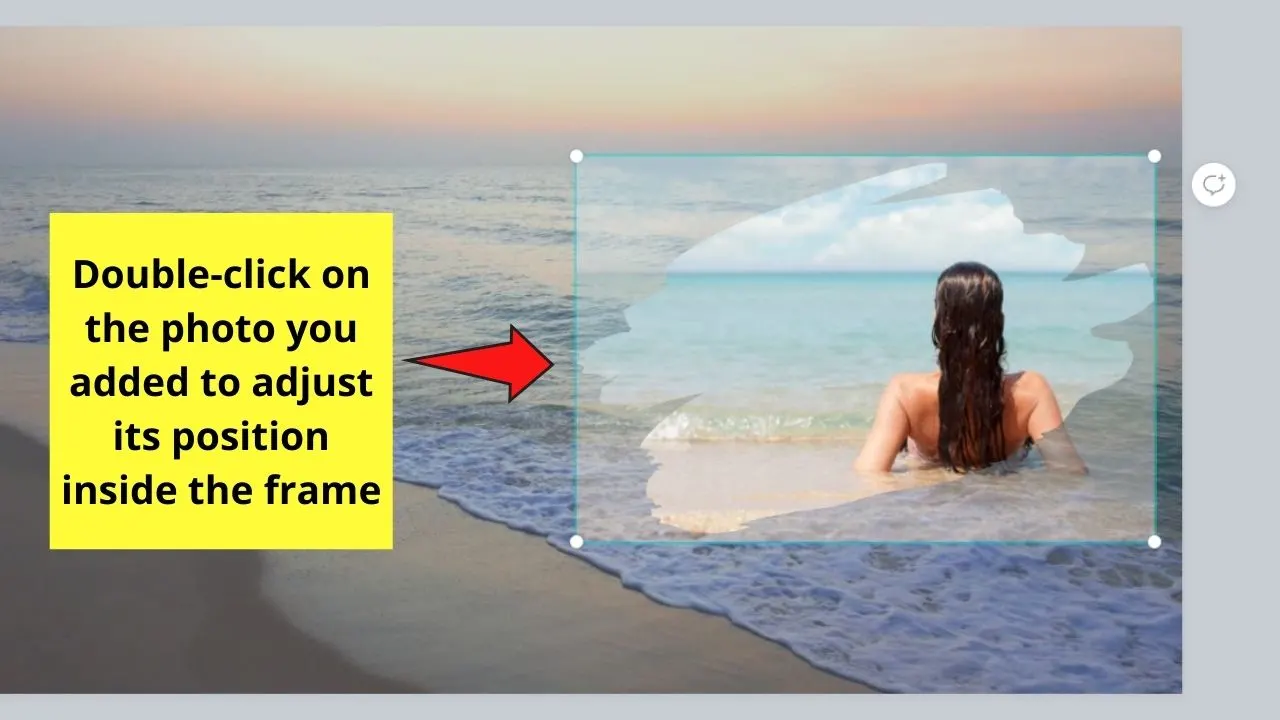
Click on the canvas outside the greyed-out area to apply the changes.
Step 5: After inserting a frame on your design, you can also add animated elements, commonly known as stickers, on it.
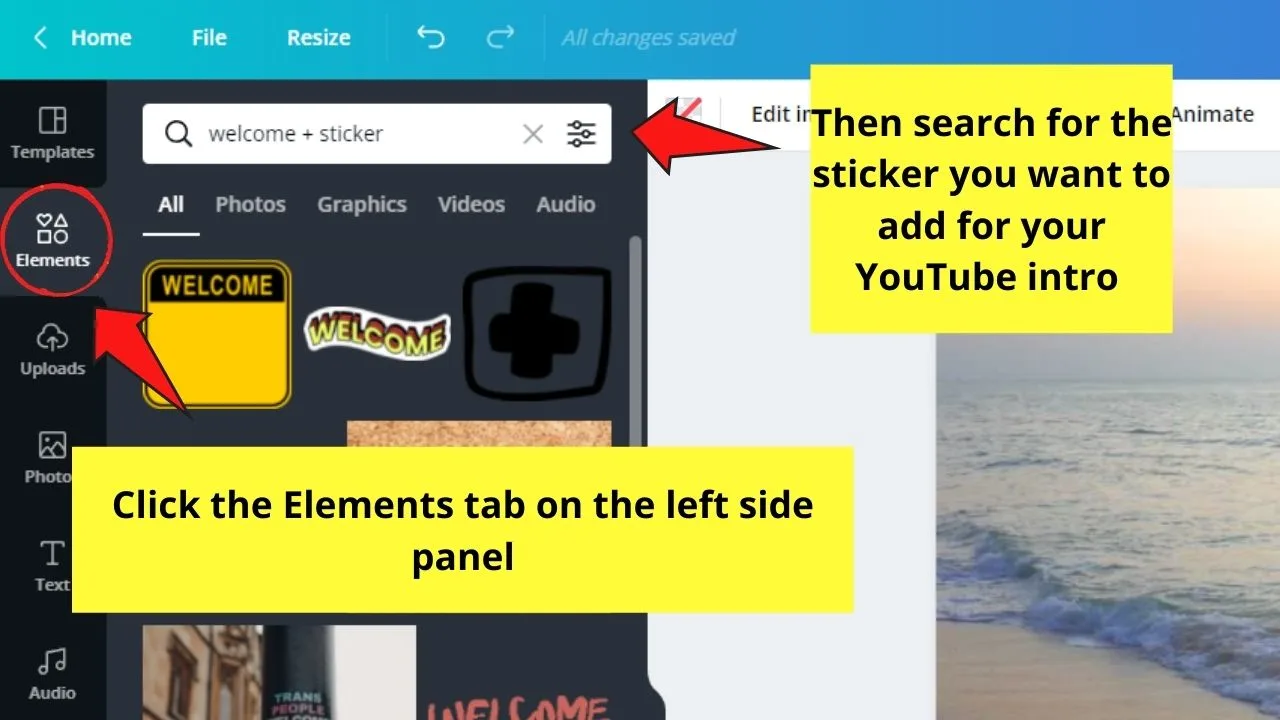
To do so, just head to the Elements tab on the left side panel and type in the descriptive keywords of the sticker you’re looking for in the search bar.
Otherwise, you can head to the Stickers section of the Elements gallery and browse through the choices available.
Once you’ve selected a sticker or stickers to use, click, drag, position, and resize them on the canvas.
Keep repeating this step until you’ve added all the stickers you need.
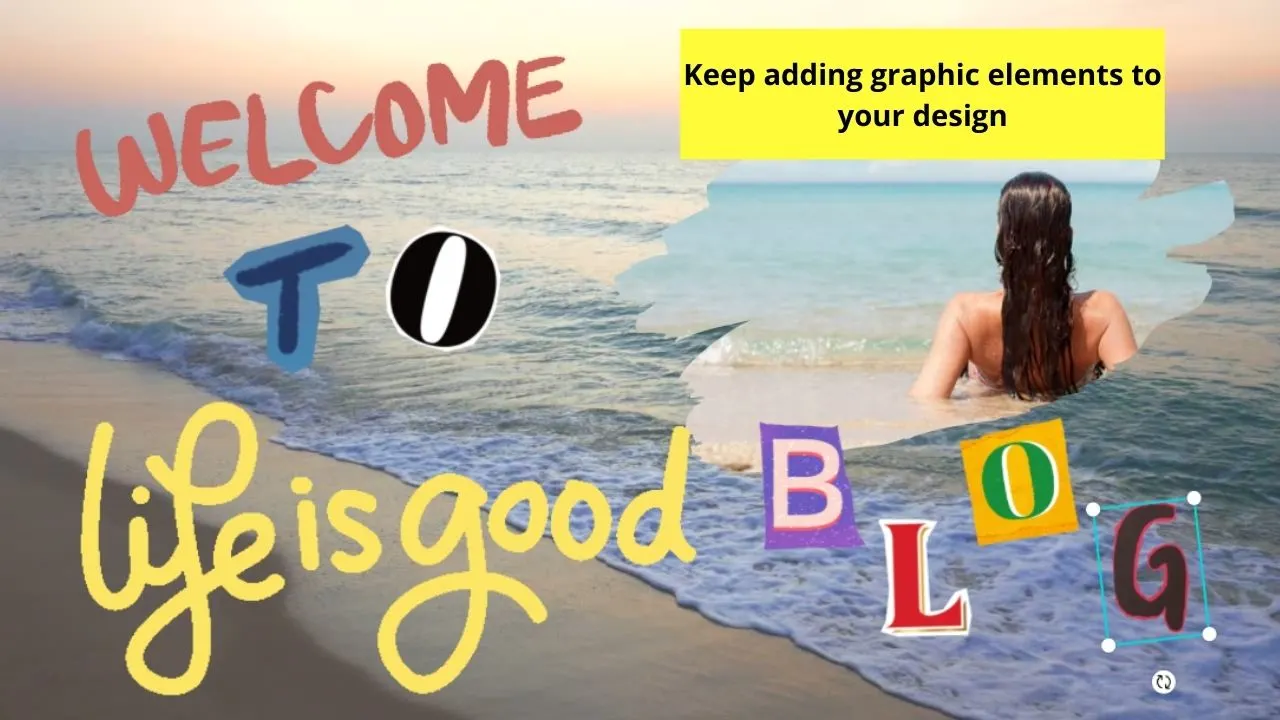
Step 6: Once you’re done adding the graphic elements component of your design, you can now add text.
The easiest way to do this is by pressing T on your keyboard to directly add a text box to the canvas.
From there, resize the text box by dragging the white circles surrounding it and changing its font style and color accordingly.
But, if you’re not too fond of matching font styles manually, go to the editor toolbar, click on the Text tab, and head to the font combinations section.
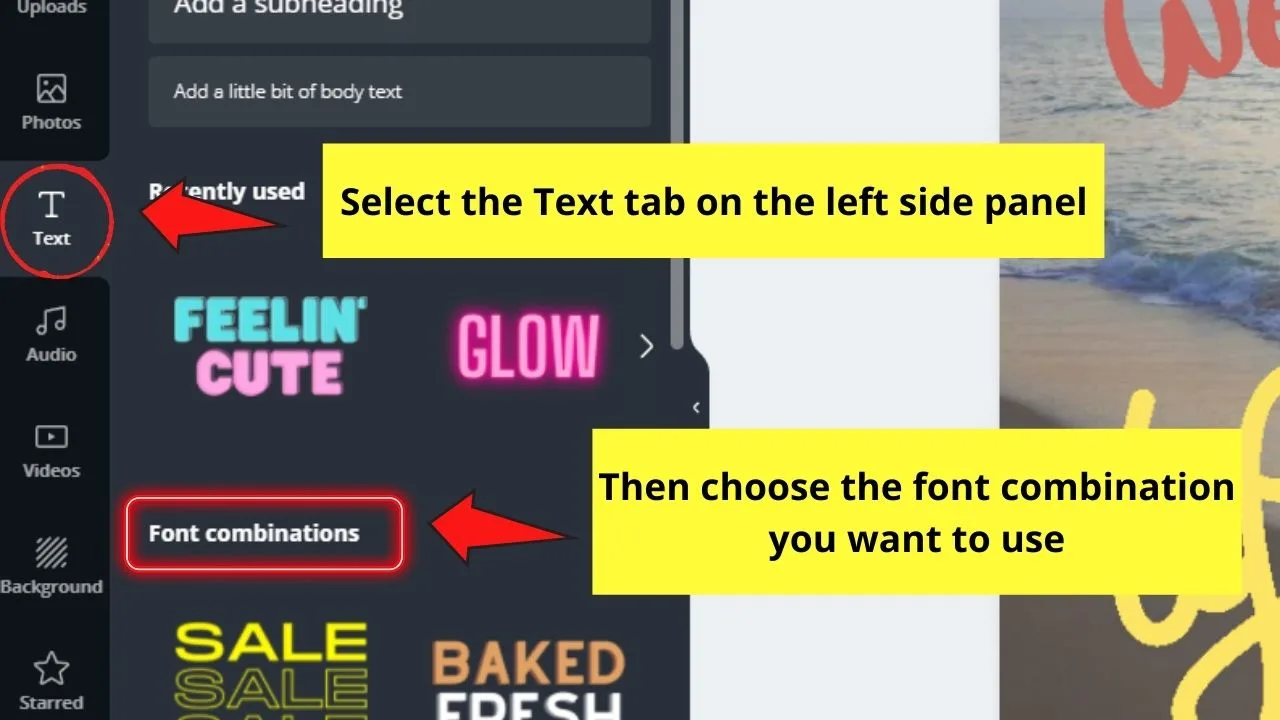
Whatever method you choose, edit the text inside by double-clicking it and typing in the title of your video or channel.
Step 7: Now, add an animation to your design. To do so, first, you’ll have to click on the page, text, or element you want to animate.
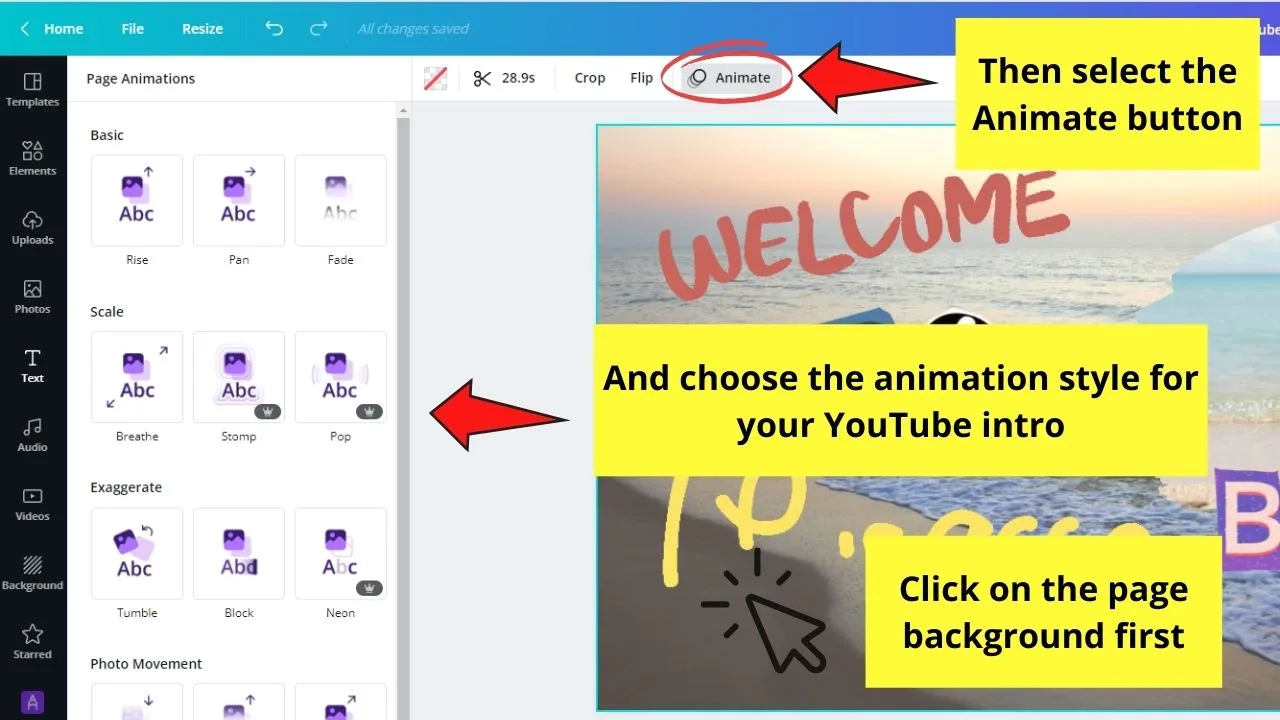
Then, head to the editor toolbar and select the Animate button. From there, choose the animation style you want to use.
Step 8: To add more fun to your YouTube intro video, add a music track.
You can choose to import audio you bought or created (if you’re that talented) through the Uploads tab.
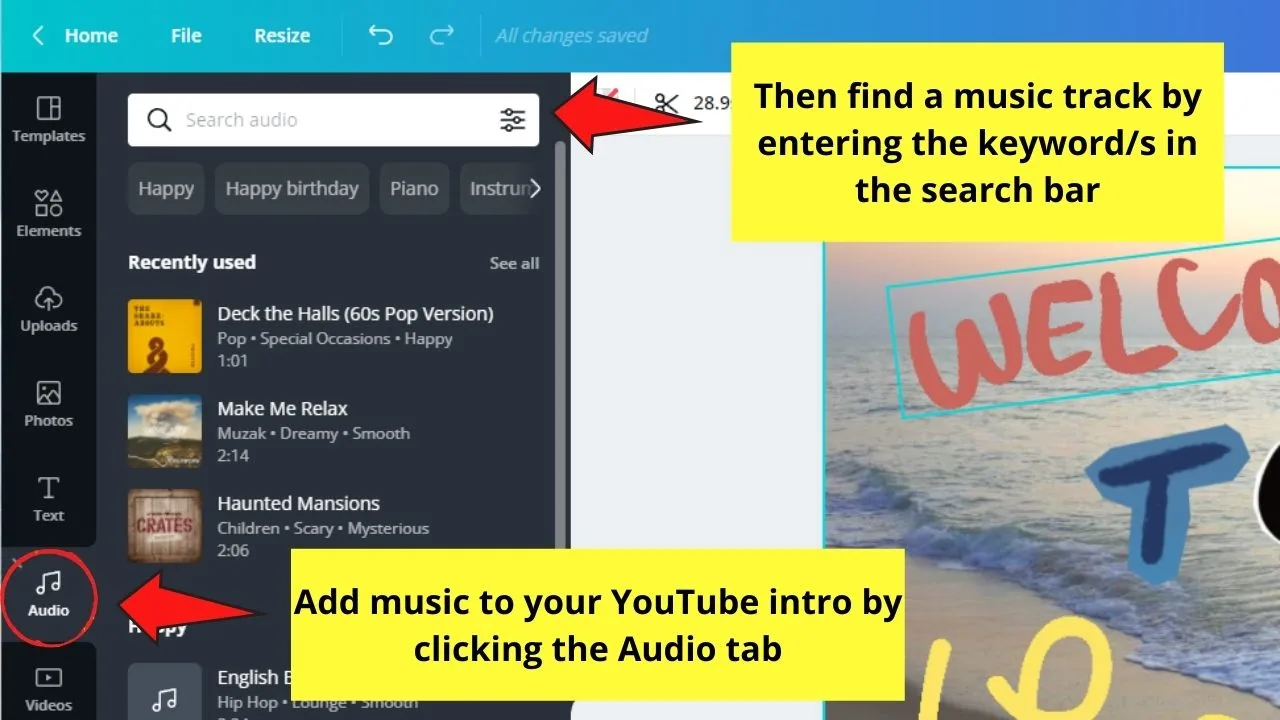
However, adding music from the Audio tab of the left side panel is also another way of achieving this feat. All you need to do is click on the audio track you wish to use for it to appear on your design.
Then, trim the audio first by clicking on the title of the music. After which, hover the cursor over the sound wave area that appears and drag it to select the segment you want to feature.
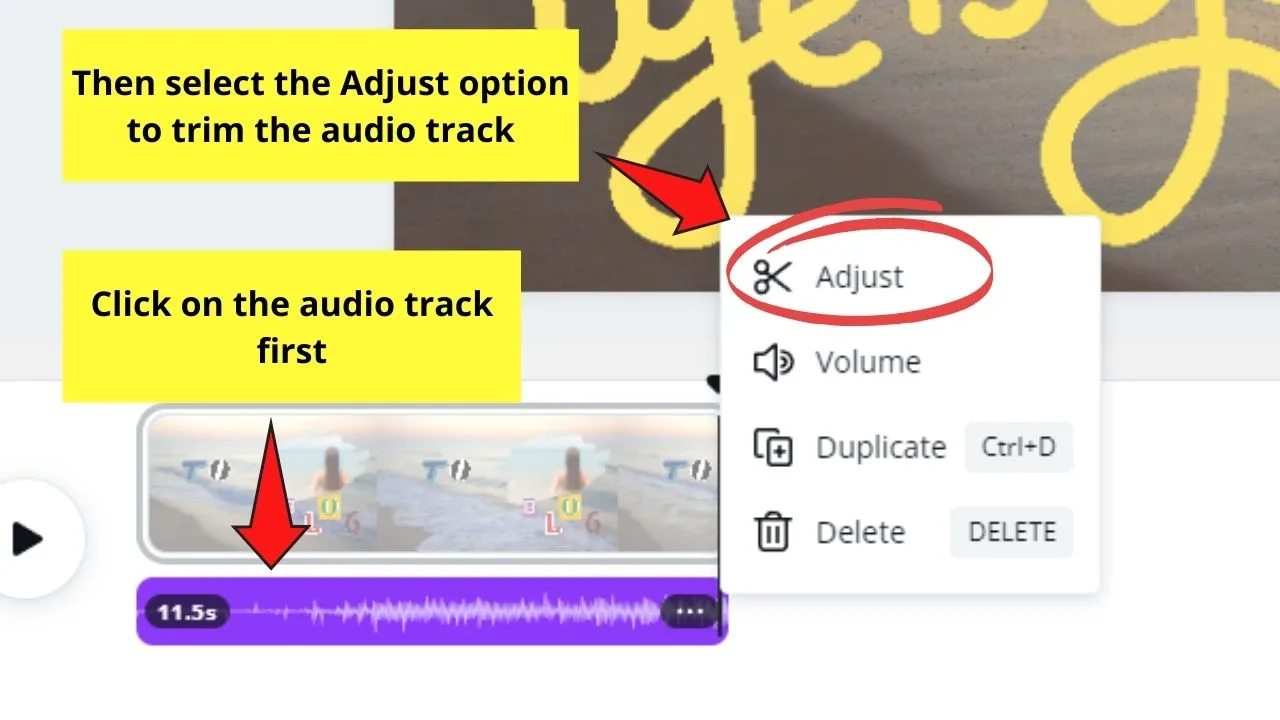
Step 9: Check how your YouTube intro video looks like by selecting the Preview button.
If you’re satisfied, simply exit the Preview window and click the Download button on the menu bar.
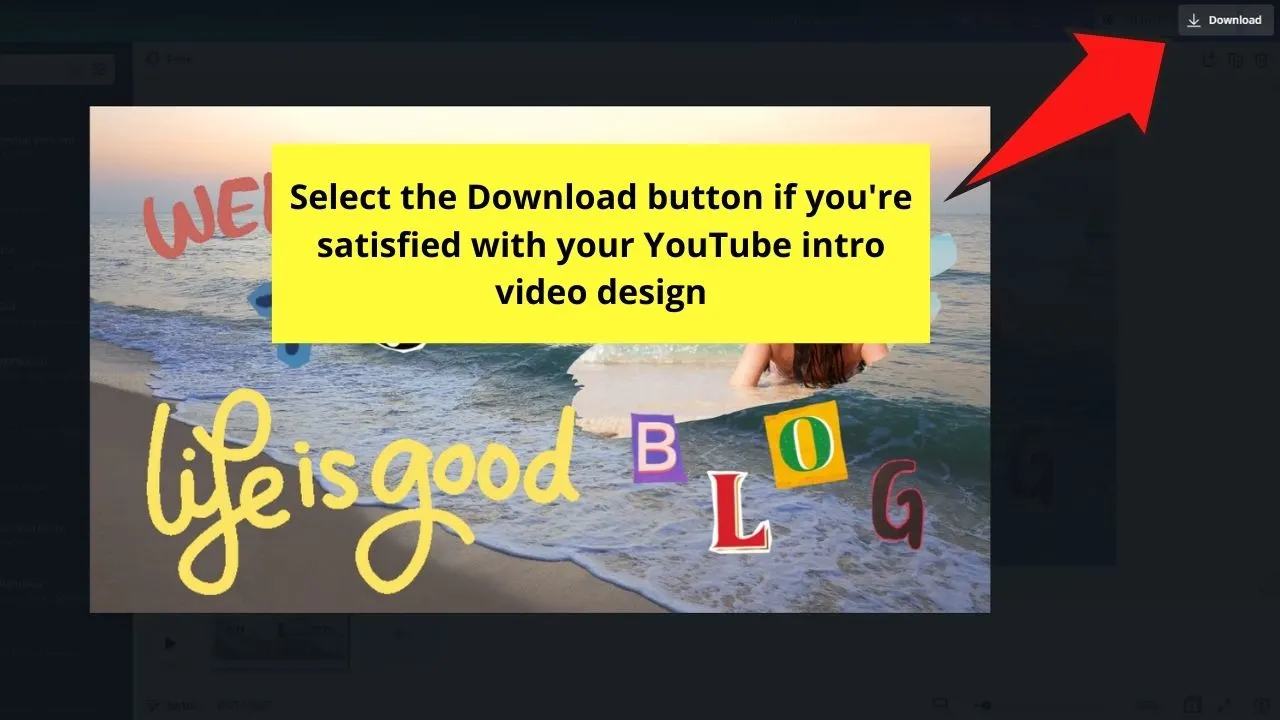
Select the MP4 Video format to export the video file to your device. And, from there, you can upload your new YouTube intro video to the video editing software you’re using.
The steps surely are quite lengthy, but, once you get the hang of the entire process, it’ll only take you minutes to design your YouTube intro videos.
Subscribe Buttons on YouTube — How to Make Them
YouTube subscribe buttons serve as your call to action (CTA) to your audience, telling them to subscribe to your channel.
Think of it as a “subtle” form of inviting the audience to become your channel subscribers. So, for you to entice the viewers to hit the Subscribe button, you better make it eye-catching.
Use of Pre-made Subscribe Buttons
Step 1: Click on the Create a Design button to open a new design file. Select Custom Size, and encode 1000 x 300 px on the boxes accordingly.
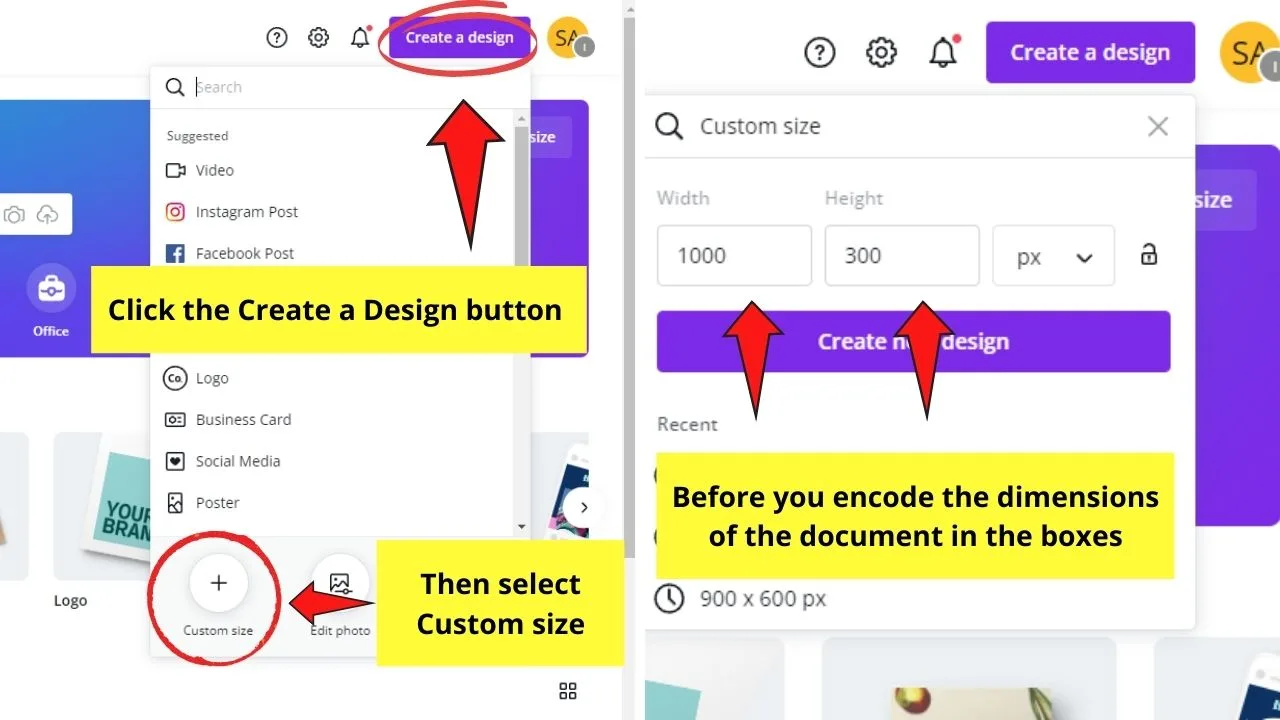
Step 2: Once you’re on the editor page, head to the Elements tab and encode “subscribe” on the search bar.
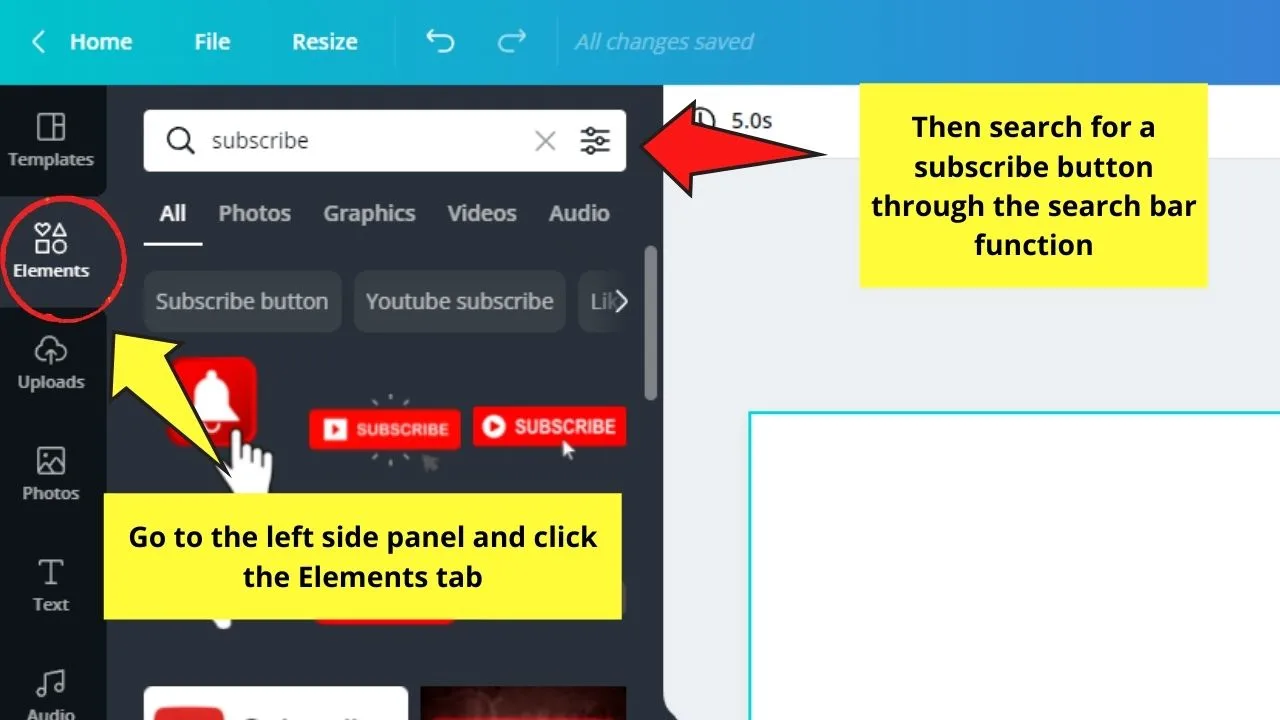
Canva will then show you a gallery of YouTube subscribe buttons to choose from.
Step 3: If you intend to overlay the subscribe button atop the footage, select an element that doesn’t have a background.
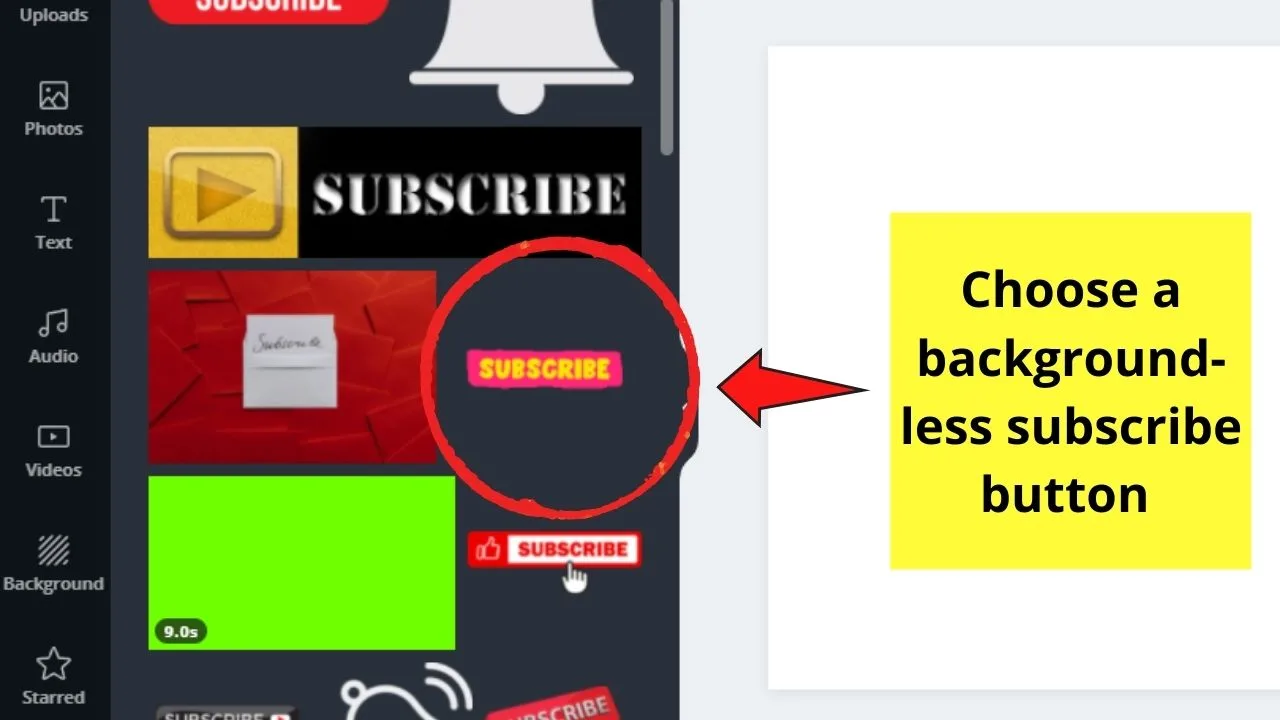
Click and drag the subscribe button design to your video and adjust its size by dragging the white circles surrounding it.
Step 4: Check to see how your overall footage looks by clicking the Preview button on the menu bar.
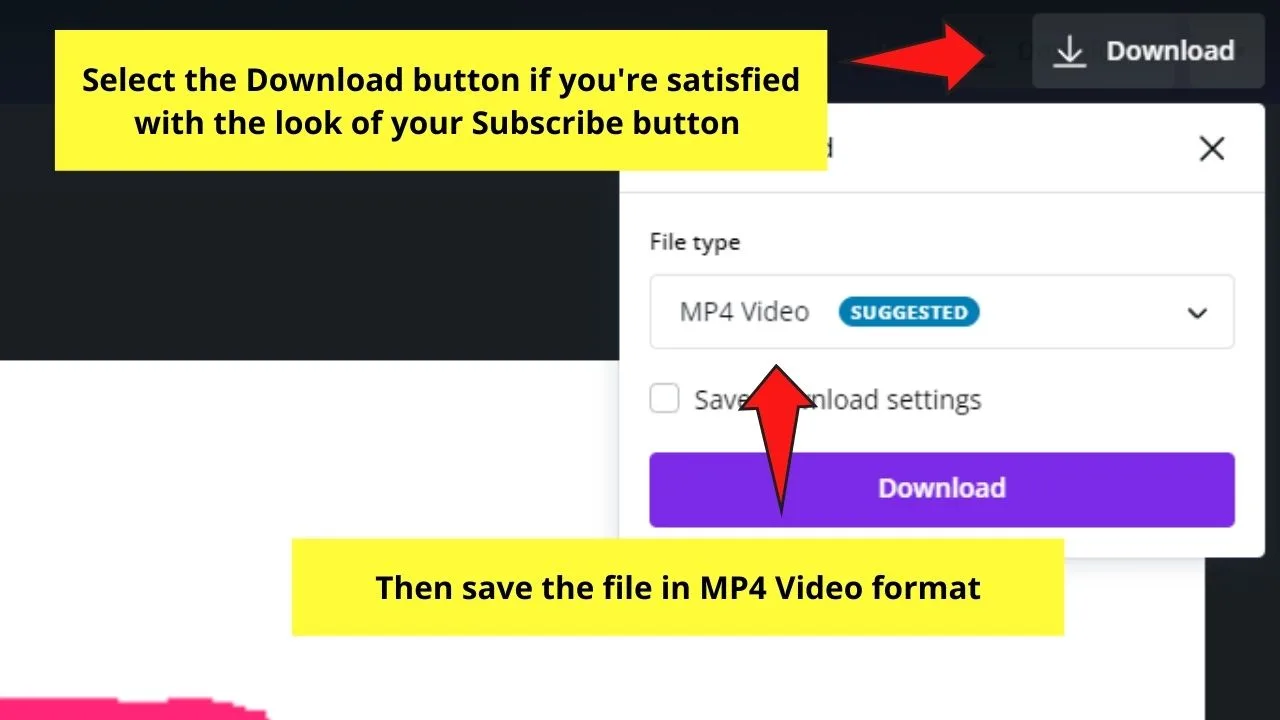
If you’re satisfied with how everything looks, select the Download button and download the file as an MP4 Video.
If the Subscribe button you prefer has a background, you can refer to this incredible tutorial to see how to remove the background.
But, if you want to customize how your Subscribe button looks and add the notification bell to it, here’s how you should go about it.
Creating Customized Subscribe Buttons
Step 1: Create a 1000 x 300 px design file by clicking the Create a Design button on Canva’s home page and selecting Custom Dimensions.
Step 2: On the editor page, head to the left side panel and click on the Text button.
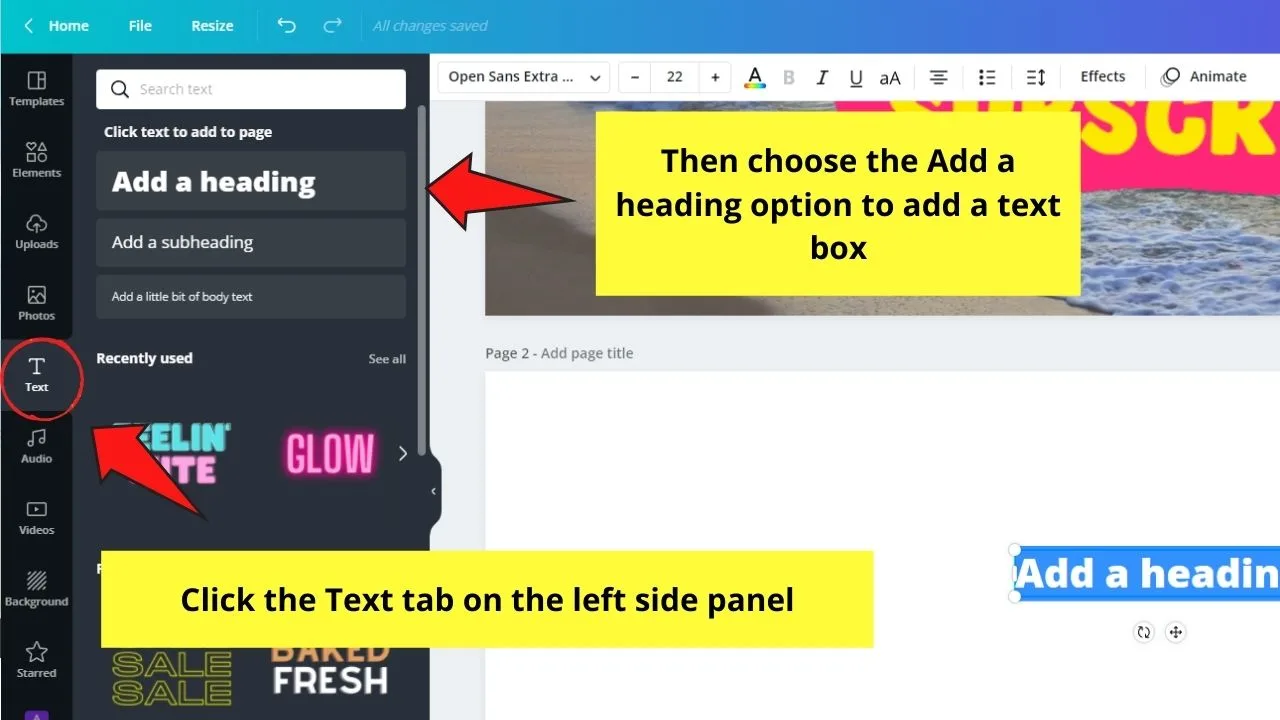
Add a heading and encode “Subscribe” in the text box. From there, edit the text’s font size, style, and color by heading to the editor toolbar and clicking the corresponding buttons on it.
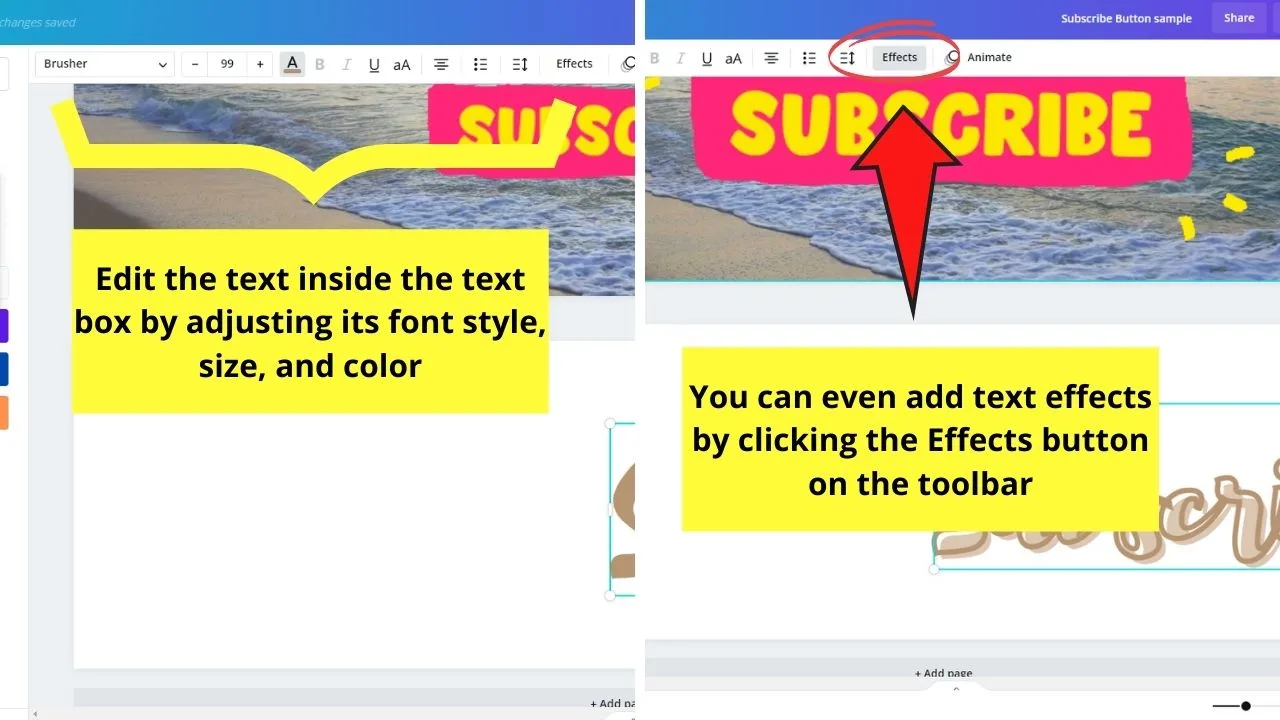
You can even add effects to your text by selecting the Effects button on the editor toolbar.
Step 3: Now, it’s time to add the YouTube icon next to the text box you added. Head to the editor toolbar again, click the Elements tab, and type “YouTube” on the search bar.
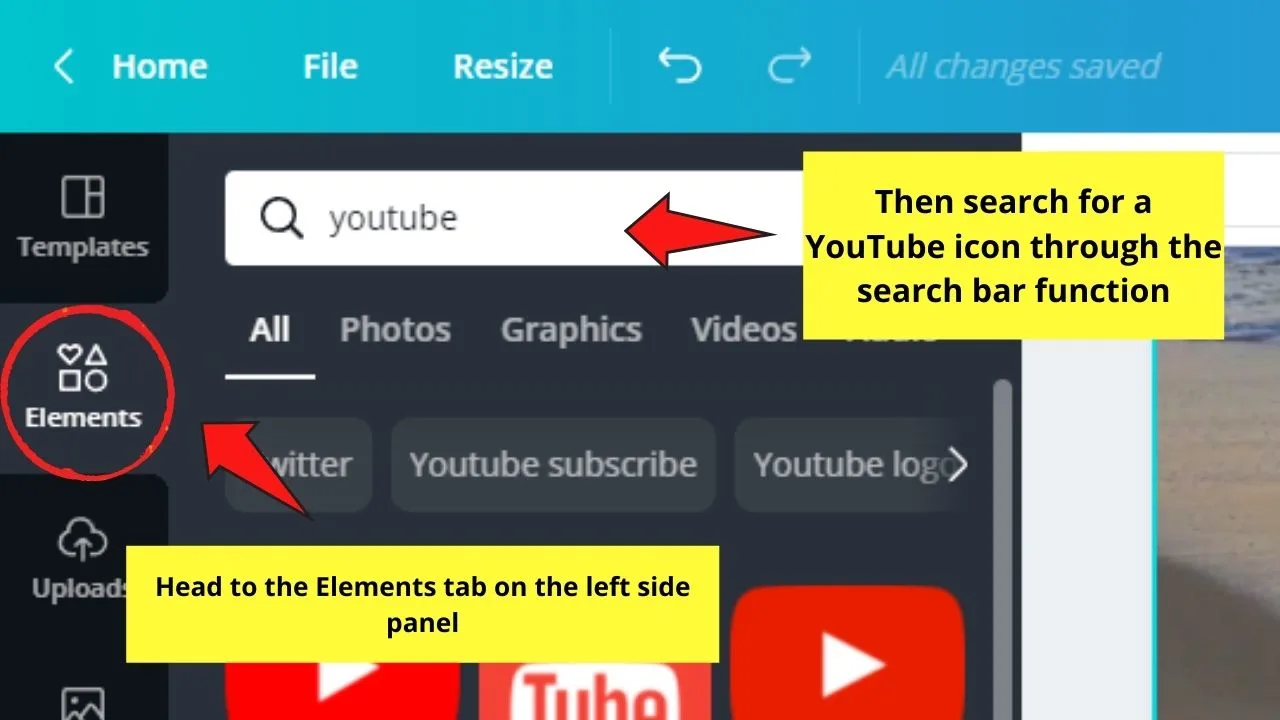
You will then see various YouTube icons for your choosing.
Click and drag one so you can adjust its size and position accordingly on the canvas.
Step 4: After which, animate the page by clicking on the canvas and selecting the Animate button on the editor toolbar.
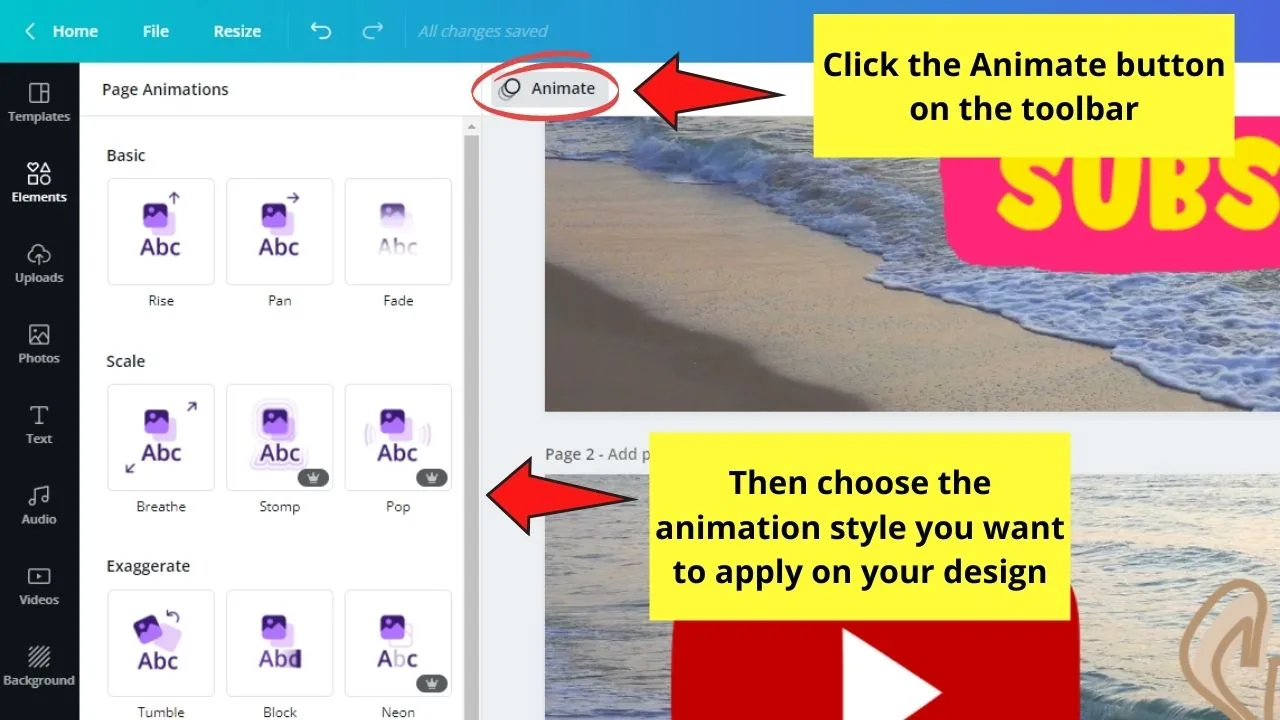
From there, choose what animation style you’ll apply to your design. Click on one for it to be applied to the page.
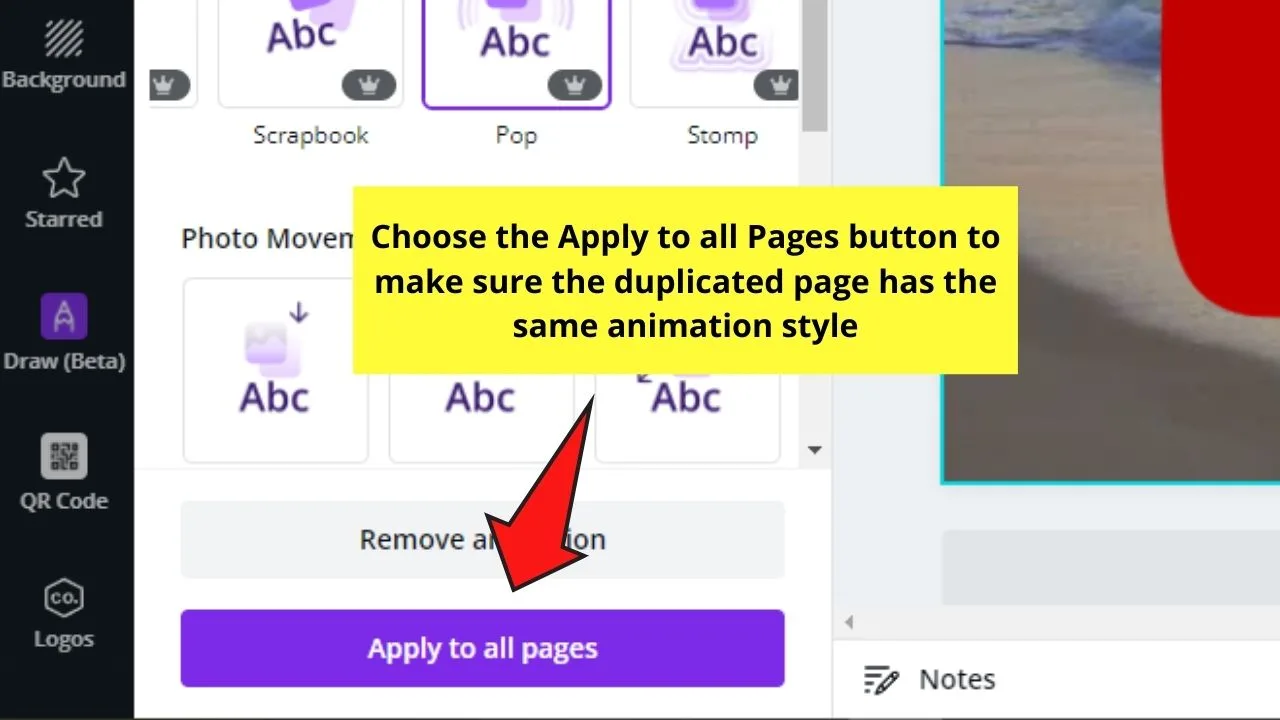
Step 5: Duplicate the current page you’re on by selecting the Duplicate Page button.
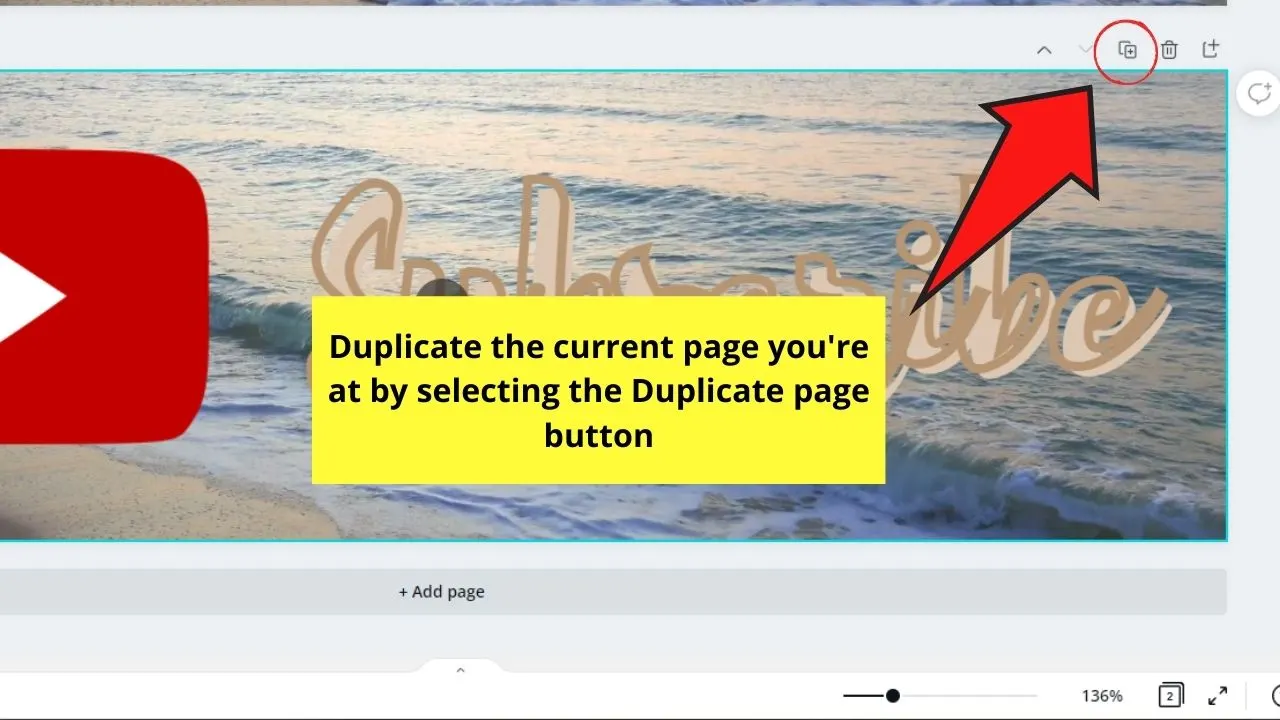
Then, make sure that the new page has the same animation by heading to the left side of the Animation gallery and ticking the Apply to all pages button.
Head to the menu bar and click the Preview button to check how everything looks on your design.
If you’re satisfied, select Download, choose the MP4 Video format and export the clip to your device.
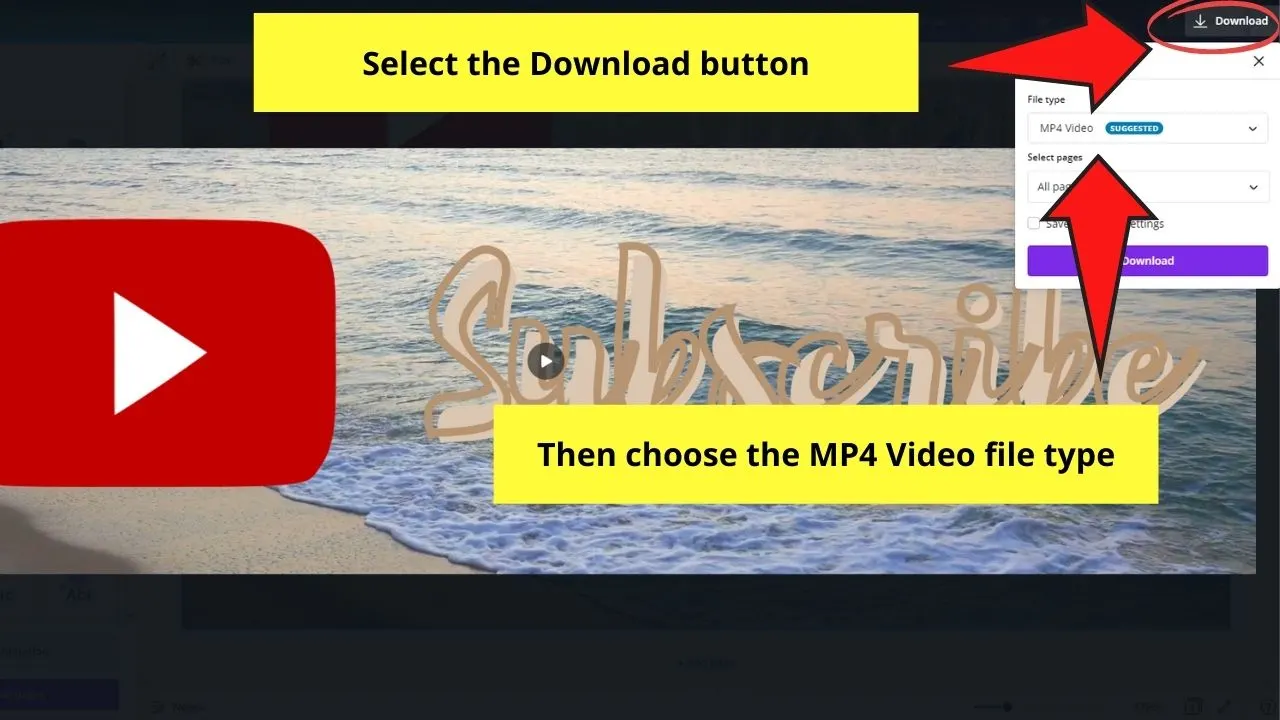
And, with that, you’ve successfully created Subscribe buttons for your YouTube channel.
Follow the same steps in creating more CTA buttons for your YouTube channel videos.
And, if you’re curious about how to create YouTube thumbnails in Canva, you can read about it on this website or watch the footage below.
Frequently Asked Questions about How to Create YouTube Channel Art in Canva
Can I create YouTube channel art in Canva even if I’m on Canva Free?
Even if you’re on Canva free, you can still create YouTube channel art. The only thing is that your choices of animations, graphic elements, and audio tracks are limited. And, if you want to use a premium element, you’ll need to pay for it first before you can download the entire design.
Is it possible to remove the green screen background of an animated Subscribe button without leaving Canva?
Unfortunately, you cannot change the green screen background of an animated Subscribe button in Canva yet. You’ll need to upload the said file to the video editing software you’re using and find the Ultra Key button to remove the green background.
What are the elements essential to creating an engaging YouTube channel art?
First, place your logo in the right area of your channel. Second, use simple images with clear focal points. Use consistent brand colors and maximize website and social media links. But, don’t forget to optimize your YouTube channel art for mobile and desktop.
What size should I use for my YouTube banner?
Ideally, your YouTube banner should have 2560 x 1440 px dimensions to make it optimized for both mobile and desktop screens.

Hey guys! It’s me, Marcel, aka Maschi. On MaschiTuts, it’s all about tutorials! No matter the topic of the article, the goal always remains the same: Providing you guys with the most in-depth and helpful tutorials!


