Videos are terrific for boosting engagement and sticking people to your website for longer.
Hosting them though is a whole different ball game.
Learning how to insert a video into WordPress also means deciding how you will play the video. Use your server to load the WordPress video player (HTML5), or one from a third-party video hosting platform.
There are merits for both. Either way, it is clear cut that your WordPress website will perform better when video is included.
Product videos help buyers decide to buy. Videos on landing pages bump up conversion rates. And, once you learn how to optimize videos for SEO, you will have stronger search performance.
Better yet, it fosters a stronger community connection, and that in turn, increases conversion metrics again.
The only thing you need to figure out is how to insert a video into WordPress, and that is exactly what you will learn as you continue reading here.
How to insert a video into WordPress
Videos can be uploaded directly into your media library. Depending on your file size limits, you may need to increase the WordPress limit to upload large video files. It is easier and cheaper to upload videos to a third-party video hosting platform, then embed videos into WordPress.
Embed or Self-Host Videos on WordPress?
The first choice you have to decide on is whether to embed videos into WordPress posts and pages, or if you would rather self-host videos.
Which is better…
Self-hosting videos or embedding videos into WordPress?
In almost all cases, embedding videos into WordPress is more beneficial.
Self-hosting videos will use a lot of bandwidth. On shared hosting plans, it is never a good idea to upload videos to your WordPress media library because it can quickly use up all of your allotted resources for the server.
That can get your hosting account suspended.
Uploading videos to WordPress.com
On WordPress.com premium plans, they do have a VideoPress block in the WP editor. On a self-hosted WordPress site, VideoPress can be purchased as a standalone subscription through Jetpack.
VideoPress is designed specifically for WordPress. It is a video hosting service with cloud storage. The Video Block is the one to use to upload videos to your WordPress media library.
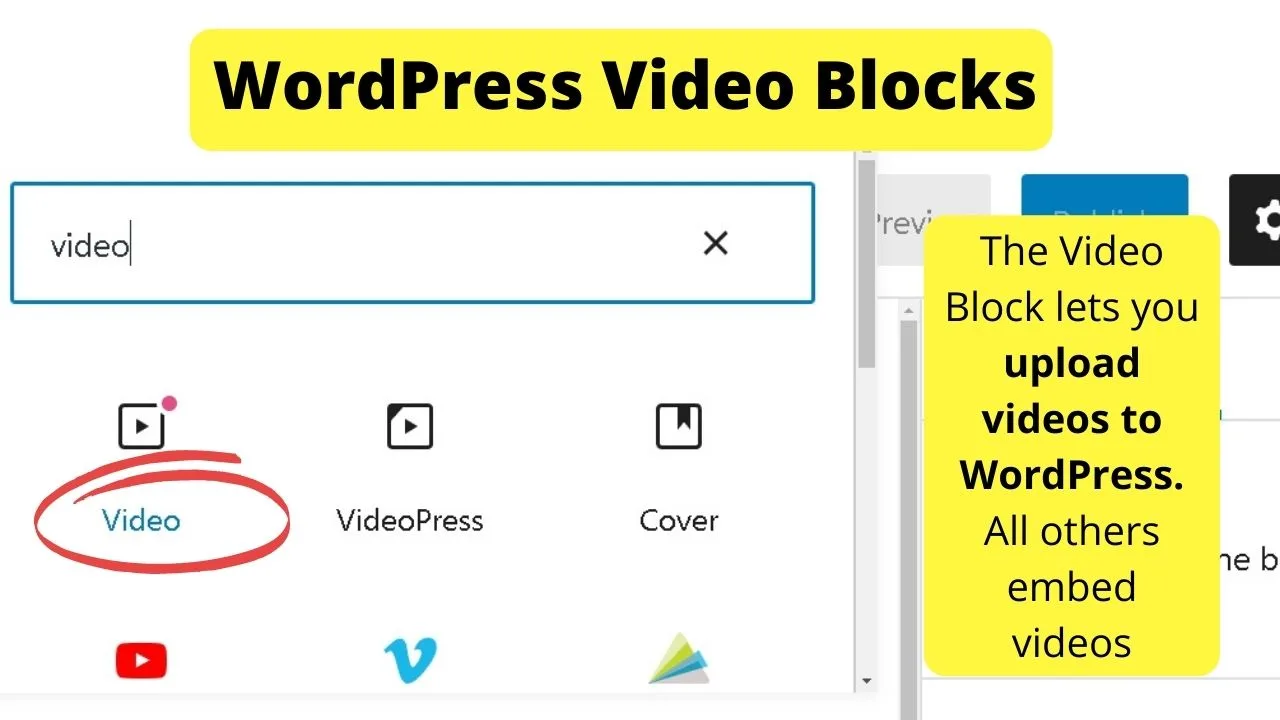
Depending on your needs, you may be able to get by on a free trial of VideoPress, which is currently one video up to 1GB in size.
There are many more premium video hosting services. The most affordable is probably going to be Amazon S3. Videos are hosted on Amazon S3 and embedded on your WordPress website.
Third-party video hosting platforms like YouTube, Vimeo, or Amazon S3 does not replace your WordPress hosting server. It integrates with it, essentially reducing the burden on the server hosting your website.
The more videos you add to your media library, the more bandwidth you use.
Before long, you may find yourself needing to upgrade to a virtual private server or a dedicated server.
It can add hundreds of dollars monthly to your operating costs.
A good way to keep your costs down is to host large files like audio, videos, and images on third-party sites, then embed them into WordPress.
Video embeds are cheaper and more reliable. It offers a better user experience too.
Embed videos within the WordPress block editor
In the block editor, there is a whitelist of video platforms that can be directly embedded using only the URL.
Whitelisted sites for video embed blocks are: Animoto, Cloudup, Dailymotion, Flickr, TED, TikTok, VideoPress, Vimeo, WordPress.tv, and of course, YouTube.
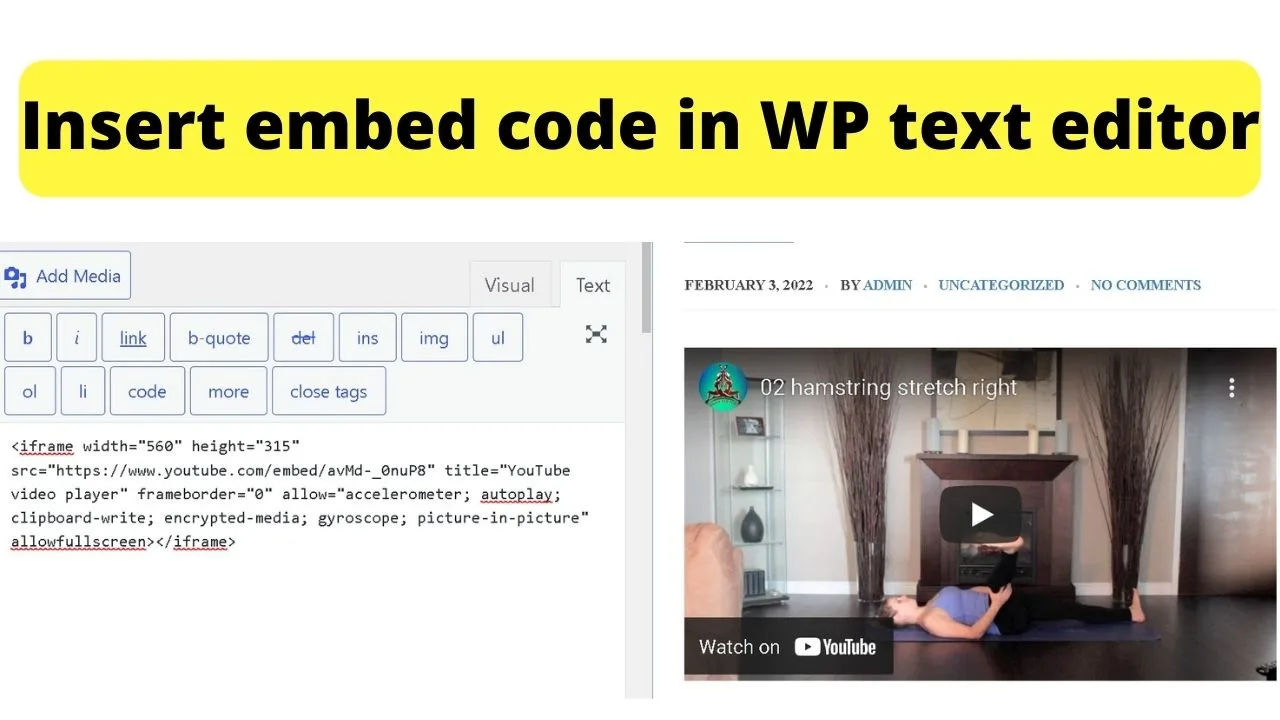
For embedding videos on sites that are not whitelisted, or if you are using the Classic Editor, you can paste the HTML embed code within the text editor.
How to upload a video to the WordPress media library
Using the block editor…
Click the + icon to add a new block. Search for Video, then select the Video Block.
You can use this to upload a video to your media library, or you can insert a URL which will then use the oEmbed to capture the video embed code for you.
It makes the embedding process nearly automatic.
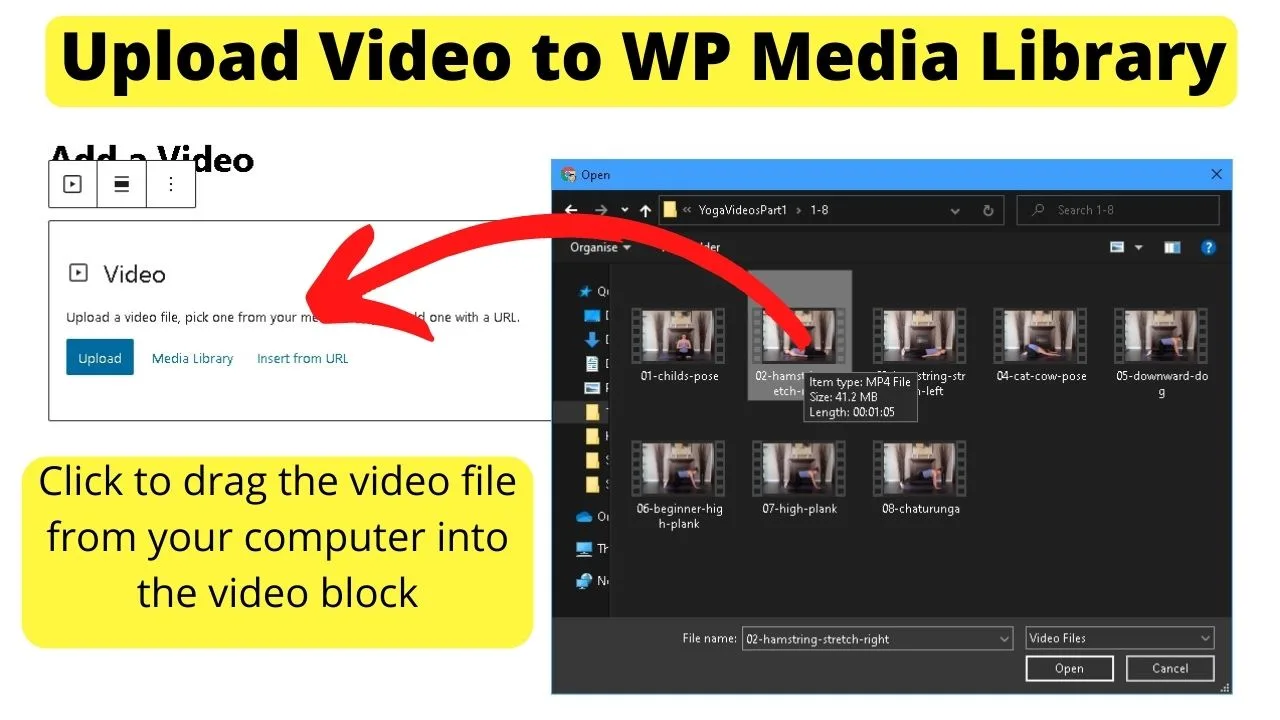
Keep in mind that uploading to the media library can have file size restrictions. If you find your file size exceeds the maximum size allowed, see how to change the WordPress upload limit.
By selecting a Video Block, only the whitelisted video hosting platforms are supported. As an example, if you paste in a Dailymotion URL, it will automatically switch the Video Block to the Dailymotion block.
Once the video is uploaded or embedded, to the right, you can set the video settings.
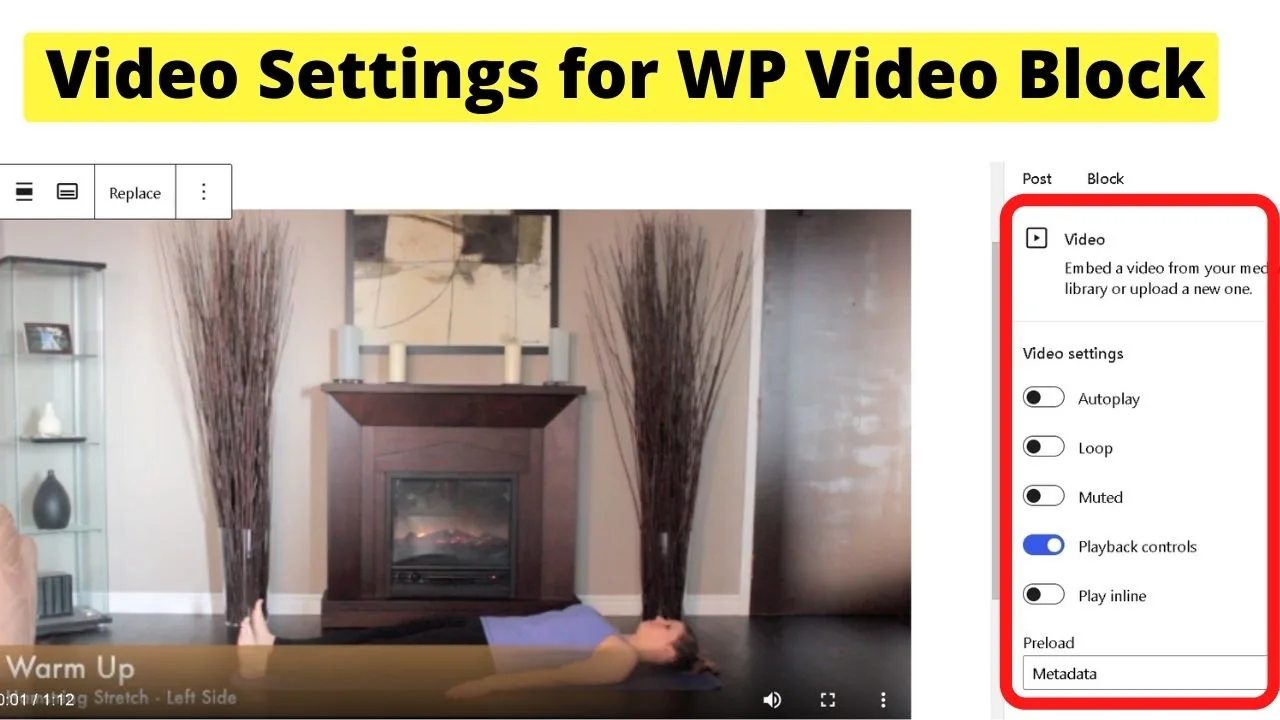
Options include autoplay, loop, mute, show the playback controls or hide them, or set it to play inline.
To set a custom image to show before a user clicks the play button, click “select” for the poster image and set a custom image for the video. This is like a YouTube thumbnail.
An alternative to playing the video is to share the link for users to download it.
How to make your videos downloadable from WordPress
To do this, on the top toolbar for the video block, click the video icon on the left, then select “file”. Type in a name such as “Click here to download the video demonstration”.
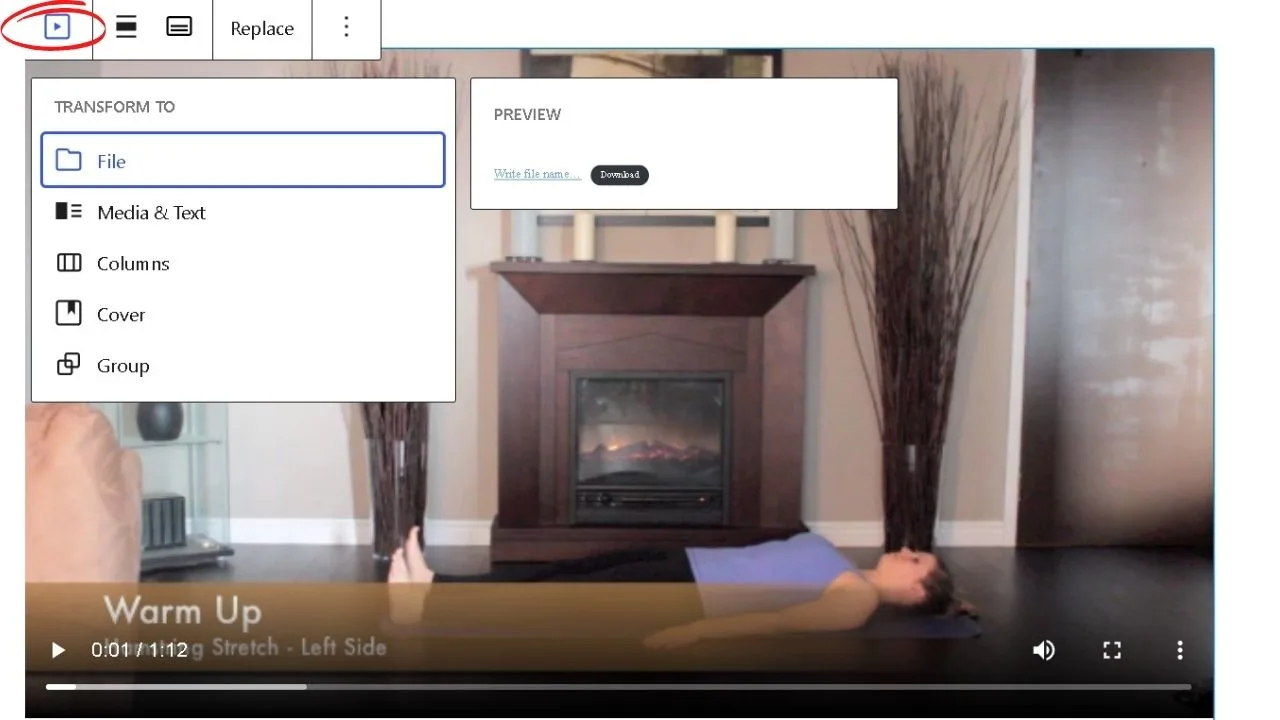
This will insert a hyperlink to the file. When a user clicks the link, the video will start downloading to their device.
How to insert videos into WordPress using the classic editor
In the classic editor, you can insert videos by clicking the “Add Media” button at the top of your WP editor toolbar.
It works the same way as adding an image.
Once the video is uploaded, hover over the video preview and click on the pencil icon to edit the settings.
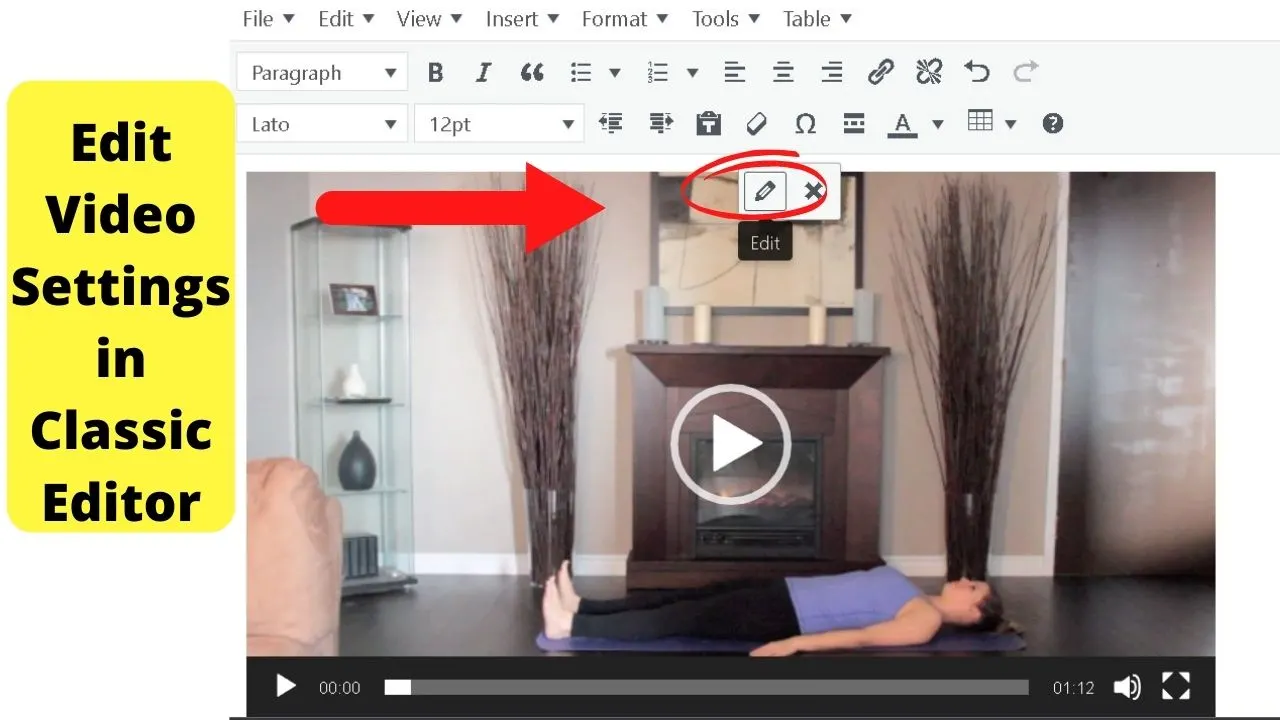
From here, in the “video details” tab, you can add alternative file types such as ogv and/or webm files. The more file types are added, the stabler the player becomes. One MP4 file will suffice.
For the “preload” options, you can choose from auto, metadata, or none.
The “preload” selection you make here impacts the speed of your site
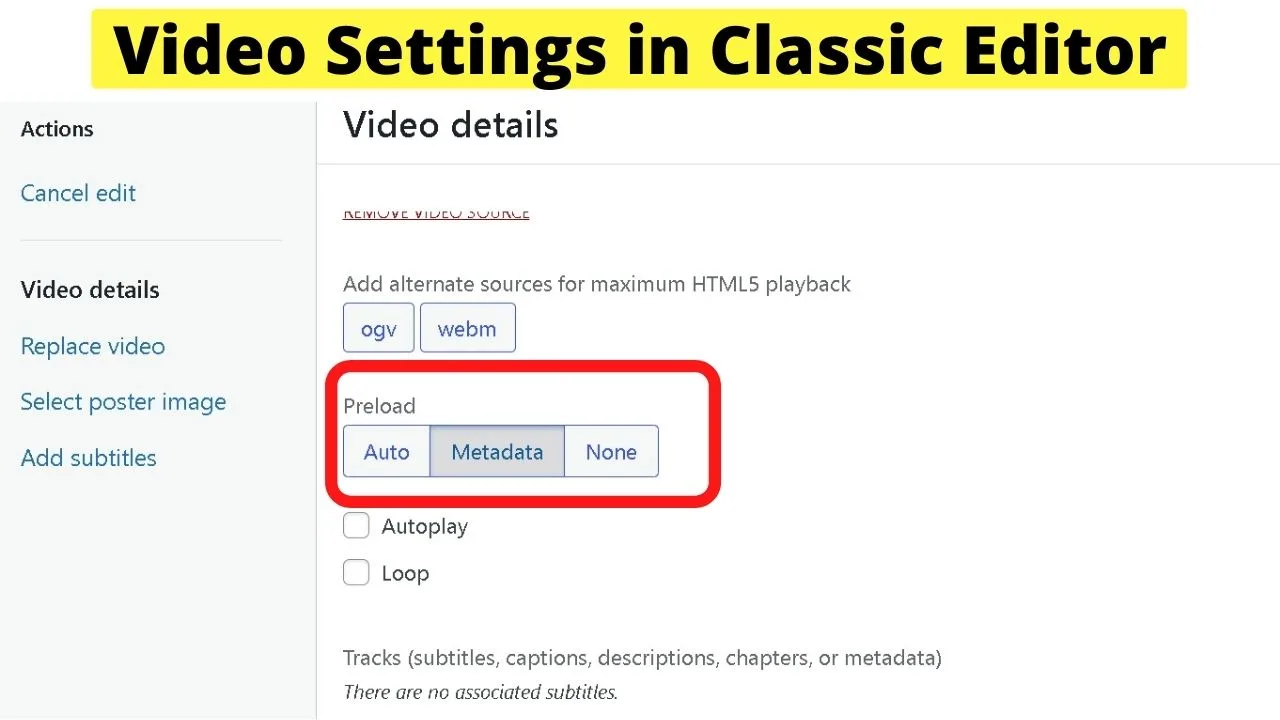
Selecting none will do nothing until the user clicks the play button. Then it will start downloading. If a user does not want to watch the video, it will not be loaded.
Selecting metadata will only download the text metadata for the video details, such as the filename and any captions you have set for the video. It will still not start downloading until the user clicks play.
Selecting auto will mean that regardless of whether the user clicks play or not, the video will automatically begin downloading. This setting has the largest impact on your server, and therefore, your site speed. It is not recommended to auto load videos.
Additional video settings in WordPress
To the right is a list of all the actions you can take for your videos. The above covered the first section for the “video details”.
Next, you can choose to “replace video” if, for example, you made an error and uploaded the wrong file.
Select a poster image is for setting the image that shows as an overlay before the video is played. This is handy for featuring your brand logo or the title of the video.
Lastly, you can add subtitles. Clicking the add subtitles link will open an upload page for you to drop your files into the media library.
The most common file type for subtitles is .srt (SubRip Text). These are plain text files created in the likes of notepad and saved as .srt files.
And that brings us back to why NOT to self-host videos on WordPress
For accessibility reasons, subtitles are good, and they factor into video SEO.
Using third-party video platforms like YouTube can automate some of the accessibility requirements for video. As an example, the YouTube caption editor uses speech recognition software to automate creating closed captions.
They are rarely accurate, but they do give you a starting point for editing. Self-hosting your videos, you have to create more files, upload more, and use more bandwidth.
Use a video hosting platform, then embed videos into WordPress and you will save time, effort, and money.
Videos on WordPress and SEO Best Practices
Having videos embedded in your WordPress articles is great for many reasons. Videos greatly increase the time people will spend on your website.
Let’s say you have a Youtube Video embedded in your article. In this case, when people will start viewing that video, they will usually do so by remaining on your page and, therefore, the time people spend on your website will increase greatly.
Now, if you have lots of ads on your website, then your ad earnings are likely to skyrocket because the more time people spend reading your articles (or viewing videos in your articles), the more money you can make with advertisements such as banner ads. Simple.
However, there is one big downside of having (t00 many) videos embedded in your articles. And now, please speak after me: “If done wrong, embedding videos in your content can have a very very bad effect on site speed.”
And site speed is no trivial matter.
In fact, site speed is now officially a Google ranking factor and hence, has a direct impact on SEO.
The good news, however, is that embedding videos on your website only have a bad effect on site speed if you are doing it WRONG.
So how can you do it right, then?
It’s actually simple. Just download the plugin Lazy Load – Optimize Images from WP Rocket!
Now, what this plugin will do for you is that it will only load a preview of your video. This means that your article will only show an image preview of your video and only when your visitors click on the video itself the video will be loaded.
Sounds simple? Yes! But it makes a huge difference because what usually happens is that when you embed videos on your website these videos will load when the article is loaded and that has a terrible effect on site speed.
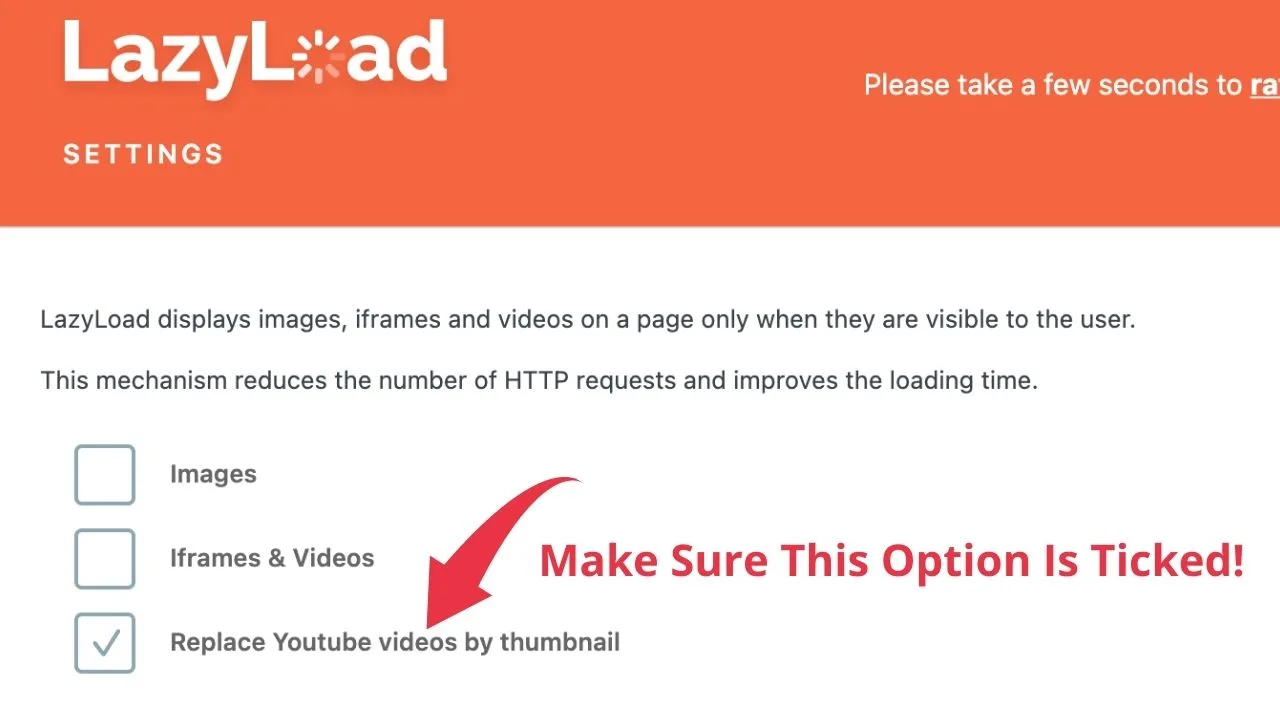
See below for the exact settings that you should set for Lazy Load plugin.
As maschituts.com only embeds Youtube videos, we only ticked the option “Replace Youtube videos by thumbnail. ” If you do have other video embeds on your website, you might also want to tick the option “Iframes & Videos.”

Hey guys! It’s me, Marcel, aka Maschi. On MaschiTuts, it’s all about tutorials! No matter the topic of the article, the goal always remains the same: Providing you guys with the most in-depth and helpful tutorials!


