All HTML does is mark your text up in a format that browsers can interpret. It is an easy enough language to learn and implement.
For simple websites that require no advanced coding, HTML may be all that is required; all you need is an HTML file.
Aside from uploading web pages, third-party services like Google may require you to know how to upload an HTML file to WordPress to verify that you own the website before they release all the data they can gather about your site and its users.
How to upload an HTML file to WordPress
To upload an HTML file to WordPress, you can use the cPanel provided by your hosting service or an FTP client. Alternatively, the WP File Manager Plugin can be installed to drop files and folders onto the server directly from within the WordPress admin dashboard.
How to Upload an HTML Page to WordPress
With WordPress, you do not have to choose between dynamic content or static HTML pages. You can add an HTML page to any WordPress website.
An example of when this is handy is if you need to have a sales page professionally designed. An HTML page will be cheaper than hiring a WP developer to customize your theme.
To add an HTML page, it is (usually) the index.html file that needs to be uploaded. This can be done in one of three ways.
- With cPanel
- Using FTP
- Installing the WP File Manager Plugin
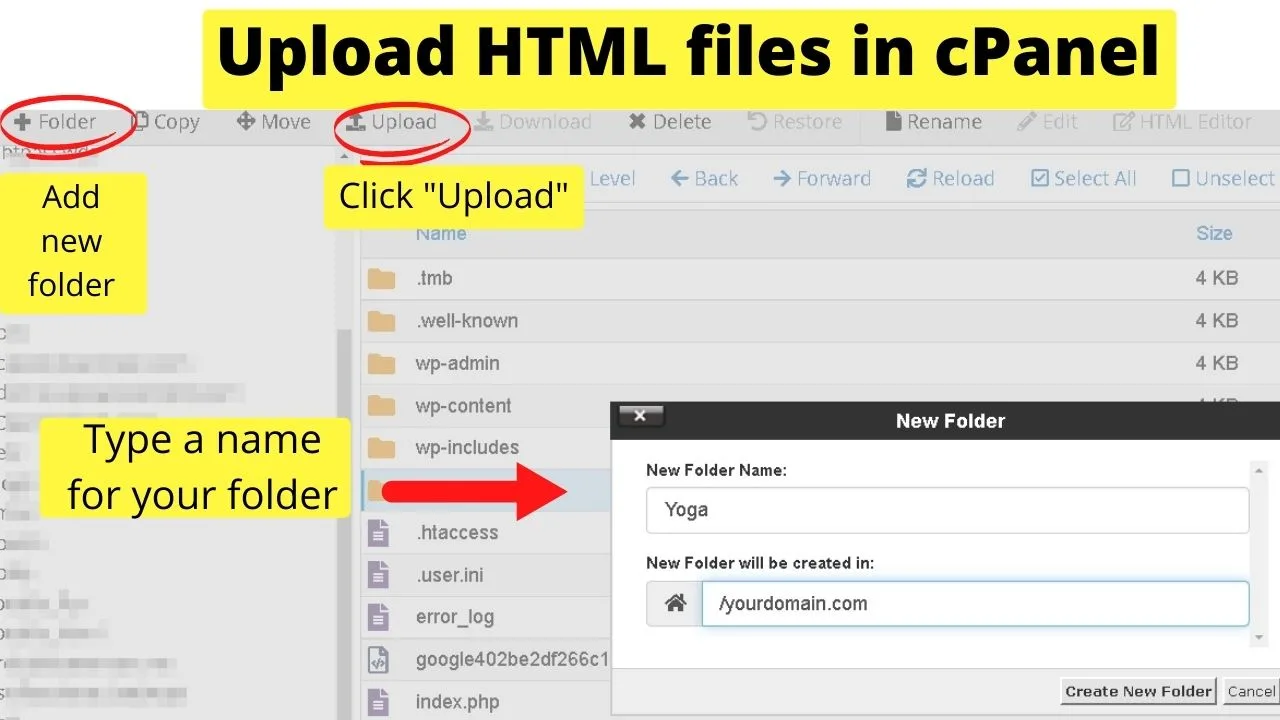
How to add an HTML page to WordPress in cPanel
1. Log into cPanel
2. Navigate to the root directory of the website you want the page to be on.
3. Click “Add new folder”. Name it whatever you want the URL to be after the trailing slash at the end of your domain. For example, yoursite.com/your-product-name. The name of the folder will be the URL address path to access the page.
4. Open the folder
5. Upload the HTML file
How to Upload an HTML file to WordPress via FTP
To upload an HTML file to WordPress via FTP, you need FTP client software. FileZilla is one of the most widely used. It can be downloaded at www.filezilla-project.org and is available for PCs and Macs.
Like WordPress, FileZilla is open-source software, so there are no fees.
The details you use to log in to cPanel double up as your FTP credentials. The only other detail you need is your hosting server’s IP address.
Login to cPanel, and the details will be shown on the right sidebar. This information is usually included in the welcome email you receive from your hosting provider.
Once connected to your hosting account, FileZilla has a split-screen view. The files on your computer show on the left, and then to the right are all the files on your server.
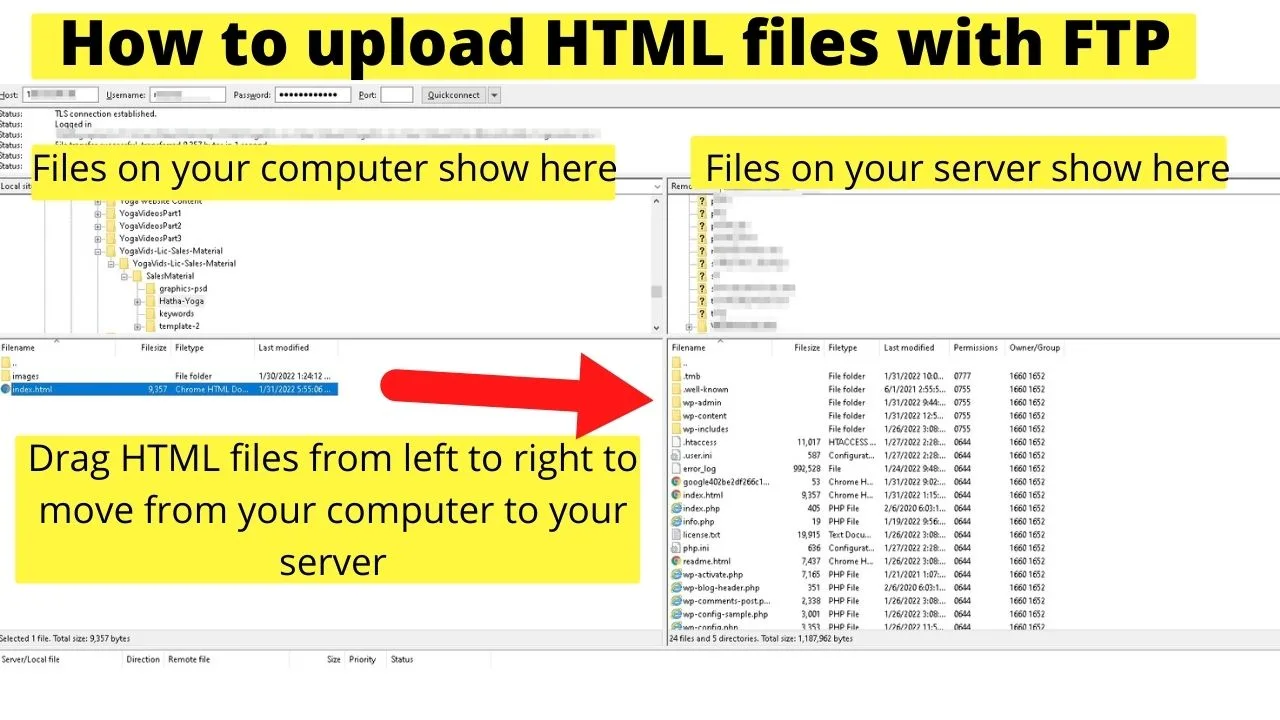
Using FTP to upload HTML files to WordPress is as simple as locating the file on the left and then dragging it to the right.
You can right-click on the remote server column and select “create directory,” and that will add a new folder.
Using folders for your HTML pages is handy for organizing your content.
As an example, you could create a folder for products, and then every HTML page you have for any new products being added can be dropped into the products folder.
In our example, we created a folder for Products, then another for Hatha Yoga, then dumped in an index.html file and an images folder by dragging from left to right. Within seconds, the content is published at sampleurl.com/Products/hatha-yoga.

FTP is one of the faster ways to get multiple files uploaded to WordPress.
Install the WP File Manager Plugin to Upload Files to WordPress
The WP File Manager plugin gives you drag-and-drop simplicity for uploading HTML files and entire folders to your WordPress server.
It is similar to FTP, only it bypasses the need for FTP client software, nor do you need to login to your hosting account.
Your WP administrator password is all you need for this, so it may be more time-efficient if you regularly need to upload HTML files to your site.
Go to Plugins, select “Add New,” and search for “WP File Manager.”
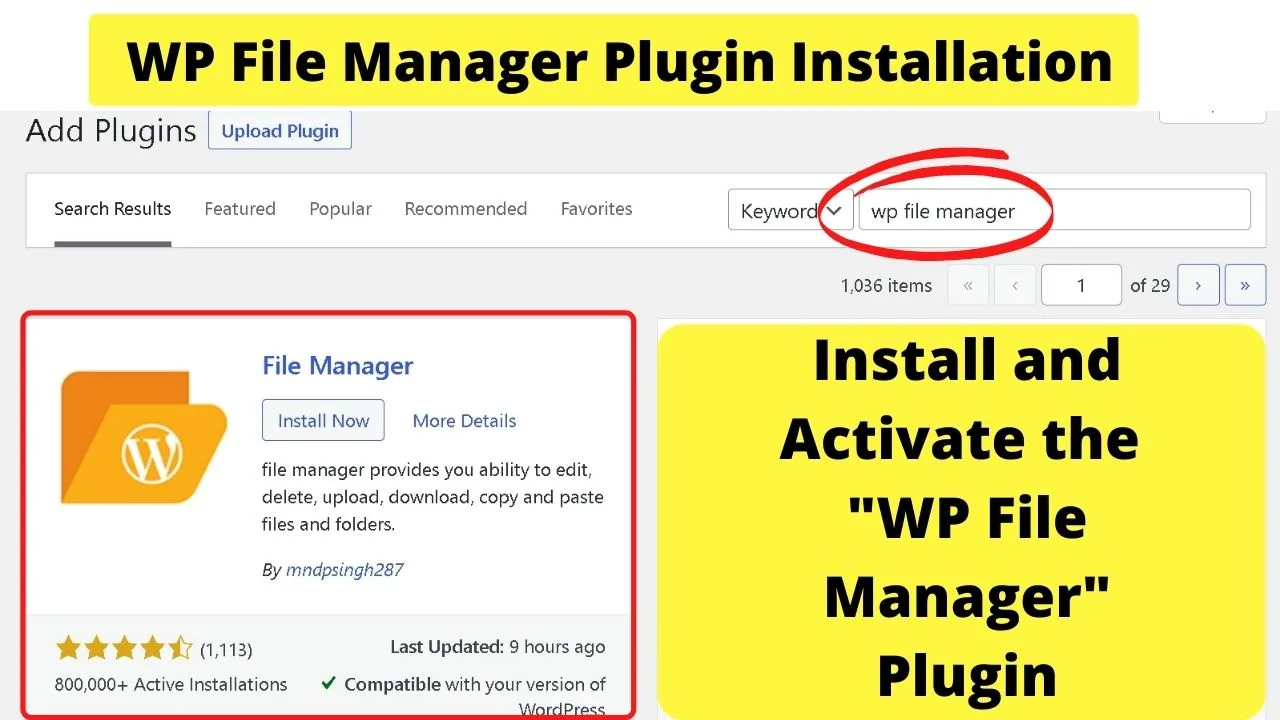
Click install, then activate.
On your left sidebar menu, click on WP File Manager.
On the top navigation bar, click the icon to “Add New Folder.” The folder’s name will become part of the URL, such as yoursite.com/Specials.
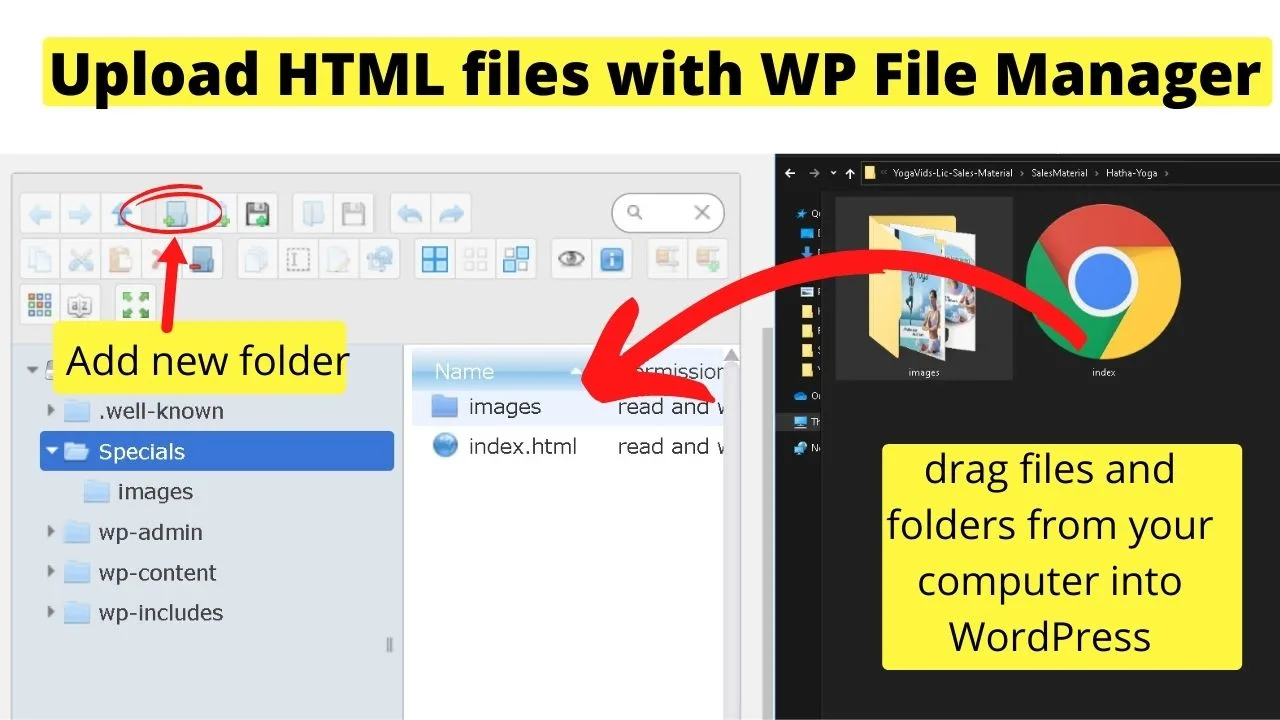
Click to open the folder, then find the HTML file(s) on your computer that you want to upload. Drag the file into the area marked “Folder is Empty. Drop to Add Items.”
Once the files are added, go to yoursite.com/Specials (or whatever name you gave the folder). The HTML file will load there.
Google site verification using the HTML upload method
Google has a suite of tools designed to help website owners optimize their sites for performance. To get full access to everything, you must verify that you own the website property.
One of the preferred verification methods is using the HTML file upload option for site verification. The reason it is preferred is that you need to have access to the server that your site is on to get the file uploaded.
If you do not own a website, you will obviously not be able to upload files to the root directory. That is the logic behind the HTML file upload option for site verification.
How to verify your site with Google using an HTML file upload for WordPress
To gain access to Search Console, go to https://search.google.com/search-console/about and sign into your Google account.
Once logged in, click “Add Property”.
To use the HTML upload option, select the “URL prefix” and type in your website address, then click continue.
The next screen is the start of the verification process. The recommended method is to download the HTML file and then upload it to your website.
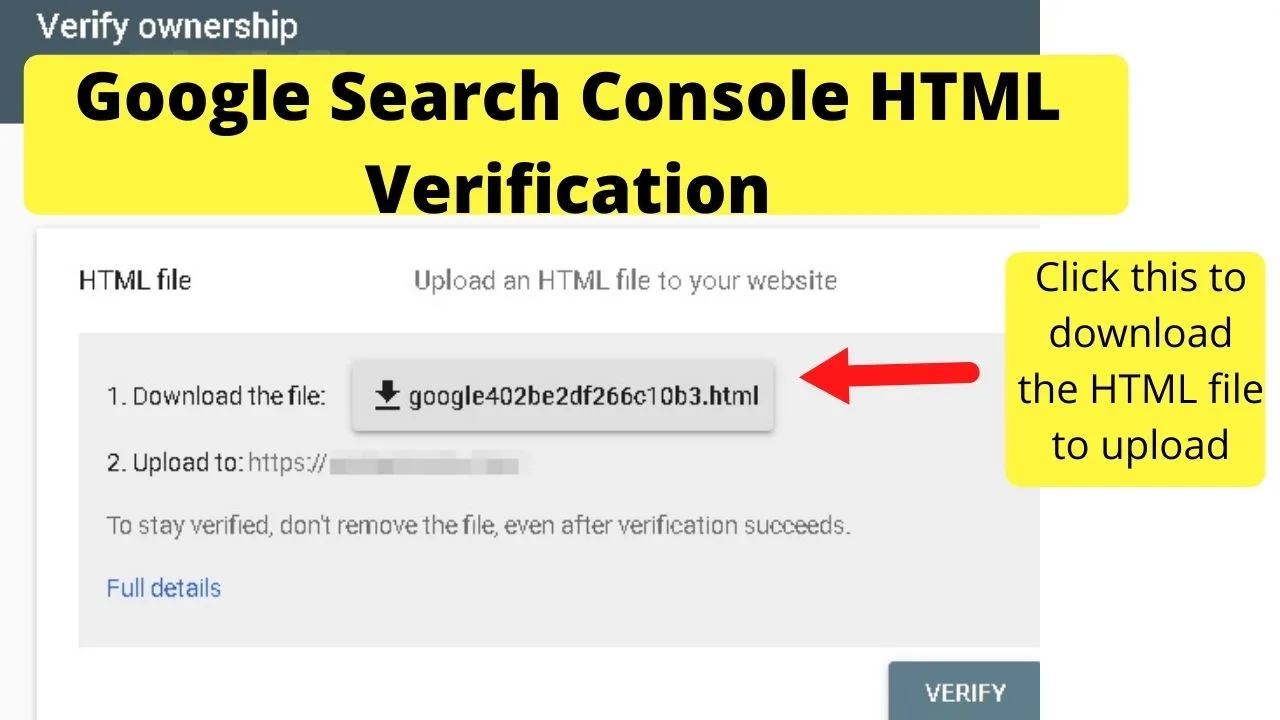
Click the download icon to save the HTML file to your computer. Do not click “verify” yet. The file now needs to be uploaded to your server.
Log into cPanel, go to File Manager, and it is the root directory this file needs to be uploaded to. If you only have one site, that will be the public_html folder. For addon domains, go to the root folder for your domain.
On the top navigation bar, click the “upload” button. On the next page, select the HTML file to upload.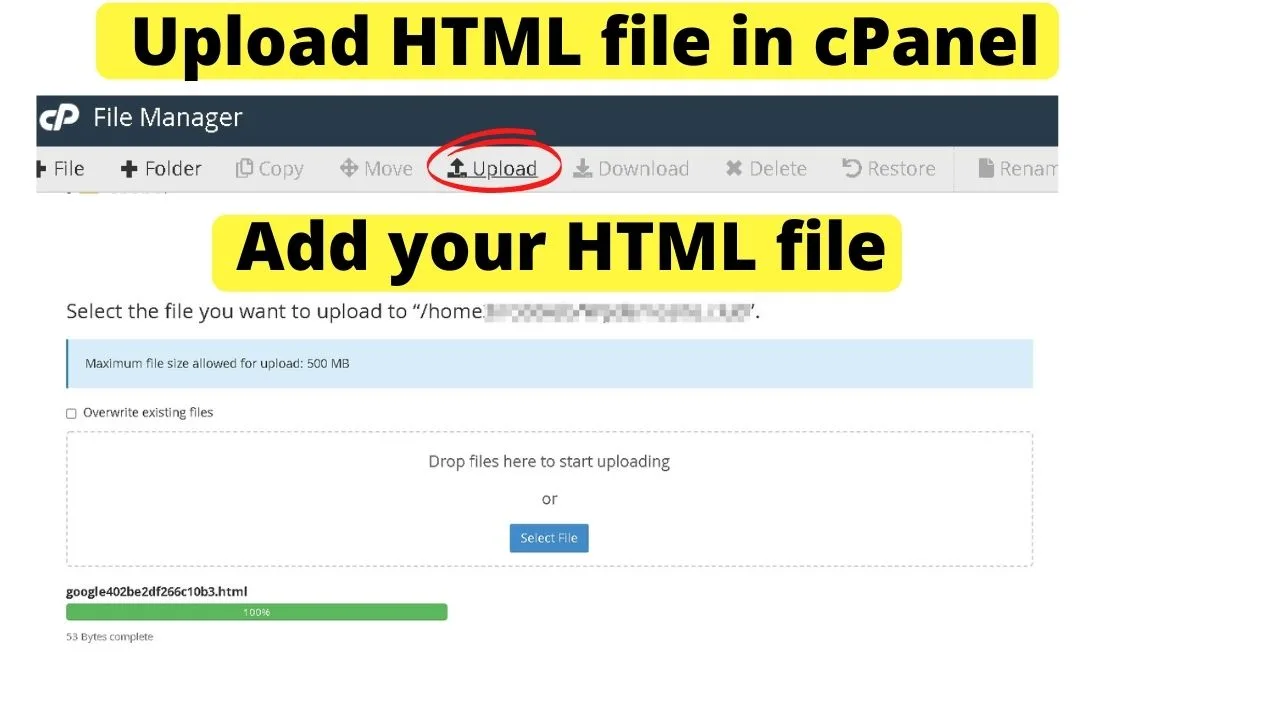 Once the file is uploaded, go back to Google Search Console. Now click “Verify,” and it will show a message stating “Ownership Verified.”
You will now have full access and permissions within the Google Search Console.

Hey guys! It’s me, Marcel, aka Maschi. On MaschiTuts, it’s all about tutorials! No matter the topic of the article, the goal always remains the same: Providing you guys with the most in-depth and helpful tutorials!


