Canva is pretty easy to use.
However, Canva constantly adds new features to their platform and they have an endless amount of templates and different sorts of projects, so that, sometimes, it can be difficult to achieve your designing goals.
One problem that many Canva users are facing is that they don’t know how to add audio per slide in Canva.
The main reason this happens is because people use the wrong sort of Canva project to begin with (they choose a custom size template instead of a dedicated VIDEO project when creating their design).
And while adding video works in Canva regardless of what kind of project you created initially, Canva’s new video features can only be used if you created a Canva VIDEO project.
But even if you created some other sort of project in Canva, there actually is one VERY NICE WORKAROUND to still get this done.
Sounds confusing? Well, it kinda is.
In this article, though, we will get this problem sorted out real quick.
How to Add Audio Per Slide in Canva
To add audio per slide in Canva, you will need to make sure that you are working on a Canva video project. In case you created a custom size project or some other sort of Canva project, you will first need to create a new blank video project and then copy the contents over from your original project in order to add audio per slide (page) in Canva.
Adding Audio Per Slide in Canva when working on a Non-Video Project
When trying to add audio per slide in Canva, the first thing you need to ask yourself is the following: Did I actually create a Canva Video Project (using Canva’s main video template) or did I create a custom size project in Canva?
If the answer to this question is that you created a Non-Video-Project, then here’s how you solve this issue (if you did create a video project, then skip this section and go to the next section in this article to find your answer).
As you created a non-video project (= you clicked on create a new design in the upper-right corner of the Canva homepage and then chose some other template than VIDEO or went with a CUSTOM SIZE), you will actually need to copy the contents of your project and then copy these over to a BLANK Canva video project, in order to be able to add audio per slide in Canva.
Here’s how you do it:
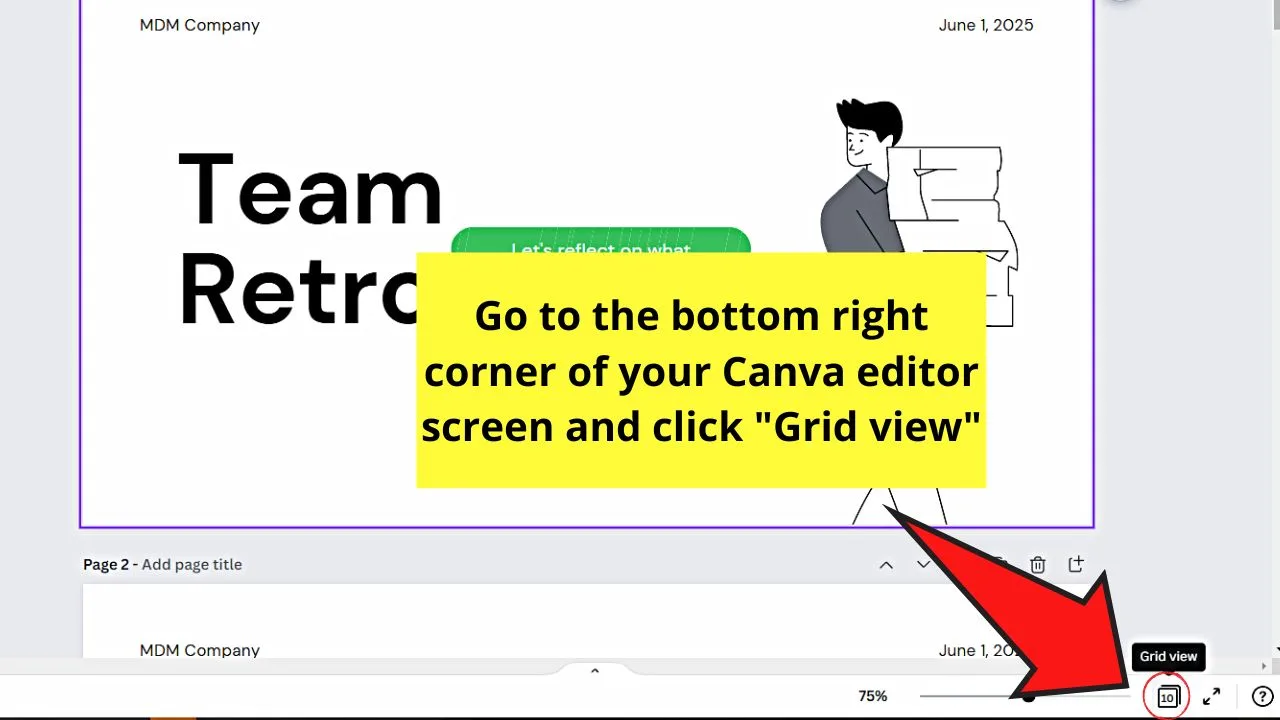
Step 1: In your project, click on “Grid View.” You will find “Grid View” in the lower-right corner of the screen.
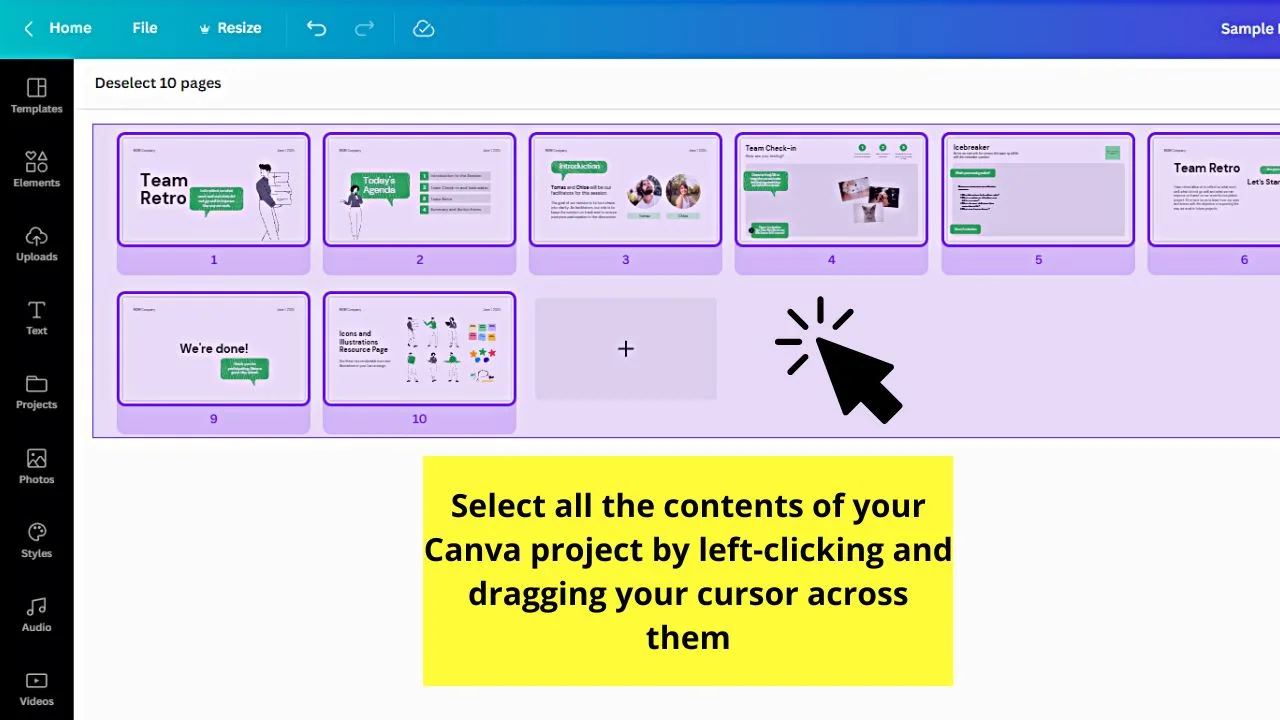
Step 2: Left-click and drag over all the pages in your project in order to select all contents.
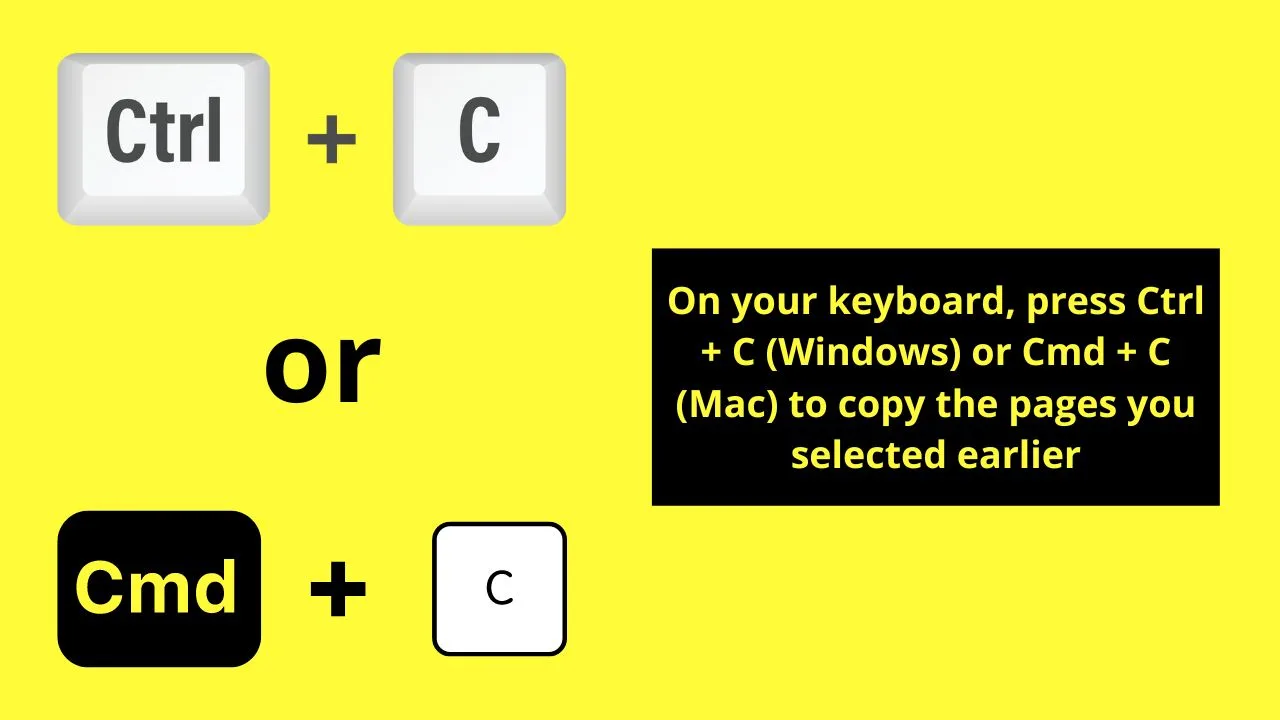
Step 3: Press Ctrl + C (Command + C on a MAC) on your keyboard in order to copy all of the contents.
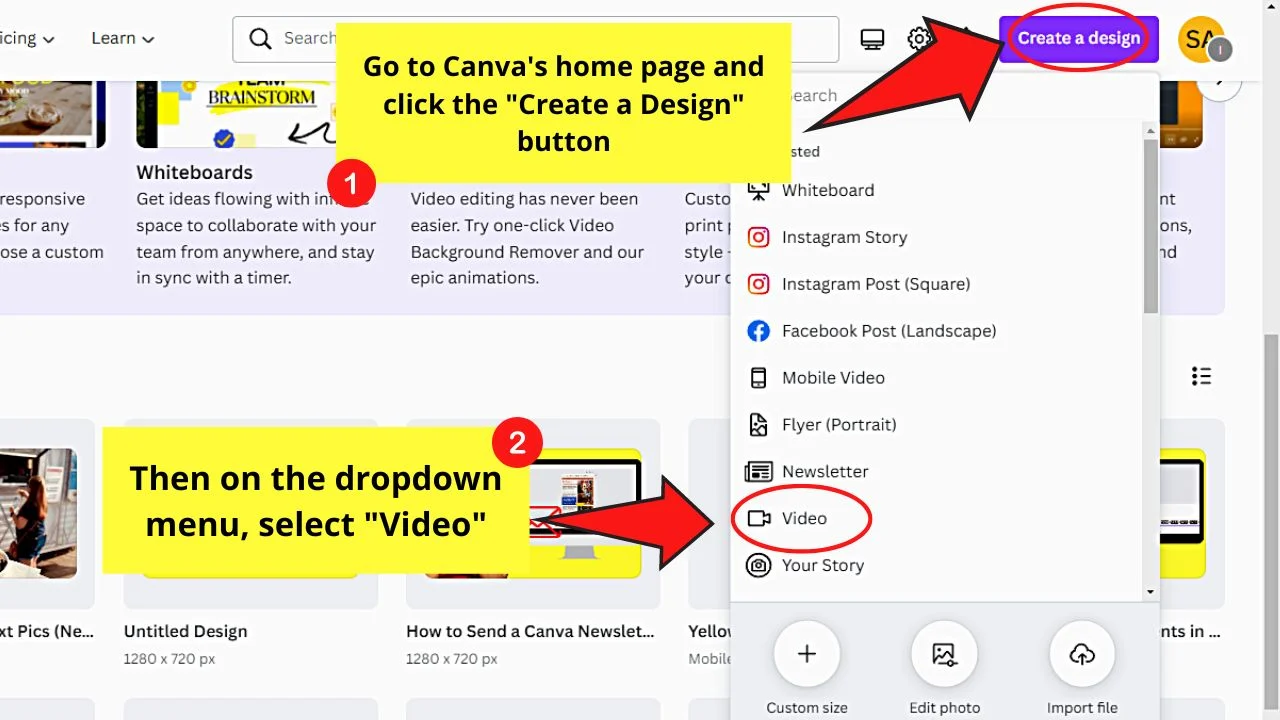
Step 4: Create a new Canva video project by clicking on “Create New Design” and then choose “VIDEO”
Step 5: Copy your contents over from your original project, all you need to do is to press Ctrl + V (Command + V on a MAC) to copy all your contents over.
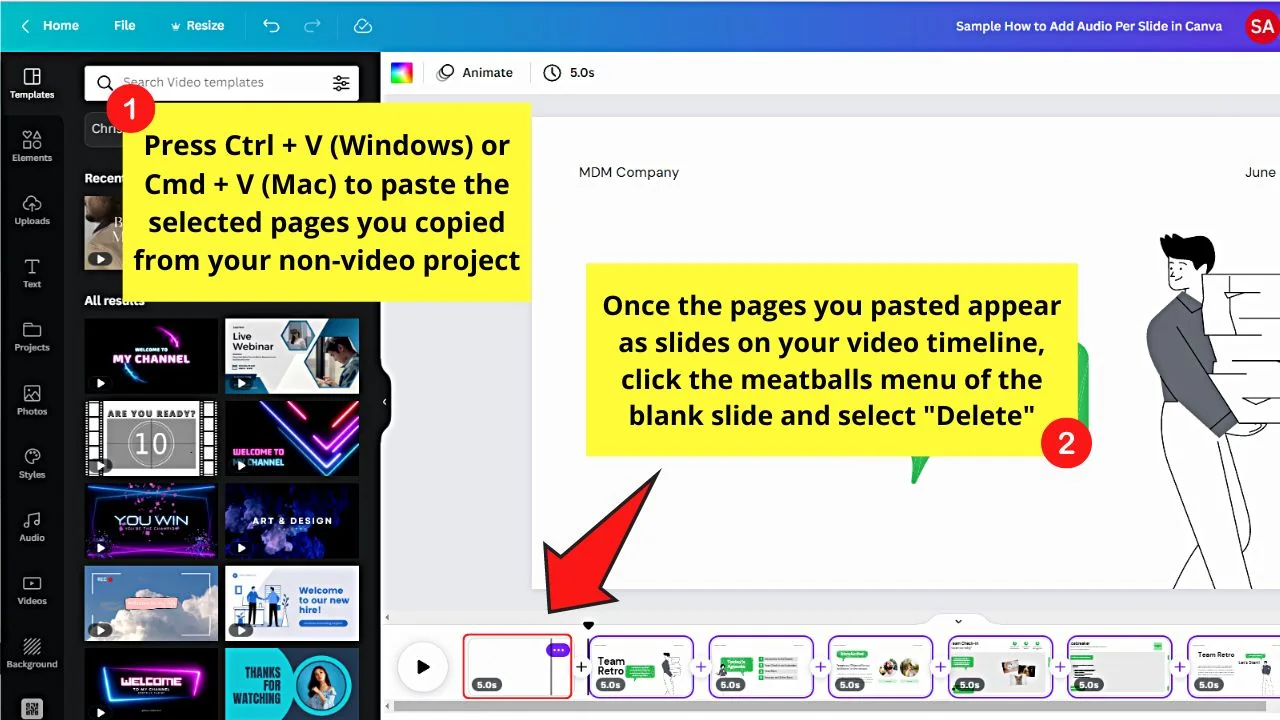
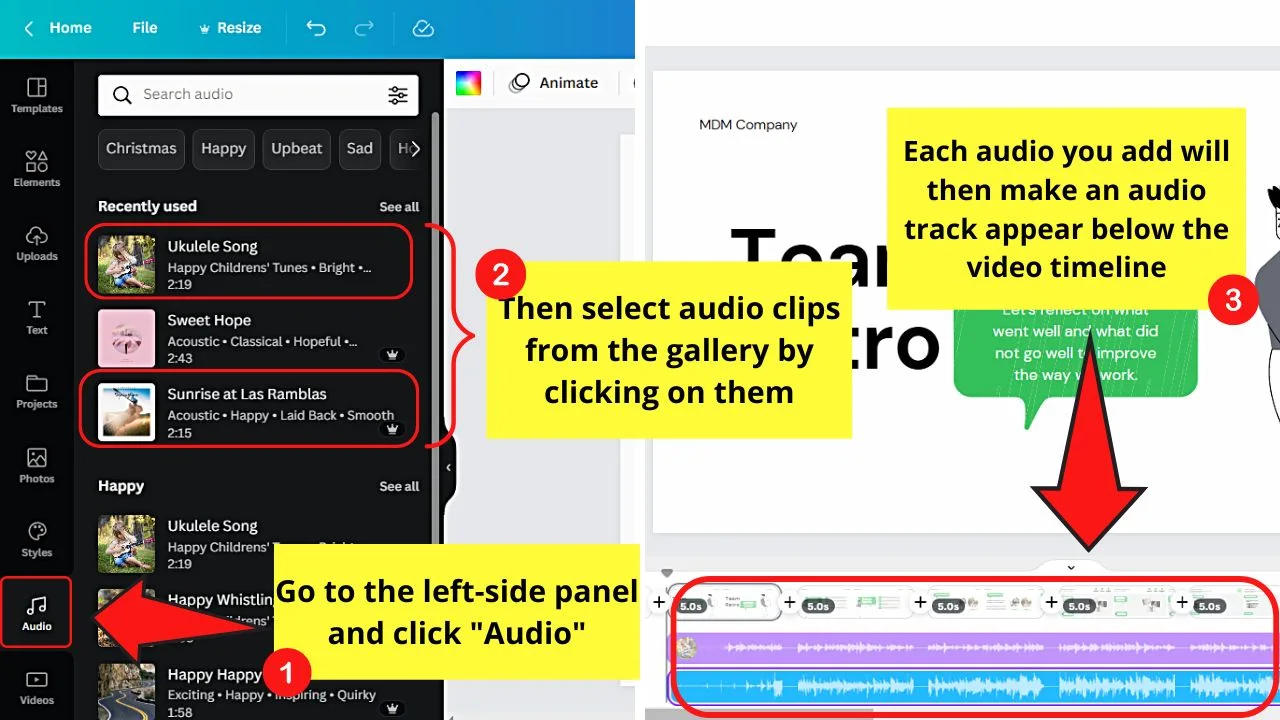
Step 6: Head over to the Audio Tab in the left sidebar and add your audio clips to the timeline (each audio clip will be automatically put on a new audio track in the timeline).
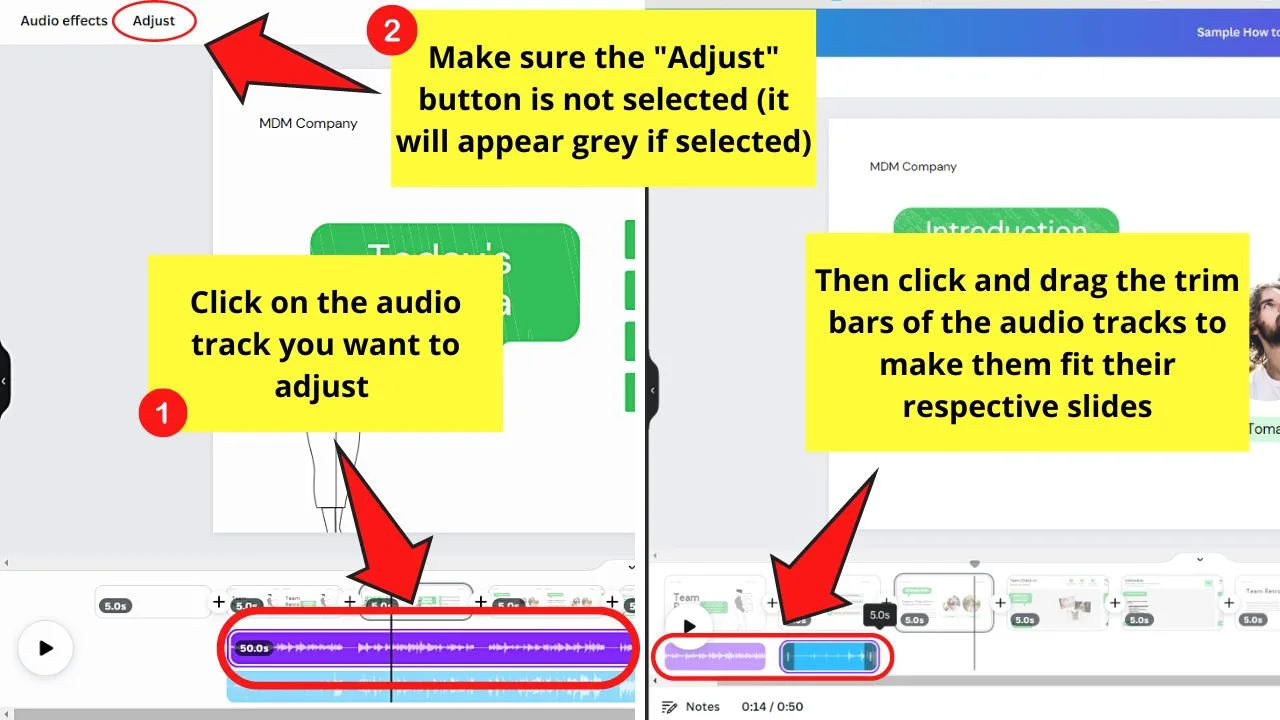
Step 7: Adjust the length of each audio clip to make it fit your slides
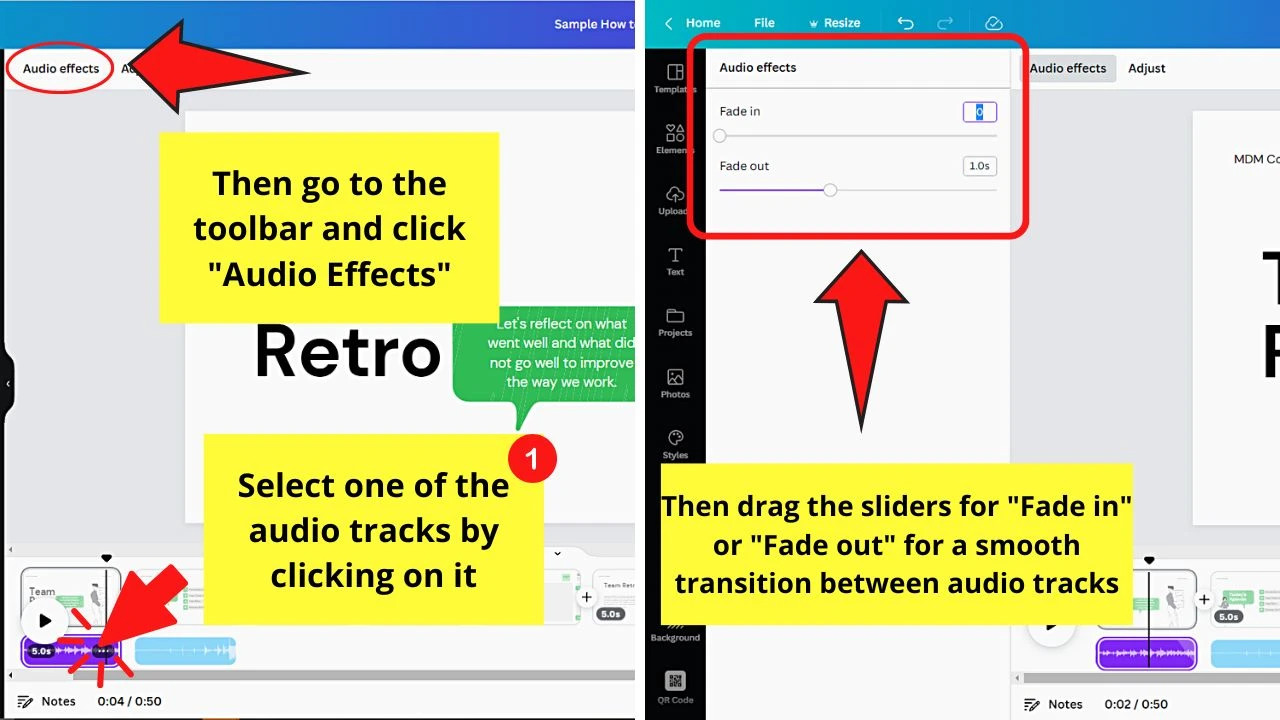
Step 8: Use the new Canva Fade in/Fade out feature to make the transition between the audio clips smoother (Optional)
Adding Audio Per Slide in Canva when working on a Canva Video Project
If you created a Canva video project from the get-go, adding audio per slide is actually an easy feat. Here’s how you do it:
Step 1: Head over to the Audio tab in the left sidebar.
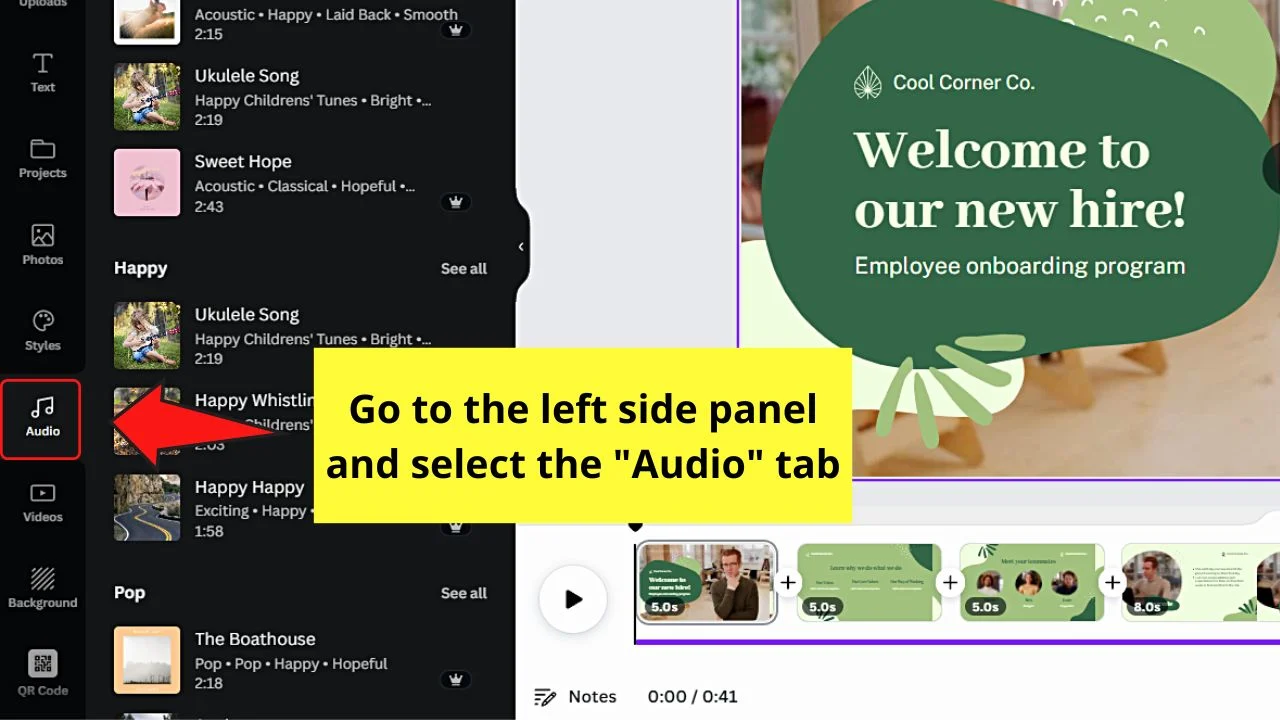
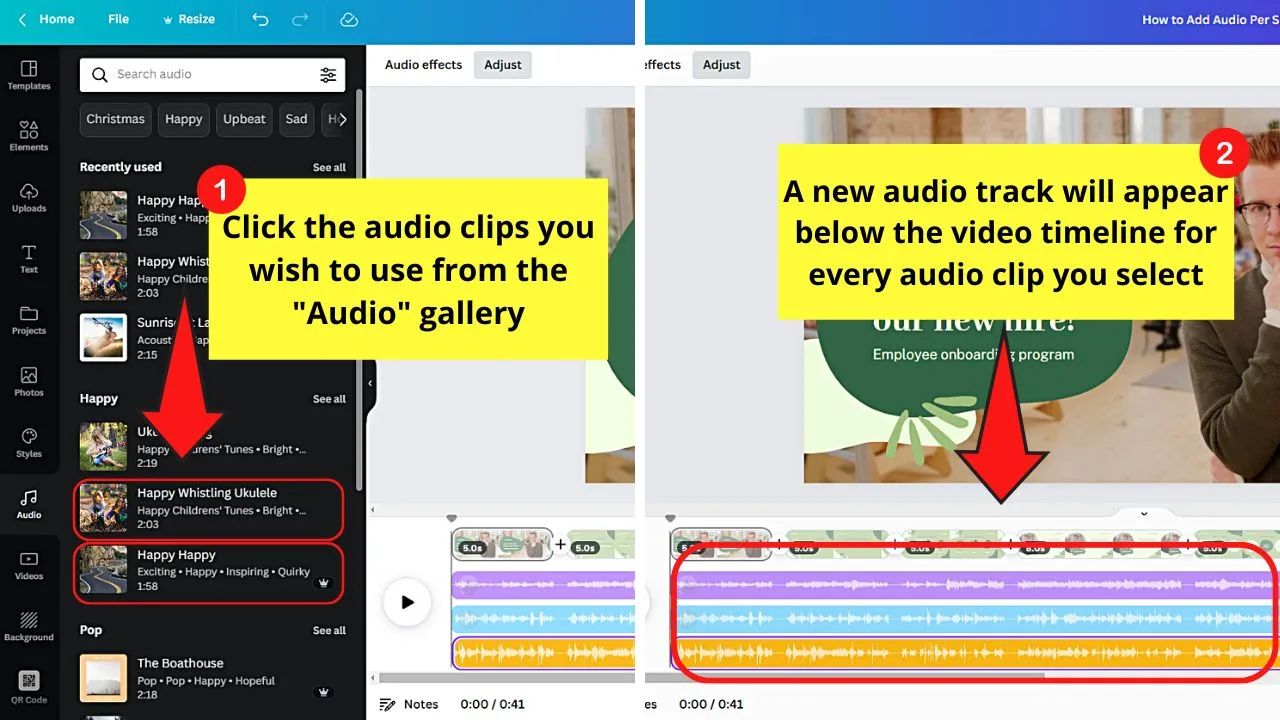
Step 2: Add the audio clips of your choice (each audio track will be added on a separate audio track in the timeline)
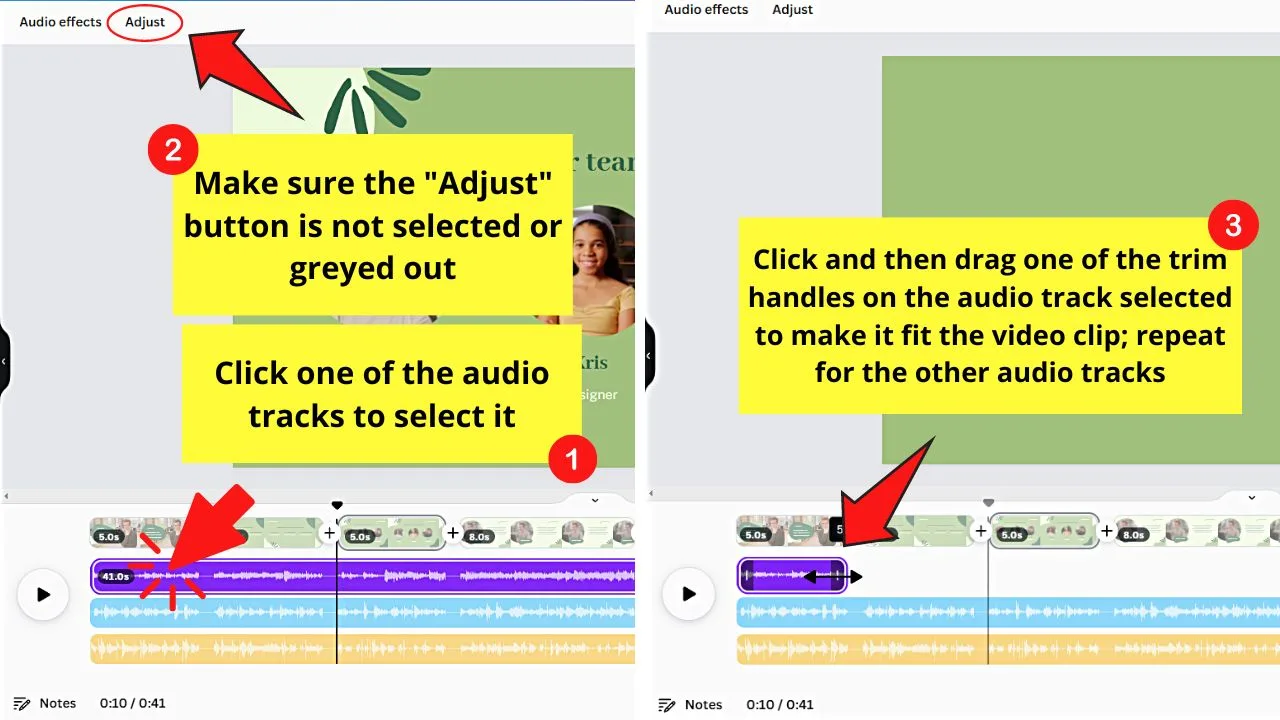
Step 3: Adjust the length of each audio clip to make it match the duration of your slides.
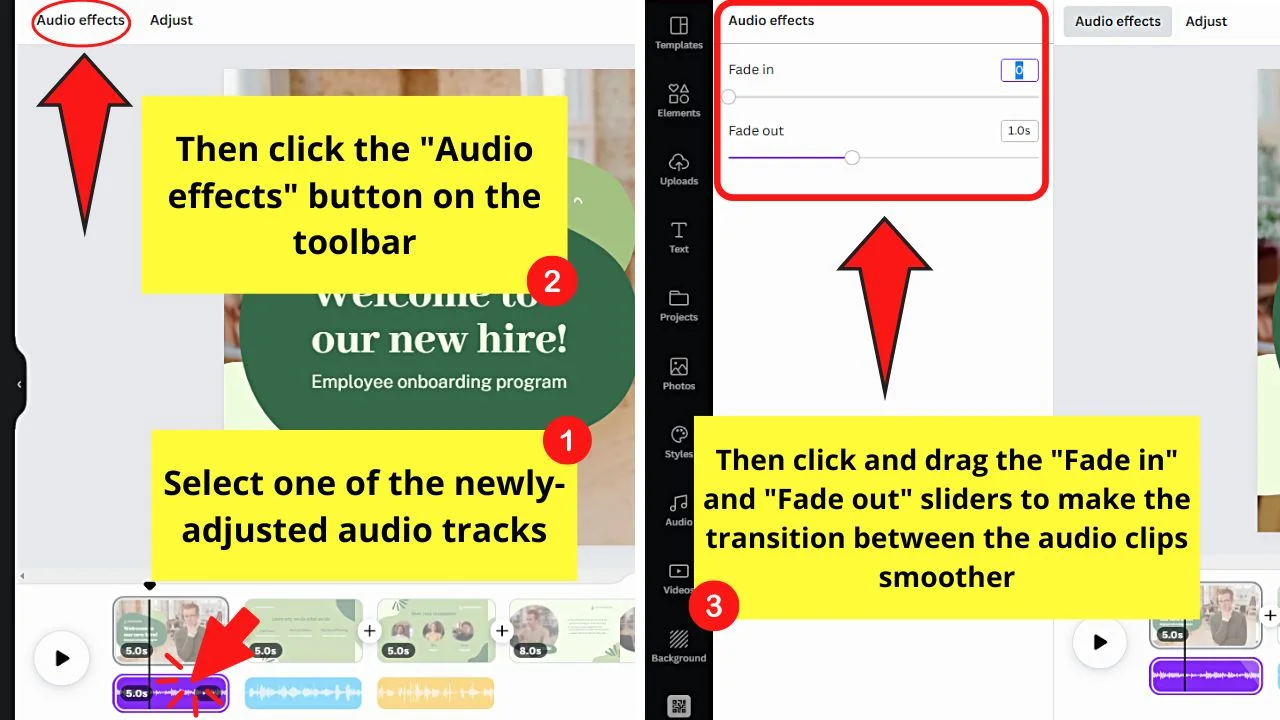
Step 4: Use Canva’s new Audio Fade in/Fade out feature to make the transition between audio clips smoother (Optional)
Using your own audio per slide in a Canva video Project
You don’t necessarily need to use Canva music for your projects.
If you do have your own audio, that’s perfectly fine (or even better).
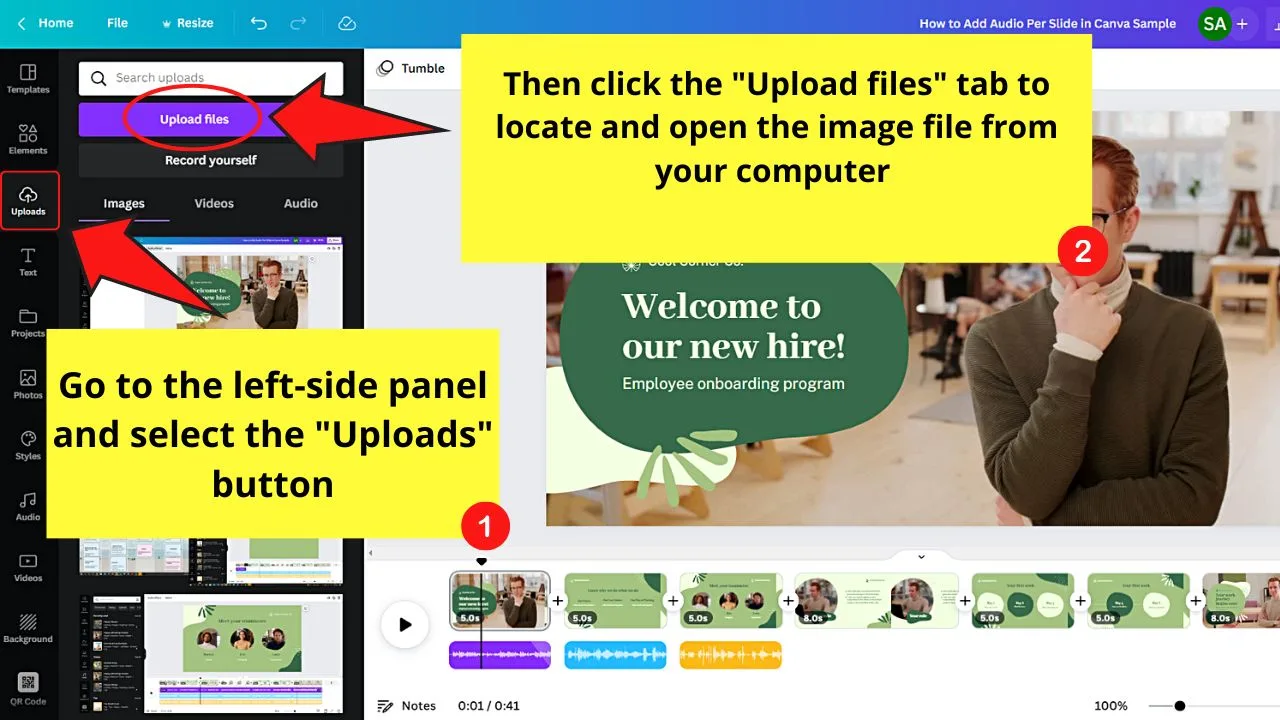
In order to upload your own audio material, simply click on “Uploads” in the left toolbar, then click on “Upload files” and then locate the audio files on your computer. You can either upload mp3 files or WAV files.
Once these audio files are uploaded, you will find them in the “Audio” tab under Uploads.
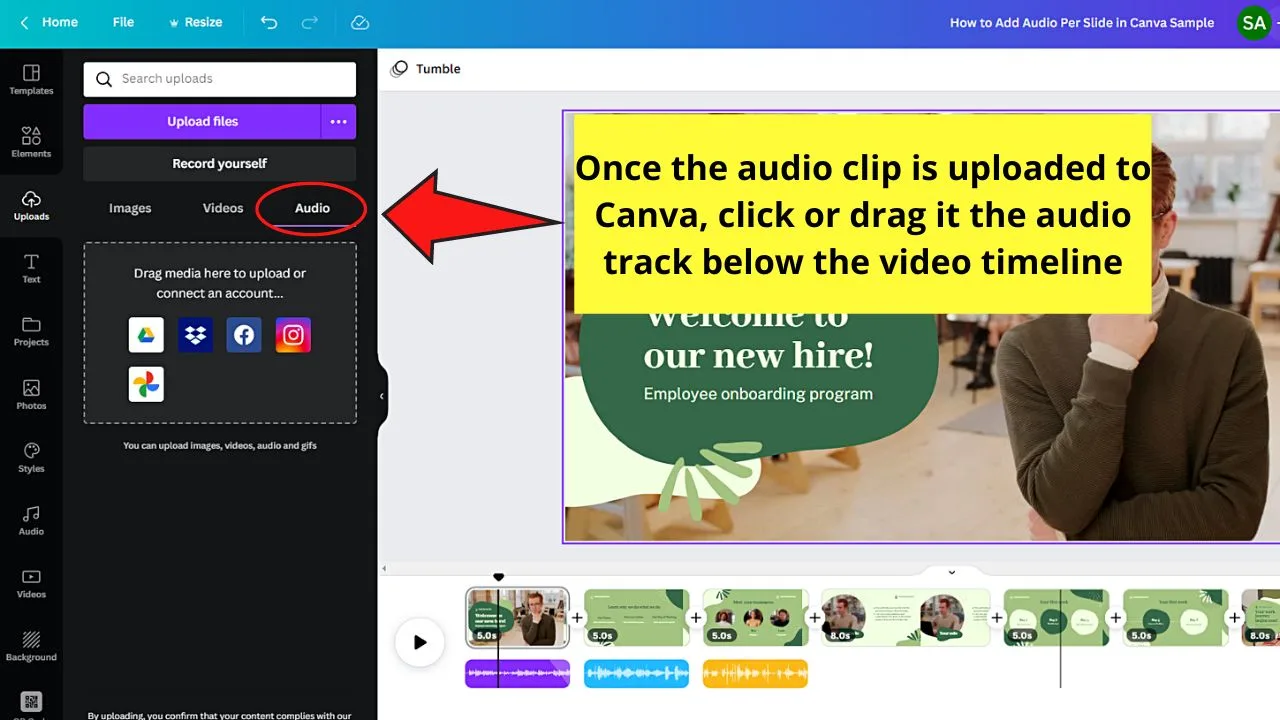
To use these audio files in your project, you can simply click on them or manually drag them onto your project’s timeline.
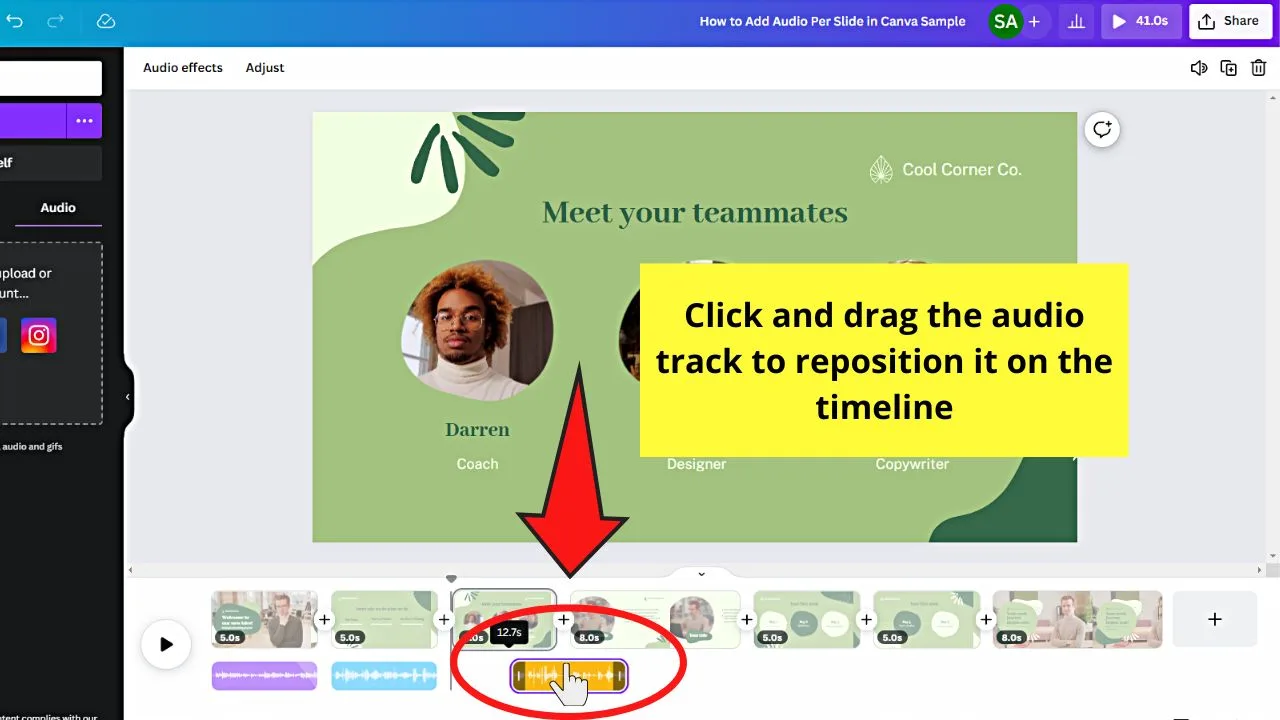
After adding the audio files to your project, you will need to reposition the audio clips and change the duration of each clip to make sure they match your video slides.
To reposition an audio clip, simply drag the audio clip around in the timeline by left-clicking on it and then move it to the left or right (make sure that “Adjust” on the top of the screen is not selected when doing so because this will prevent you from moving it).
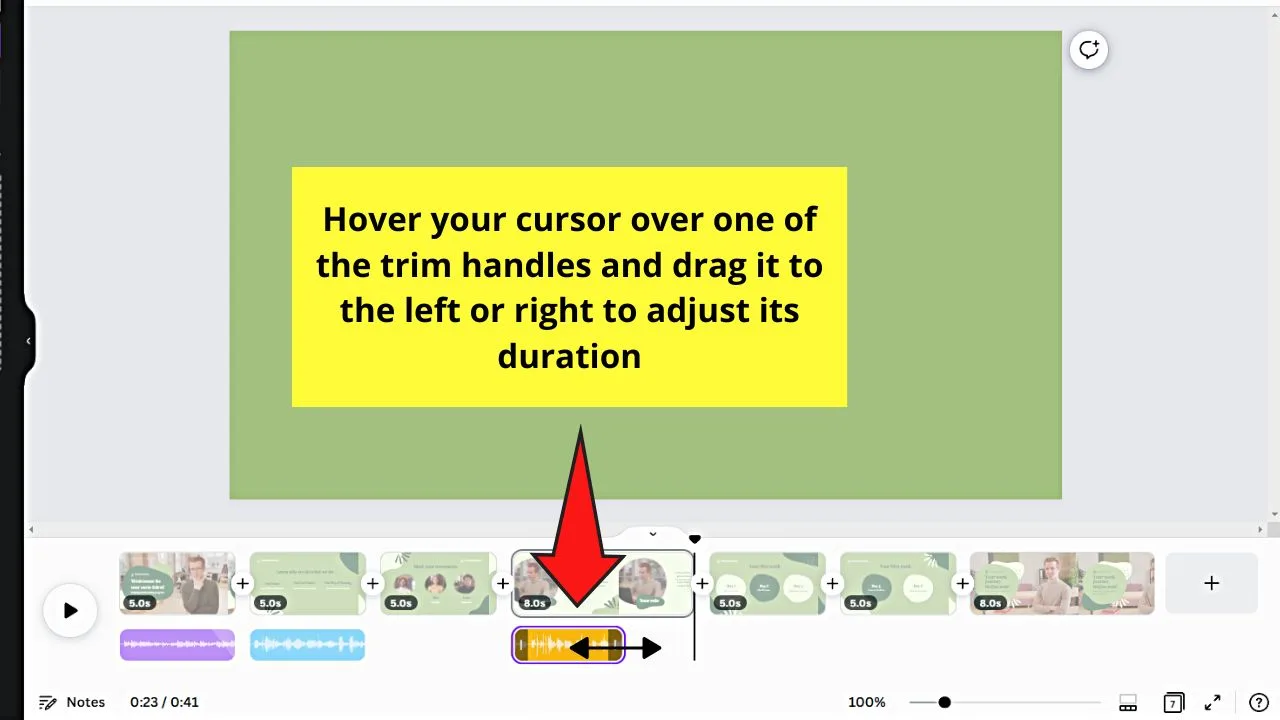
To change the duration of an audio clip, simply hover either the beginning or the end of a clip and then drag either to the left or right.
The “Problem” with Canva Templates (How to Use Slide Templates in Canva Video Projects)
Canva is actually pretty smart.
Depending on the type of project AND the dimensions that you are choosing, Canva will display DIFFERENT templates under “Templates” in the left toolbar.
While this works in your favor more often than not, it can also be really annoying because, sometimes, this means that you just simply can’t find the template that you need because Canva will simply not show it under templates.
And the solution in these cases is always the same: Create a second project with the dimensions and project-type necessary to find the template and then copy the whole contents over to your new blank video project.
So, if we were to apply this to Canva Slide templates, we would first create a normal slideshow with pictures (based on a custom-size Canva project).
Then, we would simply also create a blank video project and then copy the contents over from our first project in order to be able to use our slide template in the video project (because in the video project, remember, the slide template can’t be found because of Canva’s “smart” filtering).
Frequently asked questions about audio in Canva
Why can’t I add more than one audio clip in Canva?
If you can’t add more than one audio clip to a project in Canva, then the reason for this is that you are not working on a Canva video project. If you went with a custom-sized project from the start, you can only add one audio clip to your project.
Do I need Canva Pro to add more than one audio clip to a project in Canva?
You can add multiple audio clips to a project in Canva even as a Canva free user. However, you will need to make sure to create a Canva Video project in order to do so.
Can I upload my own audio tracks to Canva?
To upload your own audio to Canva, select “Uploads” from the left toolbar, then click on Upload files and you can then upload your audio files (mp3 or wav) to Canva.

Hey guys! It’s me, Marcel, aka Maschi. On MaschiTuts, it’s all about tutorials! No matter the topic of the article, the goal always remains the same: Providing you guys with the most in-depth and helpful tutorials!


