Discord’s one of the raving communication apps that anyone on the globe can use nowadays.
Though this app’s more known among gamers, the ability to create servers and channels for various purposes is what makes it popular among the general population.
But, after creating a Discord server and making sure its member count grows, there are times that it becomes a bit disorganized.
That’s when creating a rules channel can help.
With that said, let’s check out below how exactly you can make a rules channel in Discord, both on a desktop and mobile phone.
How to Make a Rules Channel in Discord on a Desktop
To make a rules channel, right-click on the server icon and select “Create Channel.” Type the channel name and choose “Text Channel.” Click “Create Channel” to save the settings made. Set the permissions before typing the rules on the message field. Then, press “Enter” to post your rules.
As you can see, the process of making a rules channel in Discord using a computer is quite simple.
But, in case you’re a complete newbie and don’t know how to do the entire process by yourself, feel free to continue reading below.
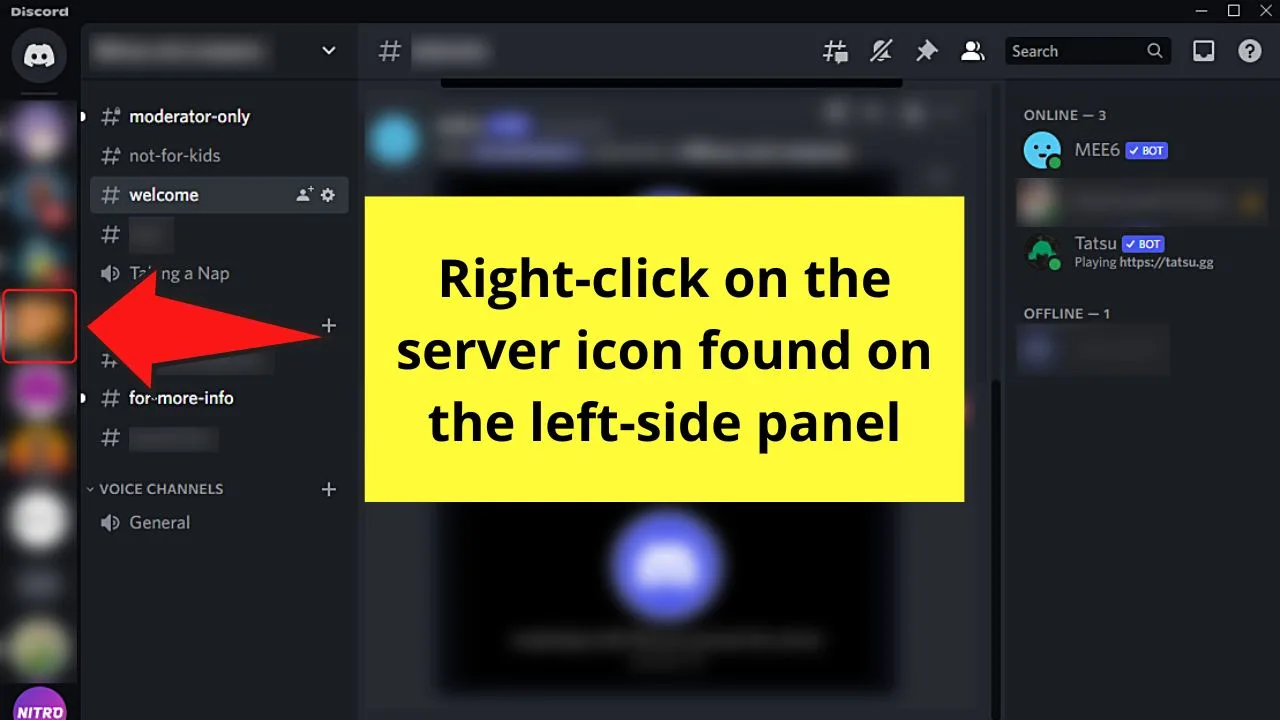
Step 1: Right-click on the server icon on the left-side panel
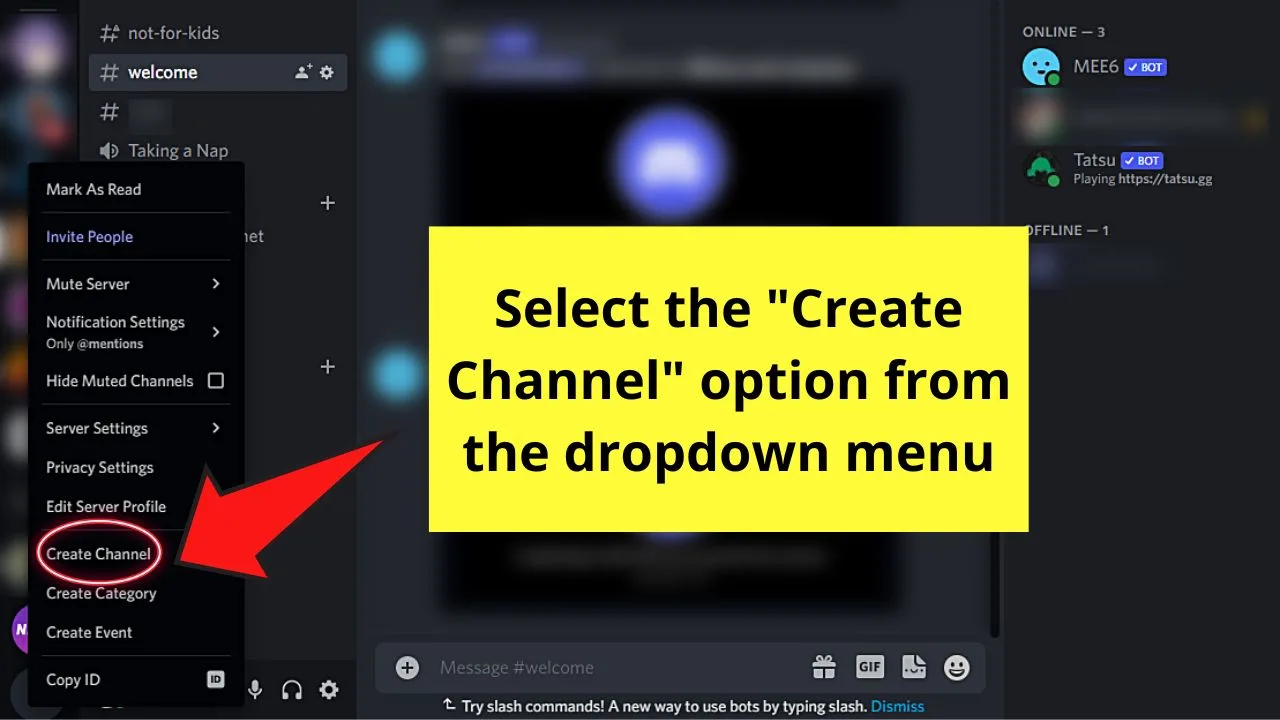
Step 2: Click the “Create Channel” option
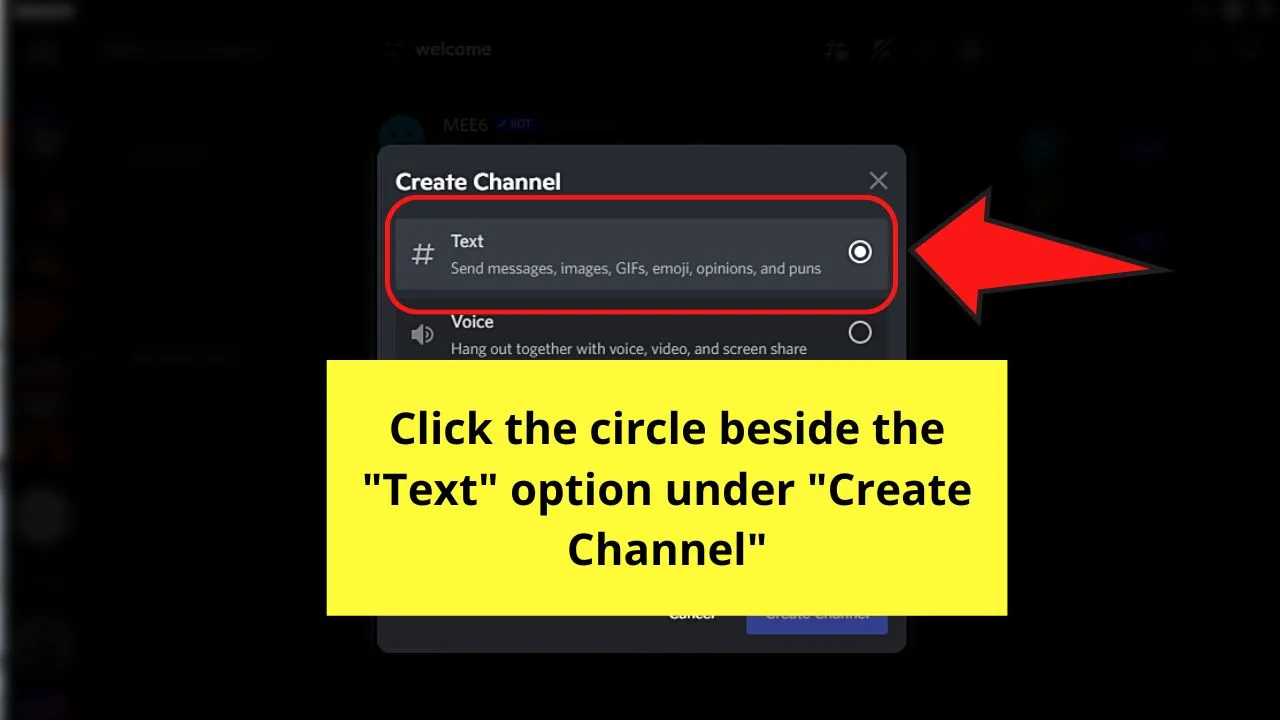
Step 3: Click the circle beside “Text” in “Channel Type”
Step 4: Type the name of your rules channel in the “Channel Name” section
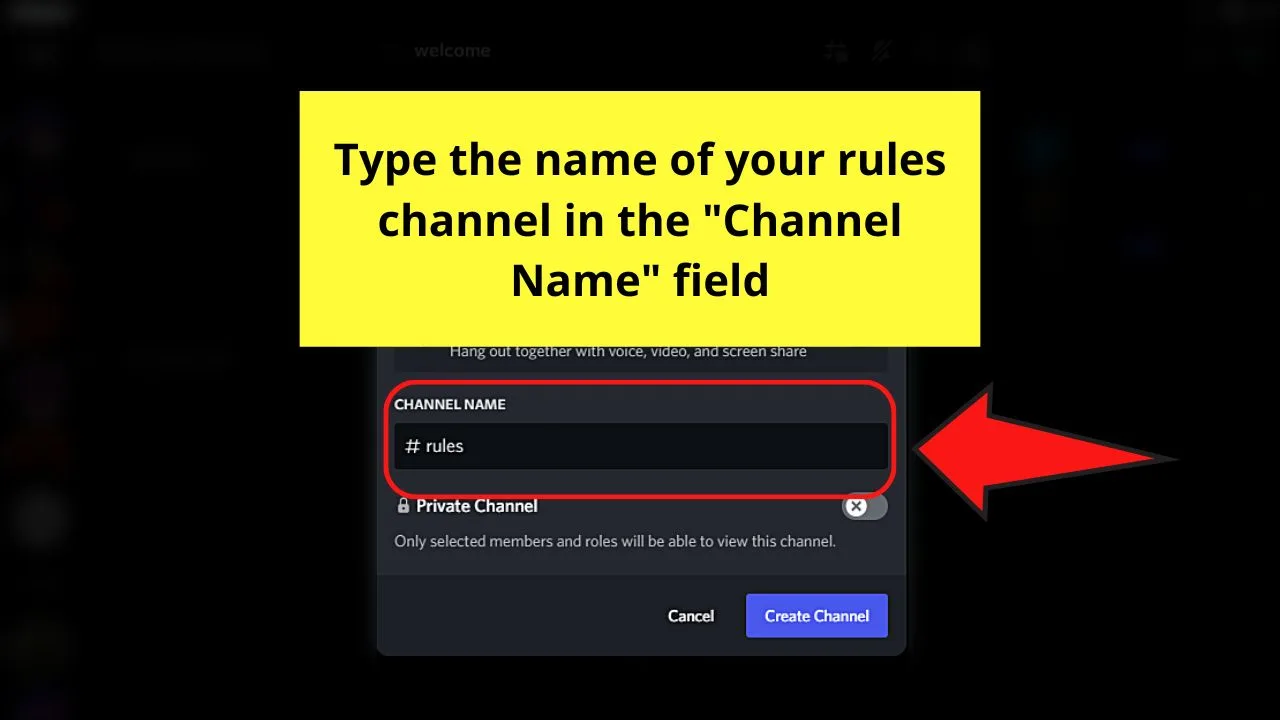
In my case, since I’m creating one for example purposes, I’ll simply name it “Rules.”
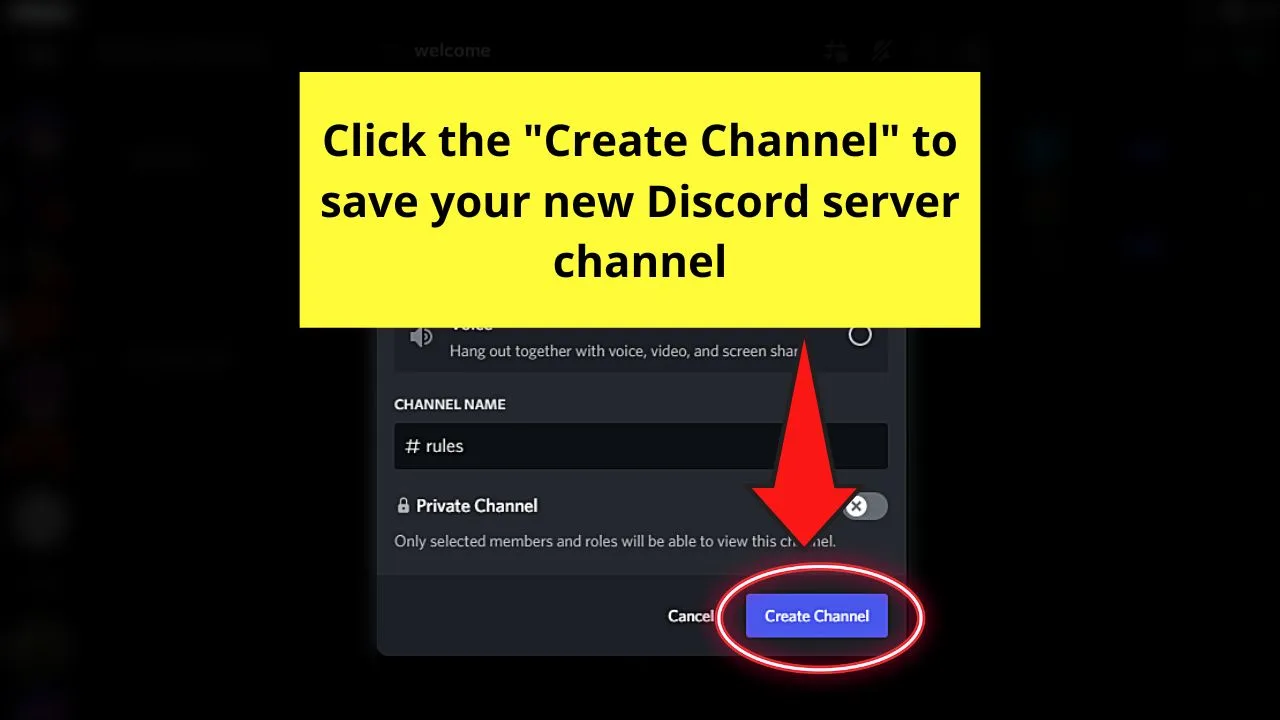
Step 5: Select the “Create Channel” button to exit the page
Step 6: Click “Edit Channel” beside the newly-created rules channel on the server details pane
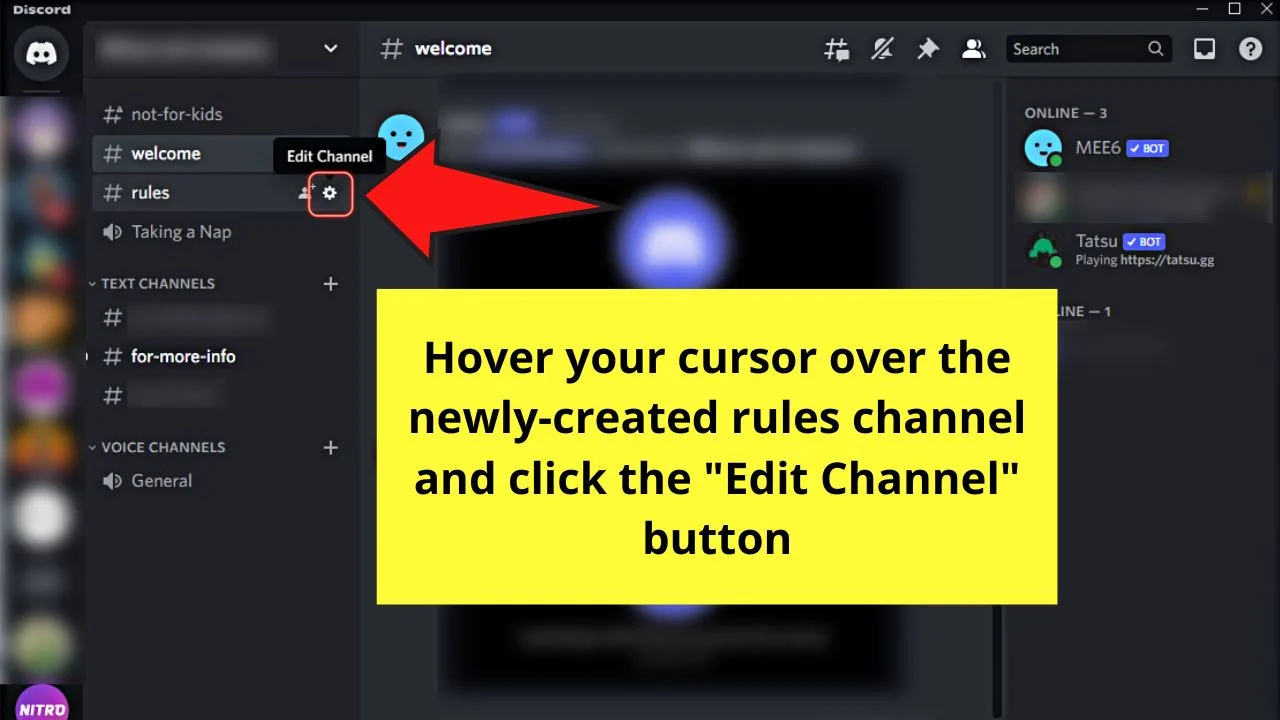
This button takes the shape of a gear or cogwheel, so you’ll never miss it.
Step 7: On the “Edit Channel” page, click the “Permissions” option on the left side panel
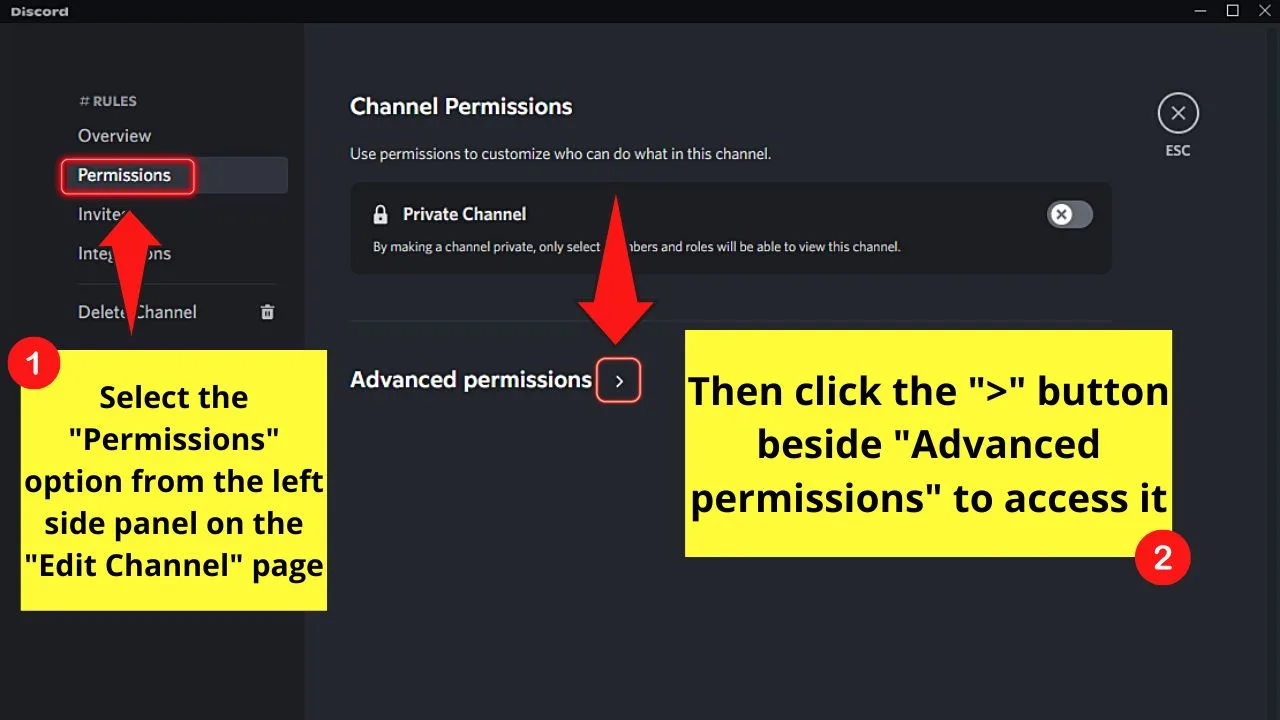
Then, select the “>” beside the “Advanced Permissions” section.
Step 8: Select “@everyone” in “Roles/Members”
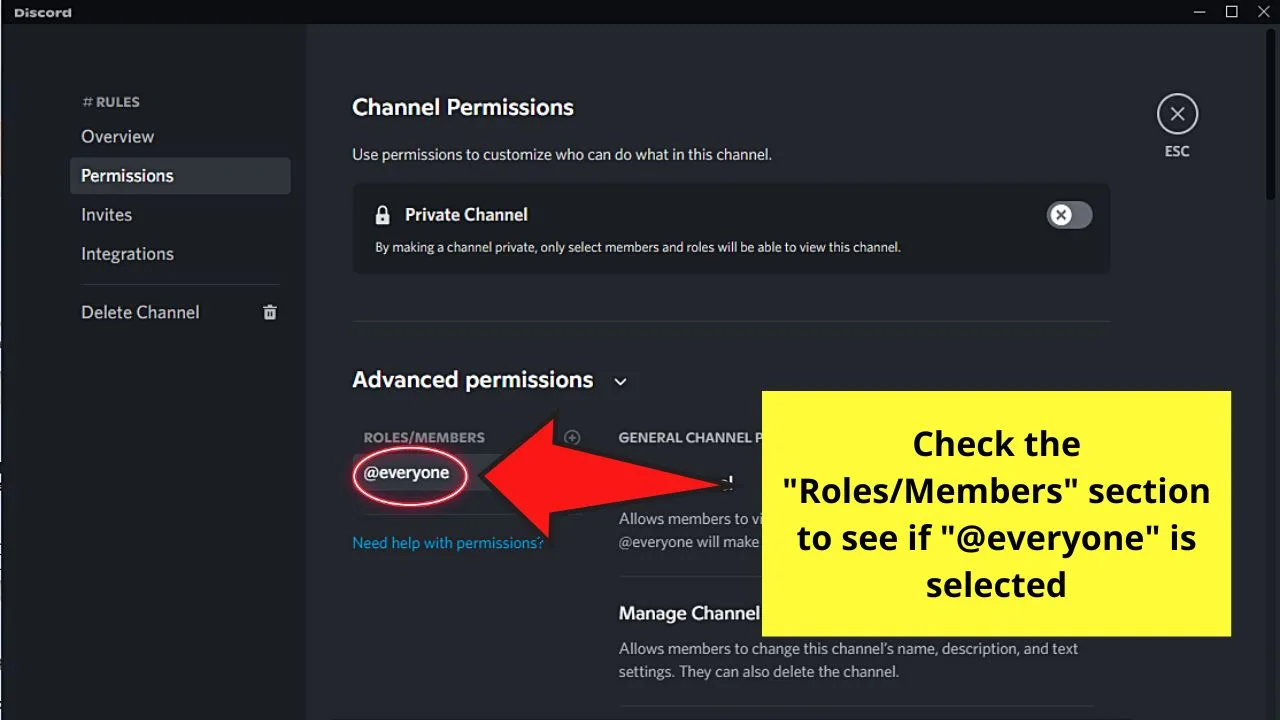
You’ll find the “Roles/Models” section to the left of “General Channel Permission.”
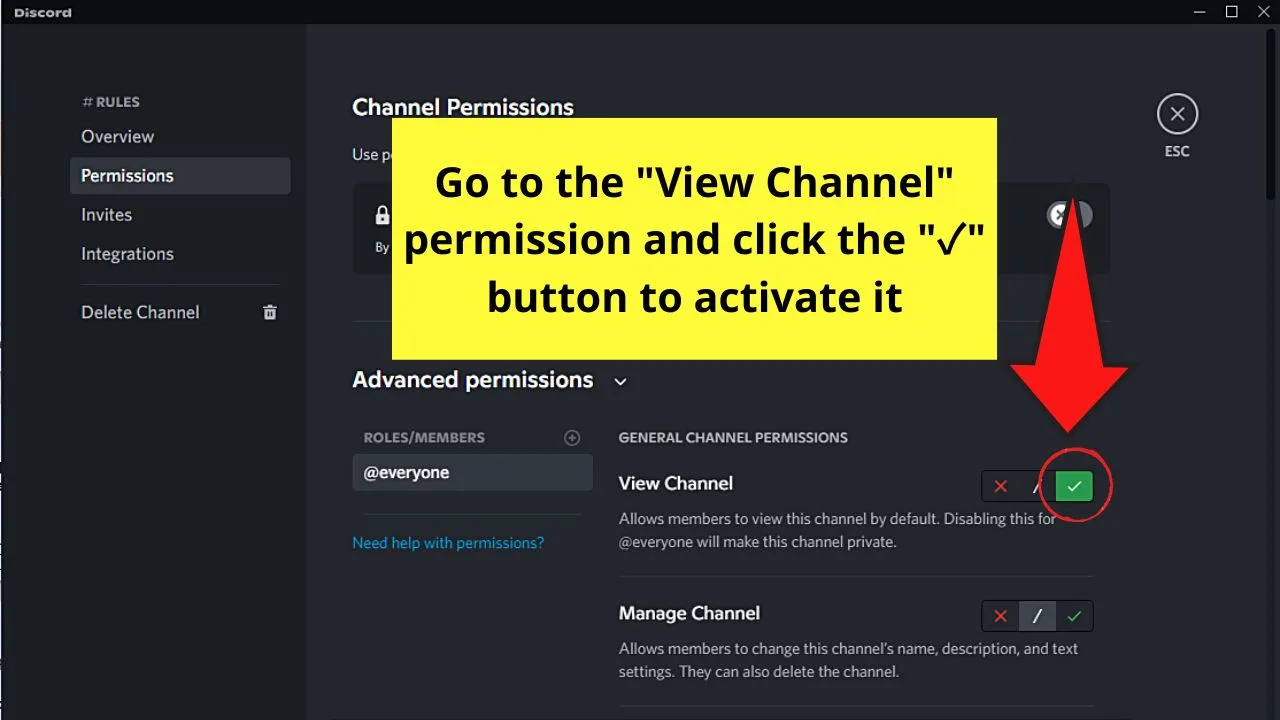
Step 9: Locate the “View Channel” permission and Click the “✓” button
Step 10: Scroll down until you see the “Read Message History” permission
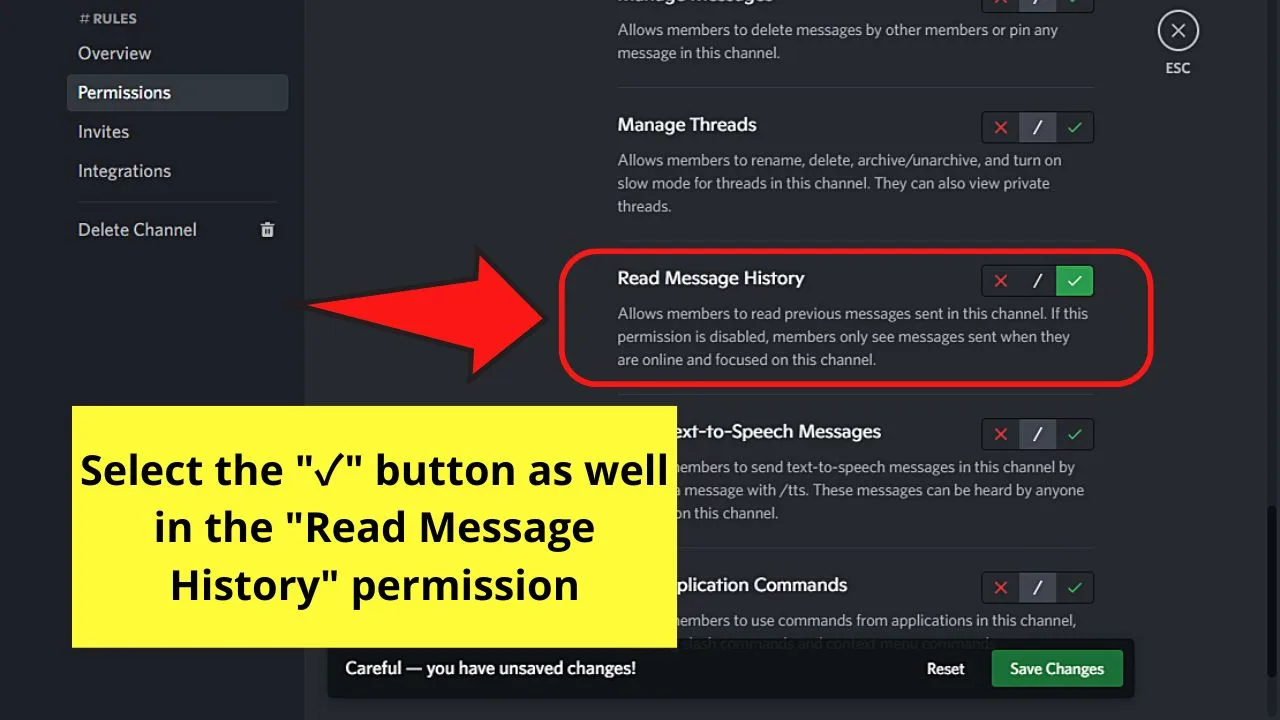
Like the “View Channel” permission, select the “✓” option to activate it as well.
Step 11: Find the “Send Messages” permission and click the “X” button
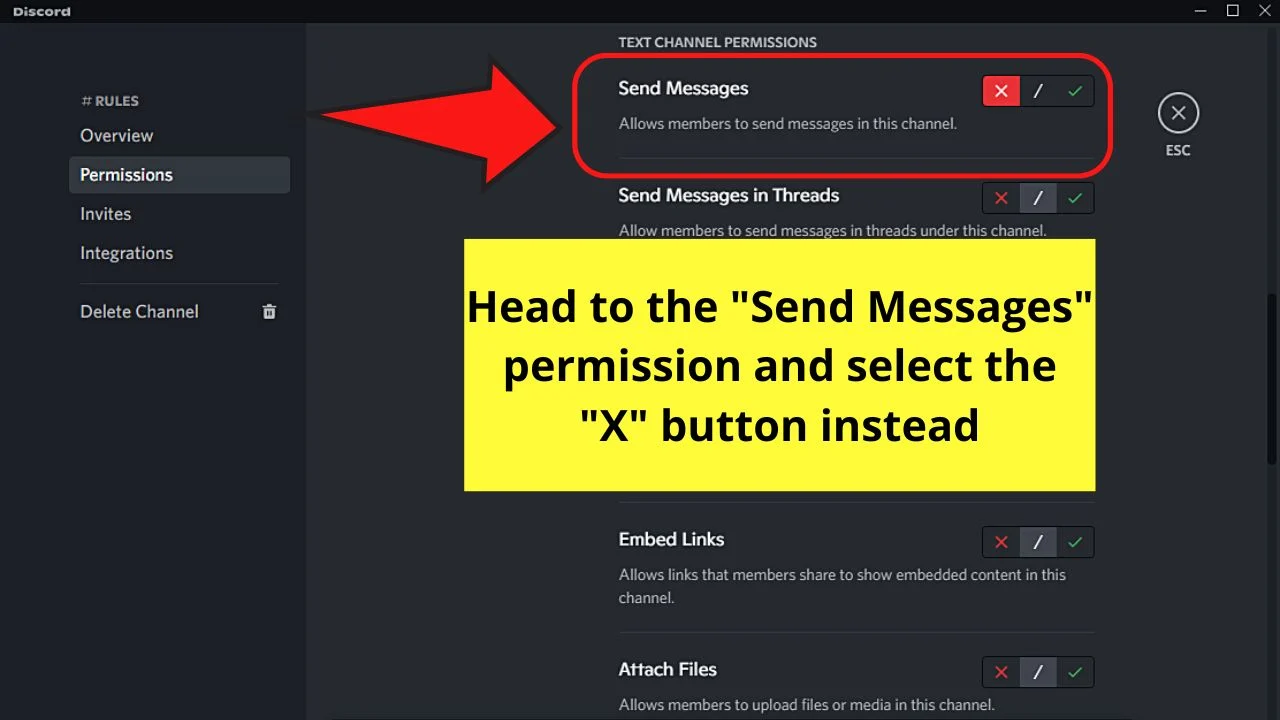
This will prevent your server members from sending messages on that channel.
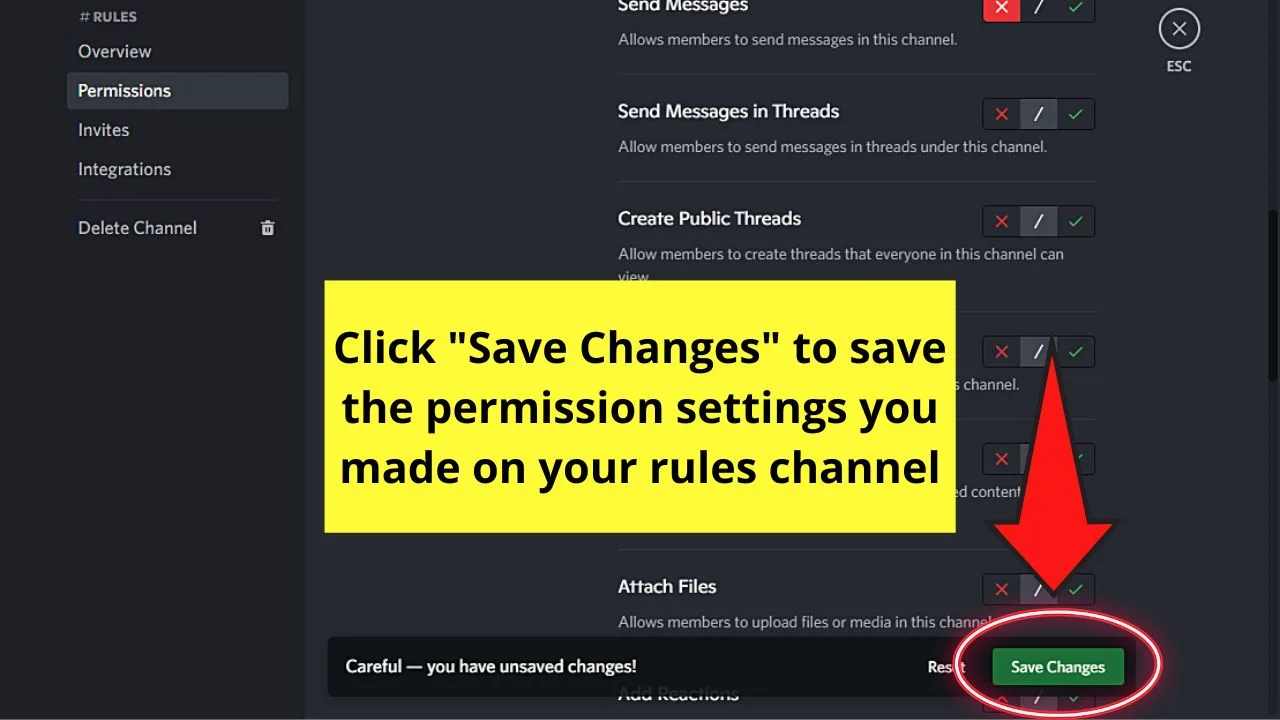
Step 12: Click “Save Changes”
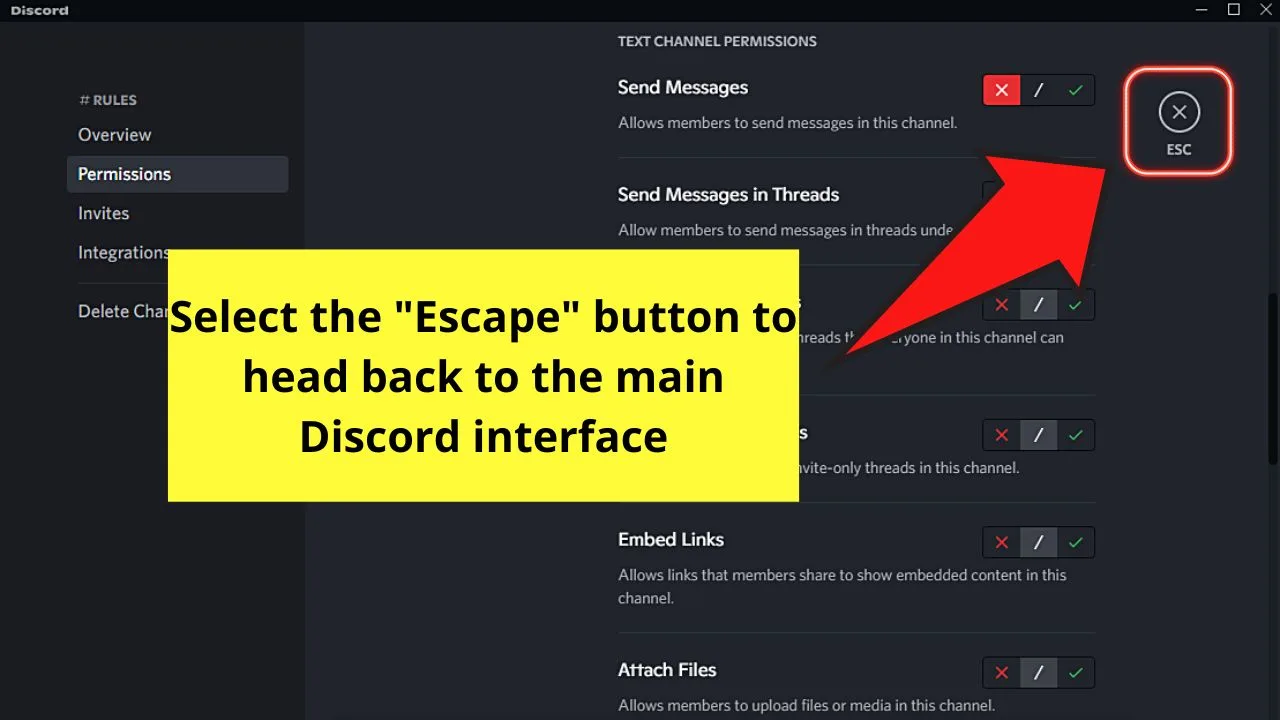
Step 13: Click the “Escape” button to go back to the main Discord interface
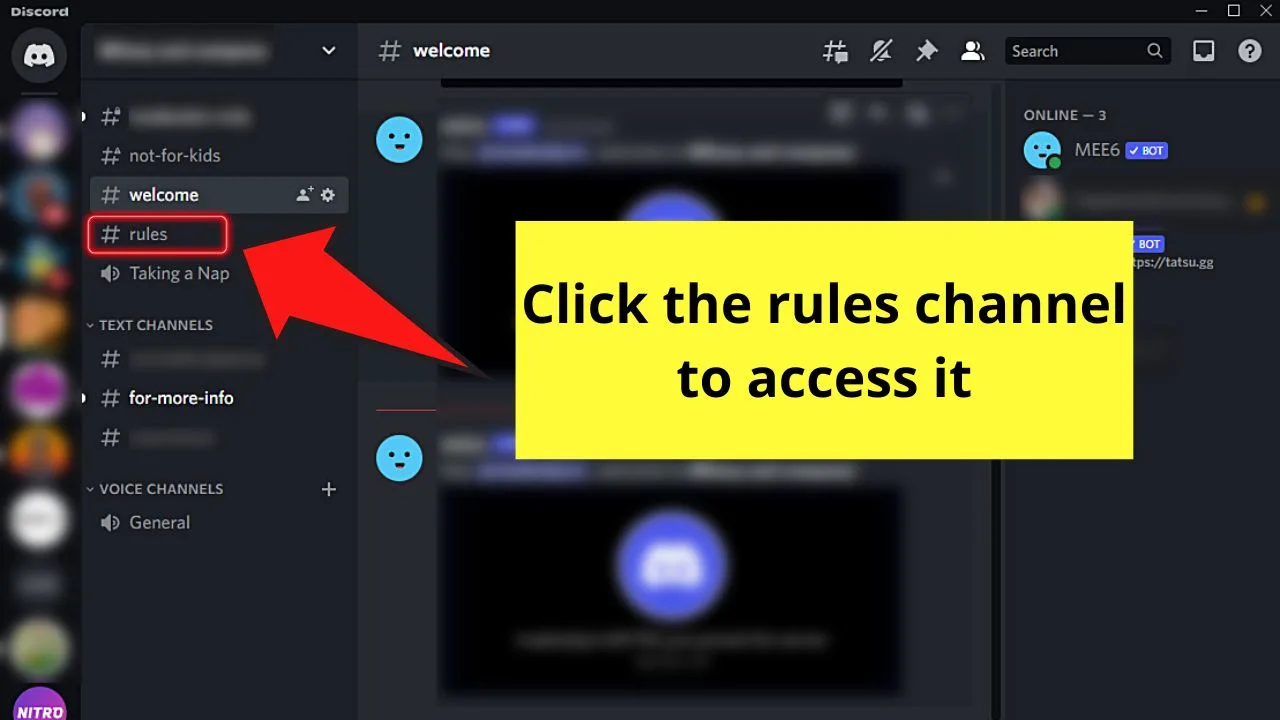
Step 14: Click on the name of the rules channel you created
Step 15: List down your rules in your newly-created rules channels
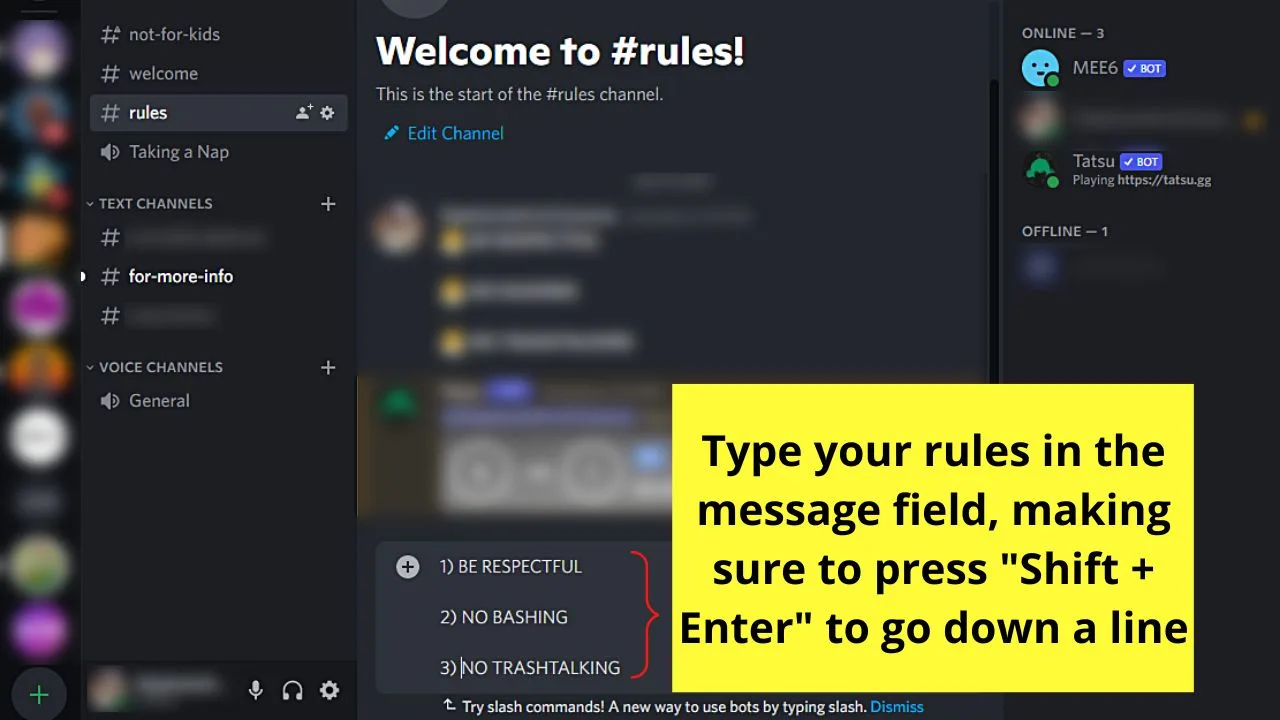
You might’ve read about more complicated stuff somewhere, but you don’t have to go to those lengths to list out the rules you want.
As cliche as it seems, you only need to type your rules in bullet or numbered form.
If you prefer the numbered rules format, simply type 1, 2, 3, and so on, and the respective rules beside those numerals.
Just make sure to go down a line so your members can easily read the rules list.
Step 16: Add emojis to serve as bullet points to the rules you’re setting
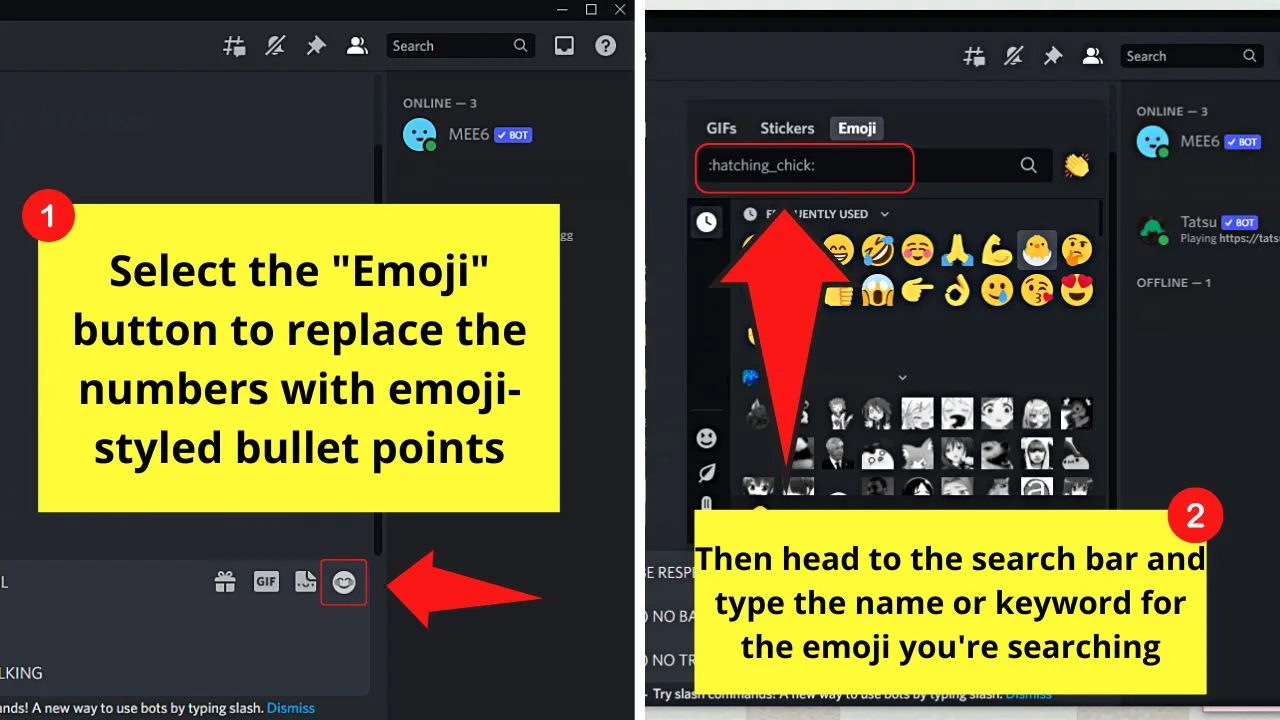
To do so, click the “Emojis” button on the message field and use the search bar to find the emoji that corresponds to your server’s theme.
You can also type “:nameofemoji:” directly on the message field if you know what the name of that particular emoji is.
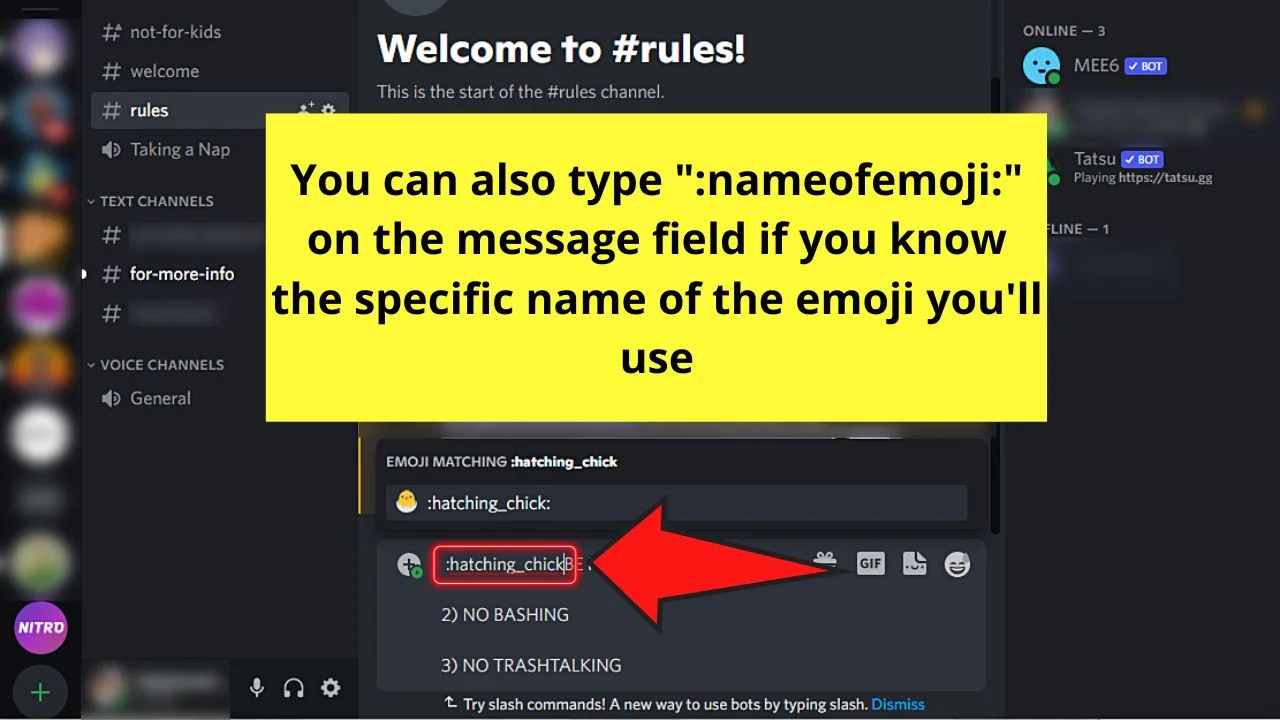
Then, just type the rules beside the emoji bullet you added.
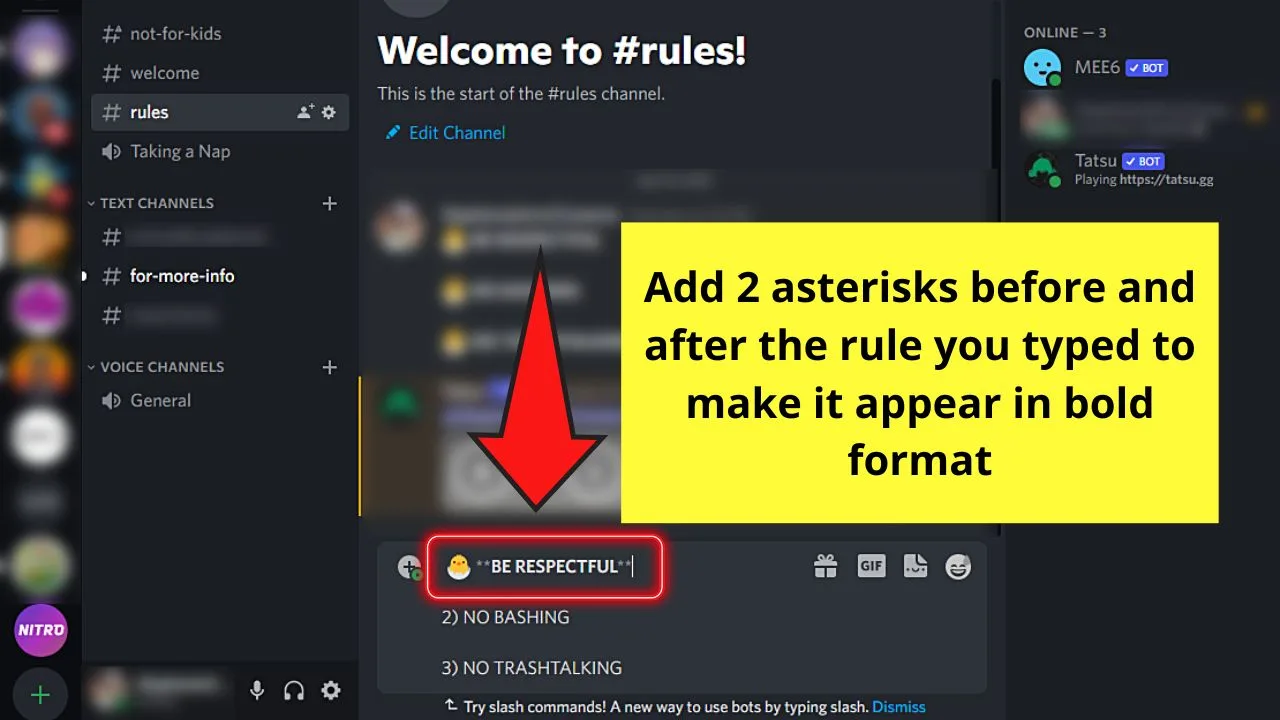
Step 17: Make the letters appear bold by typing 2 asterisks before and after the rule you’re typing
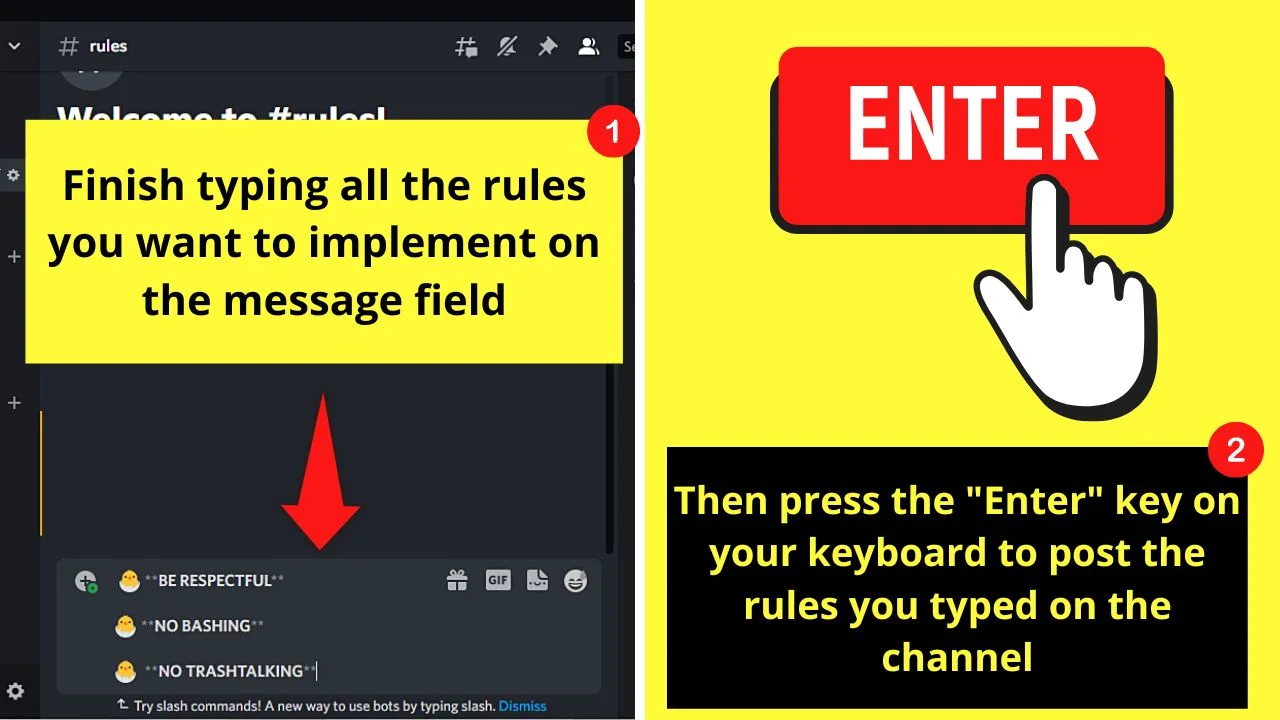
Step 18: Press the “Enter” key after typing all the rules
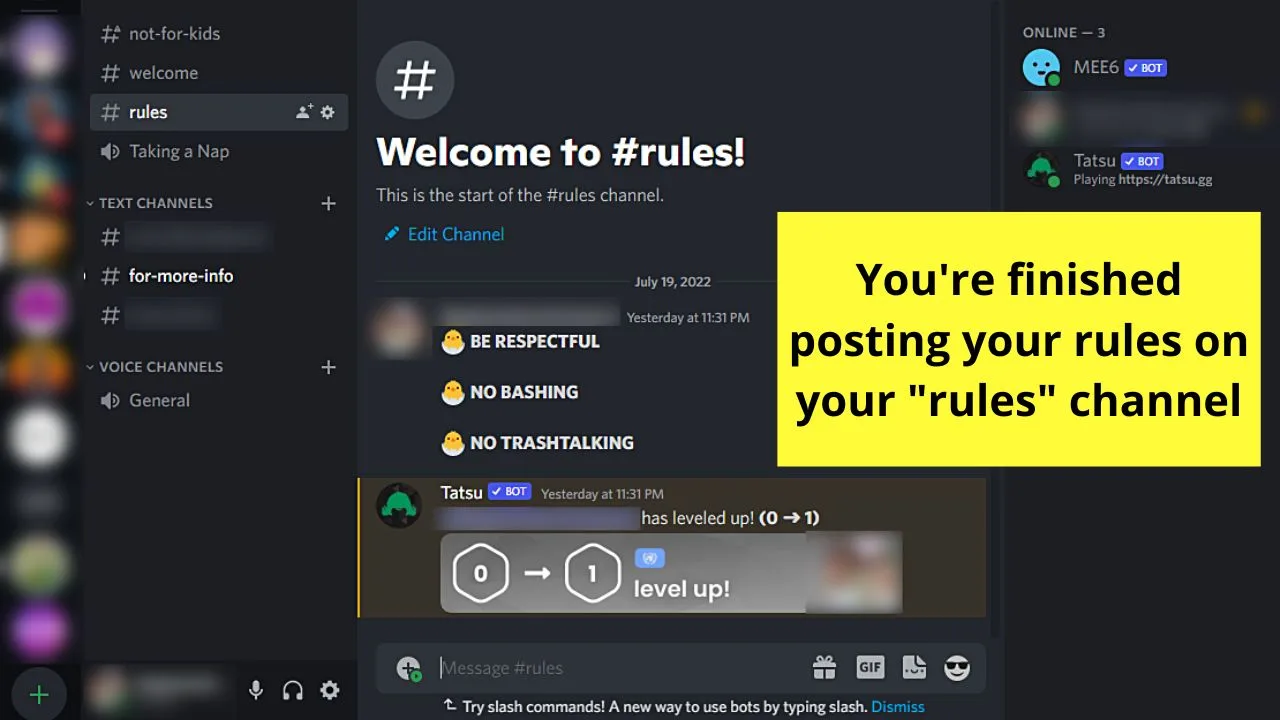
And, just like that, you’ve created a rules channel on your Discord server using a desktop.
Though it’s quite lengthy compared to making a welcome channel, an AFK channel, or an NSFW channel on Discord, the process gets easier later on.
However, before we discover how to make a rules channel in Discord mobile, you need to know of an alternative method to achieve the same effect.
Making a Rules Channel in Discord by Linking Webhooks
Advanced Discord users probably would’ve come across the term “webhooks.”
Technically speaking, webhooks are unique URLs used for linking services.
These webhooks can even be used to send updates and automate Discord messages on your text channels.
Yet, webhooks aren’t confined to those purposes as they can also be used for creating your Discord rules channel.
Step 1: Find the rules channel on the server details pane
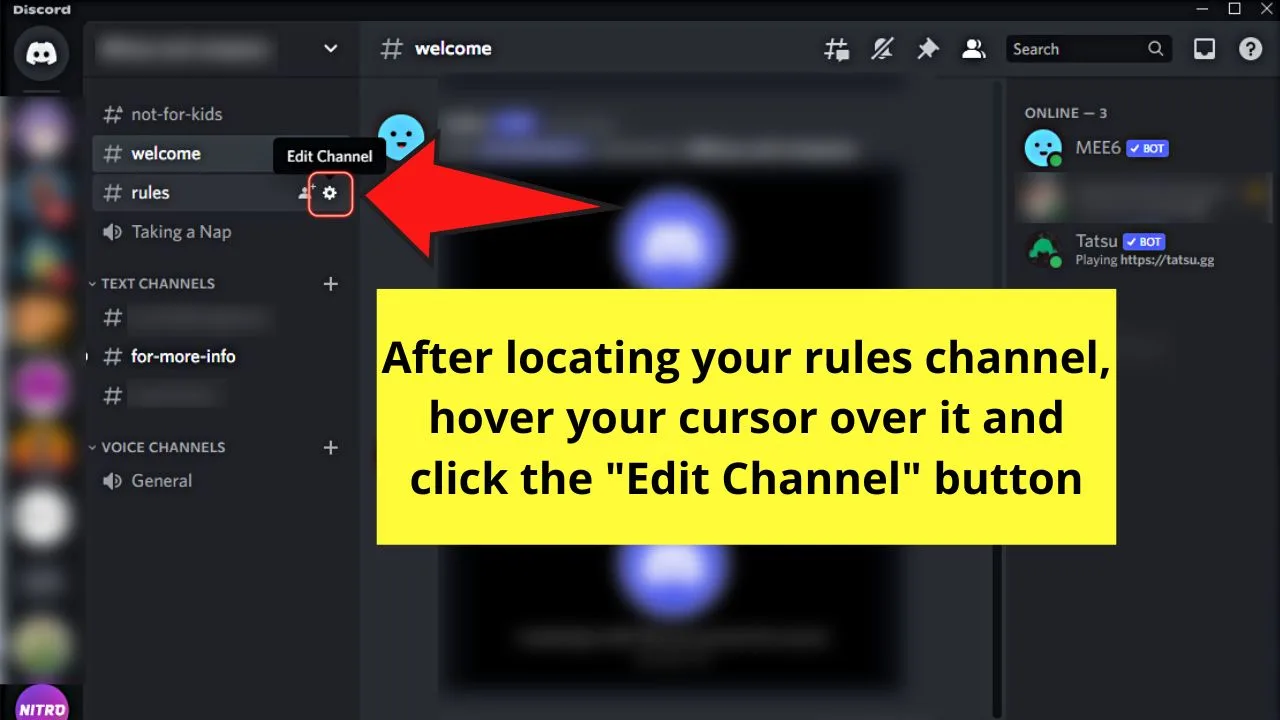
This is if you’ve already created your rules channel and set its permissions.
Select the “Edit Channel” button after hovering your cursor over the newly-created rules channel on the server details pane. This button takes the shape of a cogwheel or gear icon.
Step 2: Head to the left-side panel of the “Channel Settings” page and click the “Integrations” category
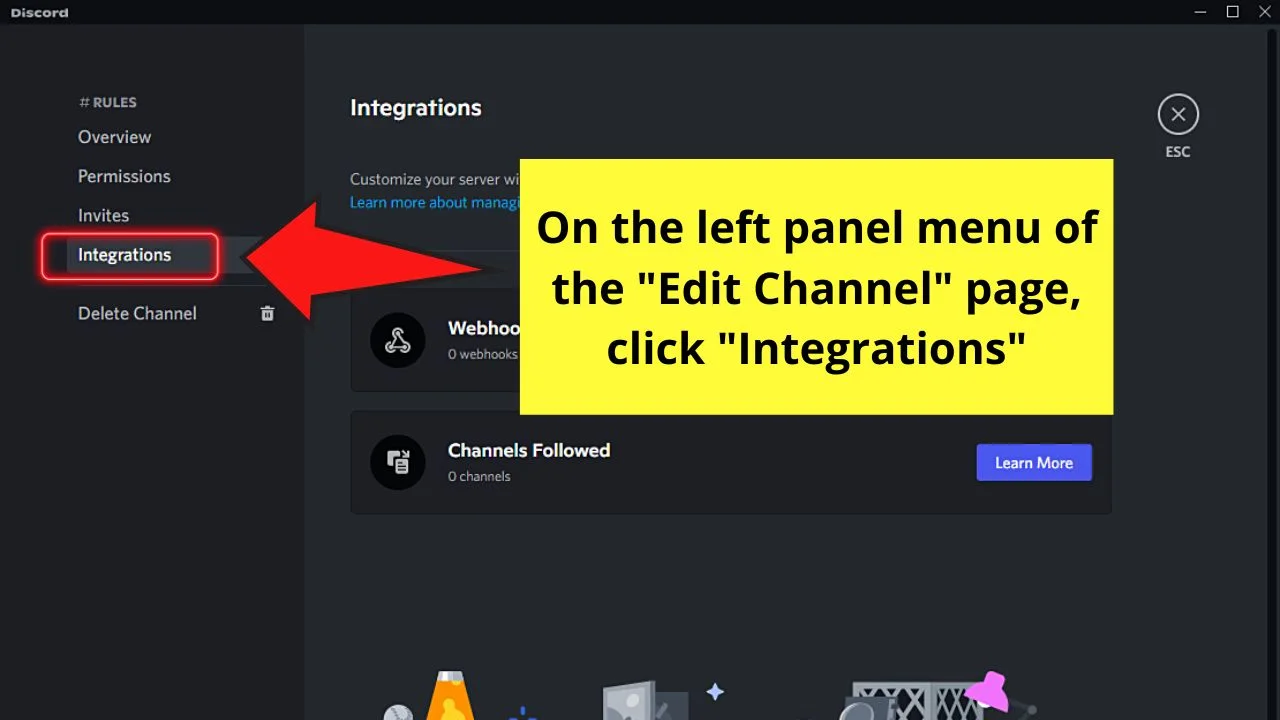
Step 3: Go to the “Webhooks” option and click “Create Webhook”
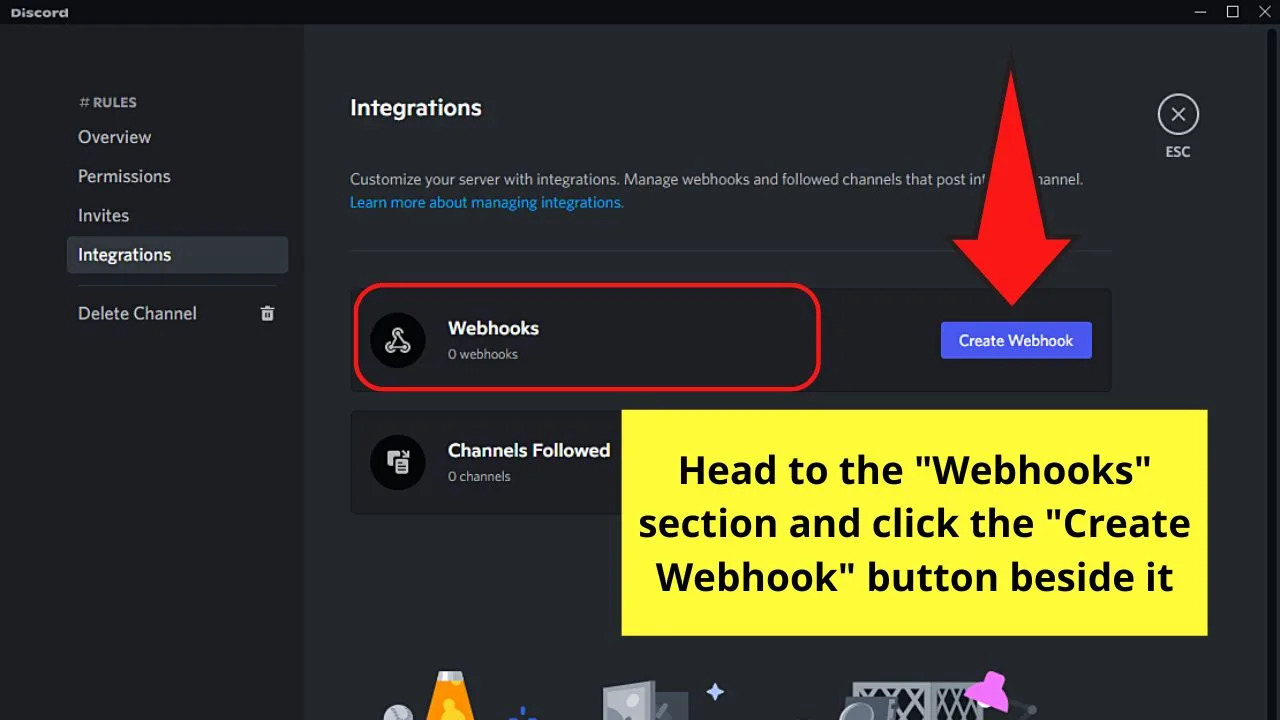
Step 4: Type the server name in the “Name” field of the“New Webhook” page
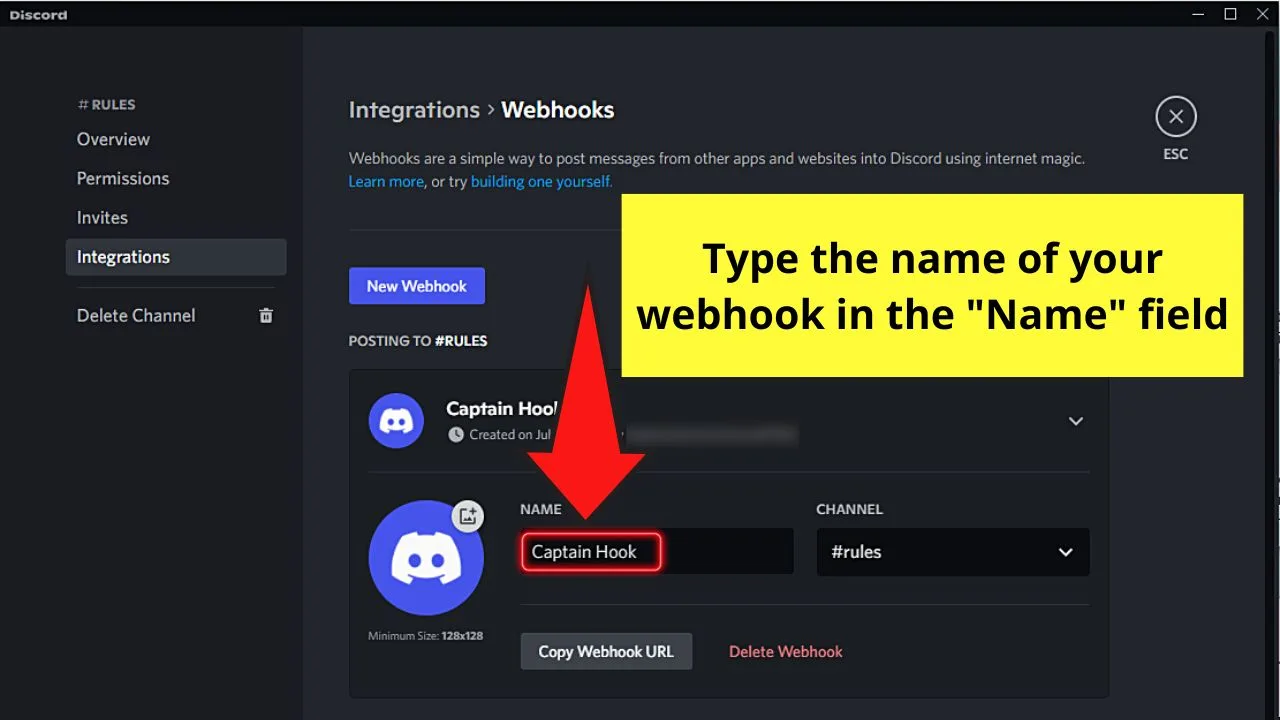
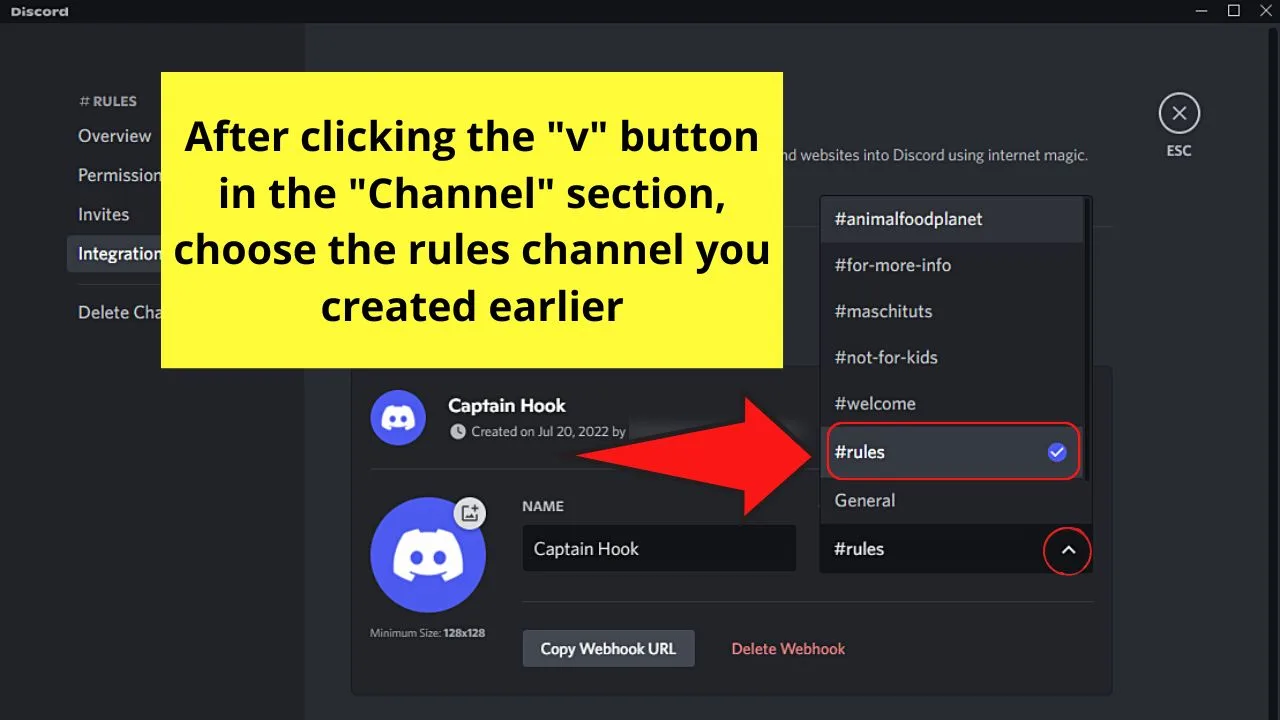
Step 5: Select your rules channel after clicking the “Down” button
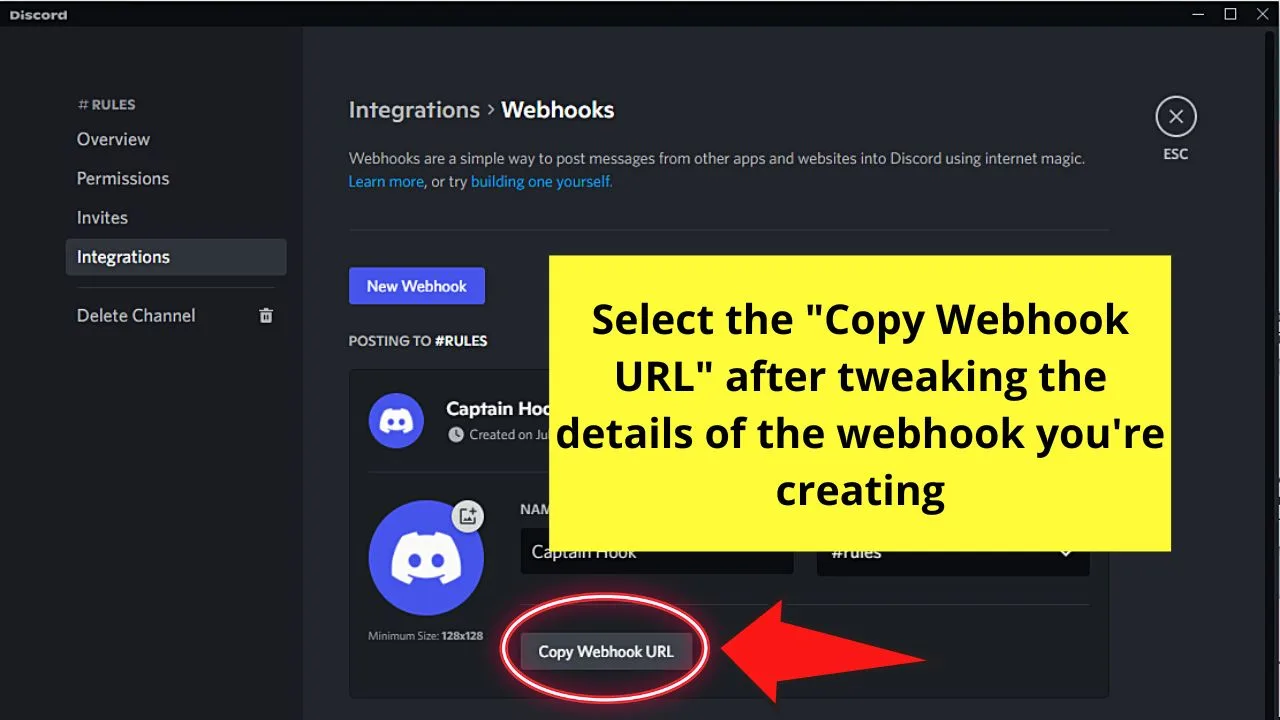
Step 6: After setting up your webhook, click “Copy Webhook URL”
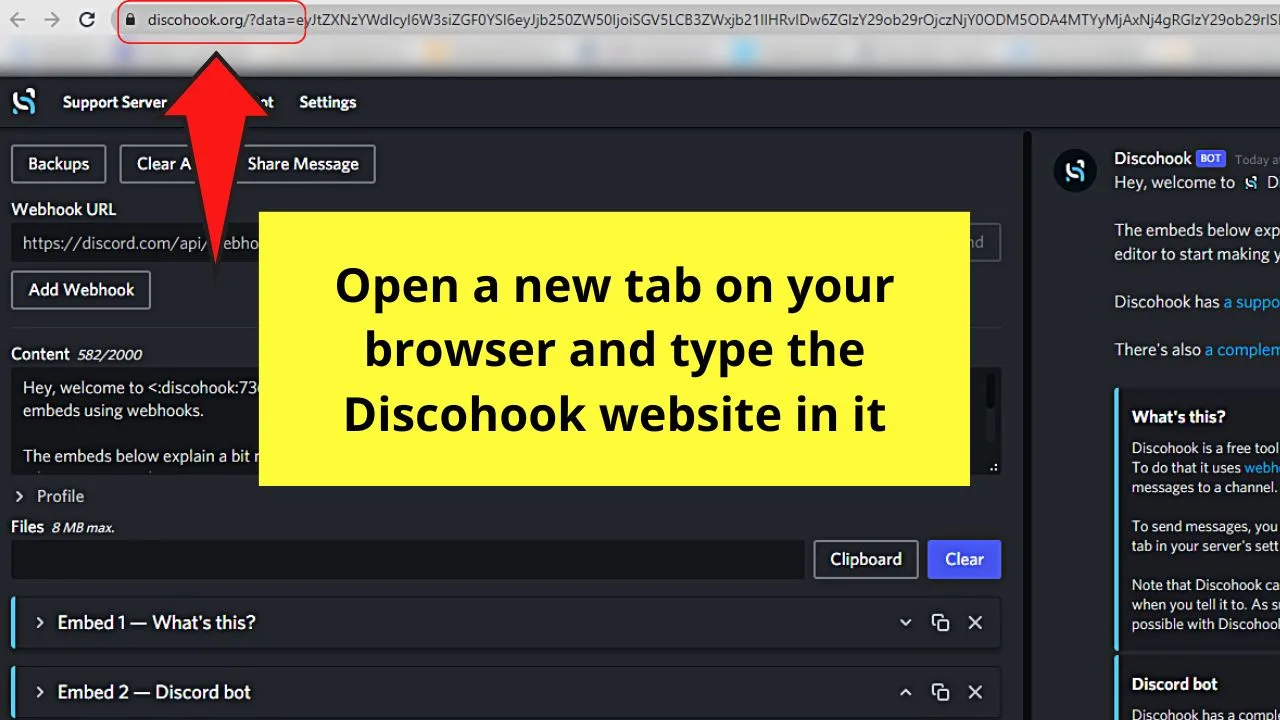
Step 7: Open a new tab on your browser and head to the Discohook website
Step 8: Click the “Clear All” button
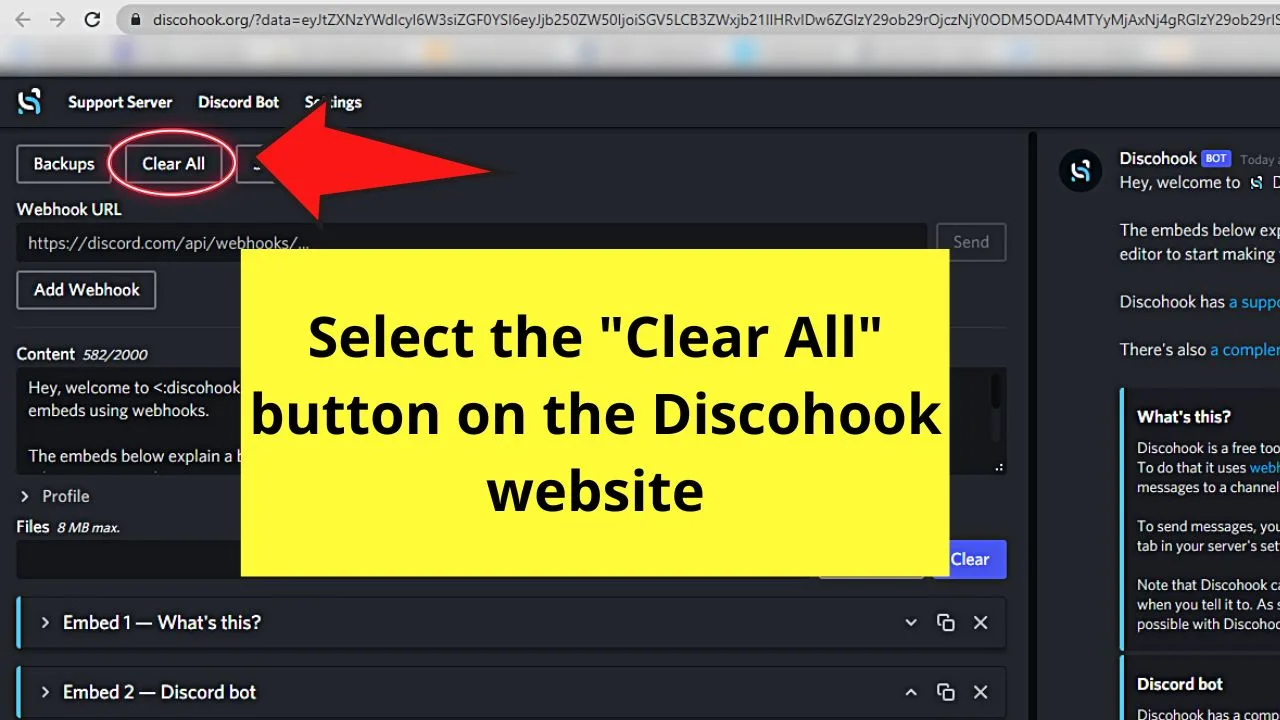
This will automatically erase all the text in the fields.
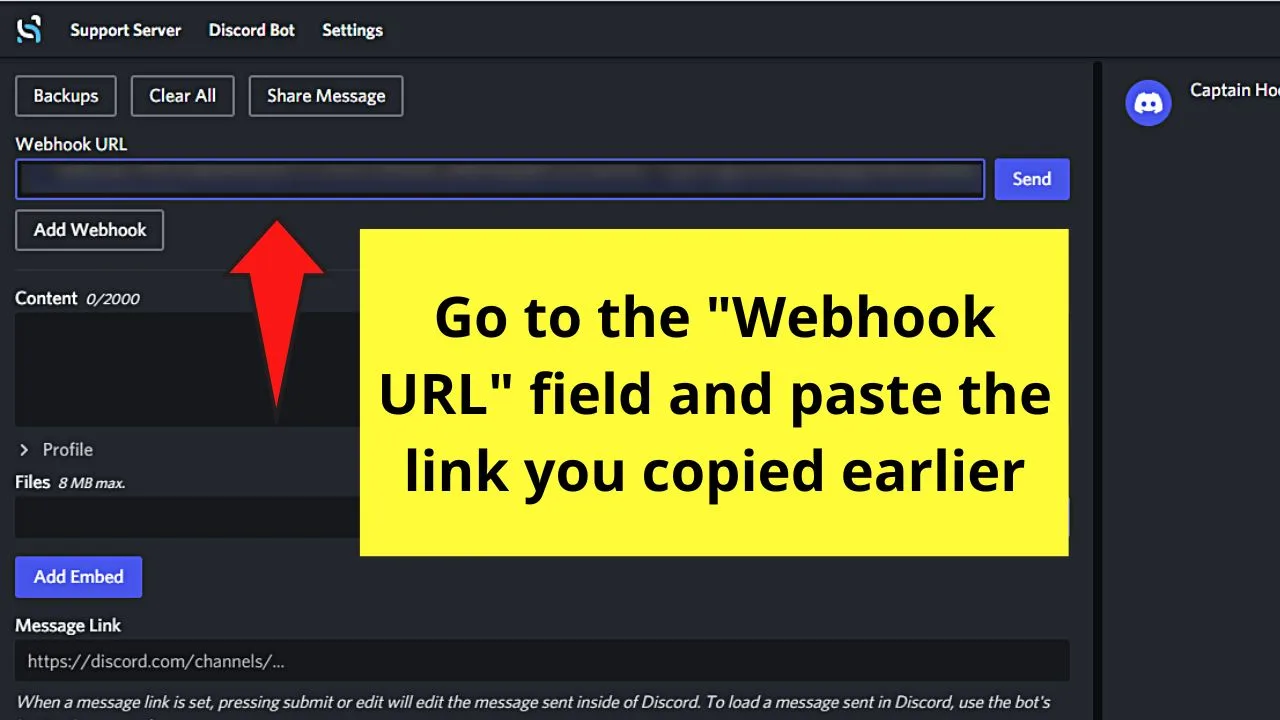
Step 9: Head to the “Webhook URL” section and the URL copied earlier
Step 10: Go to the “Profile” section and click the “Add Embed” button
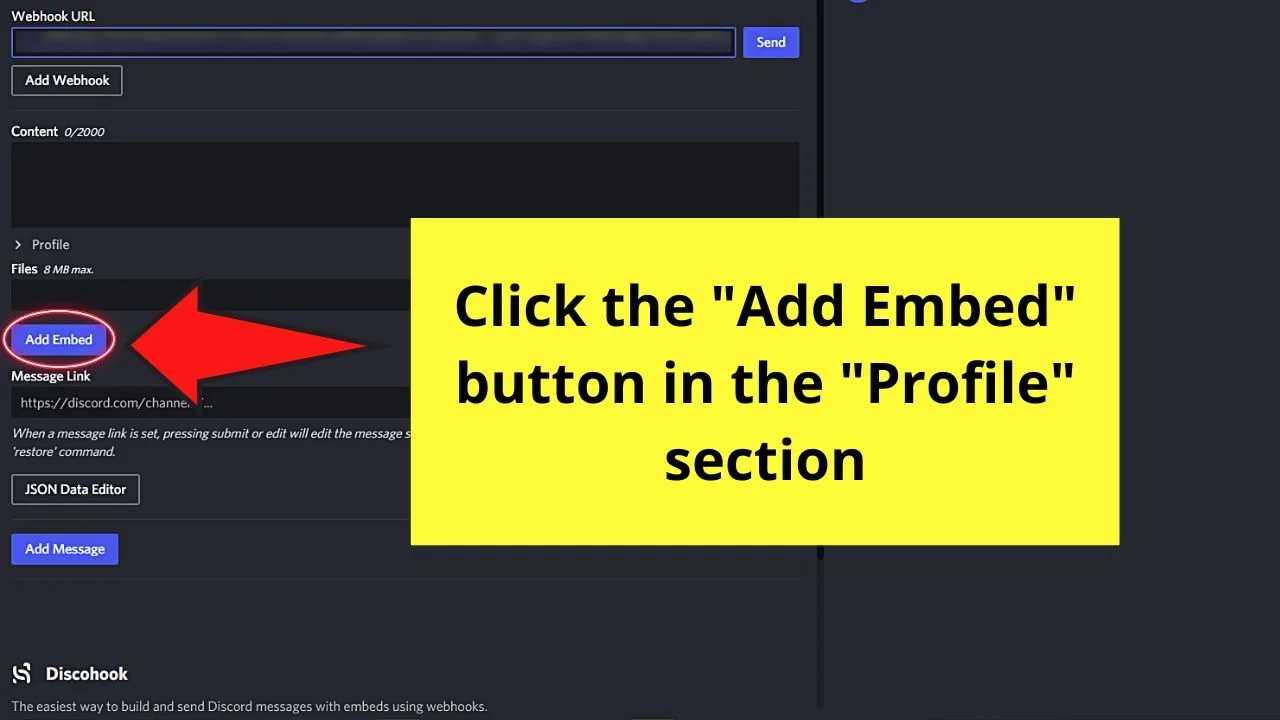
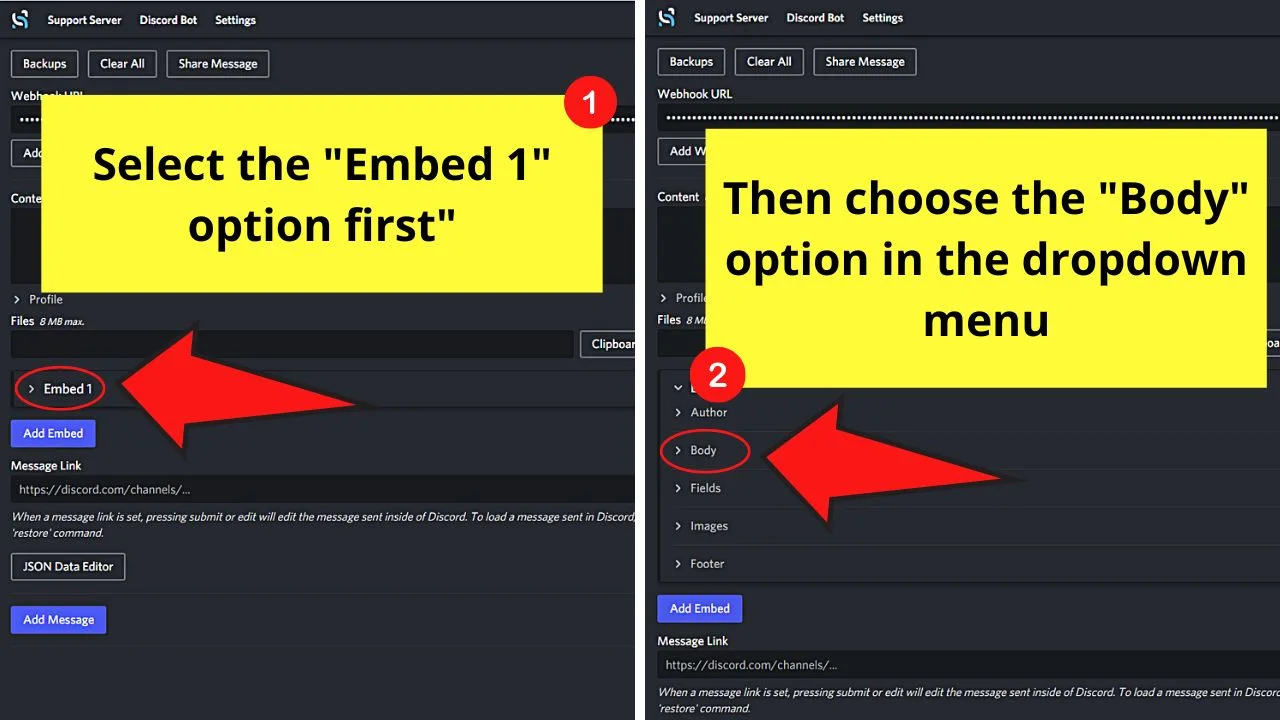
A dropdown menu will then appear.
Step 11: Select the “Embed 1” and “Body” options consecutively
Then you can begin typing a rule and its description in the provided space.
Step 12: Add a clickable link on the “URL” section to emphasize a particular rule
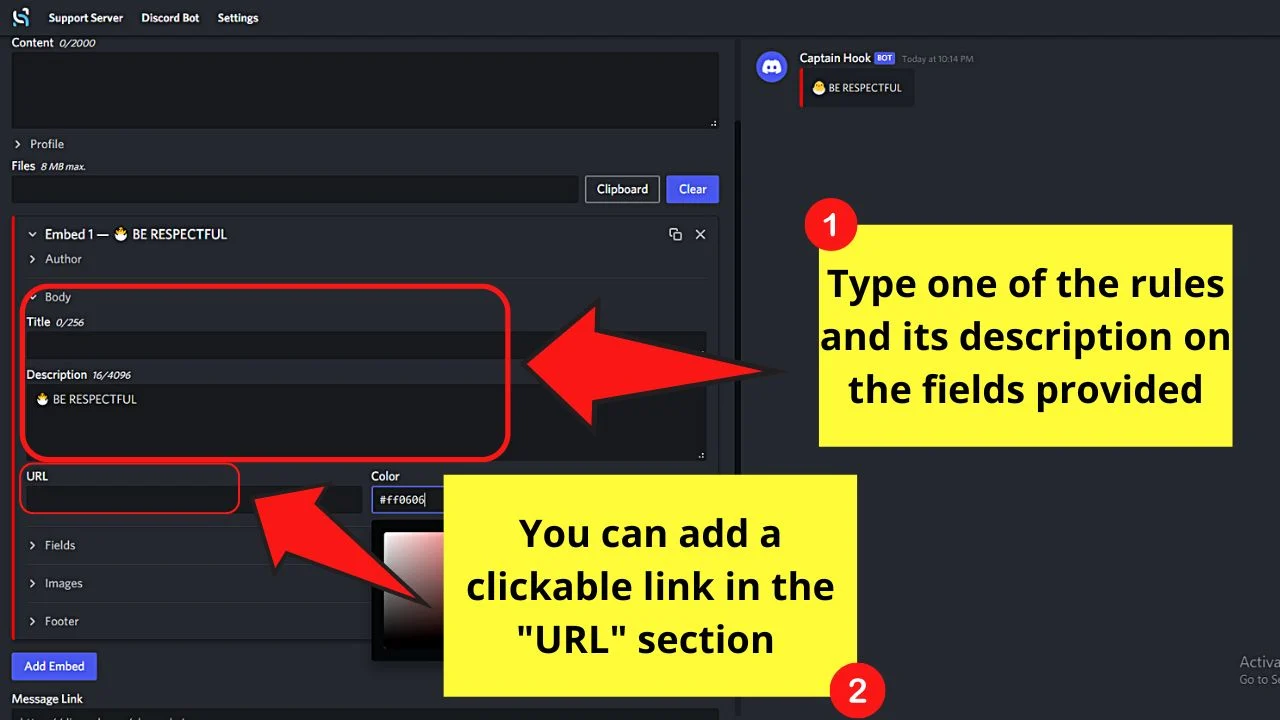
Step 13: Head to the “Color” section and choose the hue you’ll use for the rule
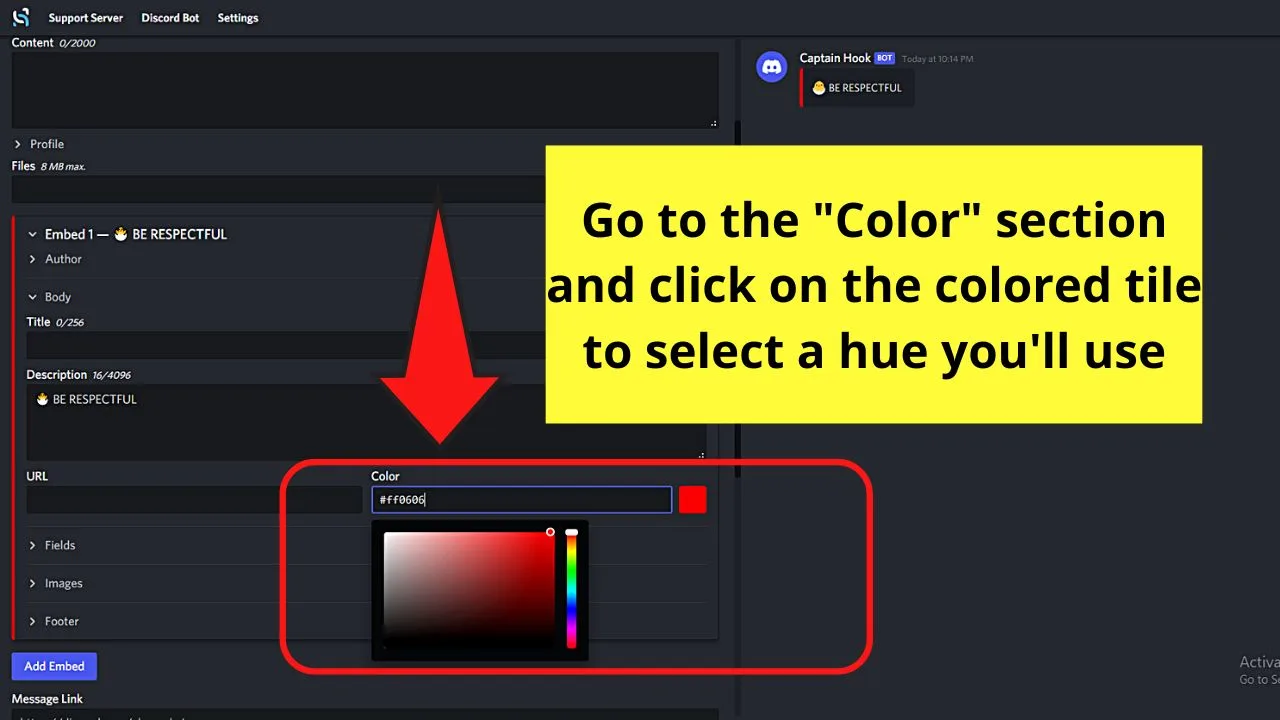
Step 14: Repeat steps 11 to 13 until you entered all the rules for your Discord server
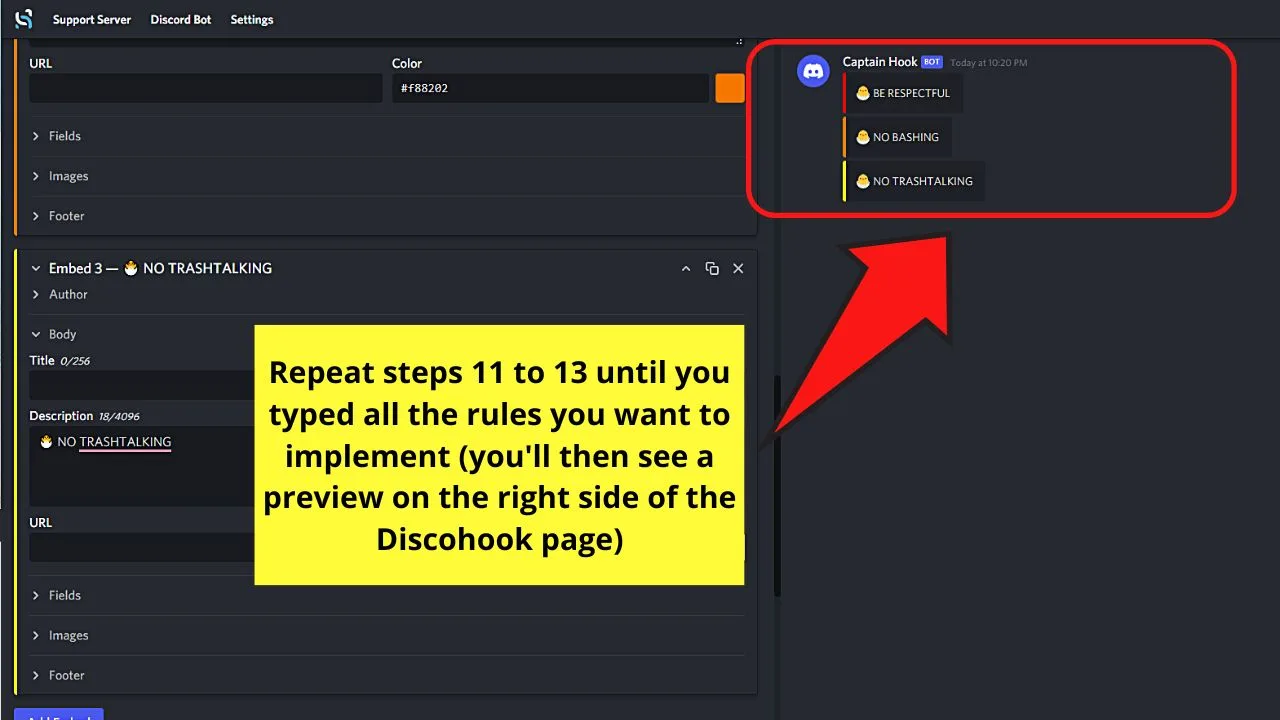
You will then see the rules you typed appear on the right panel of the Discohook screen.
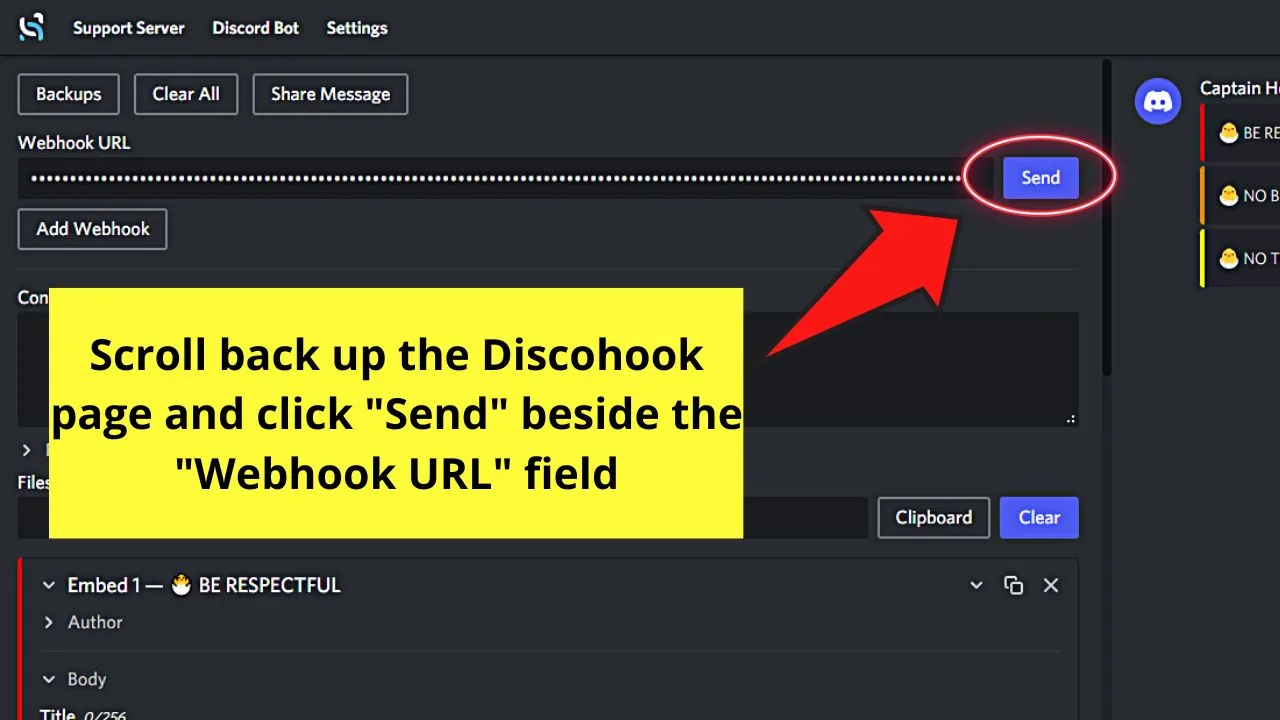
Step 15: Select the “Send” button beside the “Webhook URL” section
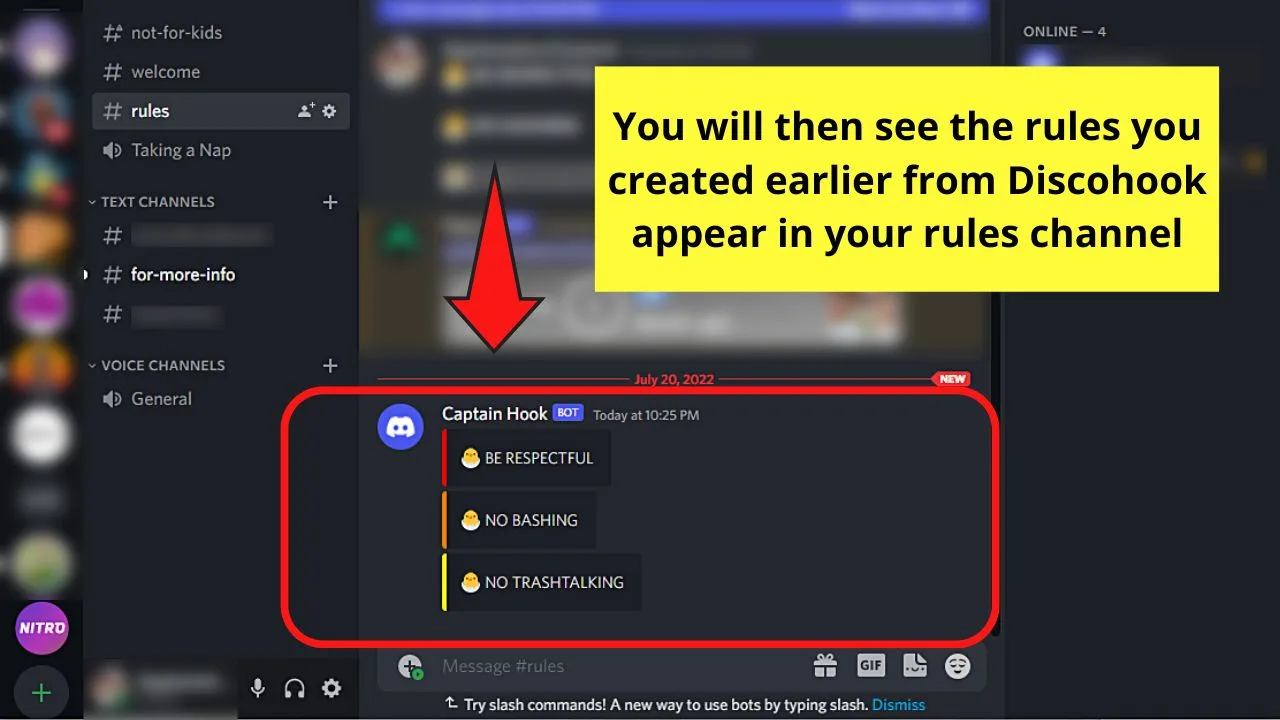
You’ll then receive a message on your Discord rules channel. The rules you set earlier will then appear as a post.
Cool, huh?
Well, you’ll be more surprised if I’ll tell you you can make a rules channel on Discord mobile.
How to Make a Rules Channel in Discord Mobile
Tap the server icon on the left-side panel. Then, tap the kebab menu and choose “Edit Channel.” Type the channel name, press “Text Channel,” and tap “✓” to save it. Tap “Edit Channel” to set the channel permissions. Then, type your rules on the message field before pressing the “Send” to post them.
Though a mobile phone has a smaller screen compared to that of a computer, you can make a rules channel still in Discord.
But, with a smaller screen, you’ll have to go through more menus and steps, which are laid out below.
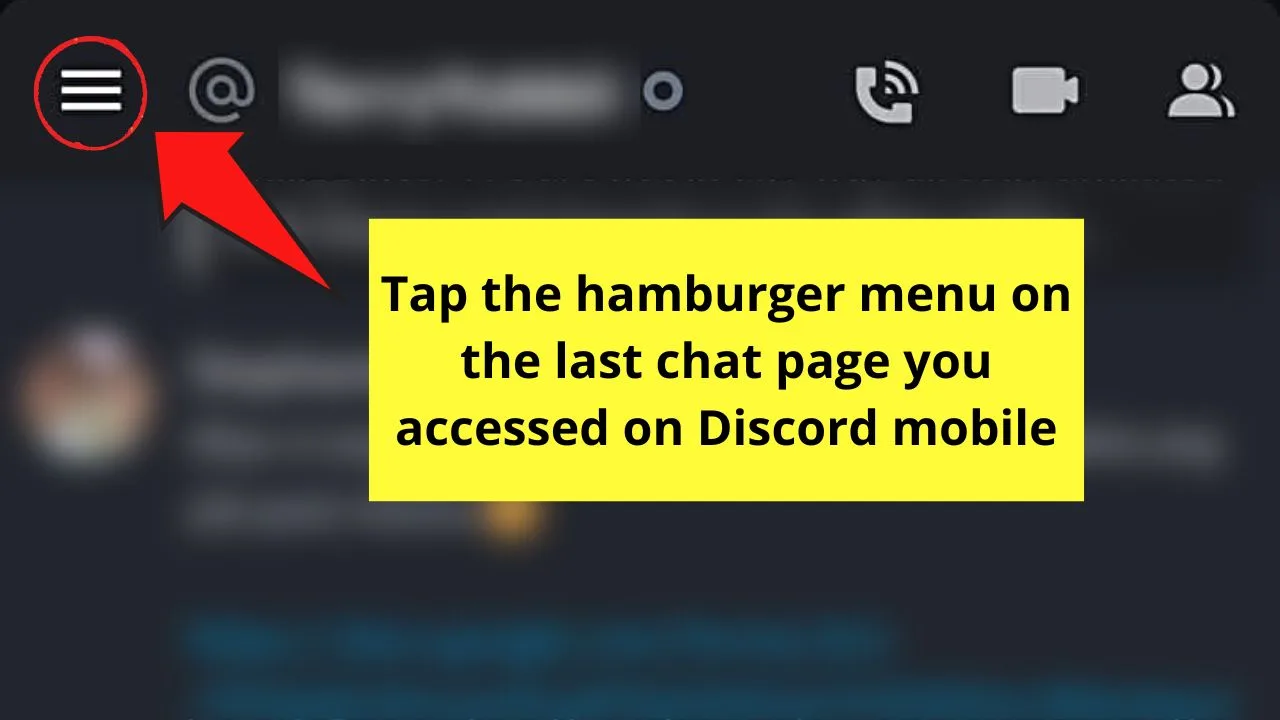
Step 1: Tap the hamburger menu on the last Discord chat page you accessed
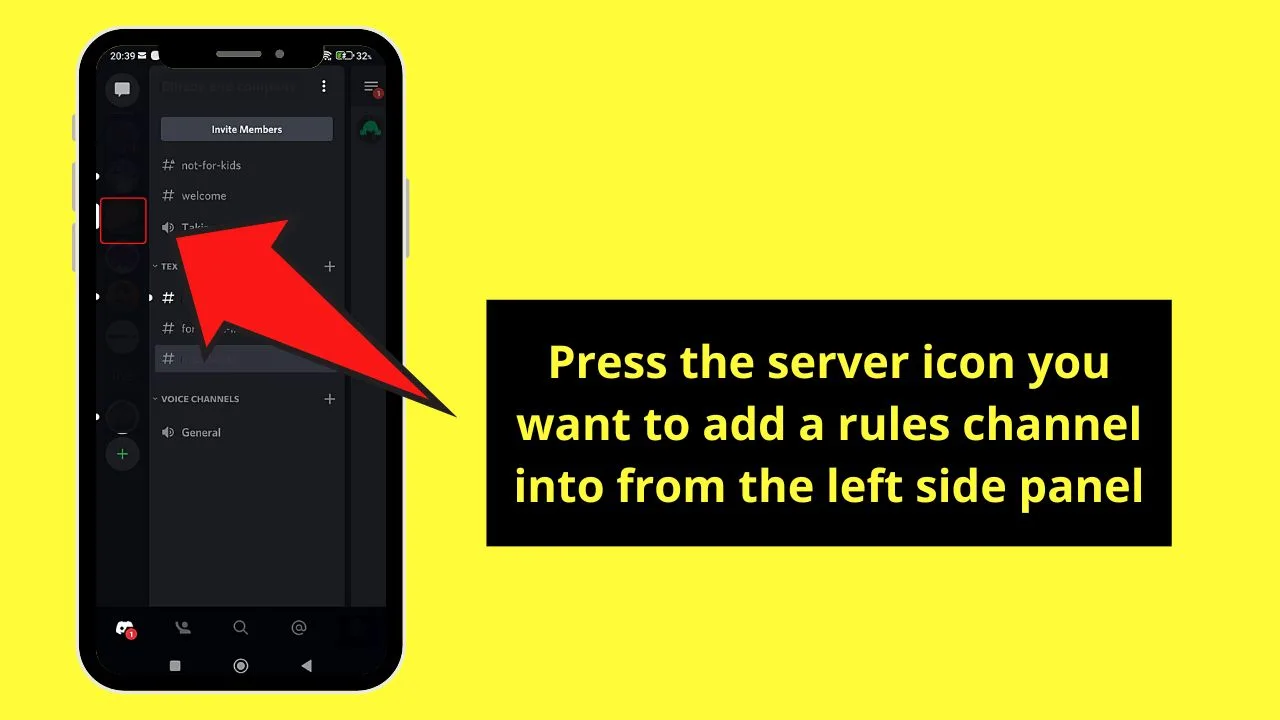
Step 2: Tap on the server icon on the left-side panel
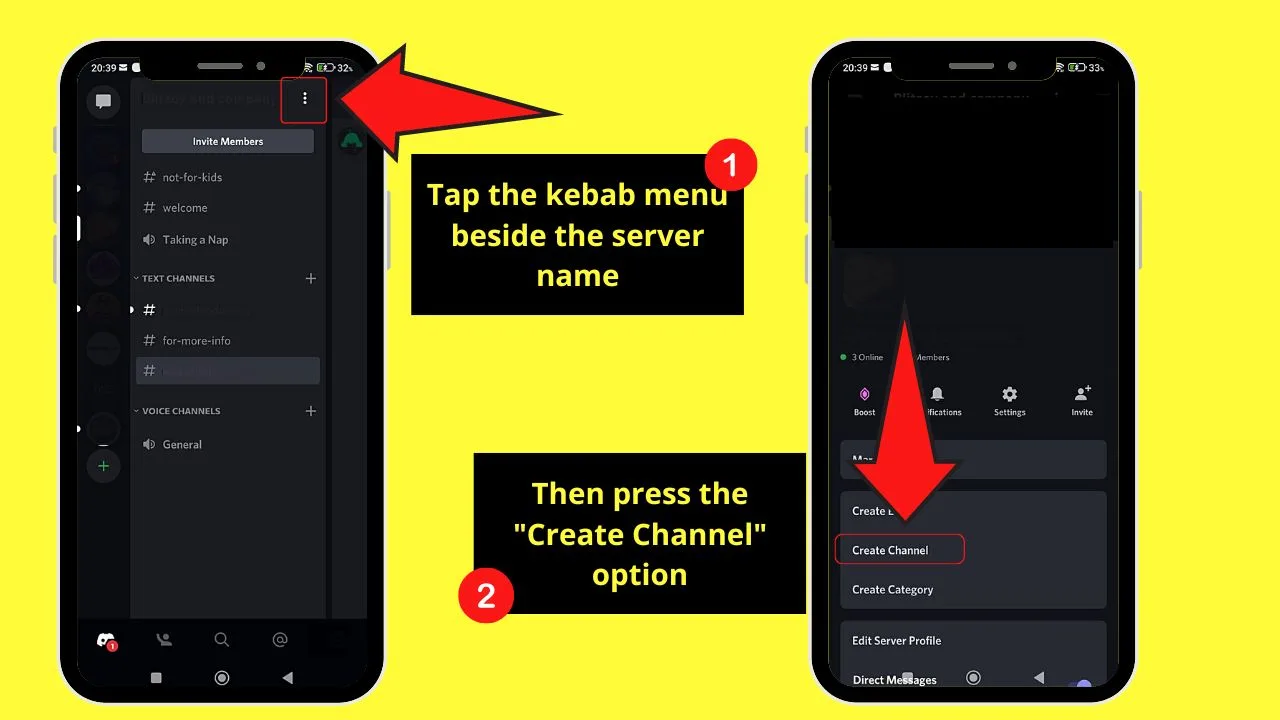
Step 3: Press the kebab menu and tap the “Create Channel” option
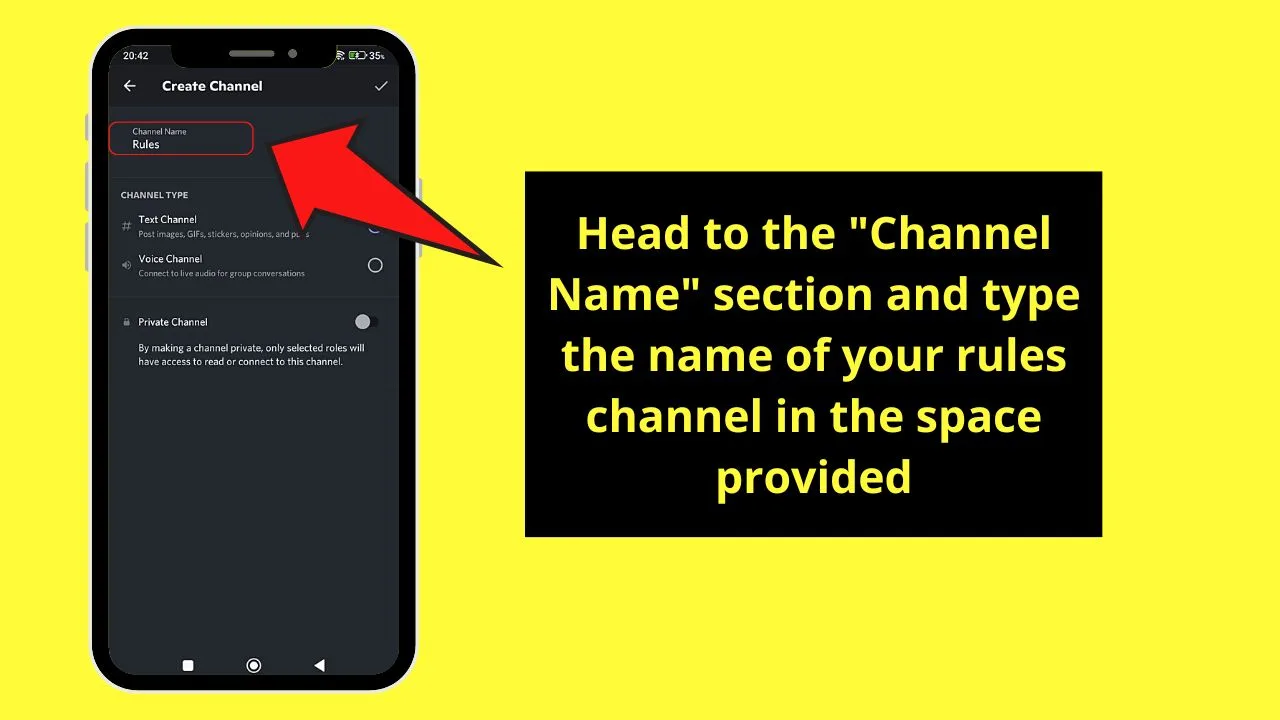
Step 4: Type your rules’ channel name in the “Channel Name” section
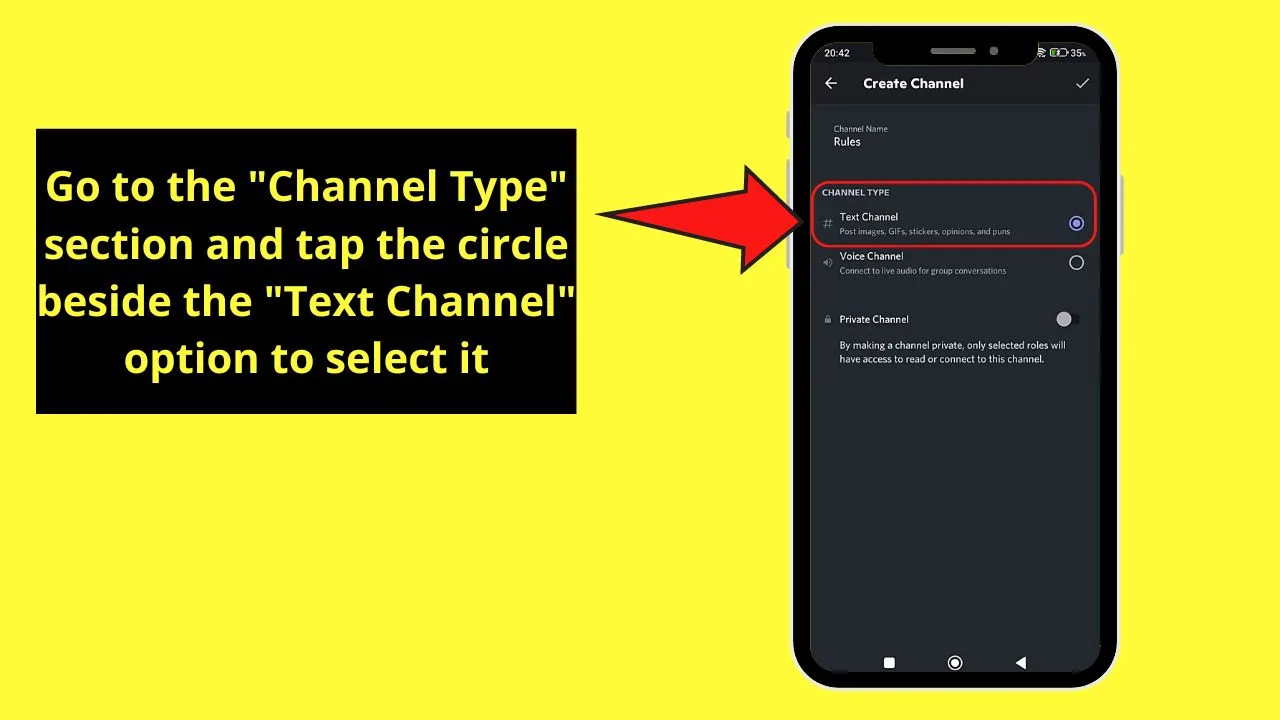
Step 5: Tap the circle beside the “Text Channel” option under the “Channel Type” section
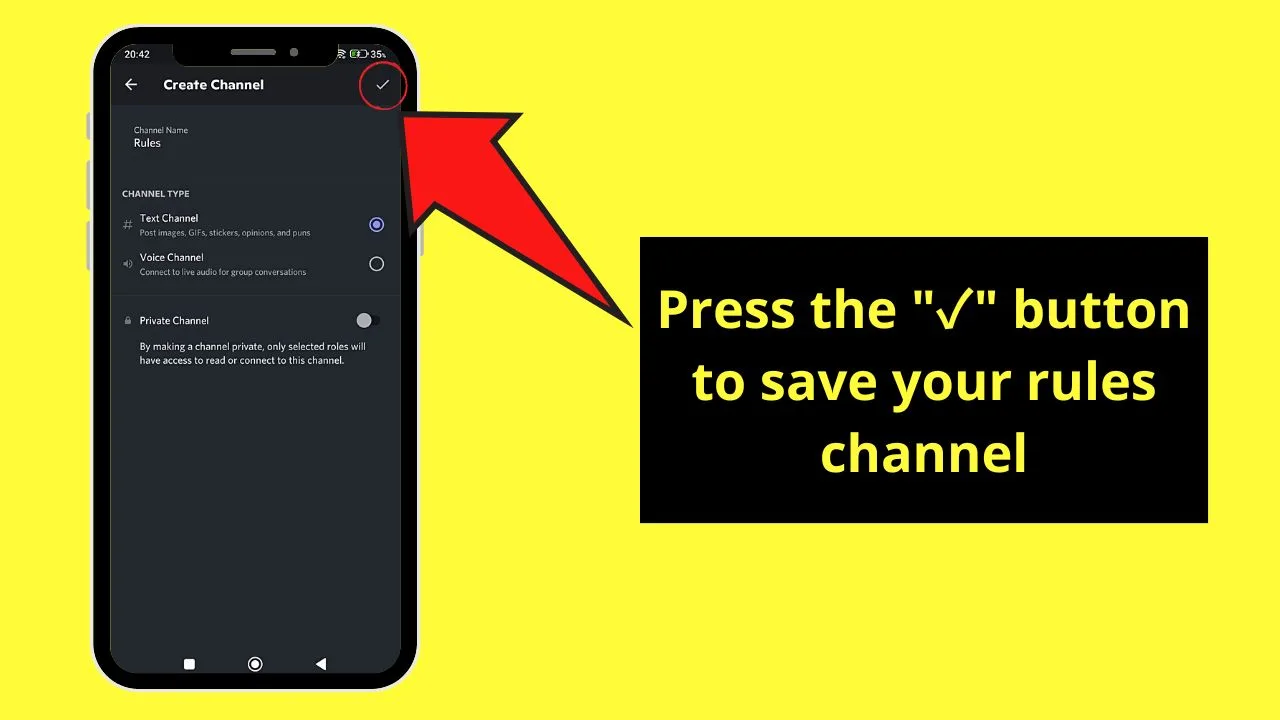
Step 6: Press the “✓” button to save your new rules channel
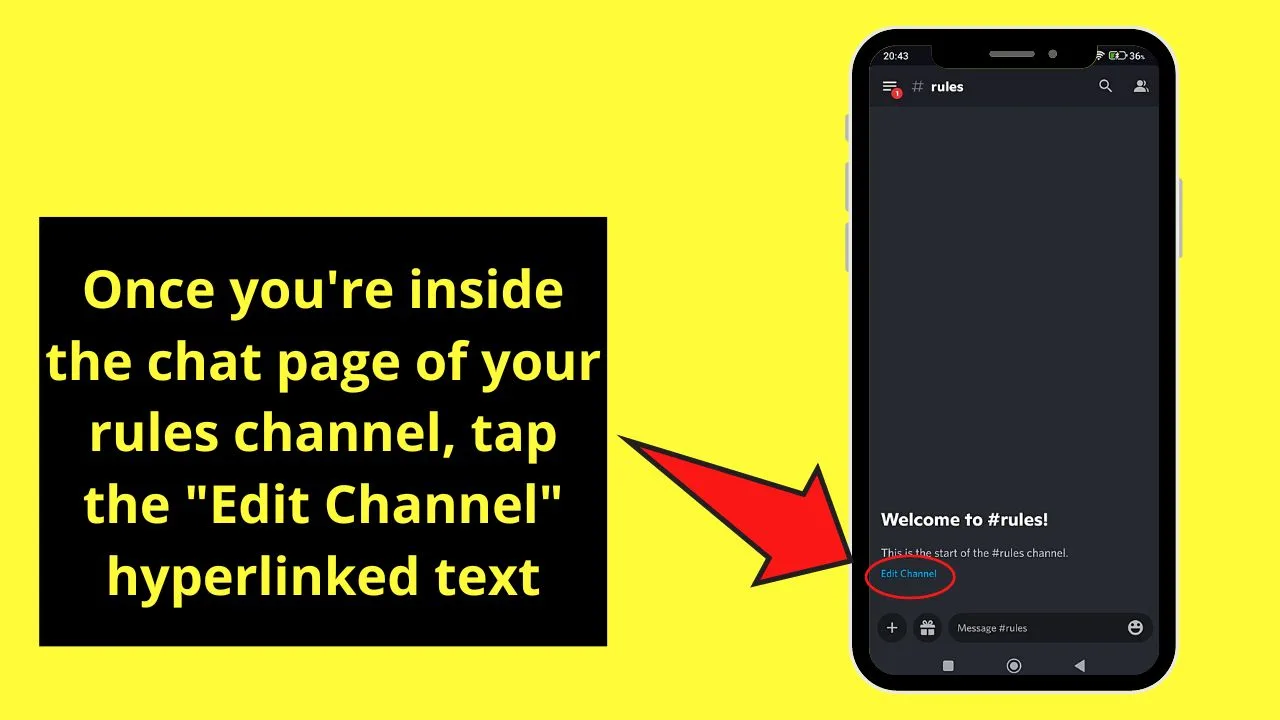
Step 7: As you haven’t added your rules yet, press the blue “Edit Channel” hyperlinked text
Step 8: Swipe up the screen until you find“User Management”
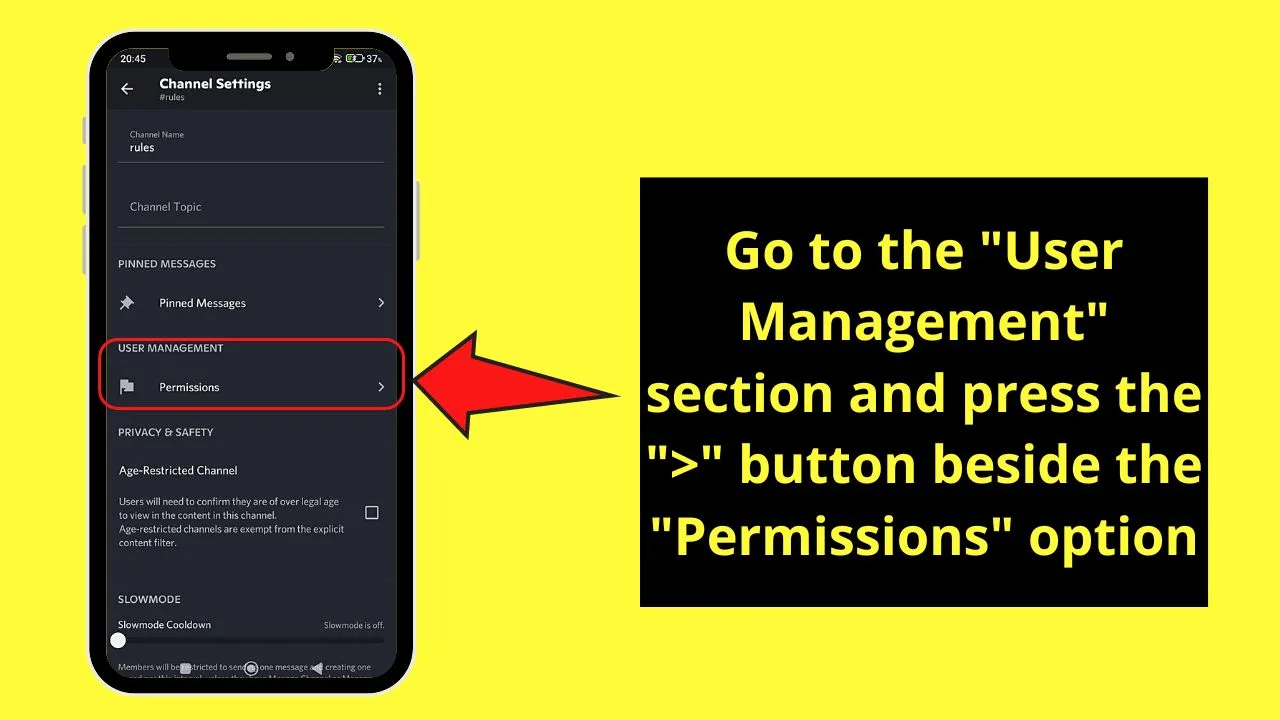
From there, press the “>” button beside the “Permissions” option to access it.
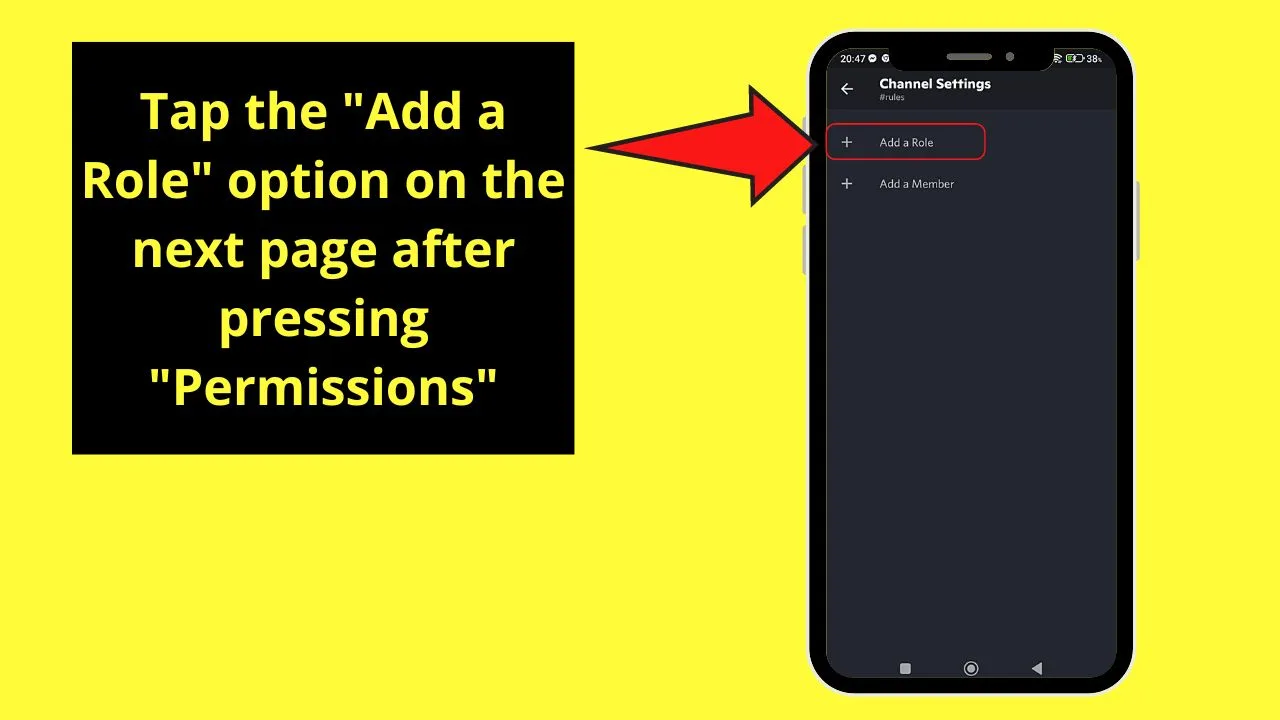
Step 9: On the “Channel Settings” page, tap the “Add a Role” option
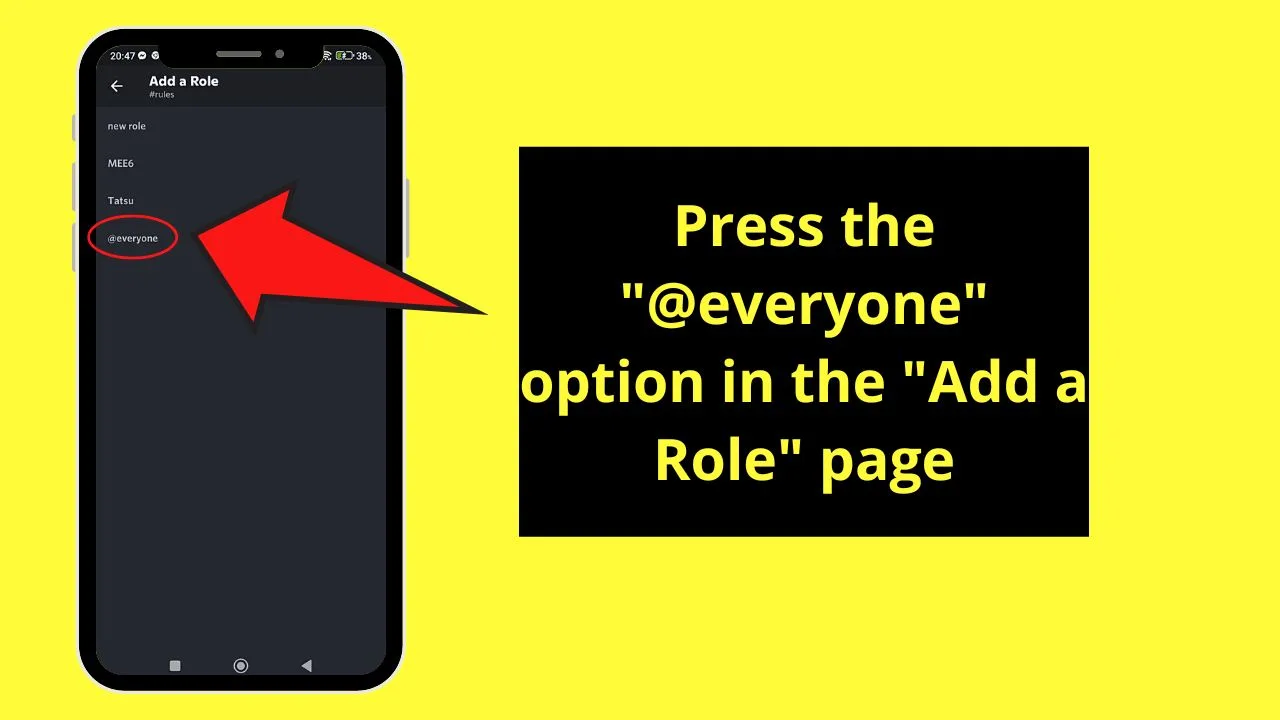
Step 10: Press “@everyone” among the options available on the “Add a Role” page
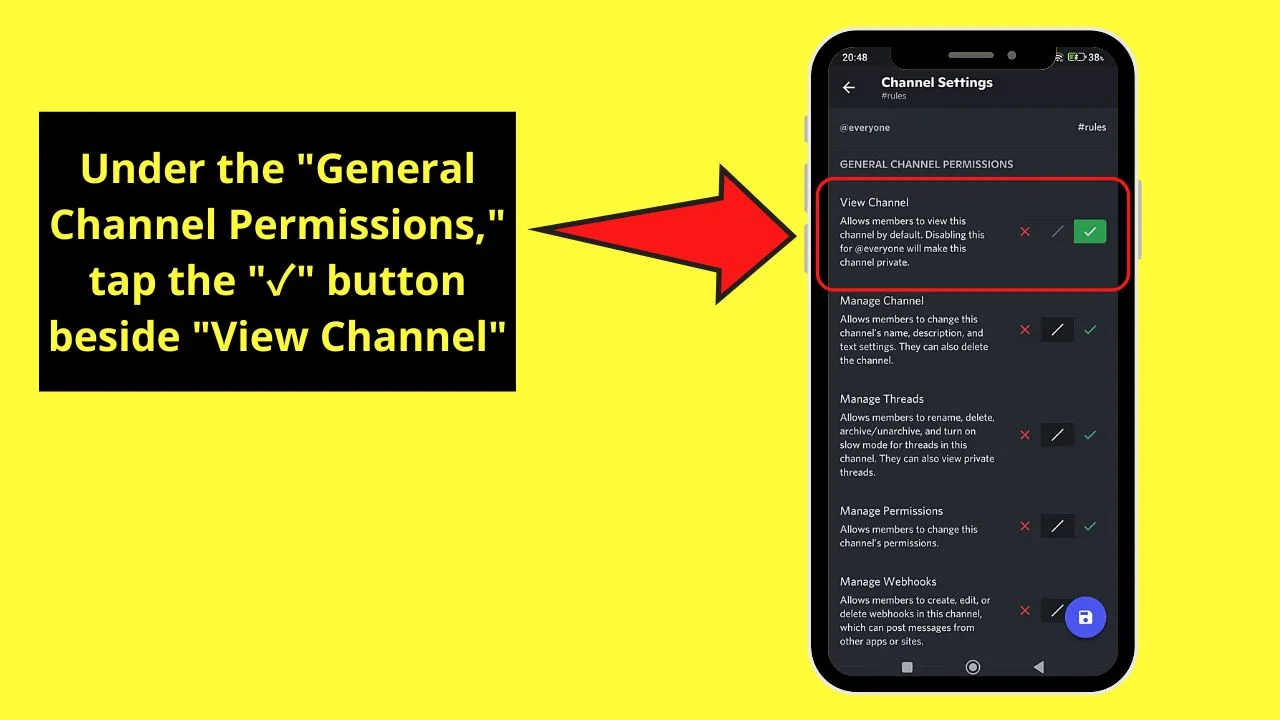
Step 11: Once you’re redirected to “Channel Settings,” go to the “View Channel” permission and tap the “✓” button
Step 12: Swipe up the screen until you reach the “Text Channels Permissions” section
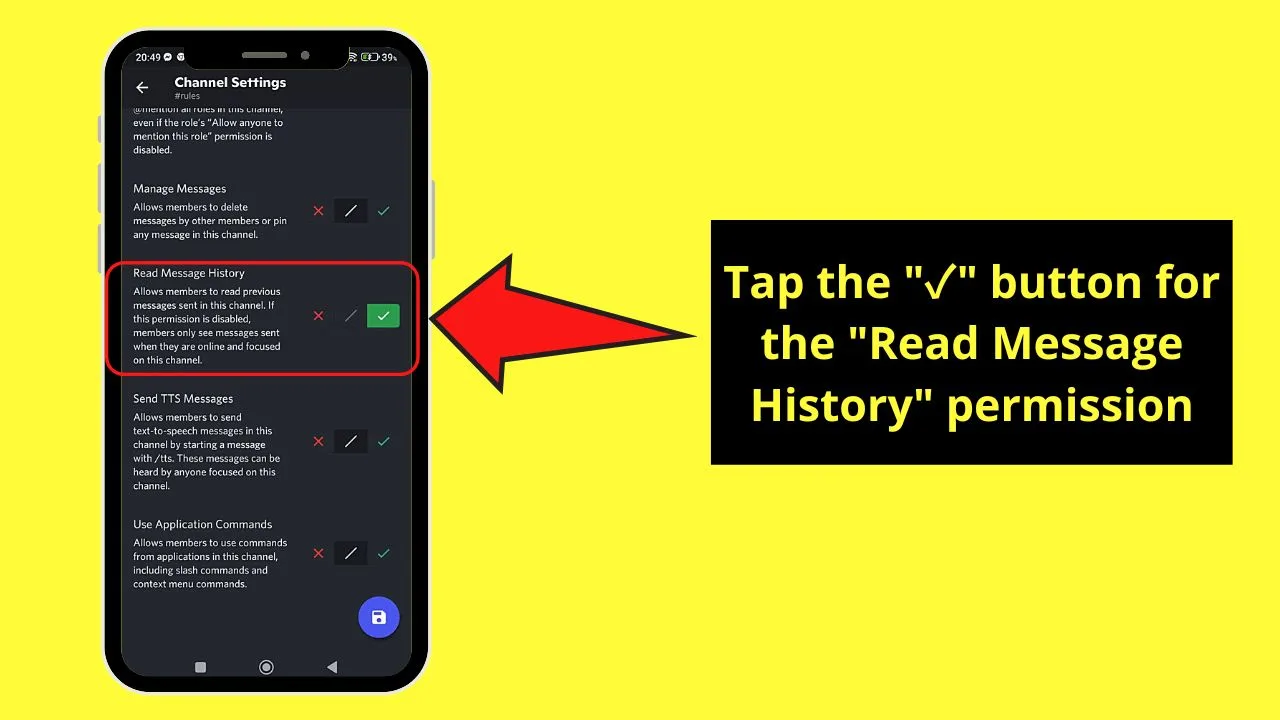
Keep scrolling up until you see the “Read Message History” permission. Tap the “✓” button as well to activate it.
Step 13: Tap the “X” button for the “Send Messages” permission under “Text Channels Permissions”
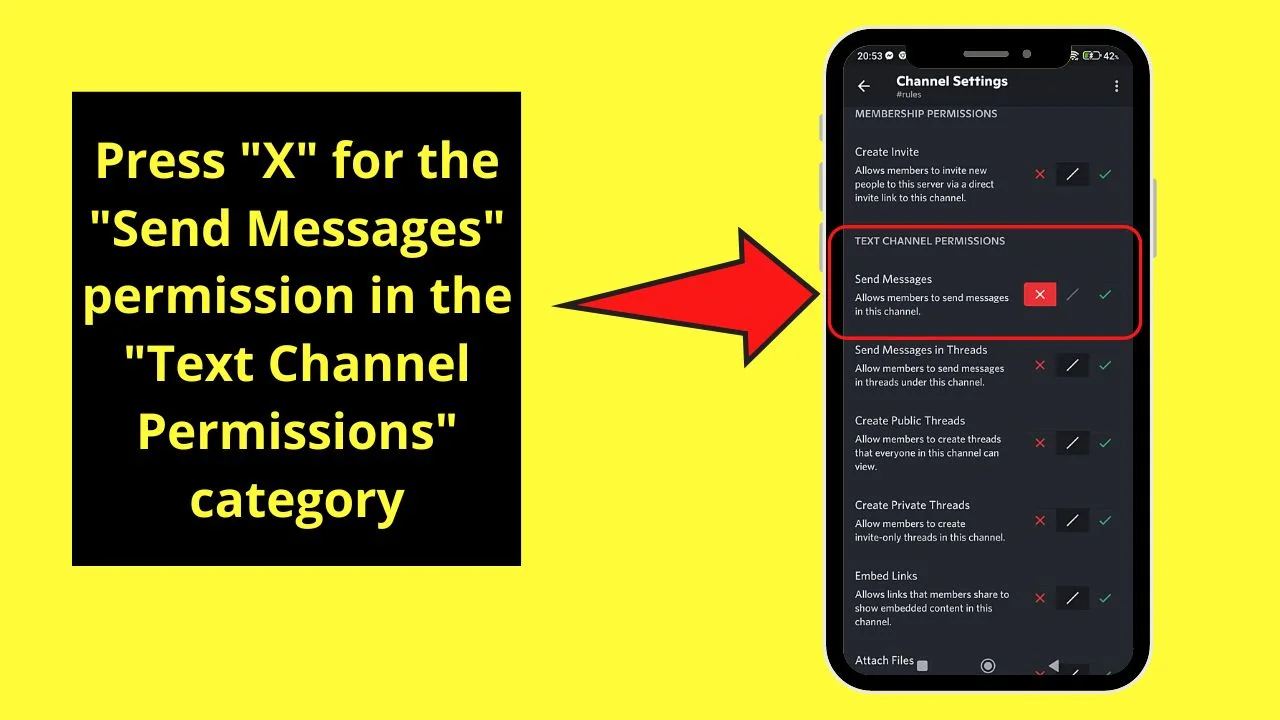
This won’t allow the members to send messages in the rules channel; just view and read the messages in it.
Step 14: Press the floppy disk icon to save the permission settings made
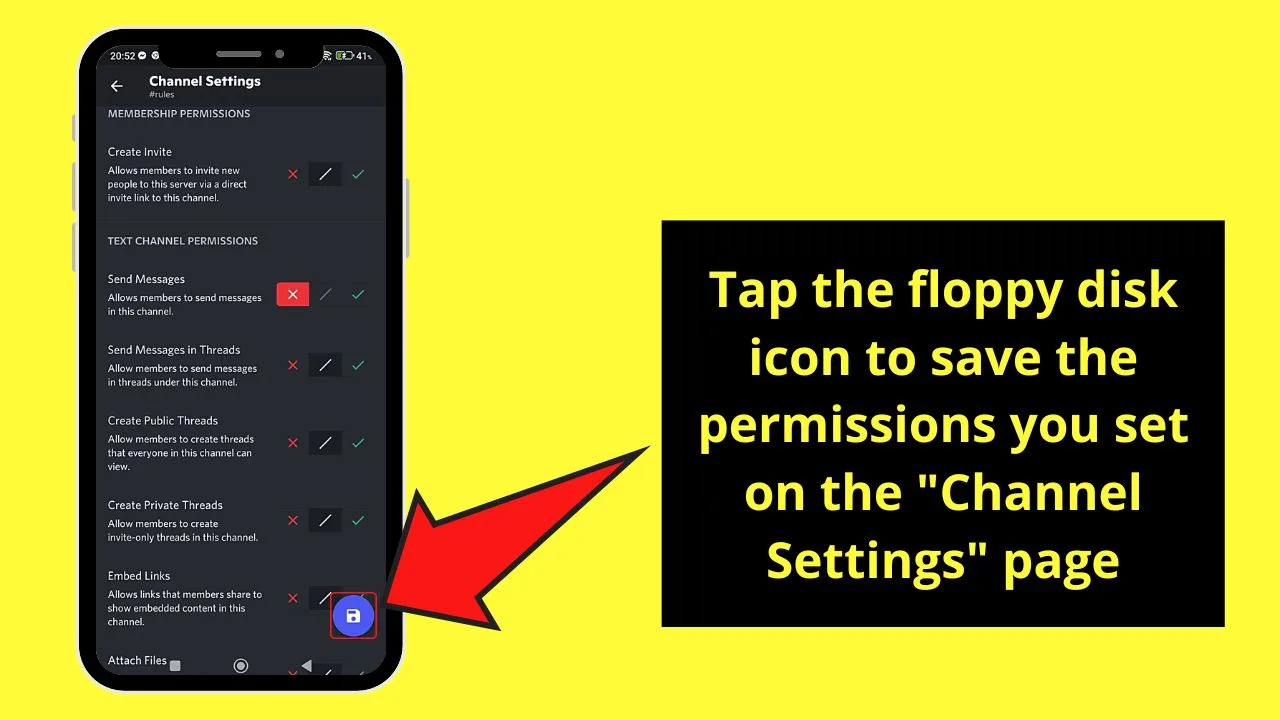
Step 15: Tap the “←” button until you reach the rules channel chat page
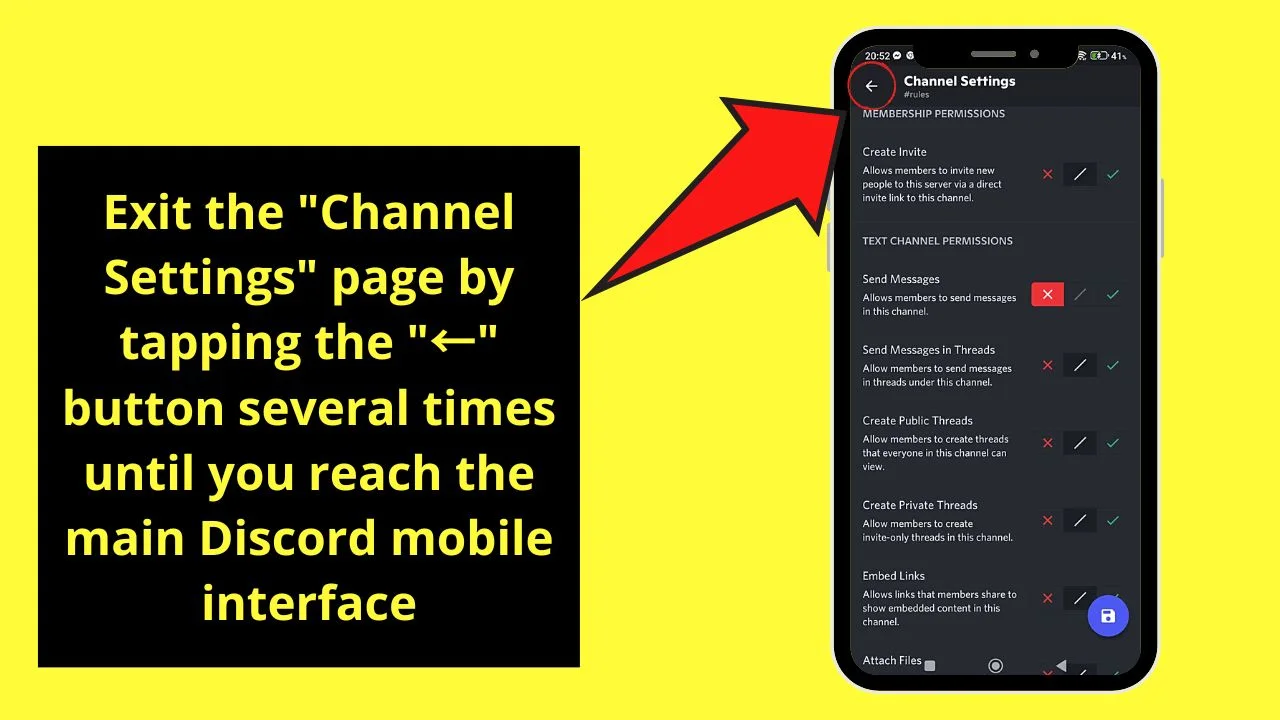
From there, tap the hamburger menu again to make the left side panel and bottom menu appear.
Step 16: Tap the rules channel you created to enter the chat page
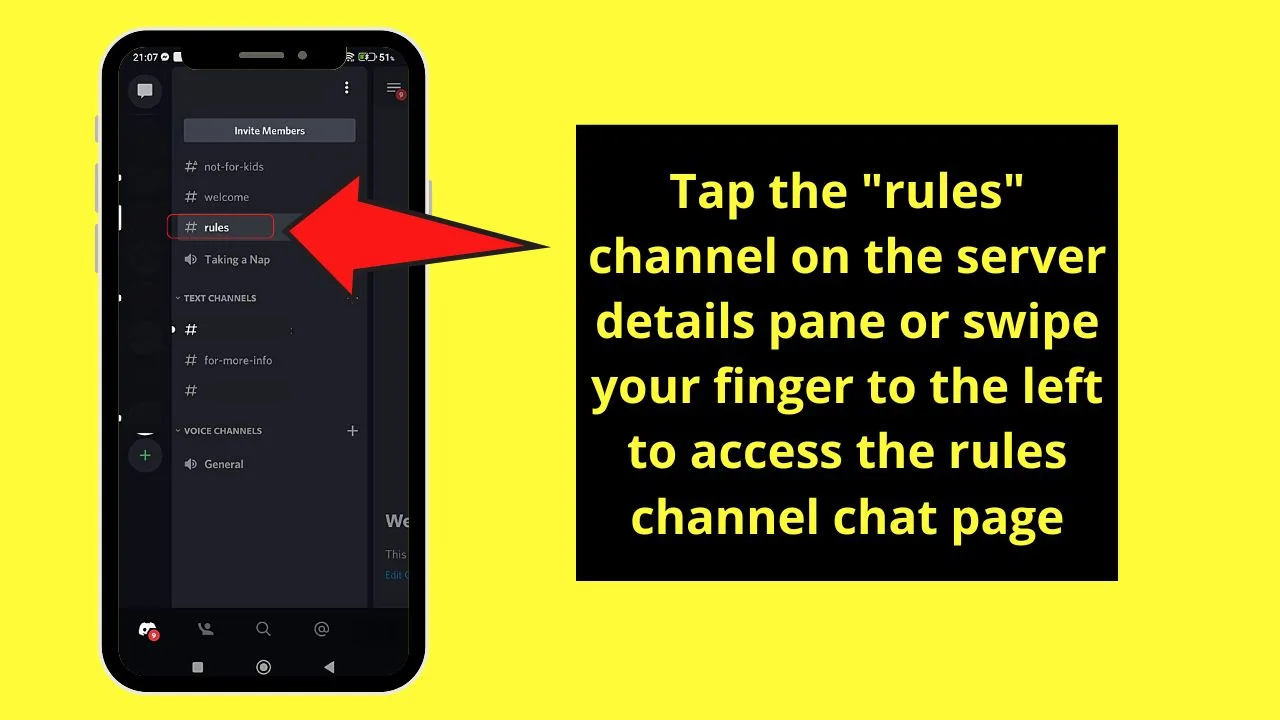
You can also reach the said chat page if you swipe your finger to the screen’s left side.
Step 17: On the “Rules” channel chat page, tap once on the message field and list your rules
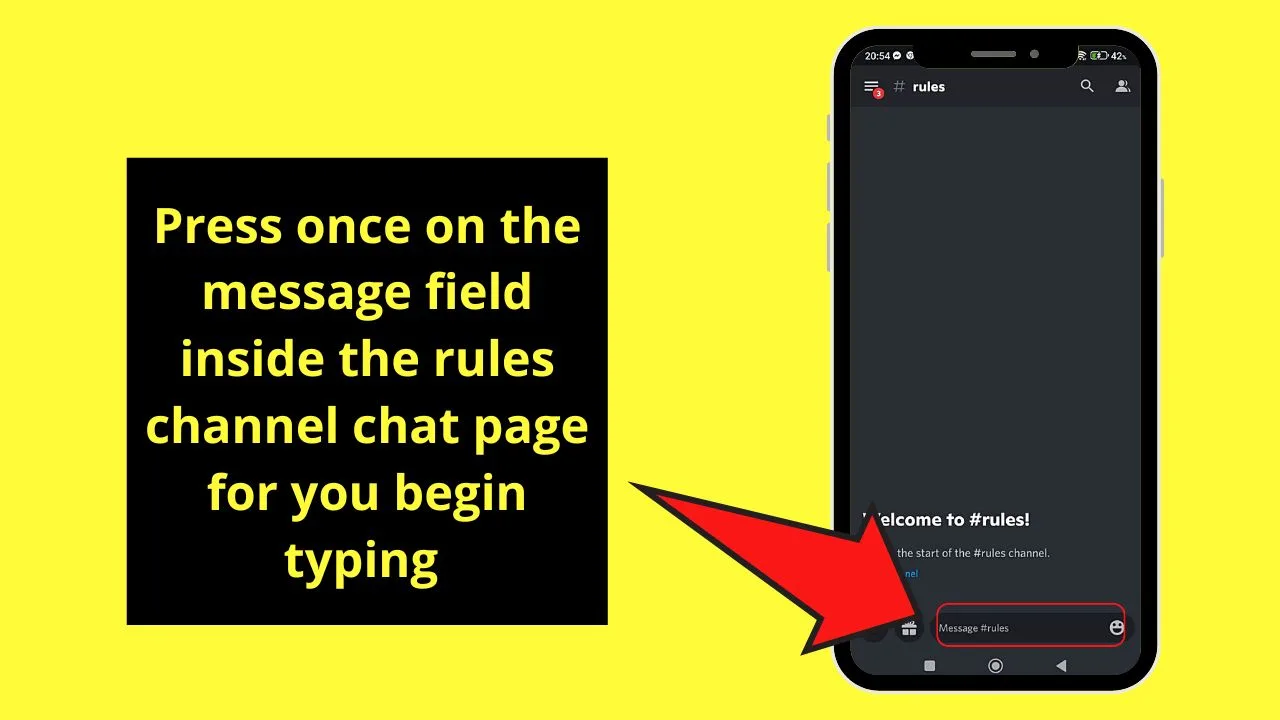
To do so, type the number followed by 2 asterisk symbols. Doing so will make the rules you created more visible by making the letters appear bold.
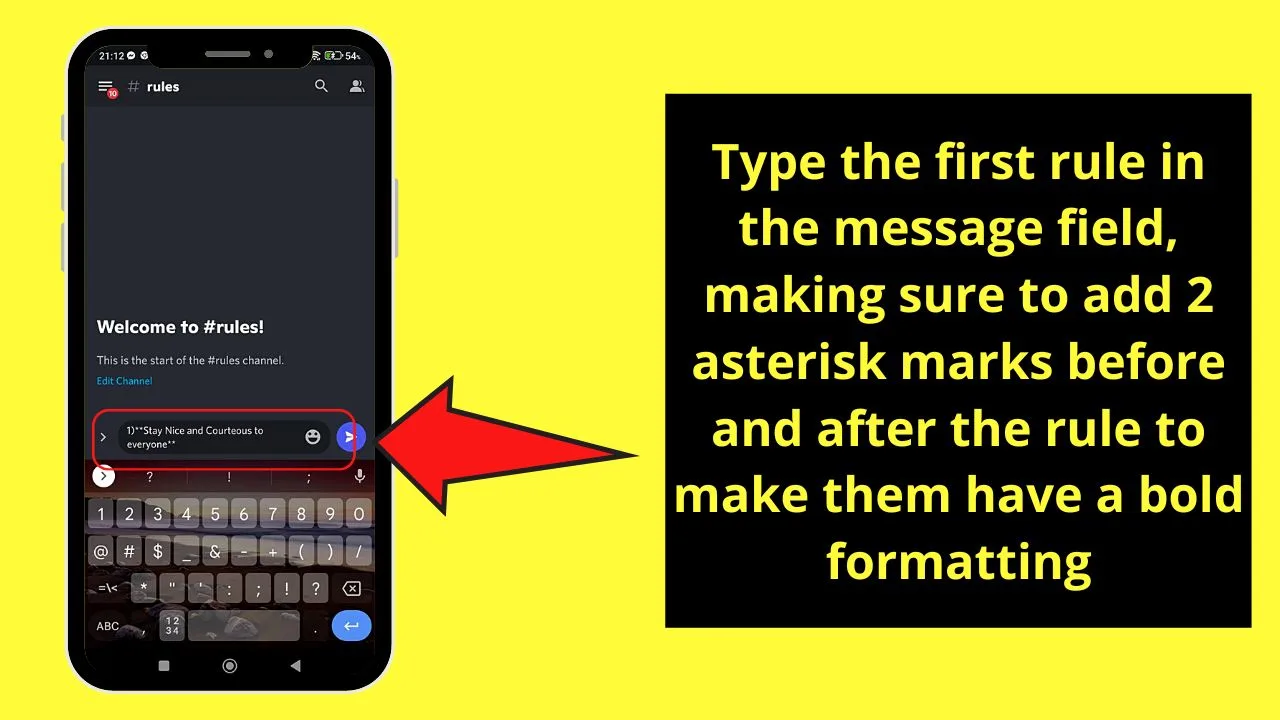
You can opt to caps lock all the letters but is not a requirement.
Then, type 2 asterisk symbols after the rule you created.
Step 18: Repeat step 17 until you complete the rules you want to impose on your server
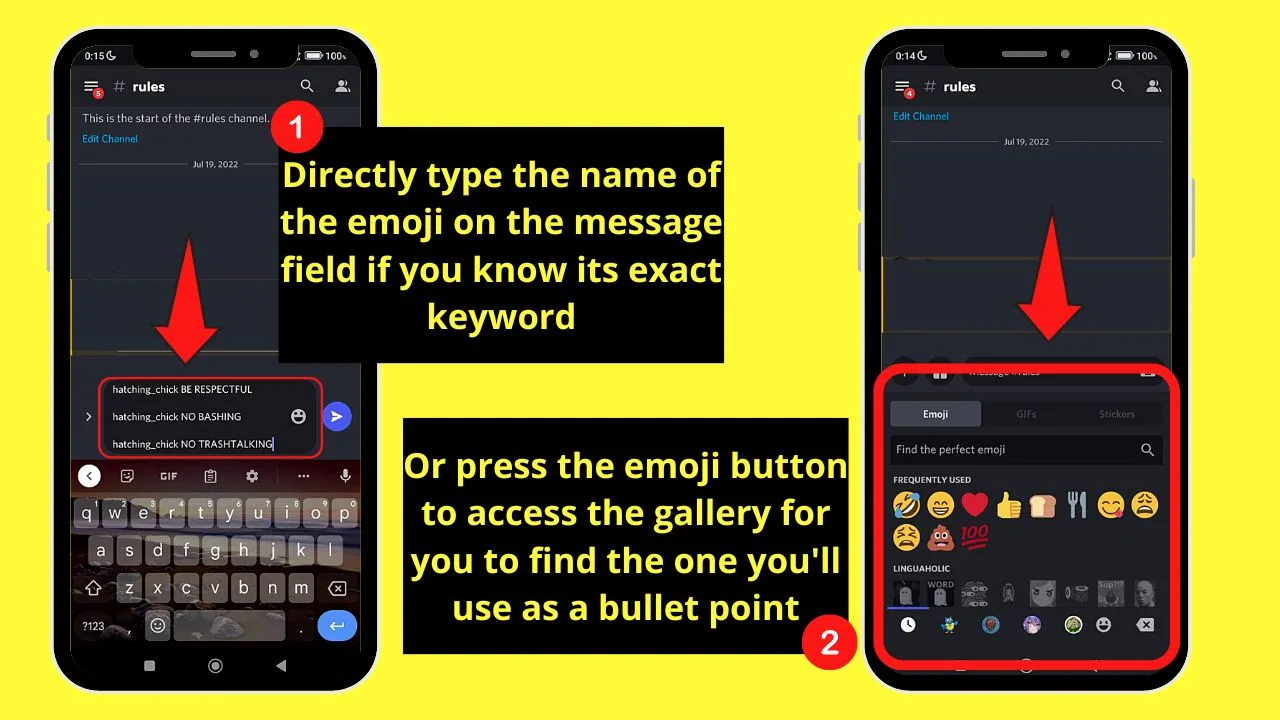
You can even add emojis as bullet points instead of using numbers if you want. (Refer to the “How to Make a Rules Channel in Discord on a Desktop” for the detailed steps.)
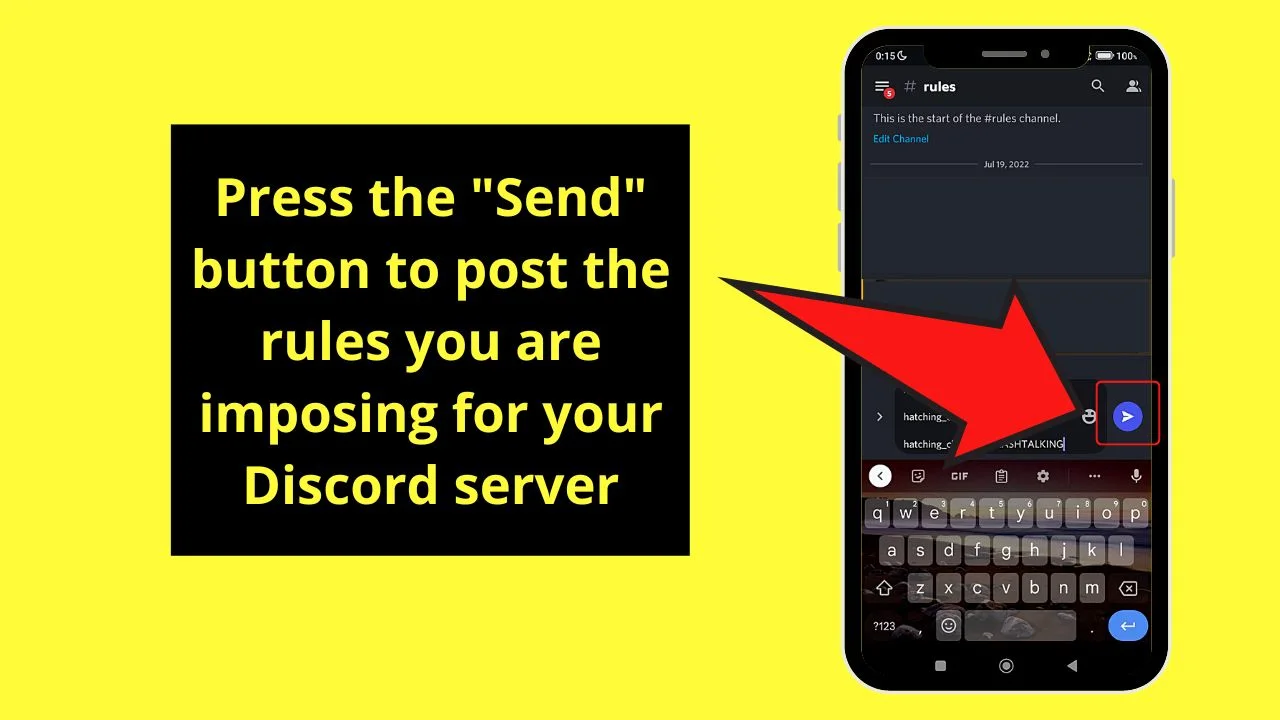
Step 19: Tap the “Send” button to post the rules you listed
Whoah! I never thought I could create a rules channel on my Discord server with just a mobile phone.
Now that you know the process more, are you more confident to create a rules channel in Discord regardless of the device you have at the moment?
Frequently Asked Questions about How to Make a Rules Channel in Discord
Can I create a rules channel in Discord if I am a member of it?
The ability to make or create a rules channel is only reserved for the owner and admins of the said server. Hence, if you don’t have any of those roles, then you can’t create a rules channel on that particular Discord server.
Why is it crucial to make a rules channel in Discord?
Making a rules channel in Discord ensures that all your server members uphold the basic ethics. Think of it as a reminder of how everyone should behave in the server without an admin or the owner itself reminding the users now and then.
Do I have to use the webhooks method for me to create a rules channel on Discord?
While using webhooks can help automate posting your rules on your Discord, you can opt not to. If you don’t want to complicate things, stick with just creating the rules channel, setting its permissions, and typing out the rules on the message field before posting them.

Hey guys! It’s me, Marcel, aka Maschi. On MaschiTuts, it’s all about tutorials! No matter the topic of the article, the goal always remains the same: Providing you guys with the most in-depth and helpful tutorials!


