
When the WordPress upload theme button is not working it is usually caused by a conflicting script in either an existing theme or a plugin.
JavaScript controls a lot of functions on WordPress. Conflicting scripts is the biggest reason for things breaking.
You can try to bulk disable all plugins, then activate one by one to find the offending plugin. A much faster, albeit a temporary fix, is to edit your config.php file.
Read on to discover the one line of code that bypasses JavaScript that fails to load, resulting in your upload theme button working again.
Why is my WordPress Upload Theme Button not working?
Self-hosted WP websites may have disk space restrictions. JavaScript errors are the usual cause of upload buttons breaking. A temp patch is to edit the WP-config file to load scripts individually. Use cPanel file manager as a temp workaround.
WordPress.com requires a Business or eCommerce plan
WordPress.com is a hosted platform. Custom themes are not a feature on the free WordPress.com plans or the Premium WordPress.com plan.
To enable support for using a custom WordPress theme, you need to upgrade to the Business or eCommerce plan.
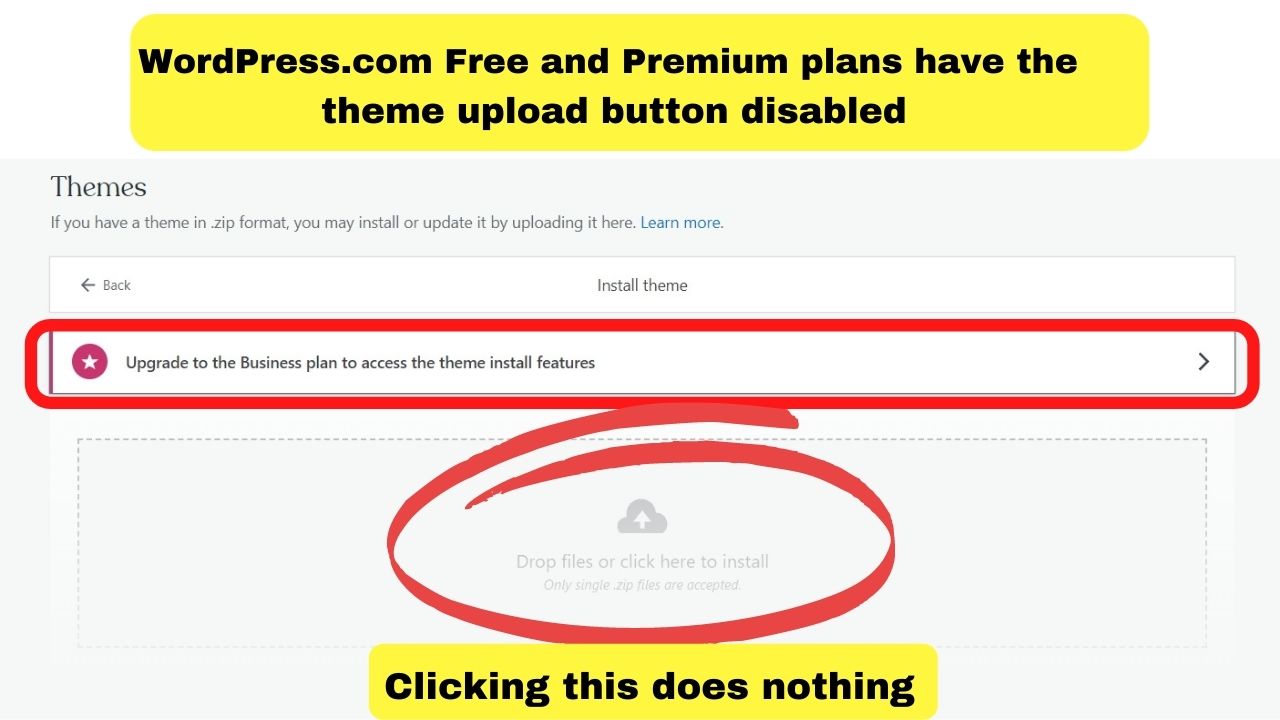
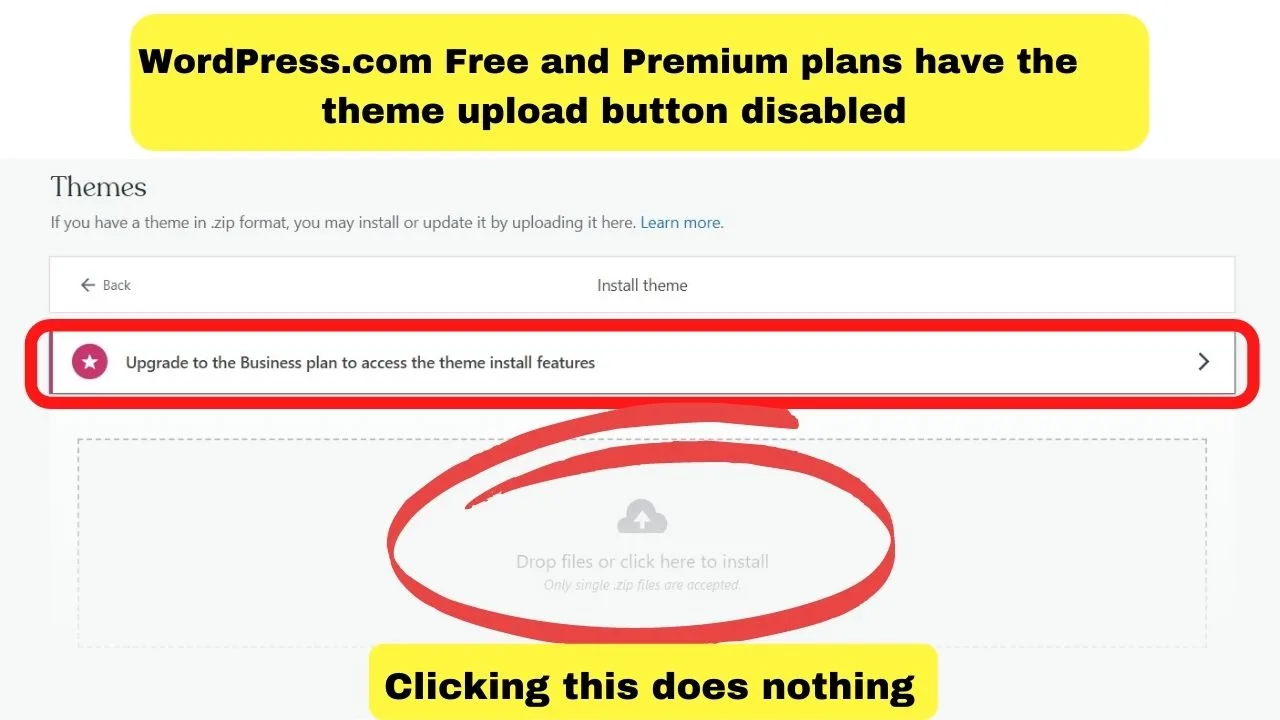
Without upgrading, you will be restricted to the WordPress theme showcase installations. These are themes approved by WordPress.com. It is a tightly controlled platform.
The premium plan lets you edit existing themes using custom CSS. To use a custom theme though, you need to pay more.
Upload buttons disabled by hosting providers
This is not something that is typically encountered, however, hosting companies may run scripts that disable your upload buttons when you exceed the allocated disk space.
The majority do not use scripts, but instead, let customers try to upload media, then show a message along the lines of WordPress failed to import data.
This hints that your hosting provider is restricting the file size of uploads.
When selecting a hosting provider, something to look at is the disk space they allocate on each plan.
It is not super important for most starter websites. It can become important once your site starts growing.
Like, if you were to add a forum to your website or install help desk software. Especially when it lets users upload attachments as those are then stored on the server.
When considering what is a good blog host in terms of the tech specs provided, you need your storage limitations to be upgradeable to accommodate for website growth.


Most good hosts will provide room for growth by starting hosting plans with 10GB or more of storage space.
Once you exceed or get close to exceeding your allocated space, hosting providers contact customers asking to reduce the disk space being used on the server.
Do that by deleting unused media files, inactive themes, and plugins.
Alternatively, upgrade to a more suitable plan.
Upload a new WordPress theme directly to your server
The WordPress upload button is just for convenience. It is not required to upload a custom theme. You can bypass it by uploading a new theme directly to your hosting server.
This can be done using cPanel.
How to upload a WordPress theme in cPanel
- Login to your cPanel (yoursite.com:2083)
- Open the “file manager”
- Then open the “WP-Content” folder
- Then open “WP-Themes”.
- Then up the top, click the “upload” button and upload your WordPress theme zip file there.
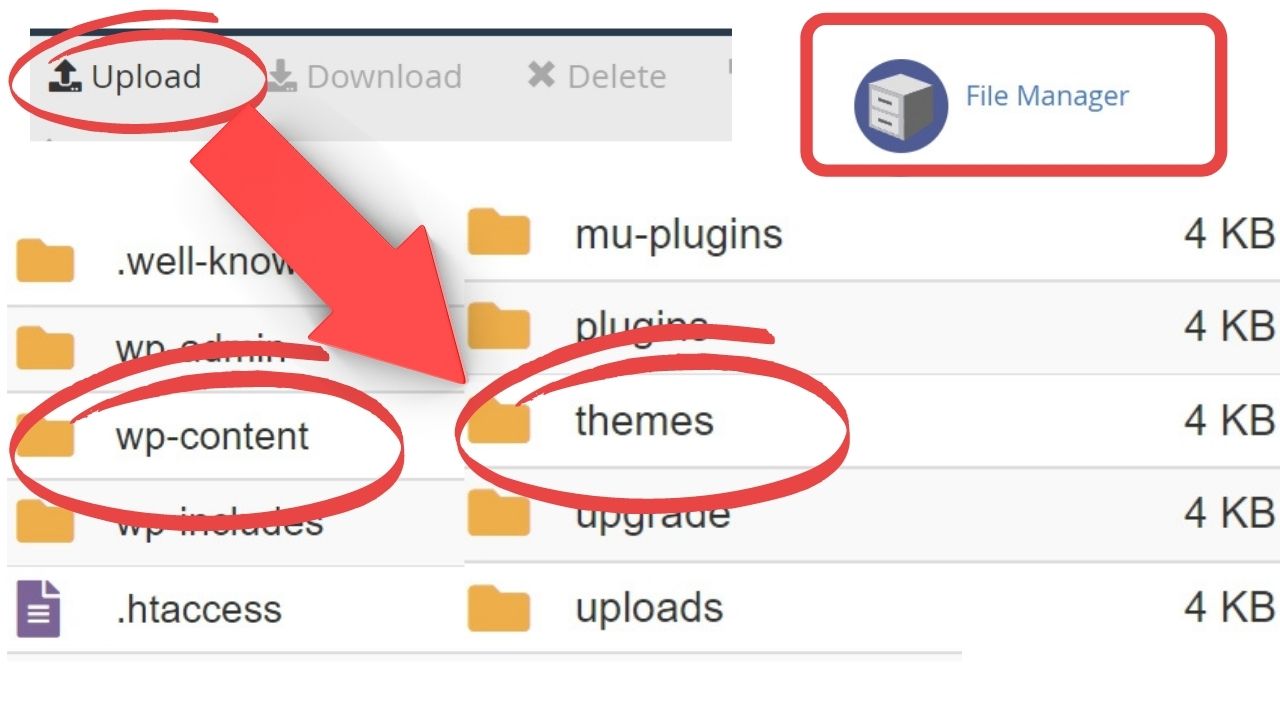
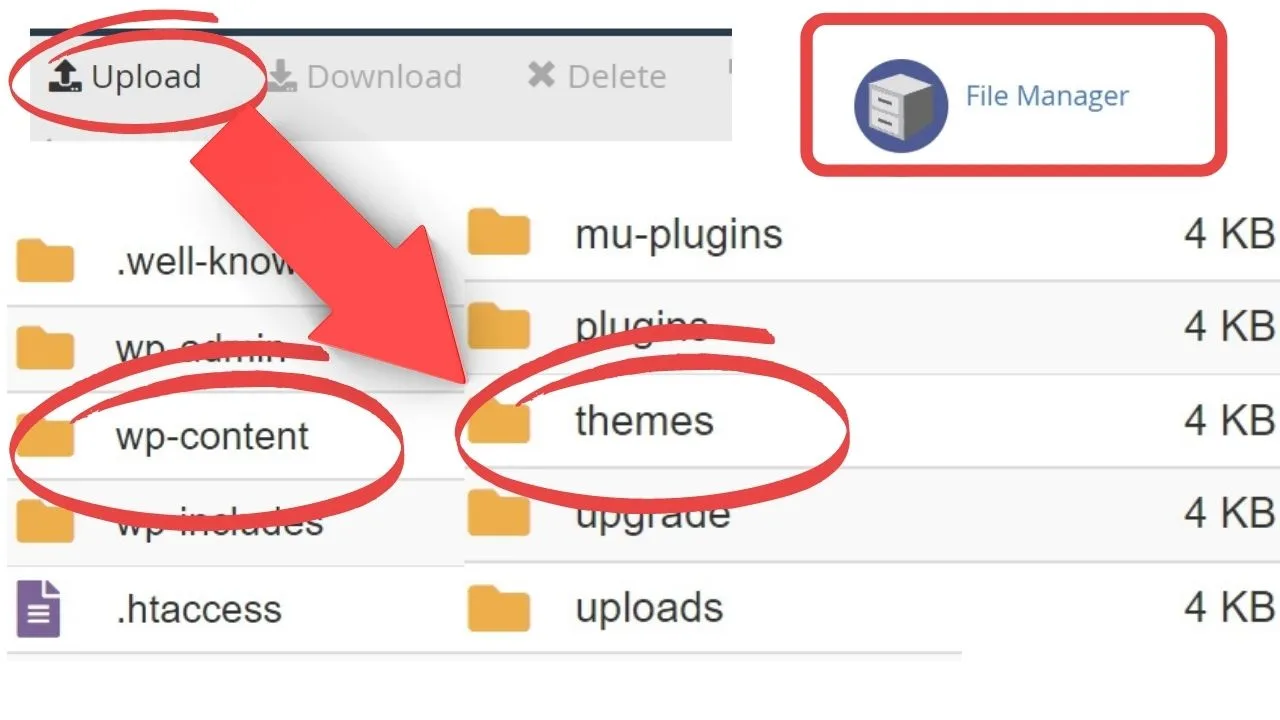 Once that is done, log into your website, go to “themes” and the one you uploaded will be there. Select it then click on activate to use the new theme.
Multisite installs only show the button when logged as a network administrator
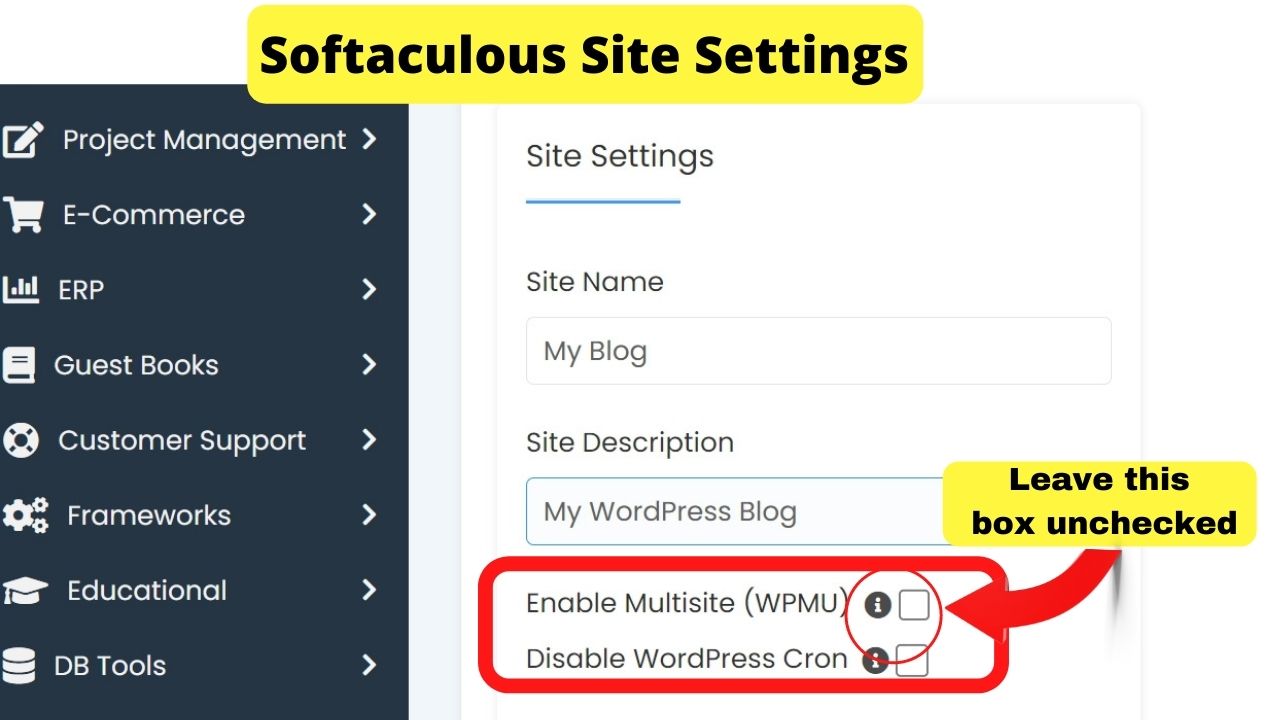
When installing WordPress using the Softaculous Apps Installer, checking the box for “Enable Multisite (MPMU)” creates a multisite installation. This type of install has a network admin and a site admin.
Unless you log in as “network admin”, the upload button will not show. On multisite installs, only network administrators can install new WordPress themes. Site administrators can then activate the theme.
When this is the case, it will not be that the WordPress upload theme button does not work. It will not show at all.
To fix it, either log in as a network admin or re-install WordPress making sure that this time, the checkbox to Enable Multisite is unchecked.

JavaScript conflict errors
A number of features within the WordPress admin area are controlled by JavaScript. The upload theme button is one of them. So are all the buttons to add anything like add media or add a new plugin.
If the upload theme button is not working, check to see if you can add a new plugin. If you can’t install WordPress plugins either, it will be a server configuration problem.
This tends to happen after an update. It is one reason not to “enable auto-updates” on any plugin in WordPress.
One error in a script will result in you having to debug your site to find the plugin or theme that is causing the issue.
The quick fix for JavaScript errors is to edit your config.php file
The config.php file is not a part of WordPress. It is the configuration settings in your hosting account that controls how a WordPress website loads.
For that reason, it is stored in the root folder of your WordPress installation. Either your public_HTML folder in cPanel > File Manager or an addon domain.
It will not be listed in the Theme Customizer of your WP admin dashboard as the purpose of the file is to configure your server settings.
How to access the WP-Config.php file in cPanel
Go to cPanel, select “file manager”.
If you have one domain, select the “public-HTML” folder. For addon domains, click the domain name to access the root folder.


Right-click on the config.php folder, select edit. Scroll to the bottom, then where it says, ‘That’s all, stop editing! Happy blogging’, insert the code below BEFORE that text.
define('CONCATENATE_SCRIPTS', false );
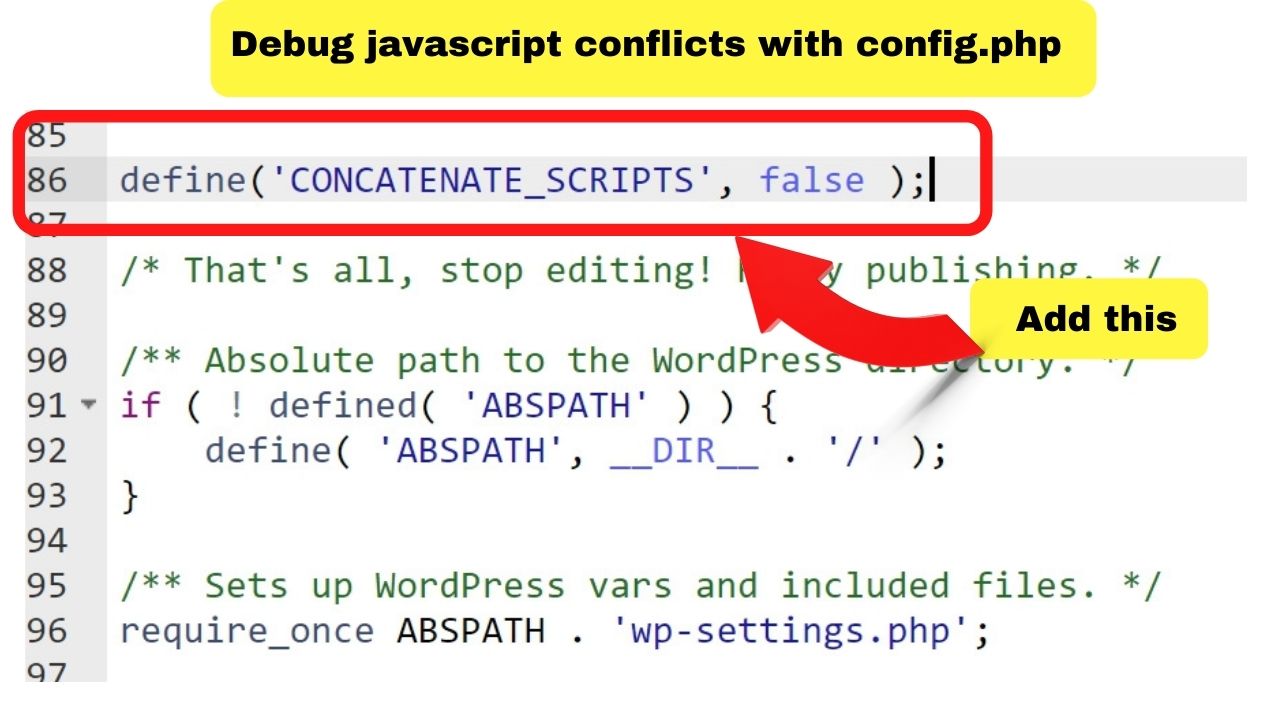

In computing terms, concatenate means to string things together. Like a chain or series of events. WordPress, by default, loads all scripts collectively. That is why if one script causes a conflict, things on your site break.
By setting the ‘CONCATENATE_SCRIPTS’ to ‘false’, it forces scripts to be loaded individually.
When one script fails to load, it will be bypassed, but other scripts will still load.
Technically, it is not a fix. Not a long-term one anyway. The conflicting script will still be present so something will not load.
Use the above script for debugging.
It only affects the back-end (admin area) of your WordPress site. It will not affect the front-end that visitors see. Still, do not use it over the long term. It is a patch only.
Once you find the plugin or theme causing the conflict, go back to your WP-config.php and remove the line of code for concatenating scripts.


Hey guys! It’s me, Marcel, aka Maschi. On MaschiTuts, it’s all about tutorials! No matter the topic of the article, the goal always remains the same: Providing you guys with the most in-depth and helpful tutorials!

