

How to Rotate Images in Google Docs
The first way to rotate images in Google Docs is by clicking and dragging the small blue circle on top of the photo. Another way is to rotate the photo in the Drawings pop-put window instead of doing the process directly in the document.
As mentioned earlier, Google Docs is almost like Microsoft Word in terms of the basic functions found in them.
Thus, you can rotate images in Google Docs like how you do it in Microsoft Word — but with some twists.
To get started, know that there is an easy and not-so-easy method of rotating pictures in Google Docs.
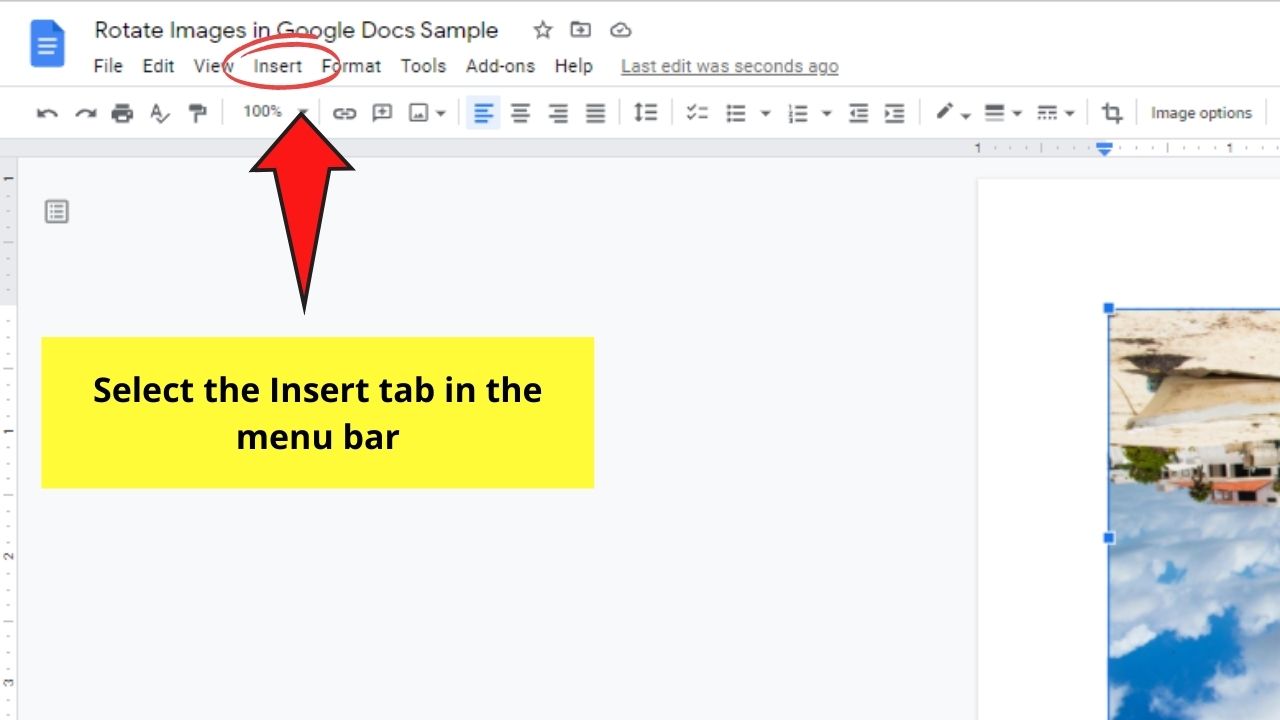
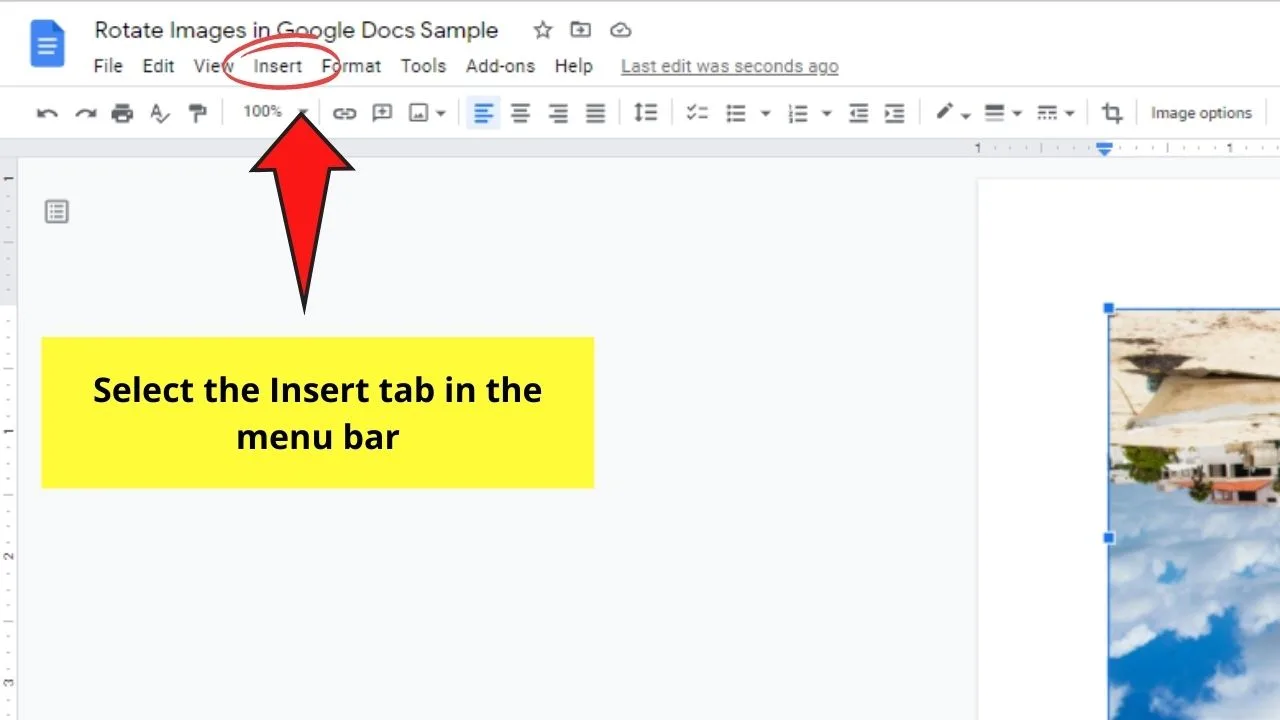
Step 1: On the menu bar, click the Insert button. A drop down menu will then appear.
![]()
![]()
Step 2: In the dropdown menu, select the Image button. Clicking it will activate another dropdown menu featuring the various options where you can pull up the photo file from.
![]()
![]()
But, for sample purposes, we’ll go with the Upload from computer option.
However, you can always insert the photo from Google Drive, Google Photos, or by pasting the URL of the said image.
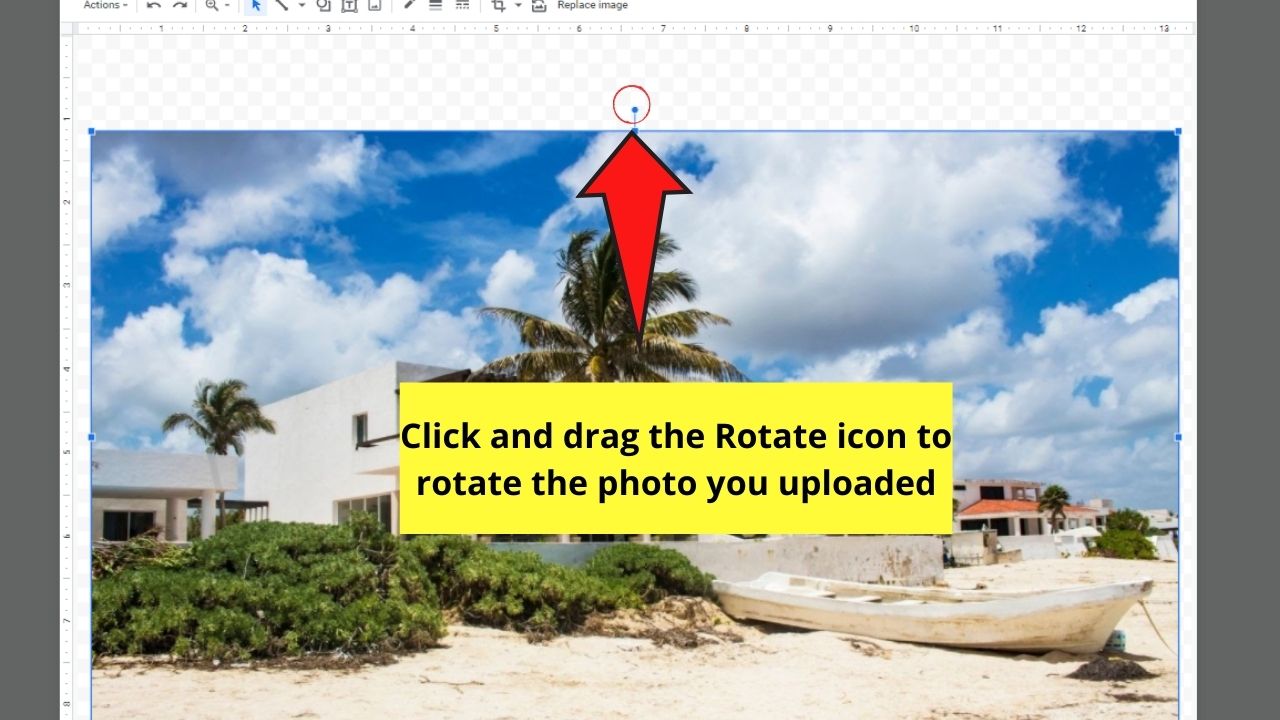
Step 3: Once the photo you selected is successfully inserted in Google Docs, click on it. This move will then surround the image with a blue border with little squares found in the corners.
You’ll also notice a small circle on top of one of the blue squares in the selected image. This is the rotate icon.
![]()
![]()
Step 4: After locating the small circle in the selected photo, click and drag it to rotate the image. Only let go of the mouse if you achieved the look you’re aiming for.
![]()
![]()
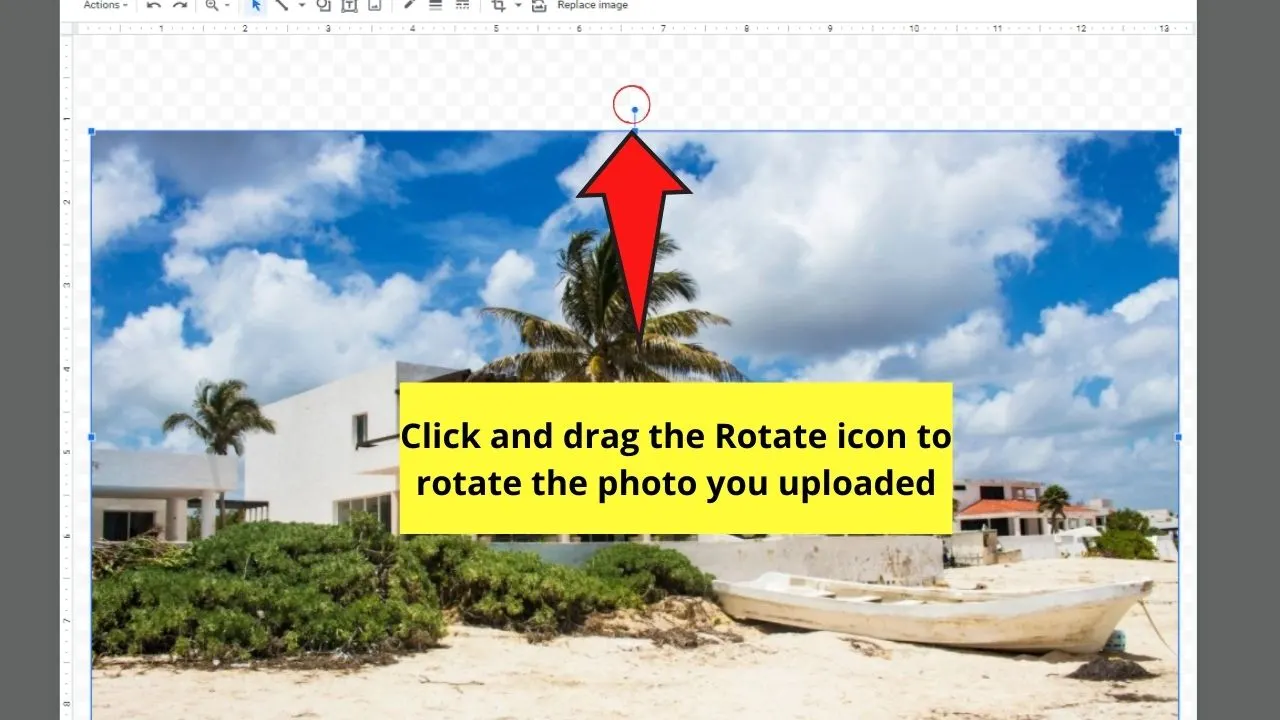
But, if you prefer a more precise rotation of the picture, click and drag the mouse while holding the Shift button on your keyboard.
![]()
![]()
Then, take a good look at your newly-rotated photo to see if everything’s good.
![]()
![]()


While the easy method of rotating an image in Google Docs is nifty enough, what if you want to do more than just a simple rotation?
Well, the second and slightly more complicated method of rotating images in Google Docs might help you out.
Rotate Images in Google Docs with the Drawing Tool
To rotate images in Google Docs with the Drawing tool, follow these steps:
Step 1: In the menu bar of the Google Docs file you opened, select the Insert button.
Step 2: Now, instead of selecting the Image option in the dropdown menu, choose the Drawing button instead.
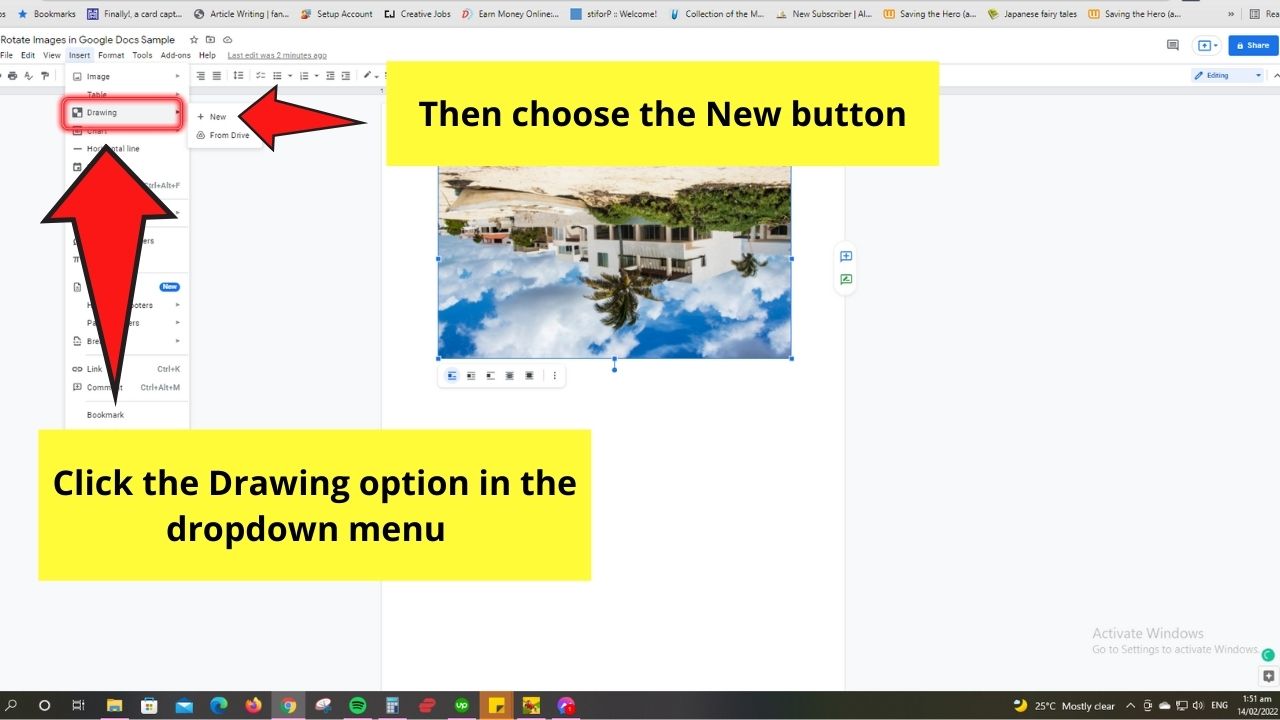

Then, select the New button in the second dropdown menu that appears.
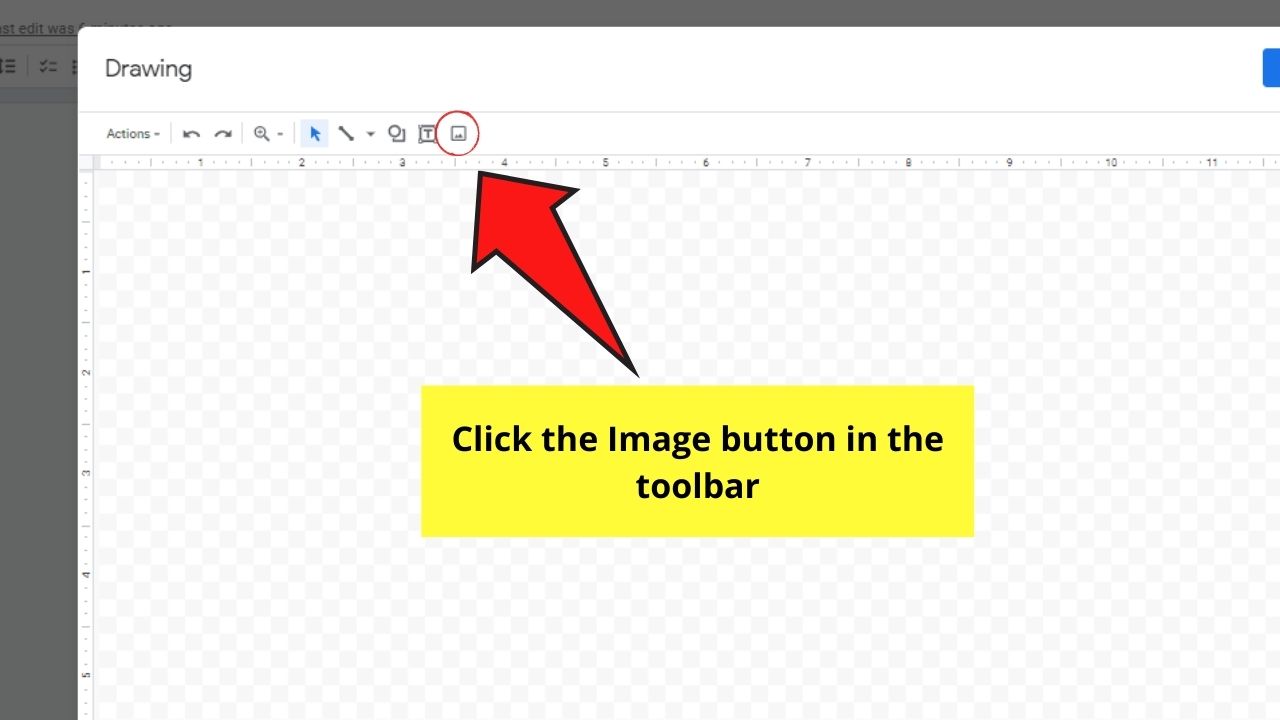
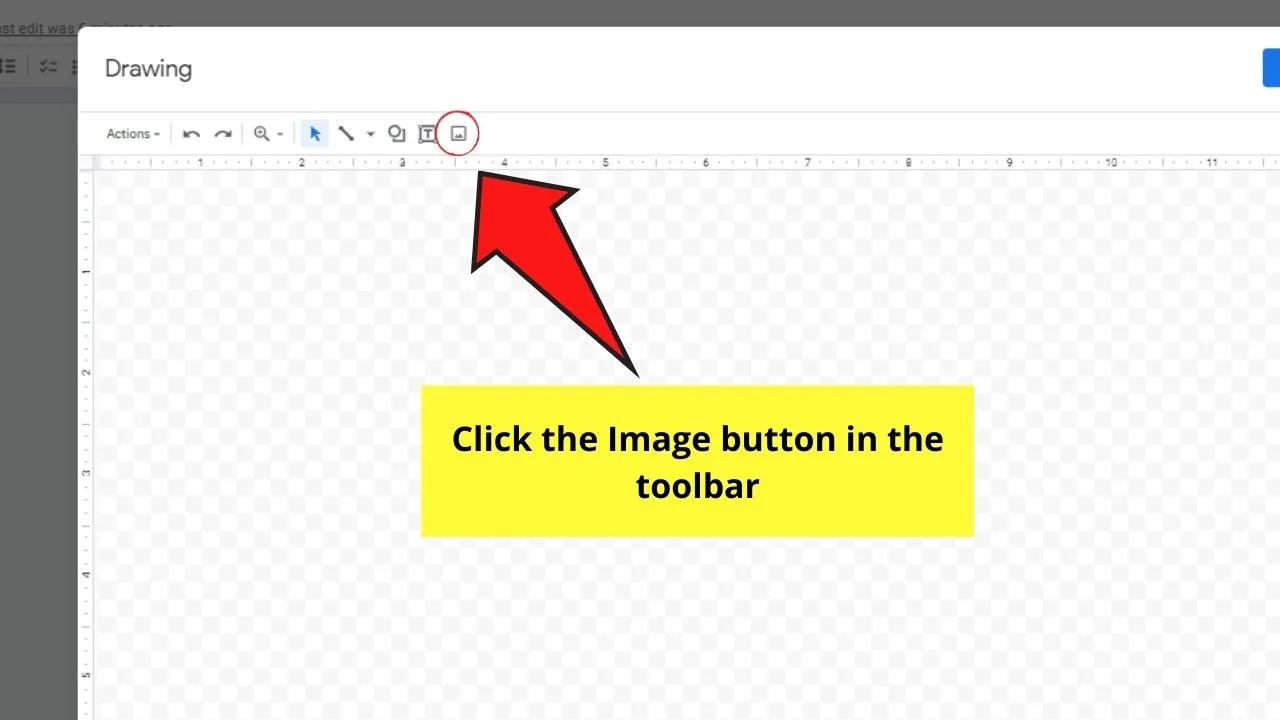
Step 3: In the Drawing pop-out window that appears, click the Image icon in the toolbar. Then, choose where you’ll source the photo from.
You can opt to pull the file from your device through the Upload from computer option. You can also insert images from Google Photos and Google Drive.

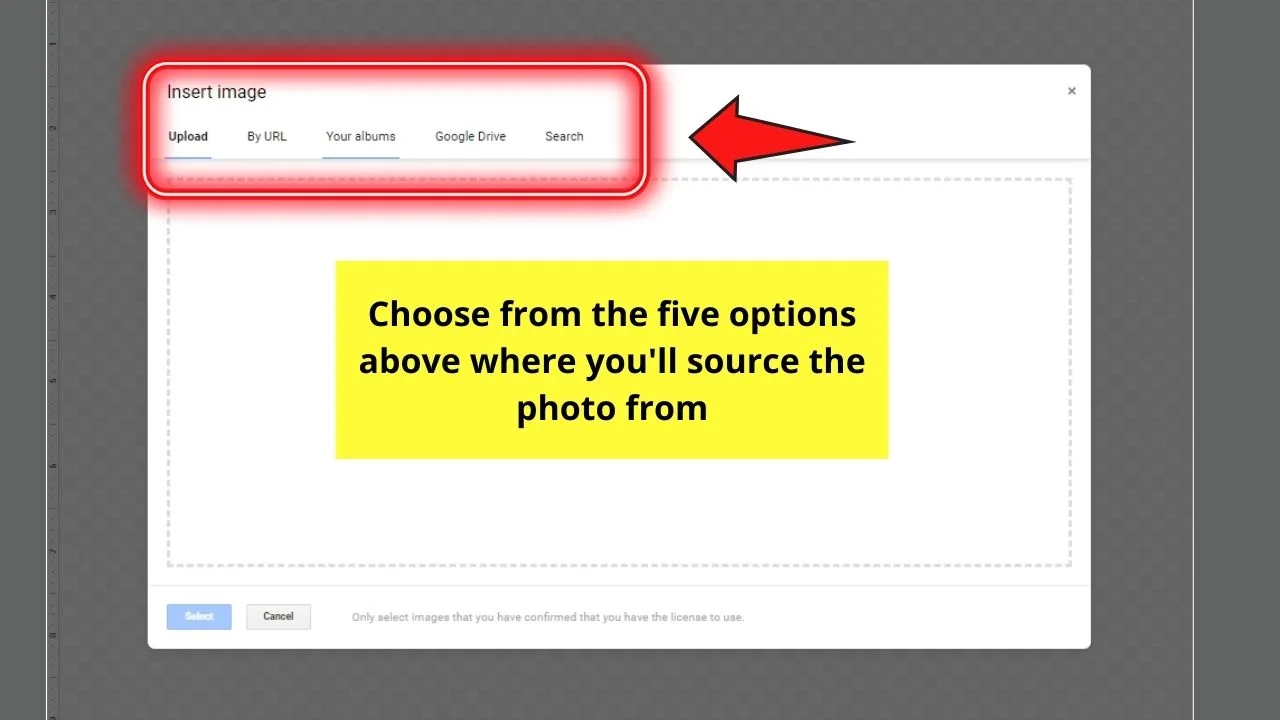
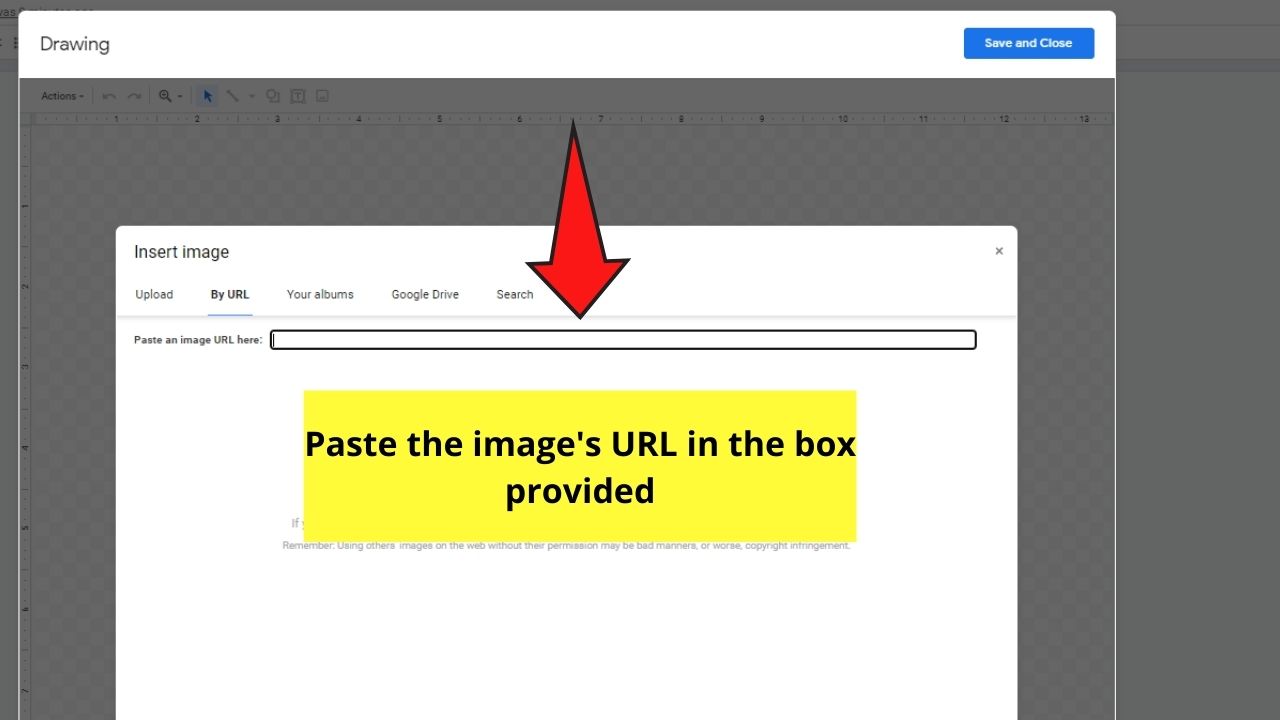
However, if the image file you want to use is in a website or your social media account, select the Insert from URL option instead.
Paste the link on the box provided if you select the URL option.

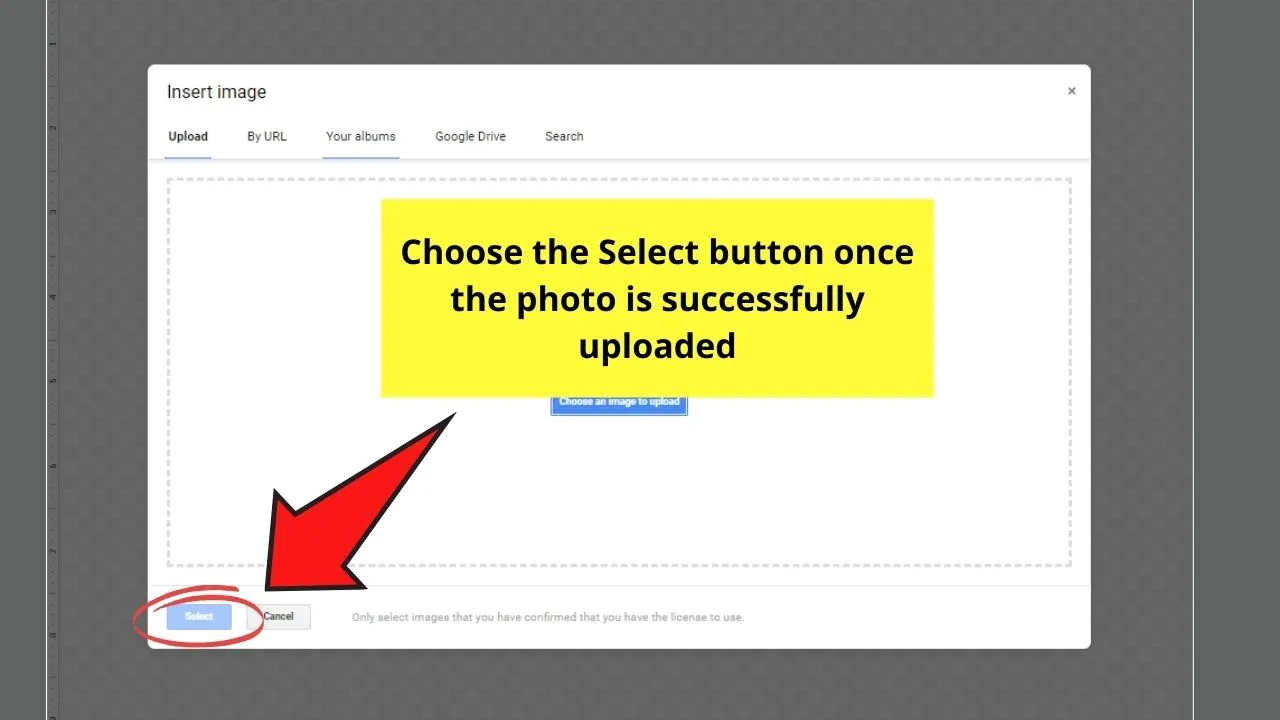
Whatever option you select, once you successfully sourced the photo, click Select.

Step 4: After inserting the image, click it to make the small blue circle appear. Refer to steps 3 and 4 of the Easy Image Rotation Method above to rotate the photo in the Drawing tool.
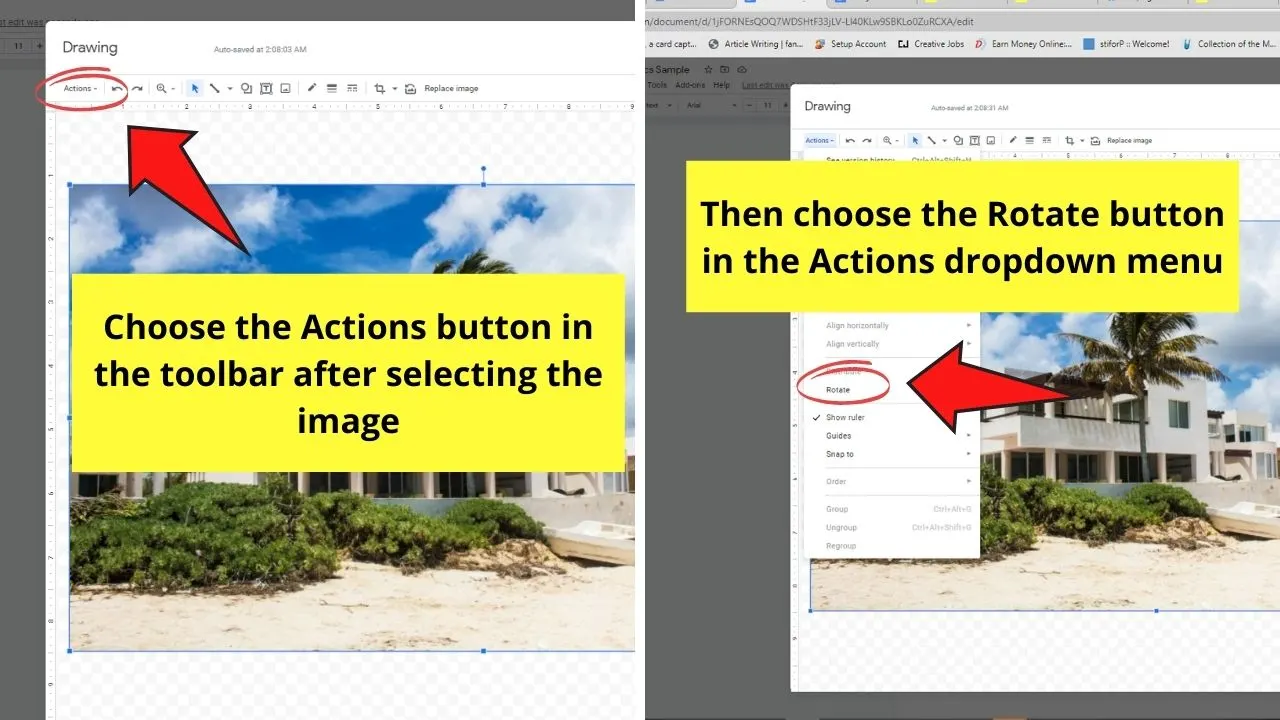
Step 5: But if you want to rotate the image in itself, select the photo by clicking it.
After which, head to the toolbar and click the Actions button. Then, select the Rotate button in the dropdown menu.

Step 6: In the second dropdown menu that appears, you’ll see four rotation options available
- Rotate clockwise by 90 degrees
- Rotate counterclockwise by 90 degrees
- Flip horizontally
- Flip vertically
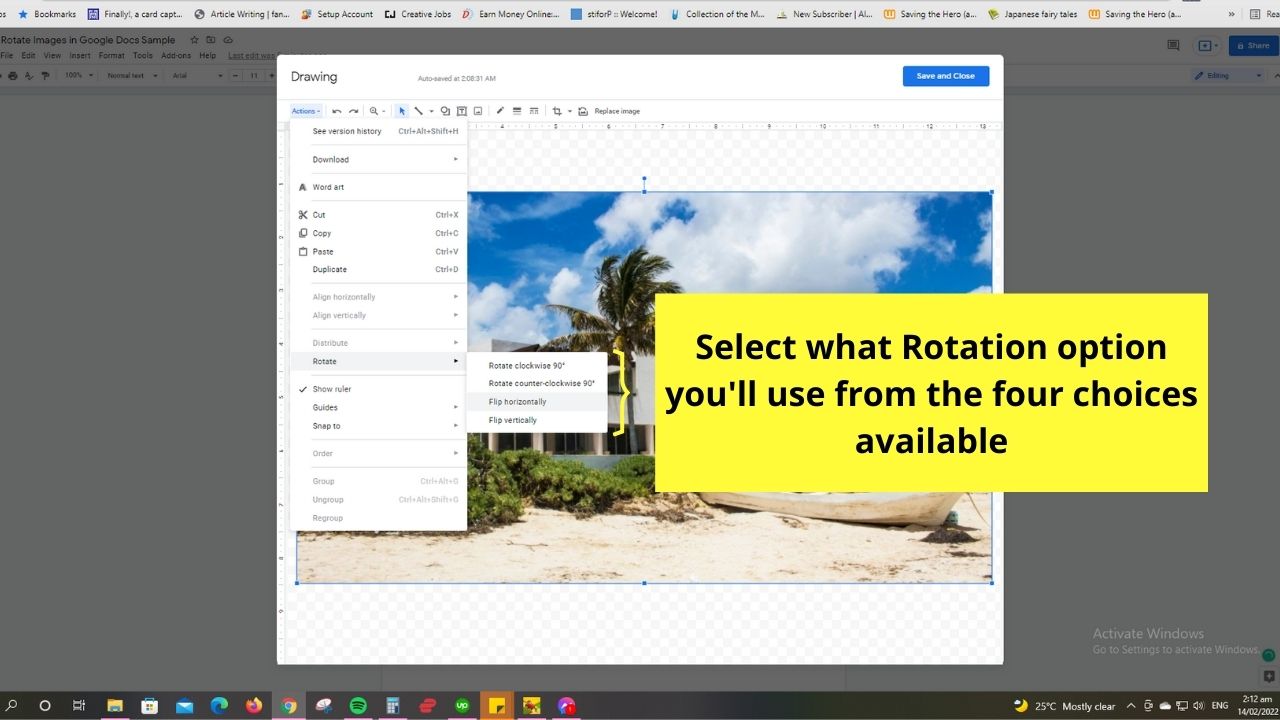

Choose one of these image rotation options. But, for sample purposes, I’ll choose the Flip horizontally option.
Step 7: Once you’re satisfied with how your photo looks, choose the Save and Close button.

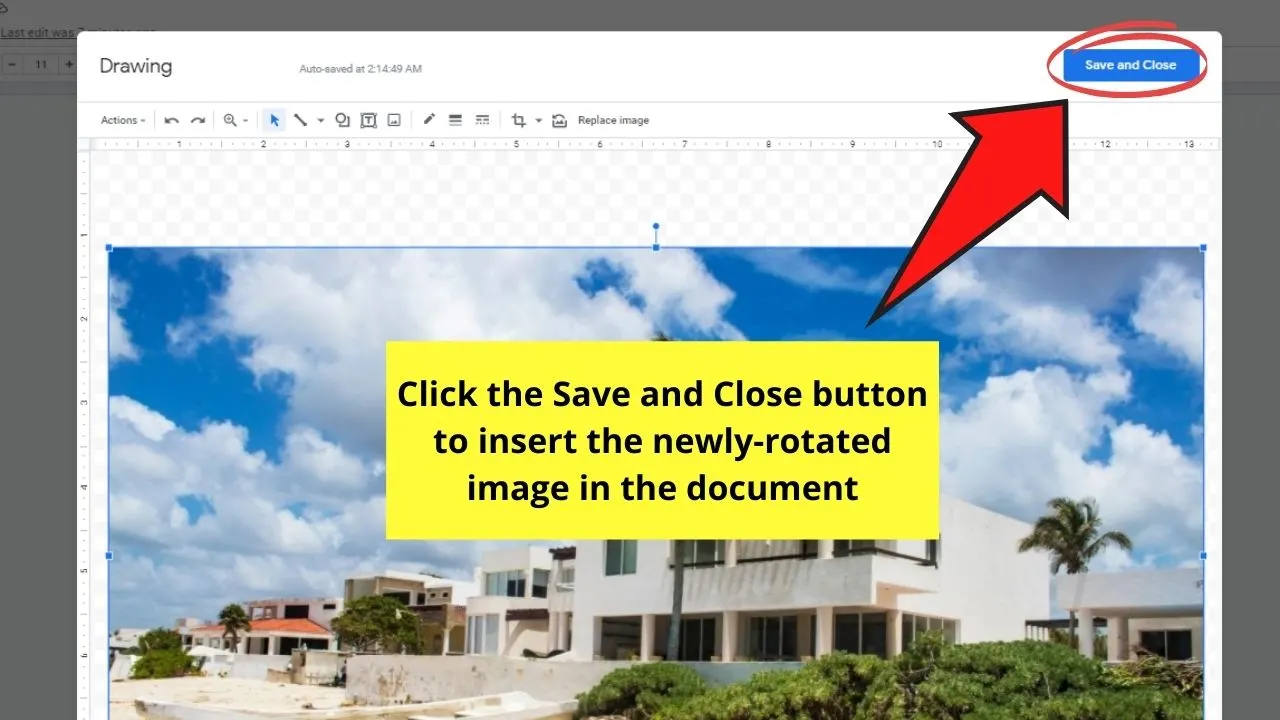
This will then automatically insert the newly-rotated picture in your document.
It is quite a long process, but the second method offers more options for rotating the photo.
So, do you now have an idea of what rotation option you’ll use for your photo?
Frequently Asked Questions about How to Rotate Images in Google Docs
Are the Flip horizontally and vertically options available when you rotate the images in Google Docs with the Easy Method?
Unfortunately, flipping the photo vertically or horizontally isn’t available when you rotate the image with the small blue circle. You can only find these two rotation options in the Drawing tool of Google Docs.
How do you activate the Drawing tool in Google Docs?
To activate the Drawing tool in Google Docs, head to the menu bar and click the Insert tab. Then, scroll down until the Drawing button in the dropdown menu appears. Once you click it, the Drawing pop-out window will then appear.


Hey guys! It’s me, Marcel, aka Maschi. On MaschiTuts, it’s all about tutorials! No matter the topic of the article, the goal always remains the same: Providing you guys with the most in-depth and helpful tutorials!

