

You know how it goes. You spot a design feature on a website that looks attractive. You have to have the same function on your own site.
How do you create those fancy text boxes in WordPress?
Is it a CSS trick? Is it a plugin? Do you need to study a new coding language?
It’s actually fairly simple and can be done by a plugin or manually.
How to create a text box in WordPress
To create a text box in WordPress, use CSS and/or HTML. However, the simplest way is to install a plugin such as Shortcodes Ultimate that already has the coding done. You can also use input text fields to let users type on the front end of your website, just like they’re filling in a form.
Adding a text input field box
To add an input text field that lets users type into a text box on a live WordPress webpage, you must input some HTML code.
<form>
<input type="text" name="boxname">
</form>
In the block editor, add a standard paragraph block, click on the three dots on the top right, and select “edit with HTML”.

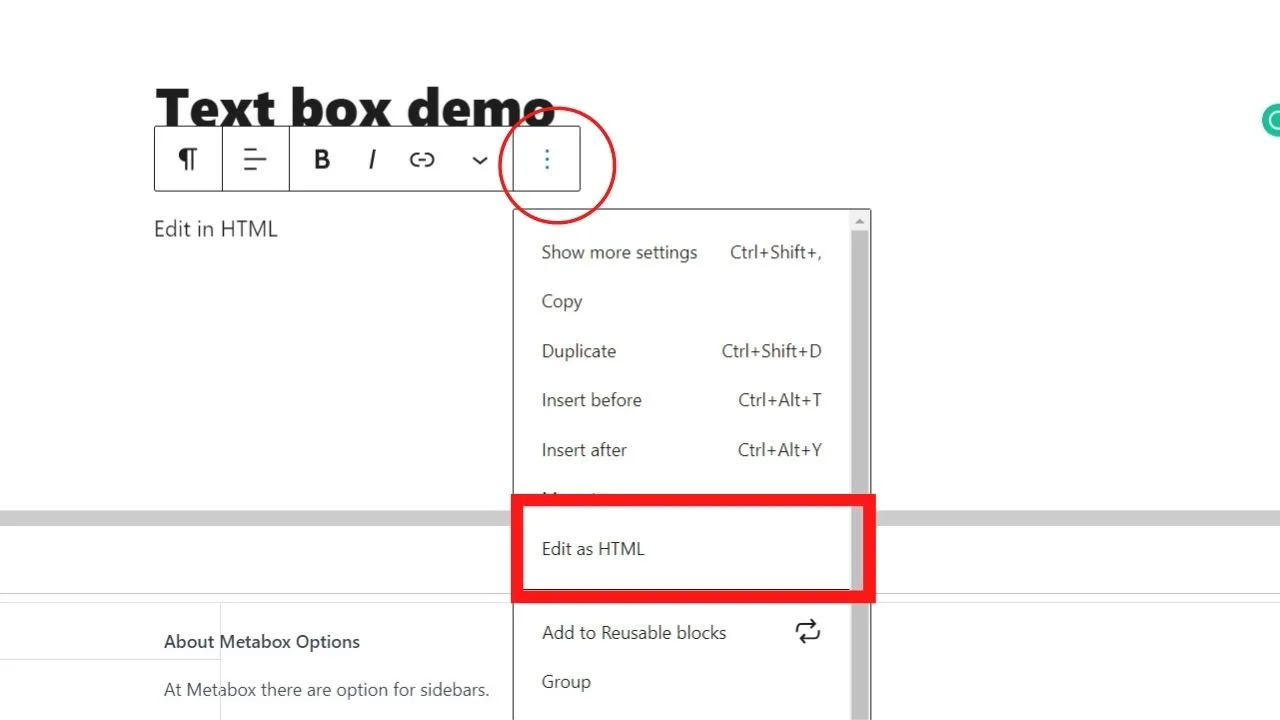
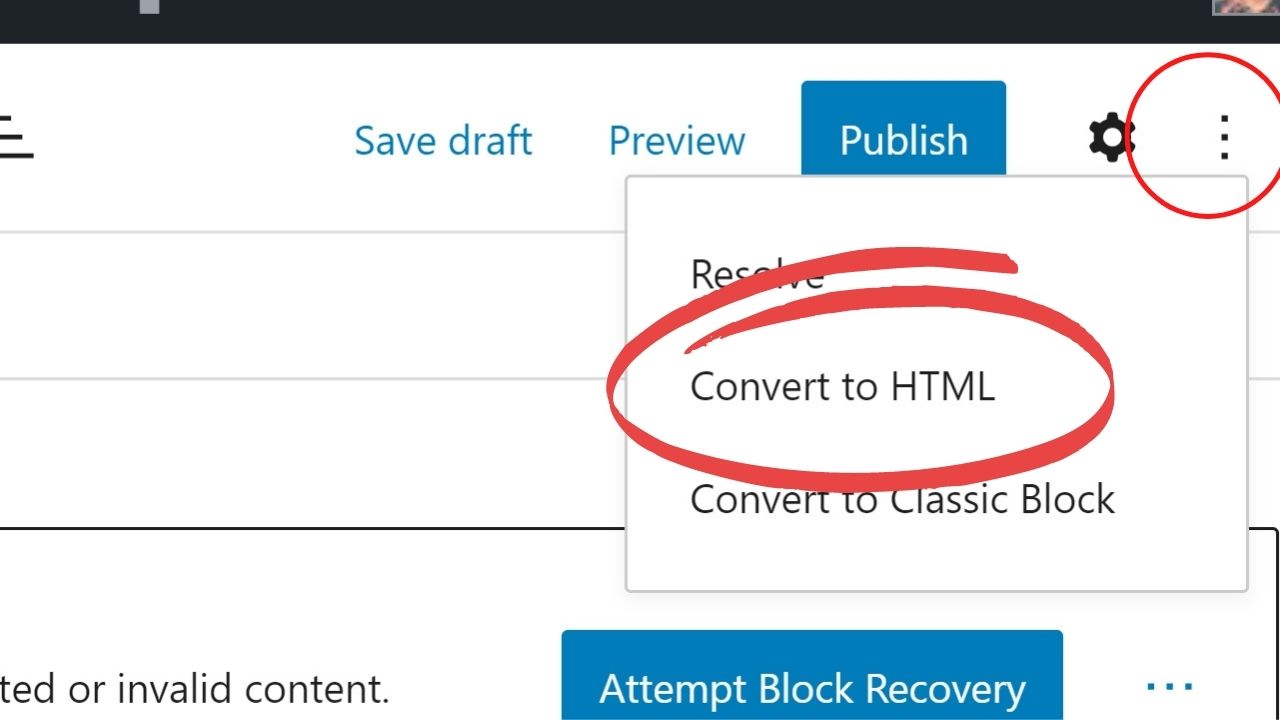
Paste in the code above. If it shows an error, click the three dots to open the expanded menu and click the “convert to HTML” option.

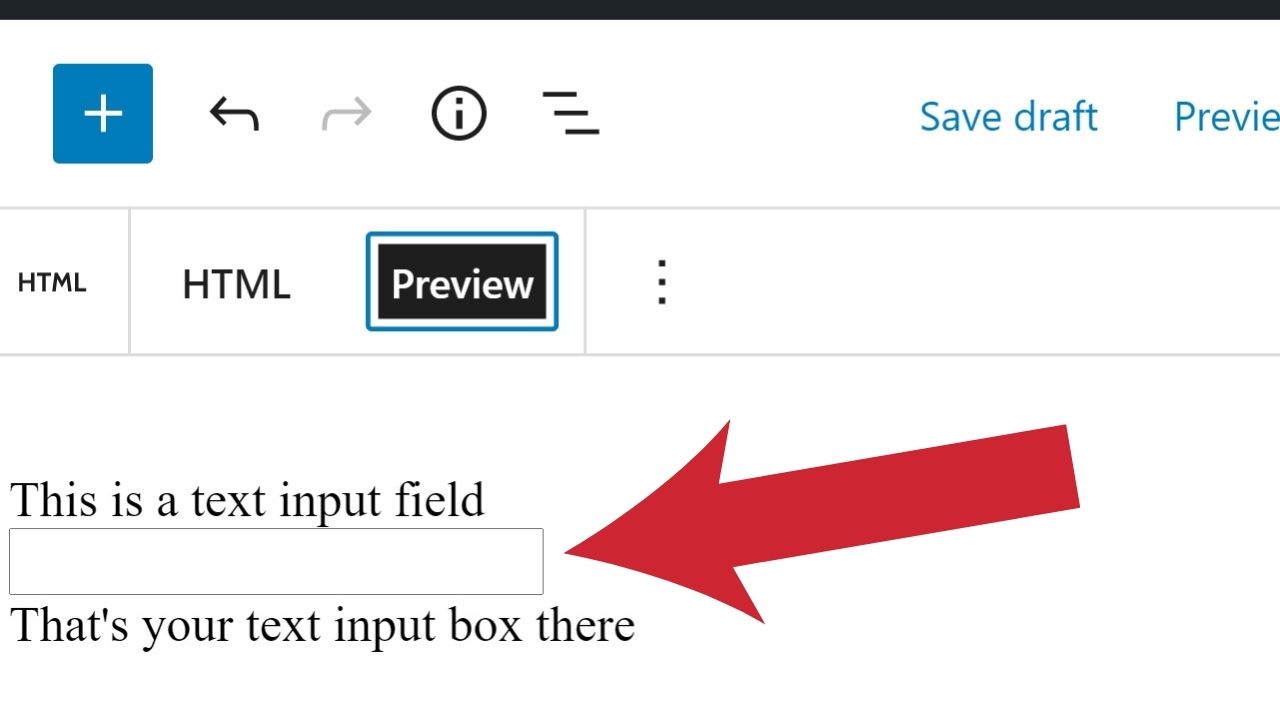
Once converted, click the preview tab, and you’ll see your text input field is there.

In the classic editor, click the “text” option to edit in HTML and insert the same code there.
Styling text input boxes with CSS
The standard styling for text input boxes is typically a thin black border with a transparent background.
Nothing too decorative or fancy.
To add styling to your boxes or make them wider, that’s controlled with CSS.
In your WP-admin panel, go to the Appearance menu and select “customize.”
From there, you can add various styling options:
The code for your CSS customizer is:
input[type="text"] {
  width: 100%;
  border: 2px solid Crimson;
  background: PeachPuff;
  border-radius: 4px;
  margin: 8px 0;
  outline: none;
  padding: 8px;
  box-sizing: border-box;
  transition: 0.3s;
  color: Crimson;
}
Each of those elements can be changed, such as changing the pixel sizes of margins, padding, or border styles.


For the colors, search online for a list of CSS color names, or if you know the hex code for the color you want, insert that instead.
Once the styling CSS is set in the customizer, any time you insert the <input type=”text”> into the HTML of your post or page, your custom text input field will show.
How to hardcode content boxes into your WP themes style.css template
If you have a particular type of content box you want to design with CSS, then use it repeatedly across multiple pages (without having to code it every single time) use this option.
The style.css is what controls all the styling elements for each theme.
You can edit the stylesheet to include your own custom text boxes.
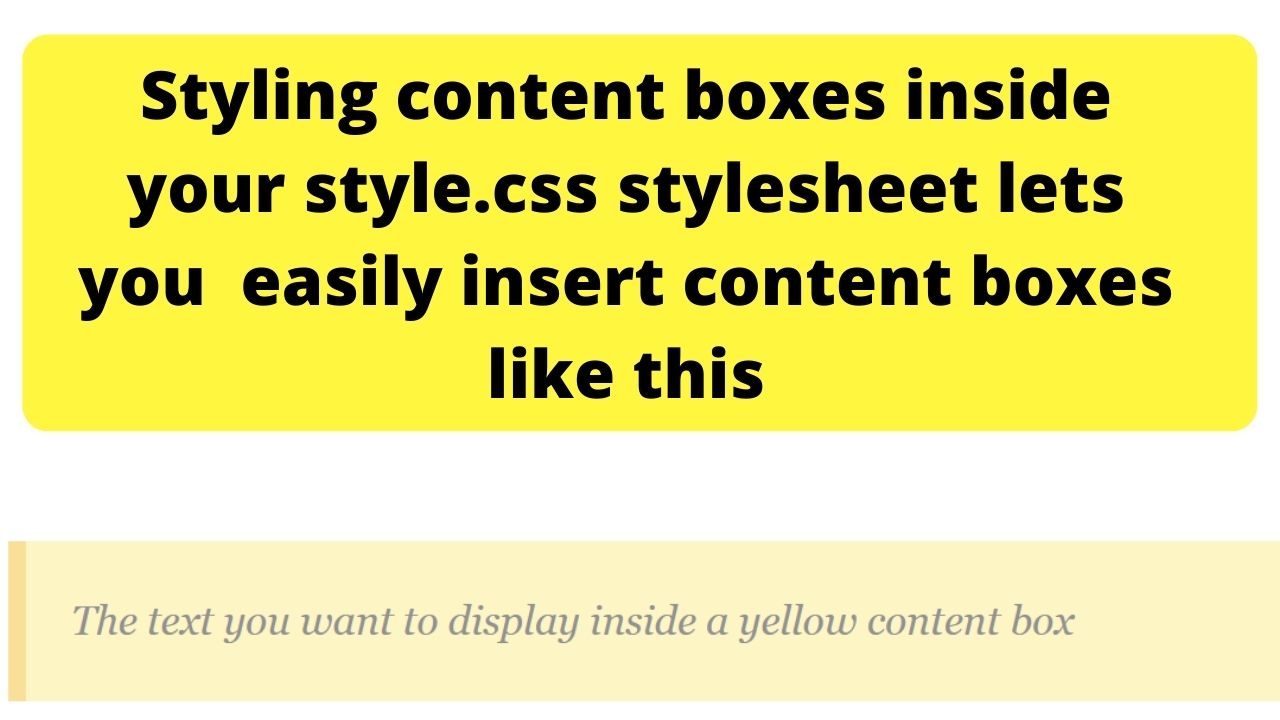
As an example, if you want to use yellow content boxes, you can add a section to your style.css for a “content-box-yellow.”
Go to cPanel, file manager, go into the public_html folder (or the subdirectory for an addon domain), and find the theme you want to add the custom content boxes into.
Right-click to edit the style.css sheet.
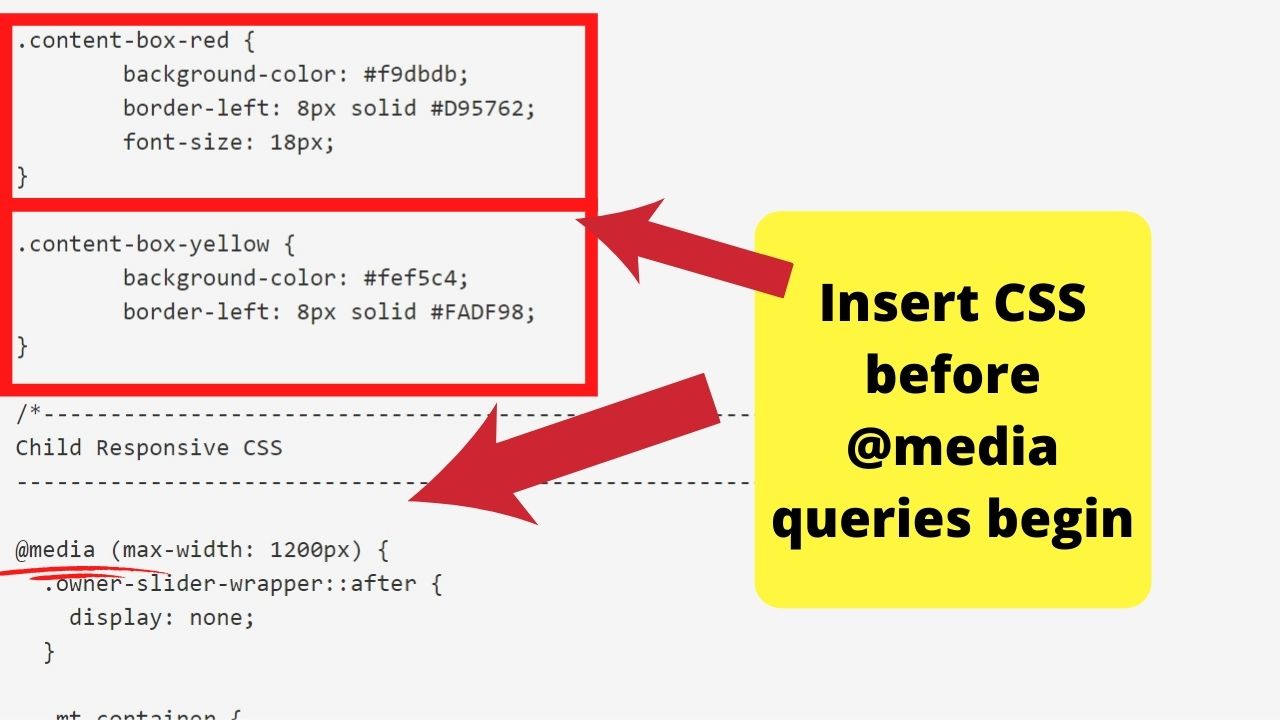
Right before the @media queries begin, insert your custom CSS for content boxes there. Starting with a . (dot) followed by a unique name for your box, then insert the CSS codes.
.content-box-yellow {
          background-color: #fef5c4;
          border-left: 8px solid #FADF98;

If you don’t want the darker shade at the edge, remove the “border-left” and only insert the “background-color” to have a solid colored box.
Save changes and go back to your WP post editor. To insert the box now, use the <div> tag to call up that styling element.
<div class="content-box-yellow">The text you want to display inside a yellow box</div>
Create as many content-box colors as you like. Have some green, some red, blue, purple, or neon pink if you like.
Insert them once into your style.css template; then you can call them up with the div tag anytime you want to insert your custom-colored text boxes.
How to add a text box to your sidebar
To add a text box to your sidebar, you need to insert a custom HTML widget and wrap your text inside a border.
The HTML tag to use here is the div, not the span tag as that’s for inline boxes.
The code to use is
<div style="border:solid 3px black">


You can change the border style from solid to dotted, dashed, double, groove, ridge, inset or outset.
The size can be changed by tweaking the number before px, and the color can be any you want, too.
Use the CSS color name or the hex code, such as #ffffff.
How to add content boxes in WordPress without coding
Content boxes are like text boxes but without the input field for your visitors to type into.
If you’re familiar with online reviews, you may have seen pages with pros listed inside a green content box and the cons inside a red content box.
These are also handy for including disclaimers, or as the Dummies website uses them… with the little lightbulb image used to highlight important tips.
This can be done similarly to how you code your HTML border in the custom HTML widget in WordPress.
Depending on the number of times you use content boxes, it’s often easier to use a plugin that has the codes already done.
That way, you can click a button to insert a content box instead of coding different styles.
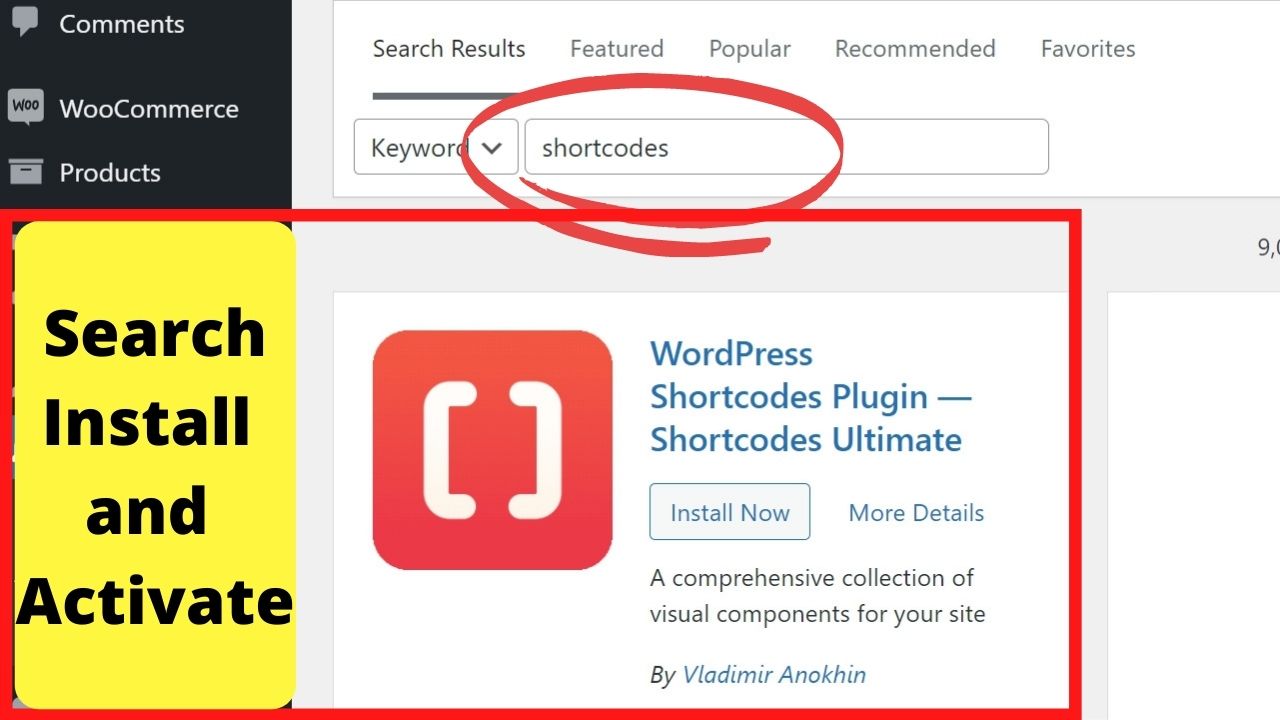
Install the WordPress shortcodes plugin by Vladimir Anokhin
Go to plugins > add new > Search for “shortcodes”
The one you’re looking for is “WordPress Shortcodes Plugin — Shortcodes Ultimate”.

There’s a few box styles you can use.
When you start a new post or page or load an existing one in edit mode, you’ll see the additional option to add shortcodes.
The shortcodes for boxes are “notes”, “lightbox”, and “box”.
Here’s an example sample:


You can change multiple styling options from within the plugin dashboard. All you do is click the “insert shortcode” pick the element you want, then do your editing and click to “insert shortcode.”
The content you type into the text box will appear on your screen with the CSS and HTML styling elements you made.


Hey guys! It’s me, Marcel, aka Maschi. On MaschiTuts, it’s all about tutorials! No matter the topic of the article, the goal always remains the same: Providing you guys with the most in-depth and helpful tutorials!

