
Once you see how easy it is to collapse text in WordPress, you can worry less about cluttering your site with chunks of content that affect readability.
Collapsible content can be added with a toggle or by creating accordion menus. Some WP themes come with custom shortcodes to inject accordion menus anywhere on your site.
If your theme does not support collapsible content, you can add it manually with plugins or by editing your theme files.
It will even work on free WordPress.com plans too, just without any styling.
How to collapse/expand content in WordPress
Use “Accordion” plugins or shortcode plugins with the “accordion” or “toggle” function to collapse text in WordPress. WordPress.com free plans can make content collapsible by adding <details> HTML within the text editor. On self-hosted sites, themes can be coded to use WordPress hooks to load a jQuery UI Accordion.
The difference between toggle and accordion on WordPress
The accordion and toggle features are two methods that work to collapse text in WordPress.
The difference between toggle and accordion text is this…
- With an accordion element, when one section is clicked, only that section of content is loaded. When the next accordion element is clicked, the previous text section closes automatically.
- With the toggle function, all collapsible content areas can be loaded and remain open. Content boxes displayed with toggle elements do not automatically close.
On long pages, the accordion element is preferable as it prevents screens from being filled with questions that the user has no interest in reading about.
They can scroll the titles on an FAQs page, then when they find a question they want to be answered, they can click to only view that specific content section.
Think of it this way…
If you wanted to find out “how much is delivery?”, what would you rather have…
a) Single title bars with specific questions in heading tags?
Or
b) Scrolling through 80 questions and answers until you found the one you wanted?
Accordion elements make your content more skimmable.
4 Ways to collapse/expand content & text in WordPress
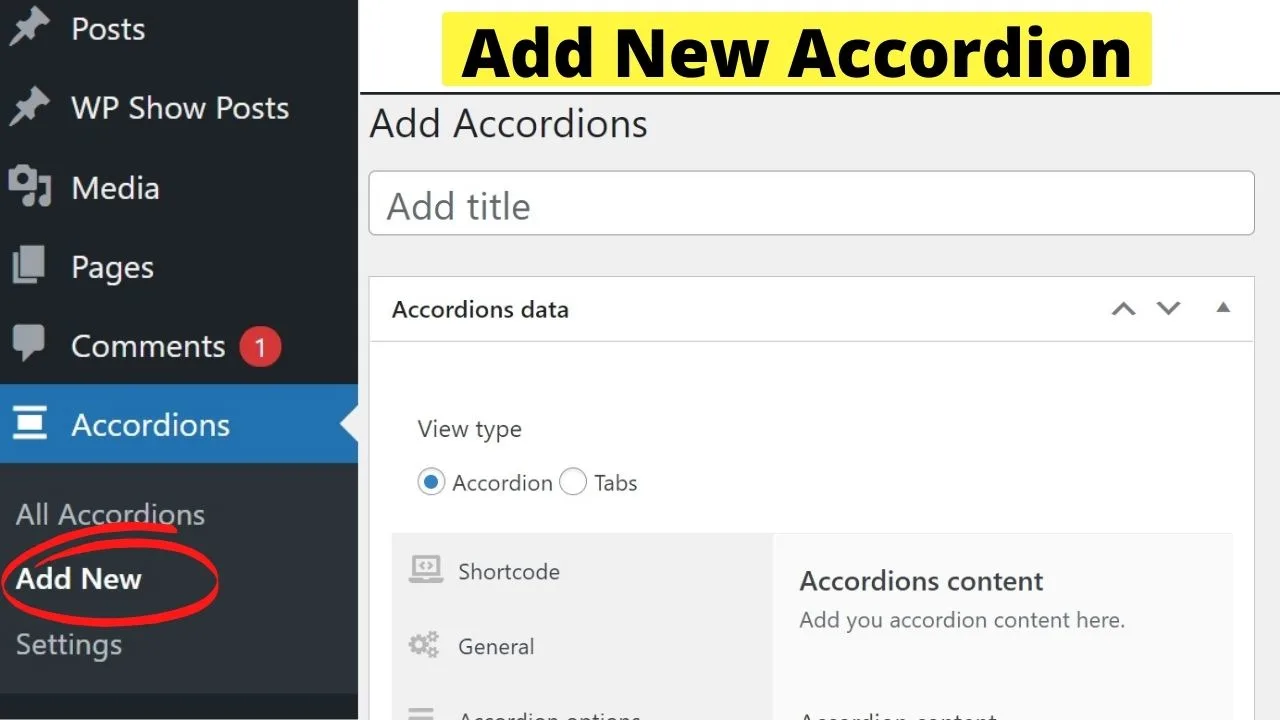
1. Use an Accordion block in the Gutenberg Editor
For those using the new “block” or Gutenberg” editor on a self-hosted WordPress website, accordion plugins can be added from the sidebar of your block editor.
It is the same process as the old method for adding plugins to extend the functionality of your site. Just more convenient as you no longer need to go to the plugins menu to add a new plugin.
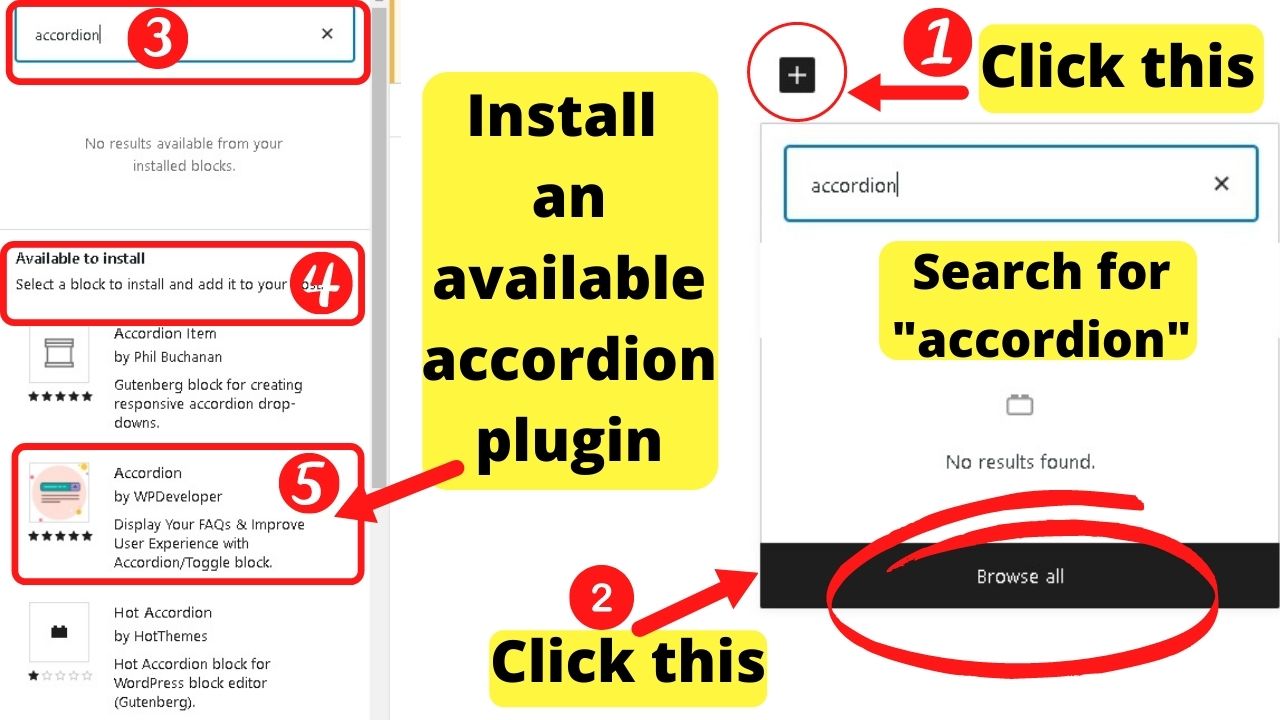
Load your block editor, click the + icon to add a new block, then search for “accordion”.
No accordion blocks are pre-installed. You need to add an accordion block plugin.
For our testing, the plugin added was “Accordion” by “WPDeveloper”.


The ability to add plugins from the WP block editor dashboard was added in WordPress version 5.6.
If you are running an older version of WordPress, you will need to add the plugin the standard way.
Alternatively, update your WordPress version to the latest available.
The advantage of using the new blocks for accordion-style content is that the JavaScript queries required to enable it only run when the block is loaded.
It used to be that hiding the images within an accordion menu could help bump up site speed. Now, WordPress has “lazy load” enabled by default. Still, it makes the presentation better.
To include images in expanded content sections, click the three vertical dots, select “Edit as HTML” and add your image source code using the following HTML string
<img src="http://yoursite.com/wp-content/uploads/2021/09/your-image-title.jpg" alt="give it an alternative title" width="###" height="###">
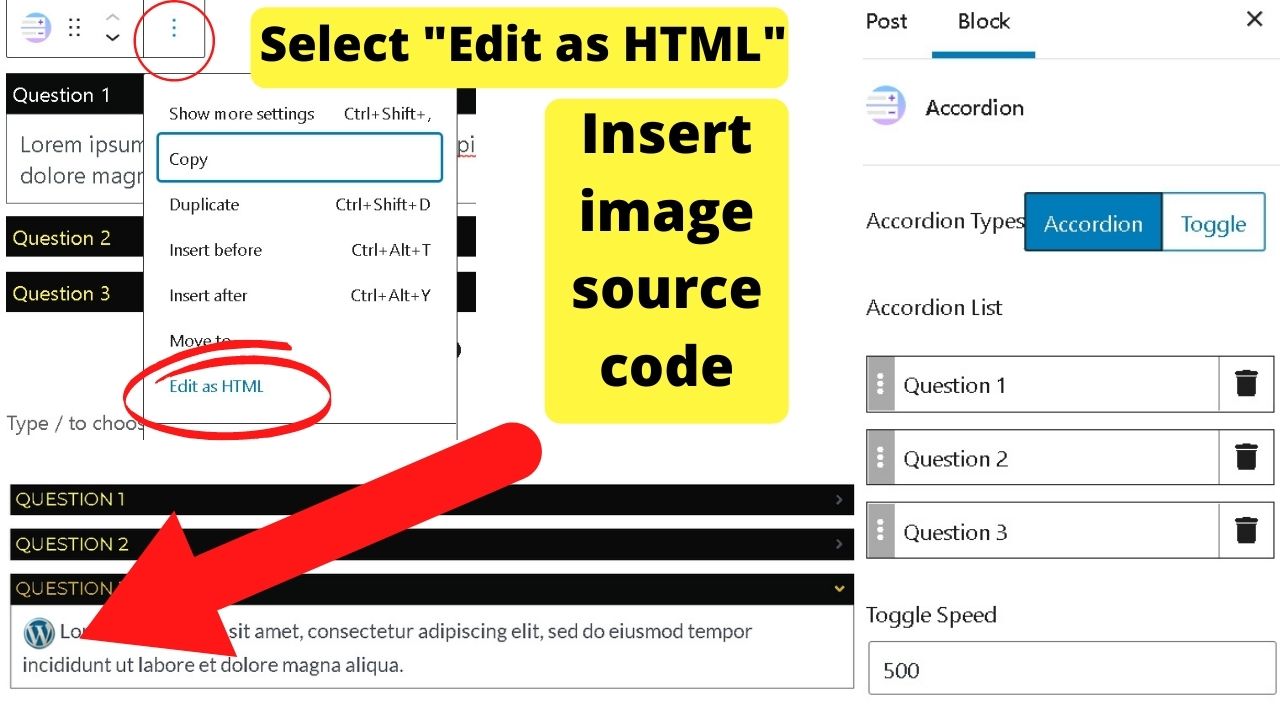

The image URL is shown in your media library.
2. Add an accordion section with HTML only (required on free WordPress.com plans)
On free WordPress.com plans, there is a handicap.
You cannot run JavaScript queries, and you can’t install WordPress plugins either. You can still collapse text within the text editor.
Open your page or post in edit mode and use the “text” editor. Not the visual editor.
The code to add is
<details>
<summary>Question 1</summary>
<p>Lorem ipsum dolor sit amet, consectetur adipiscing elit, sed do eiusmod tempor incididunt ut labore et dolore magna aliqua.</p>
</details>
(repeat as many times as required)


The upside to this is you can add it with no extra plugins and it works on free WordPress.com accounts, too.
As it is plain HTML, the result is plain text.
To include styling elements in an accordion or toggle elements, use a plugin or hardcode your theme template.
Plugins are simpler so if you are faint-hearted with editing code, go with a plugin. The Ultimate Shortcodes plugin has multiple icons.
For the fearsome, continue reading for instructions on hardcoding your theme to load a custom jQuery UI accordion.
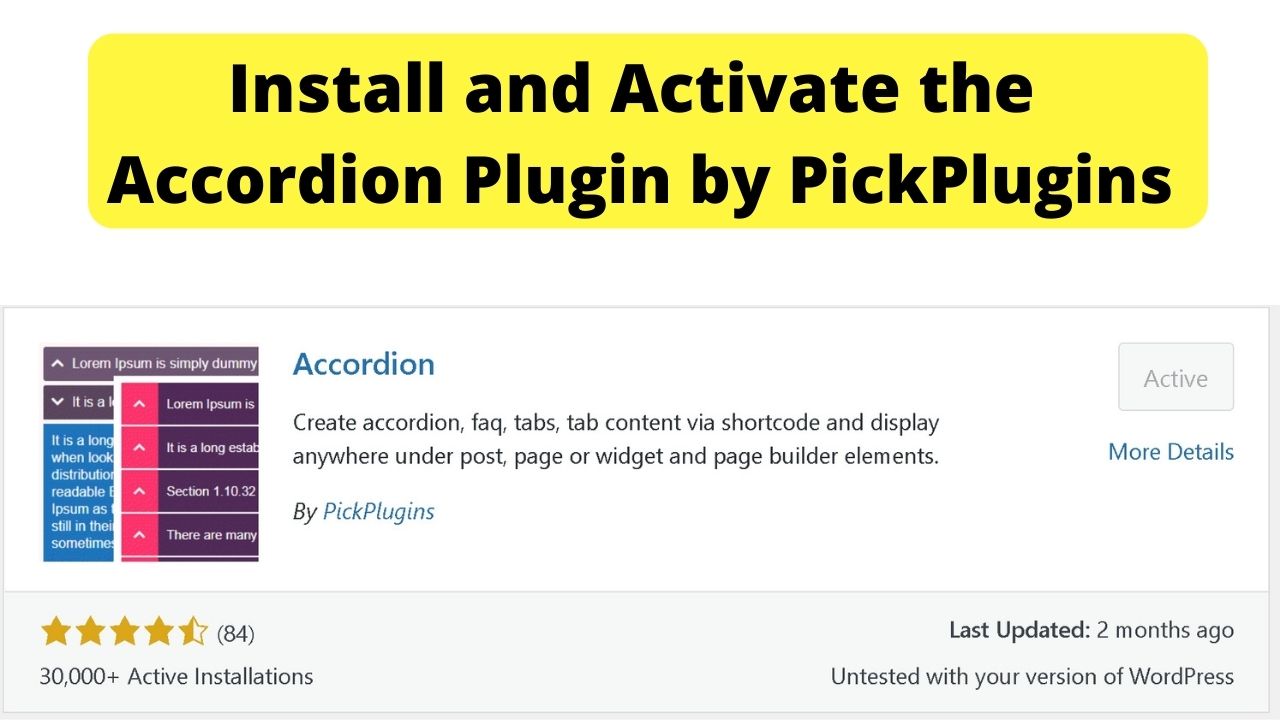
3. Use Plugins to collapse/expand text in WordPress Classic Editor
Millions of WP users still work with the Classic editor. If you do, you need a compatible plugin.
One of the simplest plugins to use is…
Accordion by PickPlugins

This plugin hooks into the Font Awesome library. Add the icon <i class> HTML code for any item from Font Awesome to override the default arrows.
Once installed, a new menu is added to your admin sidebar. Click “add new” to create as many accordion menus as you need.

The collapsed text can be displayed anywhere on your site that accepts HTML.
This can be within posts, pages, and widget areas by using the HTML widget. Add the widget, give it a title, insert the shortcode and the accordion menu is displayed.
The width of the content auto-adjusts so there is no messing with CSS required to fix display sizes for various screens.
Within the accordion menu, you can use HTML and insert images.
Rather than only remove recent posts in WordPress, you can go further by using this accordion plugin to create a fully-styled widget to show your most popular content, in-depth guides, top reviews, and buying guides right within a single accordion widget.
In other words, it gives you better use of the widget real estate on WordPress websites.
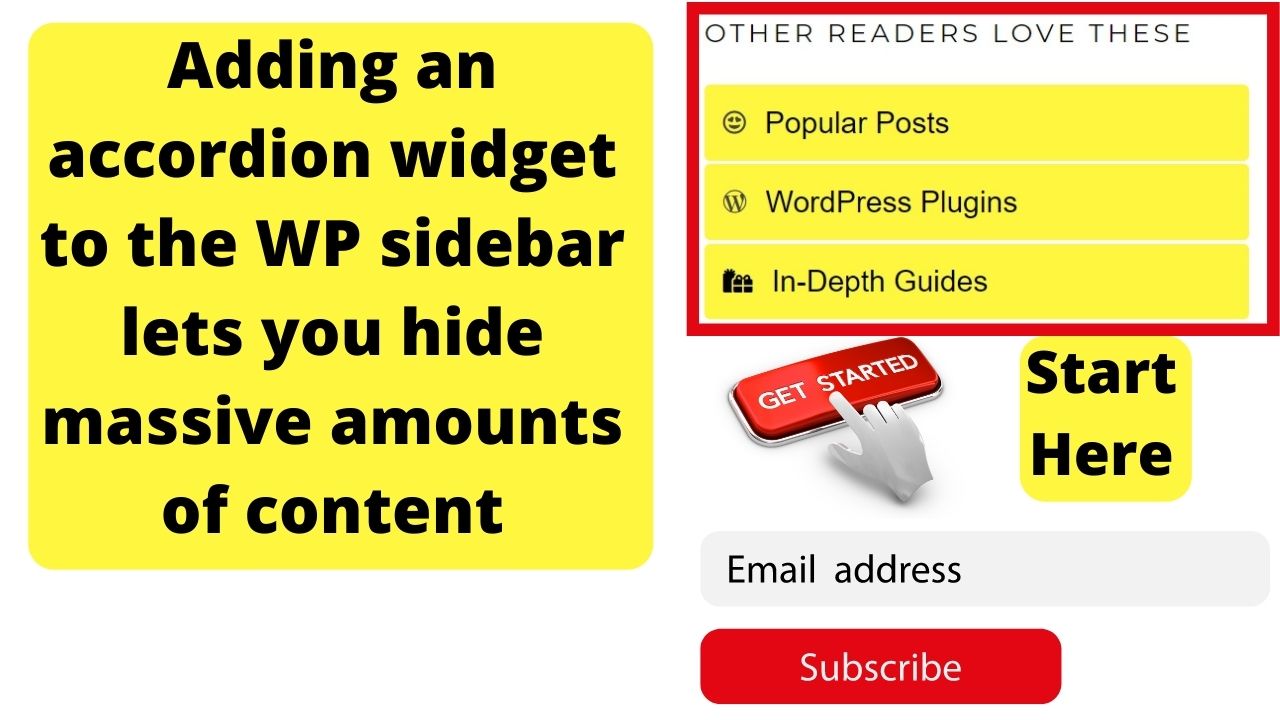

… All while avoiding cluttering your sidebar widget area.
4. Add a jQuery UI Accordion to WordPress themes
This process is somewhat complicated because WordPress does not allow JavaScript to be run within the header file.
Instead, JS scripts are already registered by default on a WordPress installation. All you need to do is “hook” into them.
Unless you are developing your own custom theme or plugin, you should not need to learn how to collapse text in WordPress using WordPress hooks.
Still, it will not hurt to know how it gets done because then you can make corrections if something stops working. Like after a WordPress update.
WP theme developers use hooks in the WordPress Codex to hook into many of the pre-bundled libraries.
The “jQuery UI Accordion” function is the one to run to make collapsible text in WP.
The scripts and files to collapse text on WordPress
First, create the JavaScript file.
Use a plain text editor like Notepad and paste in the following
//jQuery-ui-accordion
jQuery(document).ready(function($) {
$( "#accordion" ).accordion({
collapsible: true, active: false, heightStyle: "content"
});
});
Save the file as “accordion.js”.
What this code does…
The last line of code is to make all elements collapsible.
Setting the “active” state to false means that the user has to click to load the content section. Setting this to “true” will pre-load the first item in your accordion section.
The last part for “heightStyle: “content” means there is no max-height set. Setting it to “content” will load all of the content within the div element without the need to scroll down or across.
In the above code, the #accordion is for the “div ID” and the .accordion is for a “div class”. With those these added, when you place
<div ID="accordion"> and <div class="accordion">
… within your text editor, jQuery will be triggered.
- [ # ] is an identifier
- [ . ] is a class
How to add custom JavaScript files to WP themes
Go to your cPanel, open the theme you want to run the script on, then look for the folder called “JS”. This is where to put any JavaScript files.
Some themes will have the folder at the root of the theme files File path: WP Content > Themes > Your Theme > JS.
Others may use a subfolder like an “assets” folder within the Theme Folder. That would follow the file path: WP Content > Themes > Your Theme > Assets > JS.
The folder for all JavaScript files is JS. If your theme does not have one, create one.
Open the JS folder for your theme, click “upload file” and drop in your “accordion.js” file.
Edit the functions.php to load the JavaScript
This part is to tell WordPress to load the JavaScript file. On most other platforms, this is done in the header file. As WordPress runs on PHP, JavaScript cannot be loaded using the <script> tag in the header.php file.
Instead, you need to use the ‘wp_enqueue_scripts’ function. This is done in your theme’s functions.php file.
Add this code to your functions.php file…
// enqueue script
function my_scripts_method() {
if ( !is_admin() ) {
wp_enqueue_script('jQuery-ui-accordion');
wp_enqueue_script(
'custom-accordion',
get_stylesheet_directory_uri() . 'assets/js/accordion.js',
array('jQuery')
);
}
}
add_action('wp_enqueue_scripts', 'my_scripts_method');
In the above code, where “assets/js/accordion.js” is located, that is the file path to the JavaScript file uploaded previously.
Your theme may have the JS folder in a different location. Put the correct file path in here or WordPress will not be able to locate the script.
The last section of code to add is for styling and this is the complicated part. It is time-consuming to hard code an entire stylesheet.
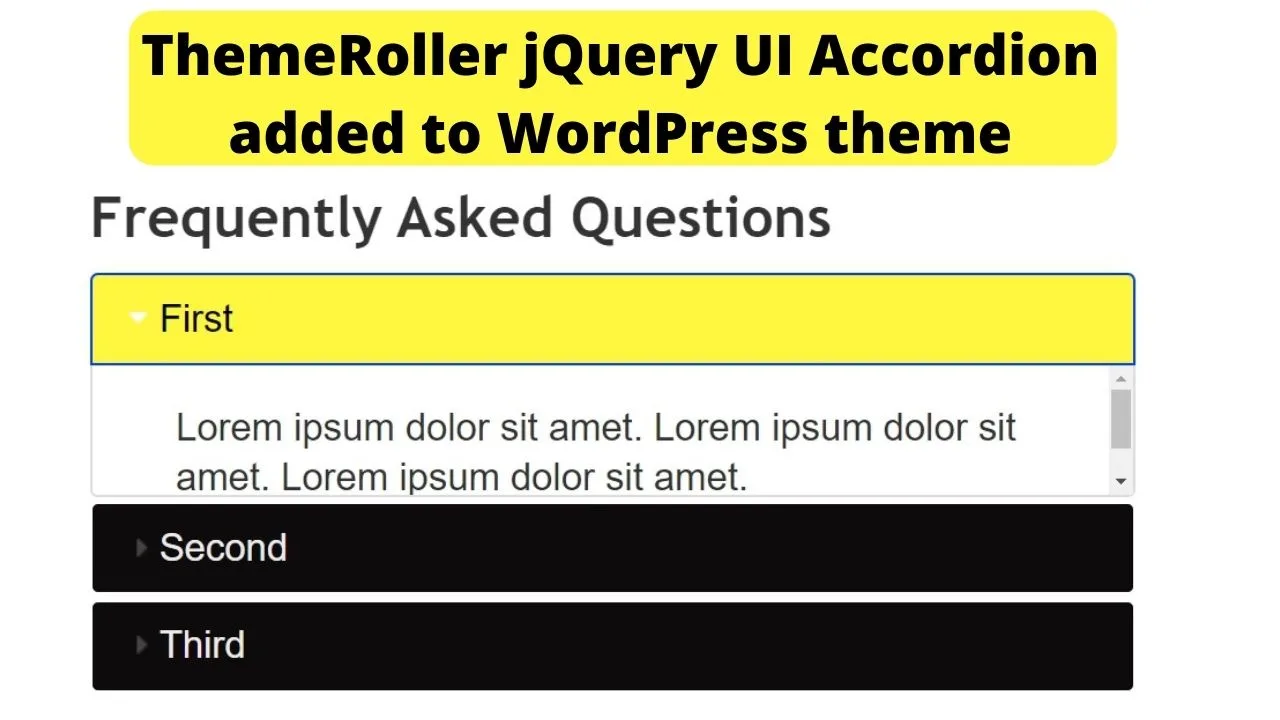
The faster method is to use the official jQuery UI library (jQueryui.com/themeroller) to create your own custom accordion stylesheet, download the files, then upload them to cPanel.
On the jQuery ThemeRoller page, you can style your own accordion menu or select the “gallery” tab to use an existing design layout.
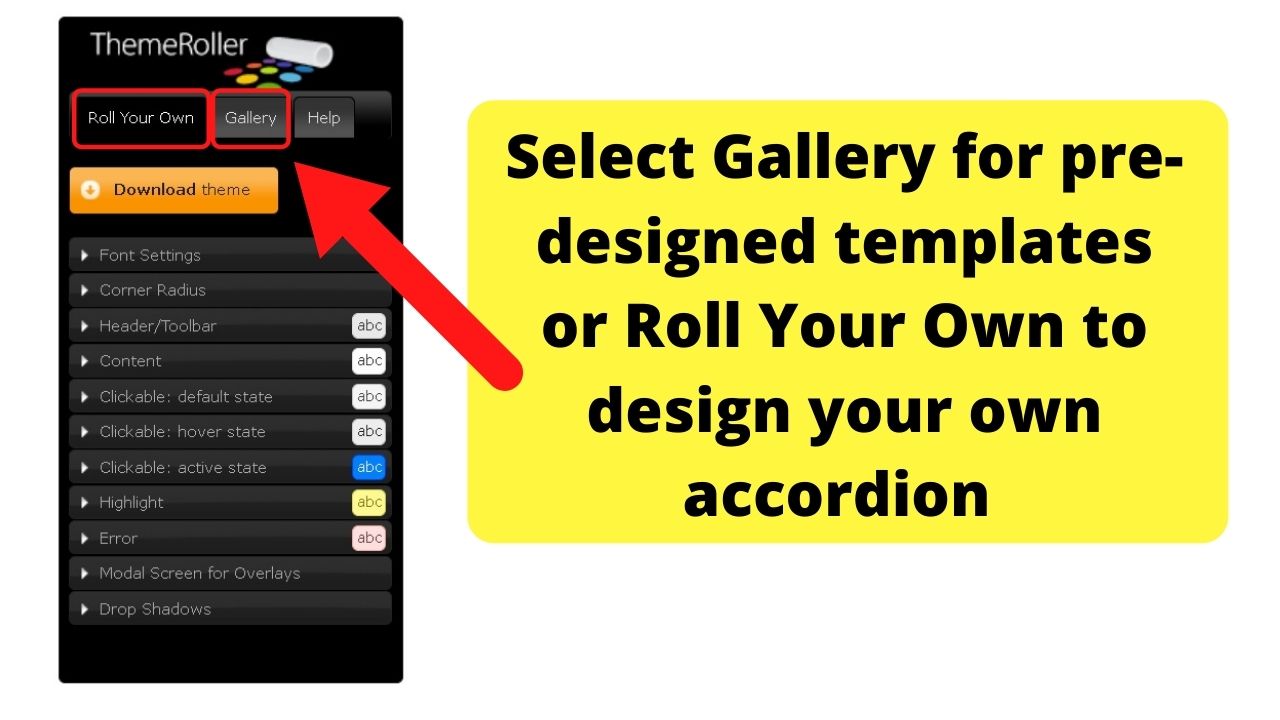

Once you have your accordion element styled to your liking, click the download button.
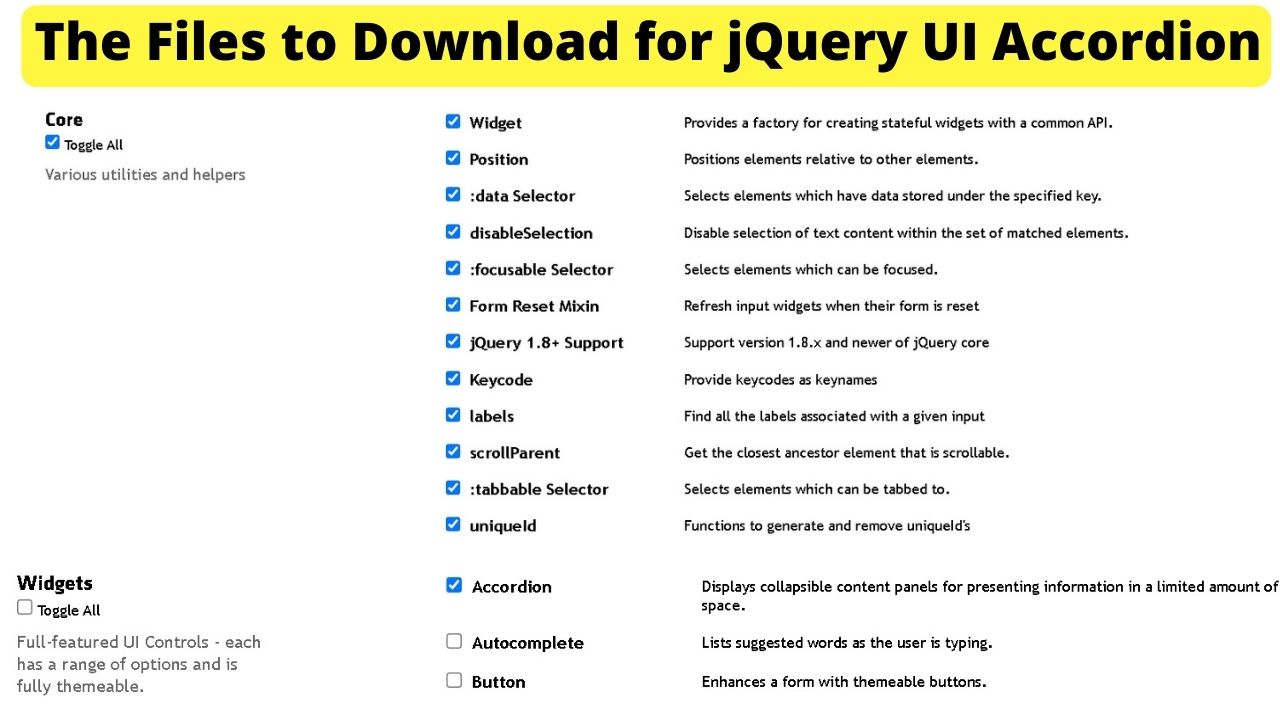
On the next page, customize your download to only include the required components.
Being on WordPress, all of the functions are already coded into the software. You only need the custom styles to control how the accordion is displayed.
This is done with another CSS folder for your theme that is specific to the accordion function being added.
The files you need for WordPress jQuery UI accordion styling are:
- All of the “Core” files.
- None from the “Interactions” section.
- Only the “Accordion” from the “widgets” section.
- No effects.
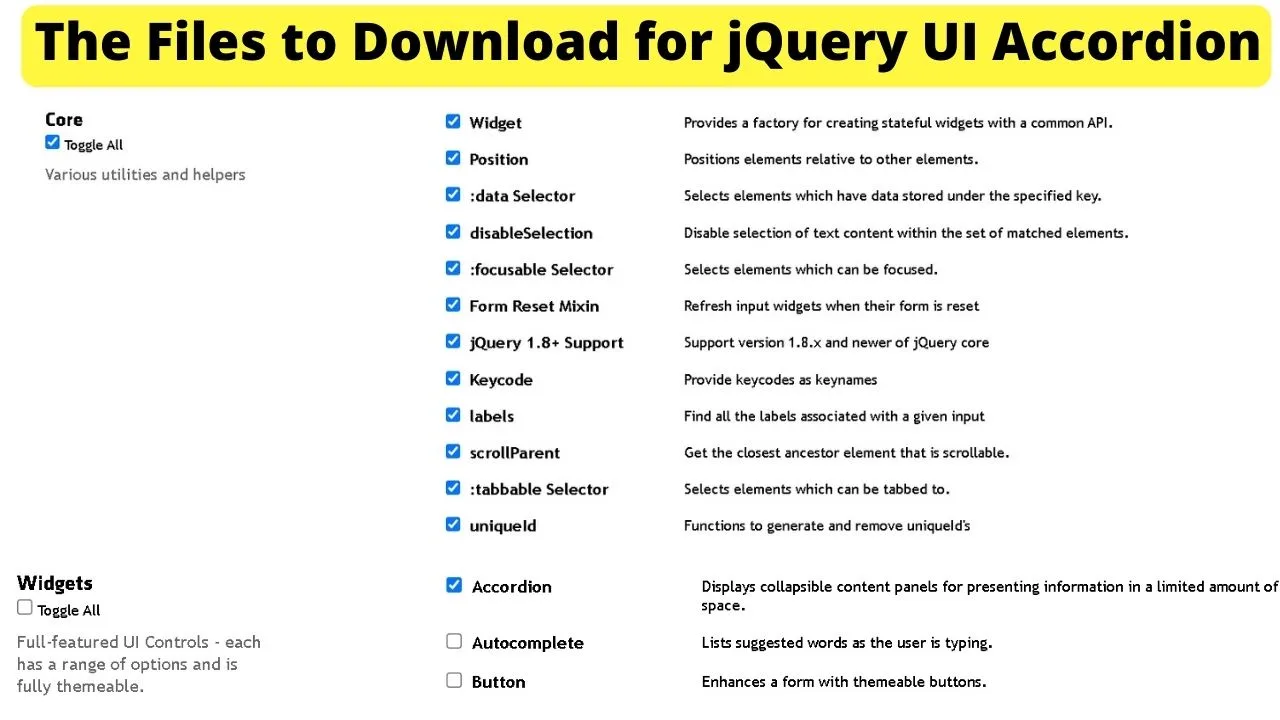
Once downloaded, unzip the folder and then upload only the “jQuery-ui-1.13.0.custom” folder into the “CSS folder” for your theme.
The “1.13.0” in the folder name refers to the version number. This will change over time as new versions are released.
Expect your folder name to be “jQuery-ui-#.##.#.custom. The numbers change. The format is the same.
After the custom CSS is added, next is to tell WordPress where to find the stylesheet for the jQuery UI accordion…
Edit the functions.php to load the custom CSS for the jQuery UI Accordion
In the functions.php file, where you have “// enqueue script” hook section (covered earlier), after that code snippet, insert the following:
//add accordion stylesheet
wp_register_style('jQuery-custom-style', get_stylesheet_directory_uri().'/css/jQuery-ui-1.13.0.custom/jQuery-ui.css', array(), '1', 'screen');
wp_enqueue_style('jQuery-custom-style');
What the above code is doing is registering the “jQuery-custom-style” hook first, then telling WordPress where the file is located*, and the last part for the “wp_enqueue_style” is to load the stylesheet.
*Calling up different stylesheets for child and parent themes
The code above uses the “get_stylesheet_directory_uri()” script. This will call up the stylesheet file for a child theme.
If you add your “jQuery-ui-#.##.#.custom” folder to the parent theme directory, the wp enqueue script to use is get_template_directory_uri().
Adding the jQuery stylesheet to a child theme requires the get_stylesheet_directory_uri() string to load files from the currently active child theme template.
The file path in the code after the “get_stylesheet_directory” shows “/css/jQuery-ui-1.13.0.custom/jQuery-ui.css”… Before the first trailing slash (/) calls up the theme template files.
If you find the styling is not applied to your accordion, either change the part of the PHP script from “get_stylesheet_directory_uri()” to “get_template_directory_uri()” or go into cPanel and move the “jQuery-ui-#.##.#.custom” folder into the CSS folder for your child theme.
Once done, you can add the accordion within your WordPress text editor by inserting div tags within your WP text editor:
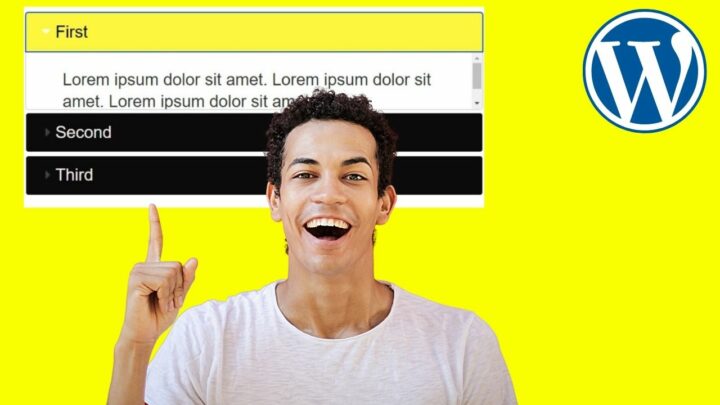
<div id="accordion">
<h3>First</h3>
<div>
<p>
Lorem ipsum dolor sit amet. Lorem ipsum dolor sit amet. Lorem ipsum dolor sit amet.
</p>
</div>
(repeat as many times as required)

As mentioned, plugins are easier to collapse text in WordPress. These already have all the files required bundled into a zipped folder and coded to let you make custom edits to style the elements however you like.
If nothing else, plugins contain the base source code. Everything on WordPress is open-source, released with GPL rights.
Plugins can have the source code edited to extend their functionality. They can at least save you from having to code from scratch. A huge time saver!
For simplicity’s sake though, you cannot get simpler than plain HTML.
Expand/Collapse text in WordPress without a plugin
To expand/collapse text in WP without a plugin, use HTML. If using the block editor, insert the HTML block.
In the Classic Editor, click on the “text” tab (top right of the editor pane). Use the “details” HTML element to show the visible heading, followed by the “summary” HTML element to show the collapsible text.


Hey guys! It’s me, Marcel, aka Maschi. On MaschiTuts, it’s all about tutorials! No matter the topic of the article, the goal always remains the same: Providing you guys with the most in-depth and helpful tutorials!

